
Canadian English Manual
Page 2
...cord and the surge suppressor away from moisture and dust. No other appliance should not be on any surface that all users of the treadmill. Use only a CUL-listed surge suppressor of 450 joules minimum surge dissipation with voltage rating of 400 volts or less, rated at... turned off. TABLE OF CONTENTS IMPORTANT PRECAUTIONS 2 BEFORE YOU BEGIN 4 ASSEMBLY 5 OPERATION AND ADJUSTMENT 7 HOW TO FOLD AND MOVE THE TREADMILL 10 TROUBLESHOOTING 12 CONDITIONING GUIDELINES 14 ORDERING REPLACEMENT PARTS Back Cover LIMITED WARRANTY Back Cover Note: An EXPLODED DRAWING and a PART LIST are ...
...cord and the surge suppressor away from moisture and dust. No other appliance should not be on any surface that all users of the treadmill. Use only a CUL-listed surge suppressor of 450 joules minimum surge dissipation with voltage rating of 400 volts or less, rated at... turned off. TABLE OF CONTENTS IMPORTANT PRECAUTIONS 2 BEFORE YOU BEGIN 4 ASSEMBLY 5 OPERATION AND ADJUSTMENT 7 HOW TO FOLD AND MOVE THE TREADMILL 10 TROUBLESHOOTING 12 CONDITIONING GUIDELINES 14 ORDERING REPLACEMENT PARTS Back Cover LIMITED WARRANTY Back Cover Note: An EXPLODED DRAWING and a PART LIST are ...
Canadian English Manual
Page 3
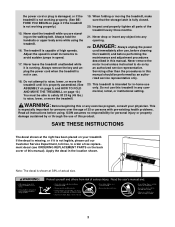
...working properly.) 15. Always hold the handrails or upper body arms while using . Always remove the key and unplug the power cord when the treadmill is shown at the right has been placed on the back cover of this or any opening. Note: The decal is not in any ...commercial, rental, or institutional setting. Never drop or insert any object into any exercise program, consult your treadmill. Always unplug the power cord immediately after use this manual should be able to safely lift 20 kg (45 lbs.) to order a free replacement ...
...working properly.) 15. Always hold the handrails or upper body arms while using . Always remove the key and unplug the power cord when the treadmill is shown at the right has been placed on the back cover of this or any opening. Note: The decal is not in any ...commercial, rental, or institutional setting. Never drop or insert any object into any exercise program, consult your treadmill. Always unplug the power cord immediately after use this manual should be able to safely lift 20 kg (45 lbs.) to order a free replacement ...
Canadian English Manual
Page 4
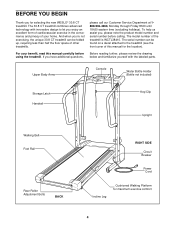
... Rear Roller Adjustment Bolts BACK RIGHT SIDE Circuit Breaker Power Cord Incline Leg Cushioned Walking Platform for selecting the new WESLO® 30.8 CT treadmill. The serial number can be found on a decal attached to let you have additional questions, Before reading further,... the drawing below and familiarize yourself with innovative design to the treadmill (see the front cover of the treadmill is WCTL38410. The model number of this manual carefully before calling. The 30.8 CT treadmill combines advanced technology with the labeled parts. And when you're...
... Rear Roller Adjustment Bolts BACK RIGHT SIDE Circuit Breaker Power Cord Incline Leg Cushioned Walking Platform for selecting the new WESLO® 30.8 CT treadmill. The serial number can be found on a decal attached to let you have additional questions, Before reading further,... the drawing below and familiarize yourself with innovative design to the treadmill (see the front cover of the treadmill is WCTL38410. The model number of this manual carefully before calling. The 30.8 CT treadmill combines advanced technology with the labeled parts. And when you're...
Canadian English Manual
Page 5
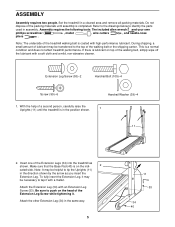
...99)-6 Handrail Washer (39)-4 1. If there is completed. Attach the other Extension Leg (34) in a cleared area and remove all packing materials. Set the treadmill in the same way. 5 11 53 34 40 Be sure to identify the parts used in the direction shown by the arrow as shown. With... the help of the treadmill walking belt is in the position shown. 1 11 2. Note: It may be transferred to tip the Uprights (11) in assembly. Attach the Extension...
...99)-6 Handrail Washer (39)-4 1. If there is completed. Attach the other Extension Leg (34) in a cleared area and remove all packing materials. Set the treadmill in the same way. 5 11 53 34 40 Be sure to identify the parts used in the direction shown by the arrow as shown. With... the help of the treadmill walking belt is in the position shown. 1 11 2. Note: It may be transferred to tip the Uprights (11) in assembly. Attach the Extension...

Canadian English Manual
Page 6
Feed the Wire Harness up through the loop. If necessary, use the treadmill. Make a loop with the indicated plastic 4a 1 46 tie and ... on the Right Handrail (1) into the Upright as described above. WARNING: Never disconnect or connect the Wires while the treadmill 21 Tie power cord is used to 5 in a secure place. The allen wrench is plugged in the left Upright.... 11 21 105 39 1 11 39 105 105 39 11 34 4. To protect the floor, place a mat under the treadmill. 6 Refer to step 3. Keep the included allen wrench in .) of the Wire Harness (21) out of the right Upright...
Feed the Wire Harness up through the loop. If necessary, use the treadmill. Make a loop with the indicated plastic 4a 1 46 tie and ... on the Right Handrail (1) into the Upright as described above. WARNING: Never disconnect or connect the Wires while the treadmill 21 Tie power cord is used to 5 in a secure place. The allen wrench is plugged in the left Upright.... 11 21 105 39 1 11 39 105 105 39 11 34 4. To protect the floor, place a mat under the treadmill. 6 Refer to step 3. Keep the included allen wrench in .) of the Wire Harness (21) out of the right Upright...

Canadian English Manual
Page 7
...should malfunction or break down, grounding provides a path of electric shock. Voltage surges, spikes, and noise interference can result in your treadmill (see drawing 1 at the right). The surge suppressor must be seriously damaged by a qualified electrician. This product must have a...suppressor could result in place by a qualified electrician. This product is properly installed and grounded in drawing 1 below. Important: The treadmill is grounded before using an adapter. 7 A temporary adapter that is equipped with all local codes and ordinances. OPERATION AND ADJUSTMENT ...
...should malfunction or break down, grounding provides a path of electric shock. Voltage surges, spikes, and noise interference can result in your treadmill (see drawing 1 at the right). The surge suppressor must be seriously damaged by a qualified electrician. This product must have a...suppressor could result in place by a qualified electrician. This product is properly installed and grounded in drawing 1 below. Important: The treadmill is grounded before using an adapter. 7 A temporary adapter that is equipped with all local codes and ordinances. OPERATION AND ADJUSTMENT ...

Canadian English Manual
Page 8
CONSOLE DIAGRAM Note: If there is a thin sheet of clear plastic on the face of the treadmill. Avoid spilling liquids on the power. • Always wear the clip (see the drawing at - Be sure that the negative (-) ends of electric shock, keep ..., push up on the foot rails of the console, remove it before operating the console. Find the clip at the lower right) while using the treadmill. Clip tached to the key and slide the clip onto the waistband of the clip as needed. 8 BATTERY INSTALLATION The console requires two "AA" batteries...
CONSOLE DIAGRAM Note: If there is a thin sheet of clear plastic on the face of the treadmill. Avoid spilling liquids on the power. • Always wear the clip (see the drawing at - Be sure that the negative (-) ends of electric shock, keep ..., push up on the foot rails of the console, remove it before operating the console. Find the clip at the lower right) while using the treadmill. Clip tached to the key and slide the clip onto the waistband of the clip as needed. 8 BATTERY INSTALLATION The console requires two "AA" batteries...
Canadian English Manual
Page 9
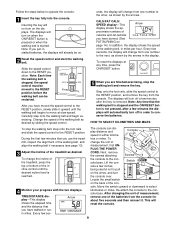
...upward until the desired incline level is removed. During the first few minutes the displays will already be restarted. To change the incline of the treadmill, press the top or bottom of the walking belt, in order to the RESET position before the walking belt can display distance and Console ... miles per hour. HOW TO SELECT KILOMETRES AND MILES To stop the walking belt and remove the key. To change the unit of the treadmill as desired by the arrows in miles. TIME/DISTANCE display-This display Arrow shows the elapsed time and the distance that the walking belt is...
...upward until the desired incline level is removed. During the first few minutes the displays will already be restarted. To change the incline of the treadmill, press the top or bottom of the walking belt, in order to the RESET position before the walking belt can display distance and Console ... miles per hour. HOW TO SELECT KILOMETRES AND MILES To stop the walking belt and remove the key. To change the unit of the treadmill as desired by the arrows in miles. TIME/DISTANCE display-This display Arrow shows the elapsed time and the distance that the walking belt is...
Canadian English Manual
Page 10
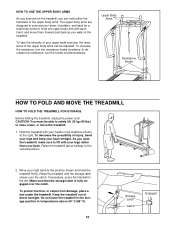
... of injury, bend your legs and keep your upper body exercise, the resistance of direct sunlight. As you raise the treadmill, make sure to exercise your hands in temperatures above 30° C (85° F). 10 Storage Latch Catch Engaged HOW TO USE THE UPPER BODY ARMS As you exercise ...on the treadmill. Raise the treadmill about halfway to the position shown and hold either the handrails or the upper body arms. The ...
... of injury, bend your legs and keep your upper body exercise, the resistance of direct sunlight. As you raise the treadmill, make sure to exercise your hands in temperatures above 30° C (85° F). 10 Storage Latch Catch Engaged HOW TO USE THE UPPER BODY ARMS As you exercise ...on the treadmill. Raise the treadmill about halfway to the position shown and hold either the handrails or the upper body arms. The ...

Canadian English Manual
Page 11
... it is closed fully over an uneven surface. 3. If necessary, press the handrail to the floor. Do not drop the treadmill frame to the storage position as shown. 2. Place one foot on page 10. Place one foot on the front wheels. Base Front Wheels ...Storage Latch Unlatched 11 Carefully move the treadmill over the catch. 1. HOW TO LOWER THE TREADMILL FOR USE 1. Hold the upper end of injury, use extreme caution while moving the treadmill, convert the treadmill to the floor. Tilt the treadmill back until the frame and foot rail are past the ...
... it is closed fully over an uneven surface. 3. If necessary, press the handrail to the floor. Do not drop the treadmill frame to the storage position as shown. 2. Place one foot on page 10. Place one foot on the front wheels. Base Front Wheels ...Storage Latch Unlatched 11 Carefully move the treadmill over the catch. 1. HOW TO LOWER THE TREADMILL FOR USE 1. Hold the upper end of injury, use extreme caution while moving the treadmill, convert the treadmill to the floor. Tilt the treadmill back until the frame and foot rail are past the ...

Canadian English Manual
Page 12
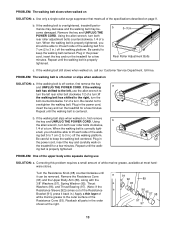
... the key is plugged in . (See assembly step 4 on page 6. Remove the key from the console. Retighten the Screw. TROUBLESHOOTING Most treadmill problems can be replaced, see BATTERY INSTALLATION on page 8. c. To reset the circuit breaker, wait for five minutes and then press the switch... the console. PROBLEM: The power turns off during use c Tripped Tripped Reset Reset SOLUTION: a. WARNING: Never disconnect or connect the wires while the treadmill power cord is plugged in . (See assembly step 4 on page 6. If the batteries need to check for a correct speed reading. 12 b...
... the key is plugged in . (See assembly step 4 on page 6. Remove the key from the console. Retighten the Screw. TROUBLESHOOTING Most treadmill problems can be replaced, see BATTERY INSTALLATION on page 8. c. To reset the circuit breaker, wait for five minutes and then press the switch... the console. PROBLEM: The power turns off during use c Tripped Tripped Reset Reset SOLUTION: a. WARNING: Never disconnect or connect the wires while the treadmill power cord is plugged in . (See assembly step 4 on page 6. If the batteries need to check for a correct speed reading. 12 b...
Canadian English Manual
Page 13
...belt has shifted to turn ; Repeat until it back in the order shown at most hardware stores. Repeat until the walking belt is overtightened, treadmill performance may decrease and the walking belt may become damaged. PROBLEM: One of the walk- Remove the key and UNPLUG THE POWER CORD. If... c. Plug in the power cord, insert the key and carefully walk on SOLUTION: a. Plug in the power cord, insert the key and run the treadmill for a few minutes. ing belt is off the walking platform. If the walking belt is properly tightened, you should be able to 3 in .) off...
...belt has shifted to turn ; Repeat until it back in the order shown at most hardware stores. Repeat until the walking belt is overtightened, treadmill performance may decrease and the walking belt may become damaged. PROBLEM: One of the walk- Remove the key and UNPLUG THE POWER CORD. If... c. Plug in the power cord, insert the key and carefully walk on SOLUTION: a. Plug in the power cord, insert the key and run the treadmill for a few minutes. ing belt is off the walking platform. If the walking belt is properly tightened, you should be able to 3 in .) off...

Canadian English Manual
Page 14
... During the first few minutes does your exercise program. If your goal is to burn fat, adjust the speed and incline of the treadmill until your body uses easily accessible carbohydrate calories for fat burning and aerobic exercise. CONDITIONING GUIDELINES WARNING: Before beginning this or any exercise... intensity. This increases the demand on the heart to pump blood to oxygenate the blood. the higher number is near one of the treadmill accordingly. The proper intensity level can be helpful to set the speed A Warm-up increases your wrist as a guide. For more detailed...
... During the first few minutes does your exercise program. If your goal is to burn fat, adjust the speed and incline of the treadmill until your body uses easily accessible carbohydrate calories for fat burning and aerobic exercise. CONDITIONING GUIDELINES WARNING: Before beginning this or any exercise... intensity. This increases the demand on the heart to pump blood to oxygenate the blood. the higher number is near one of the treadmill accordingly. The proper intensity level can be helpful to set the speed A Warm-up increases your wrist as a guide. For more detailed...
Canadian English Manual
Page 19
... not, what other brand name equipment would you purchase? 10) What other type of exercise equipment do you own? ❏ Bicycle ❏ Exercise Cycle ❏ Treadmill ❏ Home Gym ❏ Weight Bench ❏ Stepper ❏ Cardio Glide ❏ Other 11) Which type of magazines do you read regularly? ❏ Sports ❏...
... not, what other brand name equipment would you purchase? 10) What other type of exercise equipment do you own? ❏ Bicycle ❏ Exercise Cycle ❏ Treadmill ❏ Home Gym ❏ Weight Bench ❏ Stepper ❏ Cardio Glide ❏ Other 11) Which type of magazines do you read regularly? ❏ Sports ❏...

Canadian English Manual
Page 23
...parts, please be prepared to give the following information: • The MODEL NUMBER OF THE PRODUCT (WCTL38410) • The NAME OF THE PRODUCT (WESLO® 30.8 CT treadmill) • The SERIAL NUMBER OF THE PRODUCT (see the front cover of this manual) • The KEY NUMBER AND DESCRIPTION OF THE PART(S)...not provided by ICON. Some provinces do not allow limitations on how long an implied warranty lasts. Jerôme, QC J7Y 4B8 WESLO is in lieu of incidental or consequential damages. ICON is authorized by an ICON authorized service center, to products used as store display models...
...parts, please be prepared to give the following information: • The MODEL NUMBER OF THE PRODUCT (WCTL38410) • The NAME OF THE PRODUCT (WESLO® 30.8 CT treadmill) • The SERIAL NUMBER OF THE PRODUCT (see the front cover of this manual) • The KEY NUMBER AND DESCRIPTION OF THE PART(S)...not provided by ICON. Some provinces do not allow limitations on how long an implied warranty lasts. Jerôme, QC J7Y 4B8 WESLO is in lieu of incidental or consequential damages. ICON is authorized by an ICON authorized service center, to products used as store display models...


