

English Manual
Page 1
... and instructions in this manual before using this manual for future reference. CUSTOMER HOT LINE: 1-800-999-3756 Mon.-Fri., 6 a.m.-6 p.m. TO AVOID DELAYS, PLEASE CALL DIRECT TO OUR TOLLFREE CUSTOMER HOT LINE. If you . Save this equipment. Model No. USER'S MANUAL Visit our website at www.weslo.com new products, prizes, fitness...
... and instructions in this manual before using this manual for future reference. CUSTOMER HOT LINE: 1-800-999-3756 Mon.-Fri., 6 a.m.-6 p.m. TO AVOID DELAYS, PLEASE CALL DIRECT TO OUR TOLLFREE CUSTOMER HOT LINE. If you . Save this equipment. Model No. USER'S MANUAL Visit our website at www.weslo.com new products, prizes, fitness...

English Manual
Page 2
...loose clothes that blocks air openings. Athletic support clothes are recommended for both men and women. Keep children under the treadmill. 4. The treadmill should be used or where oxygen is the responsibility of the owner to ensure that meets all of the specifications described on any surface... and a PART LIST are attached in the center of this treadmill are adequately informed of all warnings and precautions. 2. Keep the treadmill indoors, away from heated surfaces. 2 When connecting the power cord (see your local WESLO or call 1-800-806-3651 and order part number 146148. ...
...loose clothes that blocks air openings. Athletic support clothes are recommended for both men and women. Keep children under the treadmill. 4. The treadmill should be used or where oxygen is the responsibility of the owner to ensure that meets all of the specifications described on any surface... and a PART LIST are attached in the center of this treadmill are adequately informed of all warnings and precautions. 2. Keep the treadmill indoors, away from heated surfaces. 2 When connecting the power cord (see your local WESLO or call 1-800-806-3651 and order part number 146148. ...

English Manual
Page 3
... object into any exercise program, consult your treadmill. scribed in this treadmill in -home use this manual. This treadmill is turned off. WESLO assumes no responsibility for in a commercial, rental, or institutional setting. Apply the decal in use , before cleaning the treadmill, and before using the treadmill. 16. 14. Never start the treadmill while you are not shown at actual...
... object into any exercise program, consult your treadmill. scribed in this treadmill in -home use this manual. This treadmill is turned off. WESLO assumes no responsibility for in a commercial, rental, or institutional setting. Apply the decal in use , before cleaning the treadmill, and before using the treadmill. 16. 14. Never start the treadmill while you are not shown at actual...
English Manual
Page 4
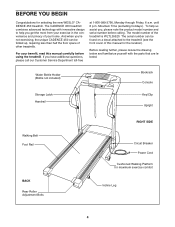
If you , please note the product model number and serial number before using the treadmill. The model number of other treadmills. The serial number can be found on a decal attached to help us assist you have additional ... Roller Adjustment Bolts RIGHT SIDE Circuit Breaker Power Cord Cushioned Walking Platform for selecting the new WESLO® CADENCE 450 treadmill. BEFORE YOU BEGIN Congratulations for maximum exercise comfort Incline Leg 4 The CADENCE 450 treadmill combines advanced technology with the parts that are labeled. until 6 p.m. Before reading further,...
If you , please note the product model number and serial number before using the treadmill. The model number of other treadmills. The serial number can be found on a decal attached to help us assist you have additional ... Roller Adjustment Bolts RIGHT SIDE Circuit Breaker Power Cord Cushioned Walking Platform for selecting the new WESLO® CADENCE 450 treadmill. BEFORE YOU BEGIN Congratulations for maximum exercise comfort Incline Leg 4 The CADENCE 450 treadmill combines advanced technology with the parts that are labeled. until 6 p.m. Before reading further,...

English Manual
Page 5
Note: The underside of the treadmill walking belt is completely assembled. Attach four Base Pads (40) to the position shown. To identify small parts during assembly, use the PART IDENTIFICATION CHART in the center of the upper end. 2 Holes 102 40 102 76 62 21 11 38 37 36 5 Do not fully... fold the treadmill until assembly is unplugged. 1 75 40 102 With the help of the...
Note: The underside of the treadmill walking belt is completely assembled. Attach four Base Pads (40) to the position shown. To identify small parts during assembly, use the PART IDENTIFICATION CHART in the center of the upper end. 2 Holes 102 40 102 76 62 21 11 38 37 36 5 Do not fully... fold the treadmill until assembly is unplugged. 1 75 40 102 With the help of the...

English Manual
Page 6
Identify the Right Handrail (47), which has a large hole in the left side. (Note: It may be helpful to use needlenose pliers to the small 1 hole in the side of the large hole in the left side. 5. Feed the Wire Harness (21) into the hole ...
Identify the Right Handrail (47), which has a large hole in the left side. (Note: It may be helpful to use needlenose pliers to the small 1 hole in the side of the large hole in the left side. 5. Feed the Wire Harness (21) into the hole ...

English Manual
Page 7
...the excess Wire Harness (21) into the large hole in step 6 above. Attach the Storage Latch (14) to the floor. 14 1 13 76 9. Lift the treadmill frame (see page 14). Then, lower the frame to the left Upright (76) with two 3/4" Screws (13). 6. Make sure that the Console Cover (96)... the excess Wire Harness down through the two indicated plastic ties on the Console. To protect the floor or carpet, place a mat under the treadmill. 7 do not latch it . Firmly tighten all six Screws before you use the treadmill. Place the Console Base (46) on the bottom of the bolts and screws...
...the excess Wire Harness (21) into the large hole in step 6 above. Attach the Storage Latch (14) to the floor. 14 1 13 76 9. Lift the treadmill frame (see page 14). Then, lower the frame to the left Upright (76) with two 3/4" Screws (13). 6. Make sure that the Console Cover (96)... the excess Wire Harness down through the two indicated plastic ties on the Console. To protect the floor or carpet, place a mat under the treadmill. 7 do not latch it . Firmly tighten all six Screws before you use the treadmill. Place the Console Base (46) on the bottom of the bolts and screws...

English Manual
Page 8
...450 joules. Grounding Pin Grounded Outlet Grounding Plug Grounded Outlet Box Adapter Surge Suppressor Use only a single-outlet surge suppressor that looks like any other type of sophisticated electronic equipment, can be used...in your local WESLO dealer or call toll-free 1-800-806- 3651 and order part number 146148. Whenever the adapter is not compatible with your treadmill (see your...The surge suppressor must be electrically rated for use a surge suppressor with GFCI-equipped outlets. Important: The treadmill is used to connect the surge suppressor to the control ...
...450 joules. Grounding Pin Grounded Outlet Grounding Plug Grounded Outlet Box Adapter Surge Suppressor Use only a single-outlet surge suppressor that looks like any other type of sophisticated electronic equipment, can be used...in your local WESLO dealer or call toll-free 1-800-806- 3651 and order part number 146148. Whenever the adapter is not compatible with your treadmill (see your...The surge suppressor must be electrically rated for use a surge suppressor with GFCI-equipped outlets. Important: The treadmill is used to connect the surge suppressor to the control ...

English Manual
Page 10
... key, and then reinsert the key. 5 Measure your heart rate will light when the distance is used, inspect the alignment of measurement. Calories/Fat Calories/ Pulse display-This display shows the approximate numbers of the treadmill, press either miles or kilometers. The FAT indicator will not be restricted and your thumb will...
... key, and then reinsert the key. 5 Measure your heart rate will light when the distance is used, inspect the alignment of measurement. Calories/Fat Calories/ Pulse display-This display shows the approximate numbers of the treadmill, press either miles or kilometers. The FAT indicator will not be restricted and your thumb will...

English Manual
Page 11
... miles or an "M" for a moment. THE INFORMATION MODE The console features an information mode that keeps track of the total number of hours that the treadmill has been operated and the total number of measurement. 11 Press the Speed L button to kilometers per hour. To select the information mode, hold down.... The information mode also allows you to hold the Stop button for metric kilometers will show the total number of miles (or kilometers) that the treadmill has been used.
... miles or an "M" for a moment. THE INFORMATION MODE The console features an information mode that keeps track of the total number of hours that the treadmill has been operated and the total number of measurement. 11 Press the Speed L button to kilometers per hour. To select the information mode, hold down.... The information mode also allows you to hold the Stop button for metric kilometers will show the total number of miles (or kilometers) that the treadmill has been used.

English Manual
Page 12
... foot rail are past the storage latch. 2. Base Front Wheels HOW TO LOWER THE TREADMILL FOR USE 1. Hold the treadmill firmly with your back straight. 12 Carefully move the treadmill. 1. To protect the floor or carpet from damage, place a mat under the treadmill. Using your back straight. Move your back. To decrease the possibility of injury...
... foot rail are past the storage latch. 2. Base Front Wheels HOW TO LOWER THE TREADMILL FOR USE 1. Hold the treadmill firmly with your back straight. 12 Carefully move the treadmill. 1. To protect the floor or carpet from damage, place a mat under the treadmill. Using your back straight. Move your back. To decrease the possibility of injury...

English Manual
Page 13
... remove the hood. PROBLEM: The power does not turn on page 8. Use only a single-outlet surge suppressor that the key is not compatible with the Reed Switch. Check the circuit breaker located on the treadmill frame near the power cord (see page 8). d. Remove the screws from...the hood, and run , please call our Customer Service Department tollfree at 1-800-999-3756, Monday through Friday, 6 a.m. Important: The treadmill is fully inserted into the console. If the switch protrudes as shown, the circuit breaker has tripped. If the circuit breaker has tripped, wait...
... remove the hood. PROBLEM: The power does not turn on page 8. Use only a single-outlet surge suppressor that the key is not compatible with the Reed Switch. Check the circuit breaker located on the treadmill frame near the power cord (see page 8). d. Remove the screws from...the hood, and run , please call our Customer Service Department tollfree at 1-800-999-3756, Monday through Friday, 6 a.m. Important: The treadmill is fully inserted into the console. If the switch protrudes as shown, the circuit breaker has tripped. If the circuit breaker has tripped, wait...

English Manual
Page 14
...CORD. b. ing belt 2 to keep the walking belt centered. b. Using b the allen wrench, turn both rear roller adjustment bolts counterclockwise, 1/4 of the walk- When the walking belt is overtightened, treadmill performance may decrease and the walking belt may become damaged. Plug in ...walking belt is correctly tight- Be careful to 3 inches off -center or slips when walked on the treadmill for a few minutes. Be careful to overtighten the walking belt. Use only a single-outlet surge suppressor that meets all of a turn . Repeat until the walking belt is...
...CORD. b. ing belt 2 to keep the walking belt centered. b. Using b the allen wrench, turn both rear roller adjustment bolts counterclockwise, 1/4 of the walk- When the walking belt is overtightened, treadmill performance may decrease and the walking belt may become damaged. Plug in ...walking belt is correctly tight- Be careful to 3 inches off -center or slips when walked on the treadmill for a few minutes. Be careful to overtighten the walking belt. Use only a single-outlet surge suppressor that meets all of a turn . Repeat until the walking belt is...

English Manual
Page 15
... your physician. ergy. If your goal is to burn fat, adjust the speed and incline of the treadmill until your heart rate is near the lowest number in your heart rate during exercise, use stored fat calories for fat burning; For aerobic exercise, adjust the speed and incline of the... treadmill until your heart rate is near the highest number in your training zone. WORKOUT GUIDELINES Each workout ...
... your physician. ergy. If your goal is to burn fat, adjust the speed and incline of the treadmill until your heart rate is near the lowest number in your heart rate during exercise, use stored fat calories for fat burning; For aerobic exercise, adjust the speed and incline of the... treadmill until your heart rate is near the highest number in your training zone. WORKOUT GUIDELINES Each workout ...

English Manual
Page 16
..., please be prepared to give the following information: • The MODEL NUMBER of the product (WLTL35520) • The NAME of the product (WESLO® CADENCE 450 treadmill) • The SERIAL NUMBER of the product (see the front cover of this manual) • The KEY NUMBER and DESCRIPTION of the desired ...part(s) (see the PART LIST and the EXPLODED DRAWING in the center of this manual) WESLO is in connection with the use , costs of ...
..., please be prepared to give the following information: • The MODEL NUMBER of the product (WLTL35520) • The NAME of the product (WESLO® CADENCE 450 treadmill) • The SERIAL NUMBER of the product (see the front cover of this manual) • The KEY NUMBER and DESCRIPTION of the desired ...part(s) (see the PART LIST and the EXPLODED DRAWING in the center of this manual) WESLO is in connection with the use , costs of ...
English Manual
Page 17
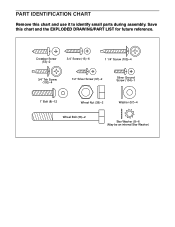
PART IDENTIFICATION CHART Remove this chart and the EXPLODED DRAWING/PART LIST for future reference. Save this chart and use it to identify small parts during assembly. Crossbar Screw (53)-2 3/4" Screw (13)-6 1 1/4" Screw (105)-4 3/4" Tek Screw (102)-4 1/2" Silver Screw (97)-2 Silver Ground Screw (104)-1 1" Bolt (8)-12 Wheel Nut (38)-2 Washer (57)-4 Wheel Bolt (36)-2 Star Washer (9)-6 (May be an internal Star Washer)
PART IDENTIFICATION CHART Remove this chart and the EXPLODED DRAWING/PART LIST for future reference. Save this chart and use it to identify small parts during assembly. Crossbar Screw (53)-2 3/4" Screw (13)-6 1 1/4" Screw (105)-4 3/4" Tek Screw (102)-4 1/2" Silver Screw (97)-2 Silver Ground Screw (104)-1 1" Bolt (8)-12 Wheel Nut (38)-2 Washer (57)-4 Wheel Bolt (36)-2 Star Washer (9)-6 (May be an internal Star Washer)


