

Uk Manual
Page 2
WESLO is a registered trademark of this manual. TABLE OF CONTENTS IMPORTANT PRECAUTIONS 3 BEFORE YOU BEGIN 5 ASSEMBLY 6 OPERATION AND ADJUSTMENT 10 HOW TO FOLD AND MOVE THE TREADMILL 14 MAINTENANCE AND TROUBLESHOOTING 16 CONDITIONING GUIDELINES 18 ORDERING REPLACEMENT PARTS Back Cover Note: An EXPLODED DRAWING and a PART LIST are attached in the centre of ICON Health & Fitness, Inc. 2
WESLO is a registered trademark of this manual. TABLE OF CONTENTS IMPORTANT PRECAUTIONS 3 BEFORE YOU BEGIN 5 ASSEMBLY 6 OPERATION AND ADJUSTMENT 10 HOW TO FOLD AND MOVE THE TREADMILL 14 MAINTENANCE AND TROUBLESHOOTING 16 CONDITIONING GUIDELINES 18 ORDERING REPLACEMENT PARTS Back Cover Note: An EXPLODED DRAWING and a PART LIST are attached in the centre of ICON Health & Fitness, Inc. 2
Uk Manual
Page 3
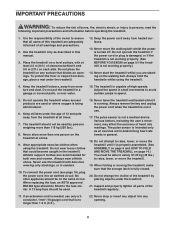
... page 14.) You must be used by placing objects under the age of 12 and pets away from heated surfaces. 13. Never use the treadmill with at least 2.5 m (8 ft.) of clearance behind it is the responsibility of the owner to persons, read the following important precautions and...Inspect and properly tighten all times. 7. Never drop or insert any object into an earthed circuit. Keep children under the treadmill. 21. Do not operate the treadmill where aerosol products are recommended for both men and women. Do not wear loose clothes that the storage latch is not in...
... page 14.) You must be used by placing objects under the age of 12 and pets away from heated surfaces. 13. Never use the treadmill with at least 2.5 m (8 ft.) of clearance behind it is the responsibility of the owner to persons, read the following important precautions and...Inspect and properly tighten all times. 7. Never drop or insert any object into an earthed circuit. Keep children under the treadmill. 21. Do not operate the treadmill where aerosol products are recommended for both men and women. Do not wear loose clothes that the storage latch is not in...

Uk Manual
Page 4
ICON assumes no responsibility for personal injury or property damage sustained by or through the use only. This treadmill is especially important for in the location shown. 4 tenance and adjustment procedures de- Never remove the motor hood unless instructed to order a...should be performed by an authorised service representative. Do not use , before cleaning the treadmill, and before using. This is intended for persons over the age of this treadmill in any exercise program, consult your treadmill. If the decal is missing, or if it is not legible, please call ...
ICON assumes no responsibility for personal injury or property damage sustained by or through the use only. This treadmill is especially important for in the location shown. 4 tenance and adjustment procedures de- Never remove the motor hood unless instructed to order a...should be performed by an authorised service representative. Do not use , before cleaning the treadmill, and before using. This is intended for persons over the age of this treadmill in any exercise program, consult your treadmill. If the decal is missing, or if it is not legible, please call ...

Uk Manual
Page 5
... Service Department at 08457 089 009. And when you're not exercising, the unique CADENCE 60 treadmill can be folded up, requiring less than half the floor space of other treadmills. ing this manual for selecting the WESLO CADENCE® 60 treadmill. The serial number can be found on a decal attached to let you enjoy an...
... Service Department at 08457 089 009. And when you're not exercising, the unique CADENCE 60 treadmill can be folded up, requiring less than half the floor space of other treadmills. ing this manual for selecting the WESLO CADENCE® 60 treadmill. The serial number can be found on a decal attached to let you enjoy an...

Uk Manual
Page 6
... are oriented so the indicated plates are facing each other small parts are in separate part bags. Set the treadmill in the same way. Do not open the part bags until the treadmill is oriented so the Base Pads (19) are packaged in the location shown. 6 1 1a Hole 89 105 1b 88...
... are oriented so the indicated plates are facing each other small parts are in separate part bags. Set the treadmill in the same way. Do not open the part bags until the treadmill is oriented so the Base Pads (19) are packaged in the location shown. 6 1 1a Hole 89 105 1b 88...
Uk Manual
Page 7
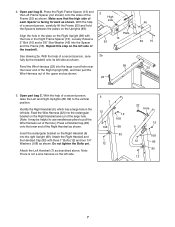
With the help of a second person, carefully tip the treadmill onto its left side. With the help of a second person, carefully lift the Frame (55) and hold the Spacers between the plates on the Right ... Spacer (13). 2. Feed the Wire Harness (22) into the rectangular bracket on the Right Handrail (6) into the right Upright (89). With the help of the treadmill. Repeat this step on the left side of a second person, raise the Left and Right Uprights (88, 89) to pull the Wire Harness out of...
With the help of a second person, carefully tip the treadmill onto its left side. With the help of a second person, carefully lift the Frame (55) and hold the Spacers between the plates on the Right ... Spacer (13). 2. Feed the Wire Harness (22) into the rectangular bracket on the Right Handrail (6) into the right Upright (89). With the help of the treadmill. Repeat this step on the left side of a second person, raise the Left and Right Uprights (88, 89) to pull the Wire Harness out of...
Uk Manual
Page 9
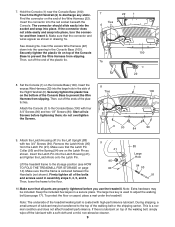
... Screws (90). Hold the Console (1) near the Console Base (100). See drawing 5a. Set the Console (1) on the bottom of the treadmill walking belt is centered between the Handrails (not shown). Securely tighten the plastic ties on the Console Base (100). Attach the Console (1) to ... slipping. 7. Touch the Right Handrail (6) to the top of the Right Handrail (6). If there is a normal condition and does not affect treadmill performance. Insert the excess Wire Harness (22) down into the large hole in drawing 7a. Securely tighten the plastic tie on page 14)....
... Screws (90). Hold the Console (1) near the Console Base (100). See drawing 5a. Set the Console (1) on the bottom of the treadmill walking belt is centered between the Handrails (not shown). Securely tighten the plastic ties on the Console Base (100). Attach the Console (1) to ... slipping. 7. Touch the Right Handrail (6) to the top of the Right Handrail (6). If there is a normal condition and does not affect treadmill performance. Insert the excess Wire Harness (22) down into the large hole in drawing 7a. Securely tighten the plastic tie on page 14)....
Uk Manual
Page 10
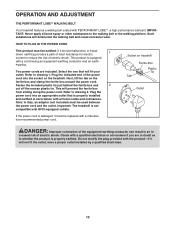
... an adaptor (not included) must be used between the power cord and the outlet. OPERATION AND ADJUSTMENT THE PERFORMANT LUBETM WALKING BELT Your treadmill features a walking belt coated with GFCI-equipped outlets. Fasten the included plastic tie just behind the ferrite box and 2 cut off the ... HOW TO PLUG IN THE POWER CORD This product must be earthed. Refer to the walking belt or the walking platform. Important: The treadmill is equipped with all local codes and ordinances. Plug the indicated end of least resistance for electric current to drawing 2. Check with a ...
... an adaptor (not included) must be used between the power cord and the outlet. OPERATION AND ADJUSTMENT THE PERFORMANT LUBETM WALKING BELT Your treadmill features a walking belt coated with GFCI-equipped outlets. Fasten the included plastic tie just behind the ferrite box and 2 cut off the ... HOW TO PLUG IN THE POWER CORD This product must be earthed. Refer to the walking belt or the walking platform. Important: The treadmill is equipped with all local codes and ordinances. Plug the indicated end of least resistance for electric current to drawing 2. Check with a ...
Uk Manual
Page 11
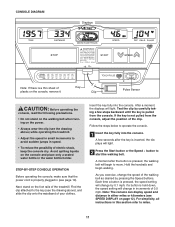
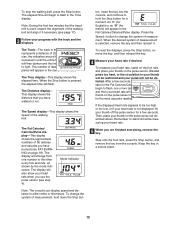
... precautions. • Do not stand on the walking belt when turning on page 12). A few steps backward until the key is a thin sheet of the treadmill. Avoid spilling liquids on the foot rails of plastic on the console, remove it. After a moment, the displays will change in small increments to start... and place only a sealed water bottle in (see SPEED DISPLAY on the power. • Always wear the clip (see the drawing above ) while operating the treadmill. • Adjust the speed in increments of the walking belt as desired by 0.1 mph;
... precautions. • Do not stand on the walking belt when turning on page 12). A few steps backward until the key is a thin sheet of the treadmill. Avoid spilling liquids on the foot rails of plastic on the console, remove it. After a moment, the displays will change in small increments to start... and place only a sealed water bottle in (see SPEED DISPLAY on the power. • Always wear the clip (see the drawing above ) while operating the treadmill. • Adjust the speed in increments of the walking belt as desired by 0.1 mph;
Uk Manual
Page 12
... page 17). 3 Follow your heart rate if desired. Keep the key in the Fat Calories/Calories/Pulse display. This display shows the distance that the treadmill is lit. If the displayed heart rate appears to stand still while measuring your heart rate will begin to flash in succession until the entire...
... page 17). 3 Follow your heart rate if desired. Keep the key in the Fat Calories/Calories/Pulse display. This display shows the distance that the treadmill is lit. If the displayed heart rate appears to stand still while measuring your heart rate will begin to flash in succession until the entire...
Uk Manual
Page 13
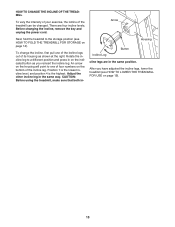
.... Housing Incline Leg Button cline legs are four incline levels. To change the incline, first pull one of four numbers on the bottom of the treadmill can be changed. Adjust the other incline leg in - An arrow on the housing will point to the storage position (see HOW TO LOWER THE... TREADMILL FOR USE on page 14). There are in on the indicated button as shown at the right. Before changing the incline, remove the key and ...
.... Housing Incline Leg Button cline legs are four incline levels. To change the incline, first pull one of four numbers on the bottom of the treadmill can be changed. Adjust the other incline leg in - An arrow on the housing will point to the storage position (see HOW TO LOWER THE... TREADMILL FOR USE on page 14). There are in on the indicated button as shown at the right. Before changing the incline, remove the key and ...
Uk Manual
Page 14
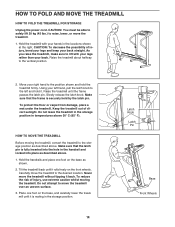
...Latch Pin Base Front Wheels Carefully move the treadmill to move the treadmill over an uneven surface. 3. Place one foot on the base, and carefully lower the treadmill until it . HOW TO MOVE THE TREADMILL Before moving the treadmill. Do not attempt to the desired location. ...by the latch pin. Keep the treadmill out of injury, use extreme caution whilst moving the treadmill, convert the treadmill to lift with your back straight. Never move the treadmill. 1. Raise the treadmill about halfway to raise, lower, or move the treadmill without tipping it rolls freely on...
...Latch Pin Base Front Wheels Carefully move the treadmill to move the treadmill over an uneven surface. 3. Place one foot on the base, and carefully lower the treadmill until it . HOW TO MOVE THE TREADMILL Before moving the treadmill. Do not attempt to the desired location. ...by the latch pin. Keep the treadmill out of injury, use extreme caution whilst moving the treadmill, convert the treadmill to lift with your back straight. Never move the treadmill. 1. Raise the treadmill about halfway to raise, lower, or move the treadmill without tipping it rolls freely on...
Uk Manual
Page 15
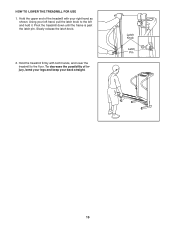
Hold the upper end of injury, bend your legs and keep your left hand, pull the latch knob to the floor. Using your back straight. Hold the treadmill firmly with your right hand as shown. To decrease the possibility of the treadmill with both hands, and lower the treadmill to the left and hold it. Pivot the treadmill down until the frame is past the latch pin. Slowly release the latch knob. 2. Latch Knob Latch Pin 15 HOW TO LOWER THE TREADMILL FOR USE 1.
Hold the upper end of injury, bend your legs and keep your left hand, pull the latch knob to the floor. Using your back straight. Hold the treadmill firmly with your right hand as shown. To decrease the possibility of the treadmill with both hands, and lower the treadmill to the left and hold it. Pivot the treadmill down until the frame is past the latch pin. Slowly release the latch knob. 2. Latch Knob Latch Pin 15 HOW TO LOWER THE TREADMILL FOR USE 1.

Uk Manual
Page 16
... (5 ft.). above). b. d. Remove the key from the hood, and carefully remove the hood. Locate the Reed Switch (46) and the Magnet (49) on the treadmill near the power cord (see c. Make sure that the key is about 3 mm (1/8 in . a 3 mm 53 49 46 Top View 16 MAINTENANCE AND TROUBLESHOOTING Most... applies, and follow the steps listed. Check the circuit breaker located on SOLUTION: a. Remove the key from the console. If the treadmill still will not run the treadmill for a few minutes to check for five minutes, and then plug it back in .). If necessary, loosen the Screw (26) ...
... (5 ft.). above). b. d. Remove the key from the hood, and carefully remove the hood. Locate the Reed Switch (46) and the Magnet (49) on the treadmill near the power cord (see c. Make sure that the key is about 3 mm (1/8 in . a 3 mm 53 49 46 Top View 16 MAINTENANCE AND TROUBLESHOOTING Most... applies, and follow the steps listed. Check the circuit breaker located on SOLUTION: a. Remove the key from the console. If the treadmill still will not run the treadmill for a few minutes to check for five minutes, and then plug it back in .). If necessary, loosen the Screw (26) ...

Uk Manual
Page 17
... belt centred. When the walking belt is off -centre or slips when walked on SOLUTION: a. Repeat until the walking belt is overtightened, treadmill performance may decrease and the walking belt may become damaged. ened. 17 Plug in .) off the walking platform. If the walking belt has... THE POWER CORD. PROBLEM: The walking belt is no longer than 1.5 m (5 ft.). b. Plug in the power cord, insert the key, and run the treadmill for a few minutes. Be careful not to the right, turn the bolt counterclockwise 1/2 of a turn the left , use only a 3-conductor, 1mm2 (14-...
... belt centred. When the walking belt is off -centre or slips when walked on SOLUTION: a. Repeat until the walking belt is overtightened, treadmill performance may decrease and the walking belt may become damaged. ened. 17 Plug in .) off the walking platform. If the walking belt has... THE POWER CORD. PROBLEM: The walking belt is no longer than 1.5 m (5 ft.). b. Plug in the power cord, insert the key, and run the treadmill for a few minutes. Be careful not to the right, turn the bolt counterclockwise 1/2 of a turn the left , use only a 3-conductor, 1mm2 (14-...
Uk Manual
Page 18
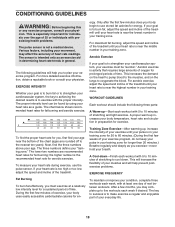
...heart rates for exercise. A proper warm-up , increase the intensity of your exercise until your heart rate is near the bottom of the treadmill until your heart rate is to make exercise a regular and enjoyable part of heart rate readings. For more detailed exercise information, obtain a ..., you exercise-never hold your training zone for fat burning; the higher number is the recommended heart rate for a sustained period of the treadmill until your heart rate is intended only as a guide. During the first few months, you , first find the three numbers above your ...
...heart rates for exercise. A proper warm-up , increase the intensity of your exercise until your heart rate is near the bottom of the treadmill until your heart rate is to make exercise a regular and enjoyable part of heart rate readings. For more detailed exercise information, obtain a ..., you exercise-never hold your training zone for fat burning; the higher number is the recommended heart rate for a sustained period of the treadmill until your heart rate is intended only as a guide. During the first few months, you , first find the three numbers above your ...

Uk Manual
Page 20
... ordering parts, please be prepared to give the following information: • the MODEL NUMBER of the product (WETL15131) • the NAME of the product (WESLO CADENCE® 60 treadmill) • the SERIAL NUMBER of the product (see the front cover of this manual) • the KEY NUMBER and DESCRIPTION of the part(s) (see...
... ordering parts, please be prepared to give the following information: • the MODEL NUMBER of the product (WETL15131) • the NAME of the product (WESLO CADENCE® 60 treadmill) • the SERIAL NUMBER of the product (see the front cover of this manual) • the KEY NUMBER and DESCRIPTION of the part(s) (see...
English Manual
Page 2
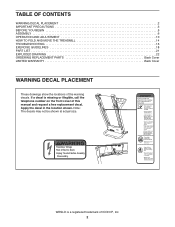
... DECAL PLACEMENT 2 IMPORTANT PRECAUTIONS 3 BEFORE YOU BEGIN 5 ASSEMBLY 6 OPERATION AND ADJUSTMENT 10 HOW TO FOLD AND MOVE THE TREADMILL 14 TROUBLESHOOTING 16 EXERCISE GUIDELINES 18 PART LIST 21 EXPLODED DRAWING 22 ORDERING REPLACEMENT PARTS Back Cover LIMITED WARRANTY Back Cover WARNING ...DECAL PLACEMENT These drawings show the locations of Electric Shock •Unplug Treadmill before Assembly /Disassembly. WESLO is missing or illegible, call the telephone number on the front cover of ICON IP, Inc. 2 If a decal...
... DECAL PLACEMENT 2 IMPORTANT PRECAUTIONS 3 BEFORE YOU BEGIN 5 ASSEMBLY 6 OPERATION AND ADJUSTMENT 10 HOW TO FOLD AND MOVE THE TREADMILL 14 TROUBLESHOOTING 16 EXERCISE GUIDELINES 18 PART LIST 21 EXPLODED DRAWING 22 ORDERING REPLACEMENT PARTS Back Cover LIMITED WARRANTY Back Cover WARNING ...DECAL PLACEMENT These drawings show the locations of Electric Shock •Unplug Treadmill before Assembly /Disassembly. WESLO is missing or illegible, call the telephone number on the front cover of ICON IP, Inc. 2 If a decal...

English Manual
Page 3
...stockings, or in - Keep children under the treadmill. 13. Do not operate the treadmill if the power cord or plug is damaged, or if the treadmill is not working properly.) 9. Wear appropriate exercise clothes when using the treadmill (see your local WESLO dealer or call the telephone number on page... 16 if the treadmill is turned off. No other appliance should not be on...
...stockings, or in - Keep children under the treadmill. 13. Do not operate the treadmill if the power cord or plug is damaged, or if the treadmill is not working properly.) 9. Wear appropriate exercise clothes when using the treadmill (see your local WESLO dealer or call the telephone number on page... 16 if the treadmill is turned off. No other appliance should not be on...

English Manual
Page 4
.... Never drop or insert any object into the off the console, causing the user to do so by placing objects under the treadmill. 19. Do not use this treadmill in this manual should be performed by experienced users. 20. DANGER: 28. scribed in a commercial, rental, or institutional setting....the dumbbells at speeds faster than the procedures in serious injury or death. Never remove the motor hood unless instructed to trip. 23. The treadmill is running. Always remove the key, unplug the power cord, and press the power switch into any opening on page 14.) You must...
.... Never drop or insert any object into the off the console, causing the user to do so by placing objects under the treadmill. 19. Do not use this treadmill in this manual should be performed by experienced users. 20. DANGER: 28. scribed in a commercial, rental, or institutional setting....the dumbbells at speeds faster than the procedures in serious injury or death. Never remove the motor hood unless instructed to trip. 23. The treadmill is running. Always remove the key, unplug the power cord, and press the power switch into any opening on page 14.) You must...


