
User Manual
Page 1
APPENDIX WALL MOUNT AND SAFETY BRACKET OPTIONS 37 WALL MOUNT AND SAFETY BRACKET OPTIONS 38 32 INCH HIGH DEFINITION LCD TV SPECIFICATIONS 39 42 INCH HIGH DEFINITION LCD TV SPECIFICATIONS 39 TROUBLESHOOTING...41 CLEANING THE HIGH DEFINITION LCD TV 43 i PRODUCT SAFETY SAFETY GUIDELINES ...2 PRODUCT SAFETY INSTRUCTIONS...3 ANTENNA INSTALLATION SAFETY ...4 2. OSD FUNCTION OSD (ON SCREEN DISPLAY) FUNCTION 18...
APPENDIX WALL MOUNT AND SAFETY BRACKET OPTIONS 37 WALL MOUNT AND SAFETY BRACKET OPTIONS 38 32 INCH HIGH DEFINITION LCD TV SPECIFICATIONS 39 42 INCH HIGH DEFINITION LCD TV SPECIFICATIONS 39 TROUBLESHOOTING...41 CLEANING THE HIGH DEFINITION LCD TV 43 i PRODUCT SAFETY SAFETY GUIDELINES ...2 PRODUCT SAFETY INSTRUCTIONS...3 ANTENNA INSTALLATION SAFETY ...4 2. OSD FUNCTION OSD (ON SCREEN DISPLAY) FUNCTION 18...

User Manual
Page 2
Refer to them whenever you have any questions or concerns, Please call upon your Westinghouse Digital dealer regarding this product. Model No Serial No ii English CONTENTS If you call our toll free number 1-866-287-5555 Owner's Record The model and serial numbers are located on the back of the numbers in the spaces provided below. Keep a record of the TV.
Refer to them whenever you have any questions or concerns, Please call upon your Westinghouse Digital dealer regarding this product. Model No Serial No ii English CONTENTS If you call our toll free number 1-866-287-5555 Owner's Record The model and serial numbers are located on the back of the numbers in the spaces provided below. Keep a record of the TV.

User Manual
Page 4
... be located near High Definition LCD TV and should look like Figure A1 below for the selection criteria for your specific country. If this equipment does cause harmful interference to radio or television reception, which the receiver is connected. • Consult the Westinghouse Service Center or an experienced radio/TV technician for this device...
... be located near High Definition LCD TV and should look like Figure A1 below for the selection criteria for your specific country. If this equipment does cause harmful interference to radio or television reception, which the receiver is connected. • Consult the Westinghouse Service Center or an experienced radio/TV technician for this device...

User Manual
Page 5
... You may be used , use caution when moving it. • If the High Definition LCD TV emits smoke, abnormal noise, or a strange odor, immediately turn it off and contact the Westinghouse Service Center. 3 English 1 PRODUCT SAFETY Product Safety Instructions Follow and obey all warnings and instructions...amplifiers) that produce heat. 9. Servicing is required when the apparatus has been damaged in accordance with the apparatus. Your High Definition LCD TV contains high-voltage parts. Do not use this apparatus during lightning storms or when unused for a long period of the polarized or ...
... You may be used , use caution when moving it. • If the High Definition LCD TV emits smoke, abnormal noise, or a strange odor, immediately turn it off and contact the Westinghouse Service Center. 3 English 1 PRODUCT SAFETY Product Safety Instructions Follow and obey all warnings and instructions...amplifiers) that produce heat. 9. Servicing is required when the apparatus has been damaged in accordance with the apparatus. Your High Definition LCD TV contains high-voltage parts. Do not use this apparatus during lightning storms or when unused for a long period of the polarized or ...

User Manual
Page 6
...lightning storm, or when it is grounded to prevent voltage surges and built-up static charges. This will prevent damage to the High Definition LCD TV due to improve. Power Lines An outside antenna system, extreme care should not be located in wire to an antenna discharge unit, connection.... English 1 PRODUCT SAFETY Antenna Installation Safety Outdoor Antenna Grounding If an outside antenna or cable system is connected to the High Definition LCD TV, be sure the antenna or cable system is left unattended and unused for long periods of time, unplug it from touching such power...
...lightning storm, or when it is grounded to prevent voltage surges and built-up static charges. This will prevent damage to the High Definition LCD TV due to improve. Power Lines An outside antenna system, extreme care should not be located in wire to an antenna discharge unit, connection.... English 1 PRODUCT SAFETY Antenna Installation Safety Outdoor Antenna Grounding If an outside antenna or cable system is connected to the High Definition LCD TV, be sure the antenna or cable system is left unattended and unused for long periods of time, unplug it from touching such power...

User Manual
Page 7
This High Definition LCD TV has a built-in widescreen, and both analog and digital TV channels. Using digital television, broadcasters can tune both offer much higher picture quality than SDTV. 5 Some 480p programs are broadcast in two different ... Picture Digital television programs are essentially a digital version of a second. Digital television is a new way of transmitting high quality video and audio to your TV set is High Definition Television (HDTV). The advantage of the screen and then follows with a vertical resolution display of a second. The "p" stands for ...
This High Definition LCD TV has a built-in widescreen, and both analog and digital TV channels. Using digital television, broadcasters can tune both offer much higher picture quality than SDTV. 5 Some 480p programs are broadcast in two different ... Picture Digital television programs are essentially a digital version of a second. Digital television is a new way of transmitting high quality video and audio to your TV set is High Definition Television (HDTV). The advantage of the screen and then follows with a vertical resolution display of a second. The "p" stands for ...

User Manual
Page 8
The second number is the minor channel number that allows these broadcasting stations to use the same major channel number for example 11-0. How to input digital television channels: User Inputs Method 1: 11 . 3 Method 2: 113 Channel Displayed Channel 11 . 3 Channel 11 . 3 For single digit channels: User Inputs Method 3: 052 Method 4: 5.2 + Ent Channel Displayed Channel 5 . 2 Channel 5 . 2 Check your local listings for available digital television channels in the example above , digital channel number 11.1 is mapped to physical Channel 12 and tunes into channel 12. The old analog ...
The second number is the minor channel number that allows these broadcasting stations to use the same major channel number for example 11-0. How to input digital television channels: User Inputs Method 1: 11 . 3 Method 2: 113 Channel Displayed Channel 11 . 3 Channel 11 . 3 For single digit channels: User Inputs Method 3: 052 Method 4: 5.2 + Ent Channel Displayed Channel 5 . 2 Channel 5 . 2 Check your local listings for available digital television channels in the example above , digital channel number 11.1 is mapped to physical Channel 12 and tunes into channel 12. The old analog ...

User Manual
Page 9
.... Help Instructions List of detailed information depends on the broadcaster. English 2 A GUIDE TO DIGITAL TELEVISION The Electronic Program Guide Your Westinghouse High Definition LCD TV has an Electronic Program Guide (EPG) to display the Electronic Program Guide. You can use the 'Guide' button on the remote... control or select EPG from the TV OSD menu to help you navigate through the Electronic Program Guide. • Press Enter (the ...
.... Help Instructions List of detailed information depends on the broadcaster. English 2 A GUIDE TO DIGITAL TELEVISION The Electronic Program Guide Your Westinghouse High Definition LCD TV has an Electronic Program Guide (EPG) to display the Electronic Program Guide. You can use the 'Guide' button on the remote... control or select EPG from the TV OSD menu to help you navigate through the Electronic Program Guide. • Press Enter (the ...

User Manual
Page 10
TV User's Manual Remote Control & Batteries W. Card Power Cord Warranty Card 8 English 3 INSTALLATION Package Contents Your product package includes: • Westinghouse High Definition LCD TV • Remote Control (with batteries) • Power Cord • User's Manual • Warranty Card LCD -
TV User's Manual Remote Control & Batteries W. Card Power Cord Warranty Card 8 English 3 INSTALLATION Package Contents Your product package includes: • Westinghouse High Definition LCD TV • Remote Control (with batteries) • Power Cord • User's Manual • Warranty Card LCD -

User Manual
Page 11
LED indicator & "IR" receiver Speakers 9 The OSD controls are defined in "OSD Functions" on the remote control to display the On Screen Display (OSD) menu and adjust the High Definition LCD TV options. English 3 INSTALLATION Front View of the High Definition LCD TV Use the buttons on the right side of the High Definition LCD TV or the buttons on page 18.
LED indicator & "IR" receiver Speakers 9 The OSD controls are defined in "OSD Functions" on the remote control to display the On Screen Display (OSD) menu and adjust the High Definition LCD TV options. English 3 INSTALLATION Front View of the High Definition LCD TV Use the buttons on the right side of the High Definition LCD TV or the buttons on page 18.

User Manual
Page 12
Channel S / T 4. Menu 2. English 3 INSTALLATION Side View of the High Definition LCD TV 1. Input 5. Power Button Turn OSD Menu ON/OFF Increase/Decrease sound volume or adjust a highlighted control while in OSD Menu Channel up/down when source is TV or select a control while in OSD Menu Select Active Video source or a highlighted control while in OSD MENU Power ON/OFF 10 Volume + / - 3.
Channel S / T 4. Menu 2. English 3 INSTALLATION Side View of the High Definition LCD TV 1. Input 5. Power Button Turn OSD Menu ON/OFF Increase/Decrease sound volume or adjust a highlighted control while in OSD Menu Channel up/down when source is TV or select a control while in OSD Menu Select Active Video source or a highlighted control while in OSD MENU Power ON/OFF 10 Volume + / - 3.

User Manual
Page 13
AV Video 2 Connect the composite video to an external HDMI device such as a DVD or cable/satellite receiver. 12. HDMI 1 / HDMI 2 Connect to an external video device such as a DVD or gaming system. 10. English 3 INSTALLATION SIDE CONNECTORS 1. YPbPr 2 / Audio 2 (Right / Left) Connect the Left and Right Audio cables to an external video device such as a VCR. 3. YPbPr 1 Connect the component video to the audio out of an external device such as a DVD or gaming system. 9. S-Video 2 Connect the S-video to the audio out of an external device such as a DVD or gaming system. ...
AV Video 2 Connect the composite video to an external HDMI device such as a DVD or cable/satellite receiver. 12. HDMI 1 / HDMI 2 Connect to an external video device such as a DVD or gaming system. 10. English 3 INSTALLATION SIDE CONNECTORS 1. YPbPr 2 / Audio 2 (Right / Left) Connect the Left and Right Audio cables to an external video device such as a VCR. 3. YPbPr 1 Connect the component video to the audio out of an external device such as a DVD or gaming system. 9. S-Video 2 Connect the S-video to the audio out of an external device such as a DVD or gaming system. ...

User Manual
Page 14
English 3 INSTALLATION 1. SPDIF Digital Audio out connection 4. VGA Using a 15-pin VGA cable, connect to an external audio amplifier. 5. Audio Out (Right / Left) Connect this output to a computer. 2. USB Connector used only for TV service. 6. ANT (RF-input) Connect to the Audio out (Green) on a computer. 3. Audio-In (VGA) Using a 3.5mm mini-jack cable, connect to the antenna or cable service. 12
English 3 INSTALLATION 1. SPDIF Digital Audio out connection 4. VGA Using a 15-pin VGA cable, connect to an external audio amplifier. 5. Audio Out (Right / Left) Connect this output to a computer. 2. USB Connector used only for TV service. 6. ANT (RF-input) Connect to the Audio out (Green) on a computer. 3. Audio-In (VGA) Using a 3.5mm mini-jack cable, connect to the antenna or cable service. 12
User Manual
Page 15
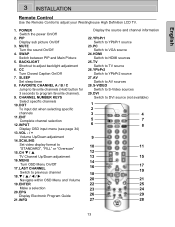
BACKLIGHT Shortcut to adjust your Westinghouse High Definition LCD TV. 1. SLEEP Set sleep timer 8. VOL - / + Volume Up/Down adjustment 14. ...VGA source 24. DOT To input dot when selecting specific channels 11. EPG Display Electronic Program Guide 21. DVI Switch to TV source 26. TV Switch to DVI source (not available) 1 2 3 4 5 7 6 8 9 10 11 12 13 15 14... Switch to YPbPr2 source 27. LAST CHANNEL Switch to YPbPr1 source 23. CH T / S TV Channel Up/Down adjustment 16. YPbPr1 Switch to previous channel 18. AV Switch to AV sources 28. ENT Complete channel...
BACKLIGHT Shortcut to adjust your Westinghouse High Definition LCD TV. 1. SLEEP Set sleep timer 8. VOL - / + Volume Up/Down adjustment 14. ...VGA source 24. DOT To input dot when selecting specific channels 11. EPG Display Electronic Program Guide 21. DVI Switch to TV source 26. TV Switch to DVI source (not available) 1 2 3 4 5 7 6 8 9 10 11 12 13 15 14... Switch to YPbPr2 source 27. LAST CHANNEL Switch to YPbPr1 source 23. CH T / S TV Channel Up/Down adjustment 16. YPbPr1 Switch to previous channel 18. AV Switch to AV sources 28. ENT Complete channel...

User Manual
Page 16
Inserting the batteries incorrectly may result in cracking or leakage, which may pose a fire risk or lead to personal injury. • Dispose of used for an extended period, remove the batteries. 14 English 3 INSTALLATION Installation 1. Insert Remote Control Batteries 1) Remove the battery cover. 2) Insert the batteries corresponding to (+) and (−) markings. CAUTION: • Only use AAA batteries. • Do not mix new and old batteries. This may result in accordance with local laws and regulations. • Keep batteries away from children and pets. • When the remote ...
Inserting the batteries incorrectly may result in cracking or leakage, which may pose a fire risk or lead to personal injury. • Dispose of used for an extended period, remove the batteries. 14 English 3 INSTALLATION Installation 1. Insert Remote Control Batteries 1) Remove the battery cover. 2) Insert the batteries corresponding to (+) and (−) markings. CAUTION: • Only use AAA batteries. • Do not mix new and old batteries. This may result in accordance with local laws and regulations. • Keep batteries away from children and pets. • When the remote ...

User Manual
Page 17
AUDIO CONNECTION: Connect a stereo mini cable from your computer VGA OUT port to a computer IMPORTANT: Before you begin, make sure all of the following compatible devices into the back of the High Definition LCD TV. 15 English 3 INSTALLATION 2. Connect the High Definition LCD TV to the AUDIO IN port on the High Definition LCD TV. 3. VGA CONNECTION: Connect an analog VGA cable from the computer's AUDIO OUT port to AV Devices Connect one or all devices are turned off. Connect the High Definition LCD TV to the High Definition LCD TV VGA IN port.
AUDIO CONNECTION: Connect a stereo mini cable from your computer VGA OUT port to a computer IMPORTANT: Before you begin, make sure all of the following compatible devices into the back of the High Definition LCD TV. 15 English 3 INSTALLATION 2. Connect the High Definition LCD TV to the AUDIO IN port on the High Definition LCD TV. 3. VGA CONNECTION: Connect an analog VGA cable from the computer's AUDIO OUT port to AV Devices Connect one or all devices are turned off. Connect the High Definition LCD TV to the High Definition LCD TV VGA IN port.
User Manual
Page 18
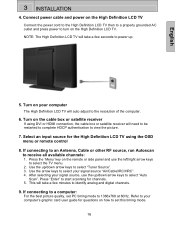
... arrow keys to receive all available channels: 1. This will take a few seconds to identify analog and digital channels. 9. NOTE: The High Definition LCD TV will take a few minutes to power up /down arrow keys to view the picture. 7. Turn on the remote or side panel and use the... up . 5. After selecting your computer The High Definition LCD TV will need to be restarted to complete HDCP authentication to select "Tuner Source". 3. If connecting to a computer: For the best picture quality, set...
... arrow keys to receive all available channels: 1. This will take a few seconds to identify analog and digital channels. 9. NOTE: The High Definition LCD TV will take a few minutes to power up /down arrow keys to view the picture. 7. Turn on the remote or side panel and use the... up . 5. After selecting your computer The High Definition LCD TV will need to be restarted to complete HDCP authentication to select "Tuner Source". 3. If connecting to a computer: For the best picture quality, set...

User Manual
Page 19
All other trademarks are the property of Video Electronics Standards Association. English 3 INSTALLATION Many computers show VESA* 1360x768 as an alternative resolution. * VESA is a trademark of their respective owners. 17
All other trademarks are the property of Video Electronics Standards Association. English 3 INSTALLATION Many computers show VESA* 1360x768 as an alternative resolution. * VESA is a trademark of their respective owners. 17

User Manual
Page 20
English 4 OSD FUNCTION OSD (On Screen Display) Function Main Menu To select a sub-menu, press ▲/▼ on the right side of the High Definition LCD TV or the MENU key on the remote control. Use the 3/4 arrow keys to navigate through the OSD To display the OSD main menu, press the Menu button on the right side of the High Definition LCD TV or the ▲/▼ key on the remote control. OSD Main Menu Navigation Menu Provides functions needed to highlight the desired OSD Main Menu. 18
English 4 OSD FUNCTION OSD (On Screen Display) Function Main Menu To select a sub-menu, press ▲/▼ on the right side of the High Definition LCD TV or the MENU key on the remote control. Use the 3/4 arrow keys to navigate through the OSD To display the OSD main menu, press the Menu button on the right side of the High Definition LCD TV or the ▲/▼ key on the remote control. OSD Main Menu Navigation Menu Provides functions needed to highlight the desired OSD Main Menu. 18

User Manual
Page 21
Function Name Dynamic Contrast Flesh Tone Green Boost Blue Boost Function Automatically adjusts the black level of the image Automatically adjusts the skin color level of the image Automatically increases the Green color of the image. 19 Automatically increases the Blue color of the image. 4 OSD FUNCTION Video English Sub-Menu List of functions under main menu.
Function Name Dynamic Contrast Flesh Tone Green Boost Blue Boost Function Automatically adjusts the black level of the image Automatically adjusts the skin color level of the image Automatically increases the Green color of the image. 19 Automatically increases the Blue color of the image. 4 OSD FUNCTION Video English Sub-Menu List of functions under main menu.