
User Manual
Page 1
... OPTIONS 38 32 INCH HIGH DEFINITION LCD TV SPECIFICATIONS 39 42 INCH HIGH DEFINITION LCD TV SPECIFICATIONS 39 TROUBLESHOOTING...41 CLEANING THE HIGH DEFINITION LCD TV 43 i OSD FUNCTION OSD (ON SCREEN DISPLAY) FUNCTION 18 VIDEO ...19 DISPLAY ...21 TV...22 PC (VGA ONLY) ...23...PASSWORD EDIT 33 INPUT MENUS...34 FAVORITE BUTTONS...35 5. INSTALLATION PACKAGE CONTENTS ...8 FRONT VIEW OF THE HIGH DEFINITION LCD TV 9 SIDE VIEW OF THE HIGH DEFINITION LCD TV 10 REMOTE CONTROL ...13 INSTALLATION ...14 4. A GUIDE TO DIGITAL TELEVISION WHAT IS DIGITAL TELEVISION?...5 A GUIDE TO DIGITAL ...
... OPTIONS 38 32 INCH HIGH DEFINITION LCD TV SPECIFICATIONS 39 42 INCH HIGH DEFINITION LCD TV SPECIFICATIONS 39 TROUBLESHOOTING...41 CLEANING THE HIGH DEFINITION LCD TV 43 i OSD FUNCTION OSD (ON SCREEN DISPLAY) FUNCTION 18 VIDEO ...19 DISPLAY ...21 TV...22 PC (VGA ONLY) ...23...PASSWORD EDIT 33 INPUT MENUS...34 FAVORITE BUTTONS...35 5. INSTALLATION PACKAGE CONTENTS ...8 FRONT VIEW OF THE HIGH DEFINITION LCD TV 9 SIDE VIEW OF THE HIGH DEFINITION LCD TV 10 REMOTE CONTROL ...13 INSTALLATION ...14 4. A GUIDE TO DIGITAL TELEVISION WHAT IS DIGITAL TELEVISION?...5 A GUIDE TO DIGITAL ...

User Manual
Page 5
.... 14. Unplug this apparatus during lightning storms or when unused for long periods of time, unplug the High Definition LCD TV and remove the batteries from the remote control • Only use attachments/accessories specified by the manufacturer, or sold with the cart, stand, tripod, bracket...Use only with the apparatus. Do not use caution when moving it. • If the High Definition LCD TV emits smoke, abnormal noise, or a strange odor, immediately turn it off and contact the Westinghouse Service Center. 3 A grounding type plug has two blades and a third grounding prong. When a ...
.... 14. Unplug this apparatus during lightning storms or when unused for long periods of time, unplug the High Definition LCD TV and remove the batteries from the remote control • Only use attachments/accessories specified by the manufacturer, or sold with the cart, stand, tripod, bracket...Use only with the apparatus. Do not use caution when moving it. • If the High Definition LCD TV emits smoke, abnormal noise, or a strange odor, immediately turn it off and contact the Westinghouse Service Center. 3 A grounding type plug has two blades and a third grounding prong. When a ...

User Manual
Page 9
...current physical channel number and all available channels, and a detailed description of program details will vary depending on the remote control or select EPG from the TV OSD menu to display the Electronic Program Guide. You can use the 'Guide' button on the broadcaster. The ...English 2 A GUIDE TO DIGITAL TELEVISION The Electronic Program Guide Your Westinghouse High Definition LCD TV has an Electronic Program Guide (EPG) to help you navigate through the Electronic Program Guide. • Press Enter (the Enter) button on the remote to step into a sub section or press Back (the Last ...
...current physical channel number and all available channels, and a detailed description of program details will vary depending on the remote control or select EPG from the TV OSD menu to display the Electronic Program Guide. You can use the 'Guide' button on the broadcaster. The ...English 2 A GUIDE TO DIGITAL TELEVISION The Electronic Program Guide Your Westinghouse High Definition LCD TV has an Electronic Program Guide (EPG) to help you navigate through the Electronic Program Guide. • Press Enter (the Enter) button on the remote to step into a sub section or press Back (the Last ...

User Manual
Page 10
TV User's Manual Remote Control & Batteries W. Card Power Cord Warranty Card 8 English 3 INSTALLATION Package Contents Your product package includes: • Westinghouse High Definition LCD TV • Remote Control (with batteries) • Power Cord • User's Manual • Warranty Card LCD -
TV User's Manual Remote Control & Batteries W. Card Power Cord Warranty Card 8 English 3 INSTALLATION Package Contents Your product package includes: • Westinghouse High Definition LCD TV • Remote Control (with batteries) • Power Cord • User's Manual • Warranty Card LCD -

User Manual
Page 11
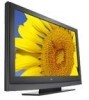
English 3 INSTALLATION Front View of the High Definition LCD TV Use the buttons on the right side of the High Definition LCD TV or the buttons on page 18. LED indicator & "IR" receiver Speakers 9 The OSD controls are defined in "OSD Functions" on the remote control to display the On Screen Display (OSD) menu and adjust the High Definition LCD TV options.
English 3 INSTALLATION Front View of the High Definition LCD TV Use the buttons on the right side of the High Definition LCD TV or the buttons on page 18. LED indicator & "IR" receiver Speakers 9 The OSD controls are defined in "OSD Functions" on the remote control to display the On Screen Display (OSD) menu and adjust the High Definition LCD TV options.
User Manual
Page 15
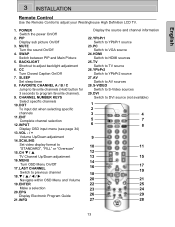
... to YPbPr1 source 23. SLEEP Set sleep timer 8. CHANNEL NUMBER KEYS Select specific channels 10. TV Switch to adjust your Westinghouse High Definition LCD TV. 1. CC Turn Closed Caption On/Off 7. English 3 INSTALLATION Remote Control Use the Remote Control to TV source 26. PIP Display sub picture On/Off 3. DOT To input dot when selecting specific channels...
... to YPbPr1 source 23. SLEEP Set sleep timer 8. CHANNEL NUMBER KEYS Select specific channels 10. TV Switch to adjust your Westinghouse High Definition LCD TV. 1. CC Turn Closed Caption On/Off 7. English 3 INSTALLATION Remote Control Use the Remote Control to TV source 26. PIP Display sub picture On/Off 3. DOT To input dot when selecting specific channels...

User Manual
Page 16
... in accordance with local laws and regulations. • Keep batteries away from children and pets. • When the remote control will not be used for an extended period, remove the batteries. 14 Insert Remote Control Batteries 1) Remove the battery cover. 2) Insert the batteries corresponding to (+) and (−) markings. English 3 INSTALLATION Installation 1. CAUTION...
... in accordance with local laws and regulations. • Keep batteries away from children and pets. • When the remote control will not be used for an extended period, remove the batteries. 14 Insert Remote Control Batteries 1) Remove the battery cover. 2) Insert the batteries corresponding to (+) and (−) markings. English 3 INSTALLATION Installation 1. CAUTION...
User Manual
Page 18
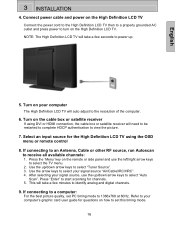
... to your signal source, use the left/right arrow keys to power up /down arrow keys to turn on the remote or side panel and use the up . 5. NOTE: The High Definition LCD TV will take a few minutes to view the picture. 7. Select an input source for channels. 5. If connecting to a...or satellite receiver If using the OSD menu or remote control 8. If connecting to an Antenna, Cable or other RF source, run Autoscan to the resolution of the computer. 6. Use the arrow keys to select your computer The High Definition LCD TV will need to be restarted to complete HDCP ...
... to your signal source, use the left/right arrow keys to power up /down arrow keys to turn on the remote or side panel and use the up . 5. NOTE: The High Definition LCD TV will take a few minutes to view the picture. 7. Select an input source for channels. 5. If connecting to a...or satellite receiver If using the OSD menu or remote control 8. If connecting to an Antenna, Cable or other RF source, run Autoscan to the resolution of the computer. 6. Use the arrow keys to select your computer The High Definition LCD TV will need to be restarted to complete HDCP ...

User Manual
Page 20
English 4 OSD FUNCTION OSD (On Screen Display) Function Main Menu To select a sub-menu, press ▲/▼ on the right side of the High Definition LCD TV or the MENU key on the remote control. OSD Main Menu Navigation Menu Provides functions needed to highlight the desired OSD Main Menu. 18 Use the 3/4 arrow keys to navigate through the OSD To display the OSD main menu, press the Menu button on the right side of the High Definition LCD TV or the ▲/▼ key on the remote control.
English 4 OSD FUNCTION OSD (On Screen Display) Function Main Menu To select a sub-menu, press ▲/▼ on the right side of the High Definition LCD TV or the MENU key on the remote control. OSD Main Menu Navigation Menu Provides functions needed to highlight the desired OSD Main Menu. 18 Use the 3/4 arrow keys to navigate through the OSD To display the OSD main menu, press the Menu button on the right side of the High Definition LCD TV or the ▲/▼ key on the remote control.

User Manual
Page 28
... connection of time: • Off • 30 minutes • 60 minutes • 90 minutes • 120 minutes NOTE: The High Definition LCD TV will detect a new incoming signal and automatically switch the input source to come back from Standby but requires less power • Normal - Enable High ...8226; E. takes longer to come back from Standby but requires more power Turns the LED on the TV on when power is no remote or panel button presses. Sets the High Definition LCD TV to automatically turn off Autosource™ will take a few seconds to go into Standby mode when there...
... connection of time: • Off • 30 minutes • 60 minutes • 90 minutes • 120 minutes NOTE: The High Definition LCD TV will detect a new incoming signal and automatically switch the input source to come back from Standby but requires less power • Normal - Enable High ...8226; E. takes longer to come back from Standby but requires more power Turns the LED on the TV on when power is no remote or panel button presses. Sets the High Definition LCD TV to automatically turn off Autosource™ will take a few seconds to go into Standby mode when there...

User Manual
Page 36
English 4 OSD FUNCTION Input Menus Input Menu PIP Input Menu To change the PIP source, press the PIP button on the remote to display the PIP input menu. The input menu will timeout after 5 seconds and switch to the highlighted input. Use the up /down arrows to ... inputs and the press enter to switch to the input that is currently highlighted. To change the input source, press the Input button on the remote to display the Input Source menu. The input menu will timeout after 5 seconds and switch to the highlighted input. When the input menu is open...
English 4 OSD FUNCTION Input Menus Input Menu PIP Input Menu To change the PIP source, press the PIP button on the remote to display the PIP input menu. The input menu will timeout after 5 seconds and switch to the highlighted input. Use the up /down arrows to ... inputs and the press enter to switch to the input that is currently highlighted. To change the input source, press the Input button on the remote to display the Input Source menu. The input menu will timeout after 5 seconds and switch to the highlighted input. When the input menu is open...

User Manual
Page 37
... FUNCTION Favorite Buttons English Favorite channels are shown. • Use the Red(A), Green(B), and Blue(C) buttons on the remote to add/remove channels. Selecting Channels Remote Control Function Scroll down and press "Enter" to select channel. 35 Scroll down and press "Enter" to select channel.... Storing Channels • Enter the main menu and open the TV sub-menu. • Scroll down and press "Enter"...
... FUNCTION Favorite Buttons English Favorite channels are shown. • Use the Red(A), Green(B), and Blue(C) buttons on the remote to add/remove channels. Selecting Channels Remote Control Function Scroll down and press "Enter" to select channel. 35 Scroll down and press "Enter" to select channel.... Storing Channels • Enter the main menu and open the TV sub-menu. • Scroll down and press "Enter"...

User Manual
Page 42
.... • Go to the video output port on the back of the computer. Saver, the TV will take longer to the source on the High Definition LCD TV. • Verify that the antenna is properly connected. Remote Control Does Not Work • Press only one button at a time. • Make sure ... set. No Picture • Check the video connection. • Make sure the video cable connected to the High Definition LCD TV is tightly secured to www.westinghousedigital.com for a list of remote codes. If so, turn on. Power is suddenly turned off . No Picture when I connect VGA cable or "No ...
.... • Go to the video output port on the back of the computer. Saver, the TV will take longer to the source on the High Definition LCD TV. • Verify that the antenna is properly connected. Remote Control Does Not Work • Press only one button at a time. • Make sure ... set. No Picture • Check the video connection. • Make sure the video cable connected to the High Definition LCD TV is tightly secured to www.westinghousedigital.com for a list of remote codes. If so, turn on. Power is suddenly turned off . No Picture when I connect VGA cable or "No ...

User Manual
Page 43
..." to SAP or minimum. • Press the Volume + (Up) key on the remote control. The High Definition LCD TV audio may cause impaired autosource operation. How Can I Find More Help? 42 AUDIO Interconnection Issues • Remember that continue to another computer. Blocky images appear in the... cable connector could cause an improper connection. • Connect the High Definition LCD TV to keep a link active, thus this may ...
..." to SAP or minimum. • Press the Volume + (Up) key on the remote control. The High Definition LCD TV audio may cause impaired autosource operation. How Can I Find More Help? 42 AUDIO Interconnection Issues • Remember that continue to another computer. Blocky images appear in the... cable connector could cause an improper connection. • Connect the High Definition LCD TV to keep a link active, thus this may ...


