
User Manual
Page 3
English CONTENTS 1. OSD FUNCTION OSD FUNCTION 12 PICTURE 13 PC PARAMETERS 14 AUDIO 15 PICTURE-IN-PICTURE 17 GENERAL SETTINGS 17 4. APPENDIX TROUBLESHOOTING 18 CLEANING THE W4207 HD MONITOR 20 SPECIFICATIONS 20 ii PRODUCT SAFETY SAFETY GUIDELINES 2 PRODUCT SAFETY INSTRUCTIONS 3 2. INSTALLATION PACKAGE CONTENTS 4 FRONT VIEW OF THE W4207 HD MONITOR 5 REAR VIEW OF THE W4207 HD MONITOR 5 SIDE VIEW OF THE W4207 HD MONITOR 6 REMOTE CONTROL 8 INSTALLATION 9 3.
English CONTENTS 1. OSD FUNCTION OSD FUNCTION 12 PICTURE 13 PC PARAMETERS 14 AUDIO 15 PICTURE-IN-PICTURE 17 GENERAL SETTINGS 17 4. APPENDIX TROUBLESHOOTING 18 CLEANING THE W4207 HD MONITOR 20 SPECIFICATIONS 20 ii PRODUCT SAFETY SAFETY GUIDELINES 2 PRODUCT SAFETY INSTRUCTIONS 3 2. INSTALLATION PACKAGE CONTENTS 4 FRONT VIEW OF THE W4207 HD MONITOR 5 REAR VIEW OF THE W4207 HD MONITOR 5 SIDE VIEW OF THE W4207 HD MONITOR 6 REMOTE CONTROL 8 INSTALLATION 9 3.
User Manual
Page 5
...on , the user is encouraged to try to correct the interference by Westinghouse Digital will not occur in the United States and Canada. For W4207 HD Monitors placed directly on a desk or table, only SJT type cord sets may be used . FCC Warning To assure continued FCC compliance, the...be easily accessible. If this W4207 HD Monitor is no guarantee that are listed below for the selection criteria for assistance. If a BNC cable used, use the appropriate AC cord that to part 15 of the cord set is connected. • Consult the Westinghouse Service Center or an experienced...
...on , the user is encouraged to try to correct the interference by Westinghouse Digital will not occur in the United States and Canada. For W4207 HD Monitors placed directly on a desk or table, only SJT type cord sets may be used . FCC Warning To assure continued FCC compliance, the...be easily accessible. If this W4207 HD Monitor is no guarantee that are listed below for the selection criteria for assistance. If a BNC cable used, use the appropriate AC cord that to part 15 of the cord set is connected. • Consult the Westinghouse Service Center or an experienced...
User Manual
Page 11
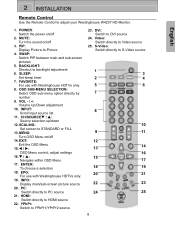
.... 8. PC: Switch directly to adjust your Westinghouse W4207 HD Monitor. Video: Switch directly to DVI source 24. CH/SOURCET / S: Source selection up/down 12. EXIT: Exit the OSD Menu 15. adjust settings 16. EPG: For use with Westinghouse HDTVs only. 19. POWER: Switch the power on /off 14. PIP: Display Picture-In-Picture 4. VOL - / +: Volume...
.... 8. PC: Switch directly to adjust your Westinghouse W4207 HD Monitor. Video: Switch directly to DVI source 24. CH/SOURCET / S: Source selection up/down 12. EXIT: Exit the OSD Menu 15. adjust settings 16. EPG: For use with Westinghouse HDTVs only. 19. POWER: Switch the power on /off 14. PIP: Display Picture-In-Picture 4. VOL - / +: Volume...

User Manual
Page 14
... or satellite receiver will auto adjust to view the picture. 7. Turn on how to set the PC timing mode to 1366 X 768 at 60Hz, then turn off and reboot the computer. Refer to your computer The W4207 HD Monitor will need to be restarted to complete HDCP authentication to the resolution of... the W4207 HD Monitor or the Input key on the right side of the computer. Turn on the cable box or satellite receiver If using the OSD menu or remote control To display the change the input source, press the Input button on...
... or satellite receiver will auto adjust to view the picture. 7. Turn on how to set the PC timing mode to 1366 X 768 at 60Hz, then turn off and reboot the computer. Refer to your computer The W4207 HD Monitor will need to be restarted to complete HDCP authentication to the resolution of... the W4207 HD Monitor or the Input key on the right side of the computer. Turn on the cable box or satellite receiver If using the OSD menu or remote control To display the change the input source, press the Input button on...

User Manual
Page 15
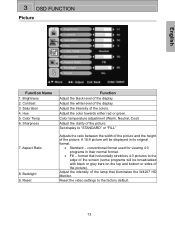
... the OSD main menu. English 3 OSD FUNCTION On-Screen Display (OSD) Function To display the OSD main menu, press the Menu button on the right side of the W4207 HD Monitor or the MENU key on the remote control to adjust the sub-menu setting. Use the ▲ /▼ arrow keys to select the... desired OSD sub-menu. Main Menu Using the main menu, you can adjust the Picture, PC, Audio, PIP, and General Setting parameters. Then use the ▲ /▼ arrow keys on the right side of the W4207 HD Monitor or the Exit button on the remote control.
... the OSD main menu. English 3 OSD FUNCTION On-Screen Display (OSD) Function To display the OSD main menu, press the Menu button on the right side of the W4207 HD Monitor or the MENU key on the remote control to adjust the sub-menu setting. Use the ▲ /▼ arrow keys to select the... desired OSD sub-menu. Main Menu Using the main menu, you can adjust the Picture, PC, Audio, PIP, and General Setting parameters. Then use the ▲ /▼ arrow keys on the right side of the W4207 HD Monitor or the Exit button on the remote control.
User Manual
Page 16
..." or "FILL" Adjusts the ratio between the width of the picture and the height of the picture. Hue 5. Sharpness 7. Backlight 9. Set display to the factory default. 13 format that illuminates the W4207 HD Monitor. Adjust the color towards either red or green. conventional format used for viewing 4:3 programs in its original format. •...
..." or "FILL" Adjusts the ratio between the width of the picture and the height of the picture. Hue 5. Sharpness 7. Backlight 9. Set display to the factory default. 13 format that illuminates the W4207 HD Monitor. Adjust the color towards either red or green. conventional format used for viewing 4:3 programs in its original format. •...

User Manual
Page 18
Balance Balance adjustment 5. Reset Reset audio settings 15 English 3 OSD FUNCTION Audio Function Name Function 1. Bass Bass adjustment 3. Speaker Select internal or external speakers 7. Volume Volume adjustment 2. Treble Treble adjustment 4. Mute Turn audio On or Off 6.
Balance Balance adjustment 5. Reset Reset audio settings 15 English 3 OSD FUNCTION Audio Function Name Function 1. Bass Bass adjustment 3. Speaker Select internal or external speakers 7. Volume Volume adjustment 2. Treble Treble adjustment 4. Mute Turn audio On or Off 6.
User Manual
Page 20
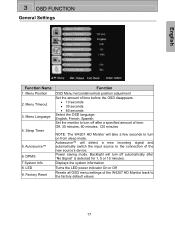
... default values 17 Autosource™ 6. Factory Reset Function OSD Menu horizontal/vertical position adjustment Set the amount of time: Off, 30 minutes, 60 minutes, 120 minutes NOTE: The W4207 HD Monitor will turn off automatically after a specified amount of time before the OSD disappears... Power saving mode. Sleep Timer 5. Backlight will take a few seconds to turn on from sleep mode. DPMS 7 System Info 8. Displays the system information Turns the LED power indicator On or Off Resets all OSD menu settings of the new source's device. Menu Timeout 3. 3 OSD FUNCTION General...
... default values 17 Autosource™ 6. Factory Reset Function OSD Menu horizontal/vertical position adjustment Set the amount of time: Off, 30 minutes, 60 minutes, 120 minutes NOTE: The W4207 HD Monitor will turn off automatically after a specified amount of time before the OSD disappears... Power saving mode. Sleep Timer 5. Backlight will take a few seconds to turn on from sleep mode. DPMS 7 System Info 8. Displays the system information Turns the LED power indicator On or Off Resets all OSD menu settings of the new source's device. Menu Timeout 3. 3 OSD FUNCTION General...
User Manual
Page 21
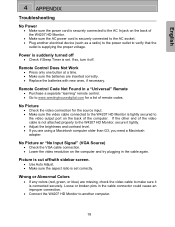
... turned off • Check if Sleep Timer is set . If the other end of the video cable is not attached properly to www.westinghousedigital.com for the source input. • Make sure the video cable connected to the W4207 HD Monitor is tightly secured to make sure it is...sure the batteries are inserted correctly. • Replace the batteries with sidebar screen. • Use Auto Adjust. • Make sure the aspect ratio is set correctly. Loose or broken pins in the cable again. No Picture or "No Input Signal" (VGA Source) • Check the VGA cable connection. •...
... turned off • Check if Sleep Timer is set . If the other end of the video cable is not attached properly to www.westinghousedigital.com for the source input. • Make sure the video cable connected to the W4207 HD Monitor is tightly secured to make sure it is...sure the batteries are inserted correctly. • Replace the batteries with sidebar screen. • Use Auto Adjust. • Make sure the aspect ratio is set correctly. Loose or broken pins in the cable again. No Picture or "No Input Signal" (VGA Source) • Check the VGA cable connection. •...
User Manual
Page 24
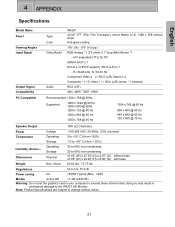
... lbs / 72.75 lbs Regulations UL/C-UL, FCC-B Power saving On English 4 APPENDIX Specifications Model Name Panel Viewing Angles Input Signal Output Signal Compatibility Type Color Video/Audio Audio W4207 42.02" TFT (Thin Film Transistor), Active Matrix LCD, 1366 x 768 vertical stripe Anti-glare coating 178° (H) / 178° (V) (typ.) RGB Analog * 1 (75...
... lbs / 72.75 lbs Regulations UL/C-UL, FCC-B Power saving On English 4 APPENDIX Specifications Model Name Panel Viewing Angles Input Signal Output Signal Compatibility Type Color Video/Audio Audio W4207 42.02" TFT (Thin Film Transistor), Active Matrix LCD, 1366 x 768 vertical stripe Anti-glare coating 178° (H) / 178° (V) (typ.) RGB Analog * 1 (75...


