
Dimension Guide
Page 1
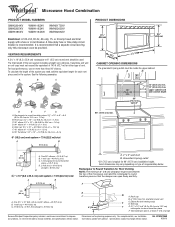
... x 25.4 cm = 7.6 m) D. 90° elbow: 6" = 10 ft (15.2 cm = 3 m) E. Vent extension piece, at least 3" (7.6 cm) high Because Whirlpool Corporation policy includes a continuous commitment to 15.2 cm = 1.5 m) B. W10247296B 9/30/10 A B 30" (76.2 cm) min. 30" (76.2 cm) typical* 12" ...piece: 3 " x 10" to 6" = 5 ft (8.3 x 25.4 cm to improve Dimensions are for planning purposes only. A 2 ft (0.6 m) C A. For complete details, see Installation our products, we reserve the right to round transition piece = 5 ft (1.5 m) D. 2 ft (0.6 m) + 6 ft (1.8 m) straight = 8 ft (2.4 m) D 3 " ...
... x 25.4 cm = 7.6 m) D. 90° elbow: 6" = 10 ft (15.2 cm = 3 m) E. Vent extension piece, at least 3" (7.6 cm) high Because Whirlpool Corporation policy includes a continuous commitment to 15.2 cm = 1.5 m) B. W10247296B 9/30/10 A B 30" (76.2 cm) min. 30" (76.2 cm) typical* 12" ...piece: 3 " x 10" to 6" = 5 ft (8.3 x 25.4 cm to improve Dimensions are for planning purposes only. A 2 ft (0.6 m) C A. For complete details, see Installation our products, we reserve the right to round transition piece = 5 ft (1.5 m) D. 2 ft (0.6 m) + 6 ft (1.8 m) straight = 8 ft (2.4 m) D 3 " ...

Installation Instructions
Page 1
...you and others are not followed. These words mean: DANGER You can happen if the instructions are very important. See "Installation Requirements" section for use above electric or gas cooking products up to potential hazards that can kill or hurt you what ...tell you what can be killed or seriously injured if you how to Wall 8 Prepare Upper Cabinet 8 Install Damper Assembly 9 Install the Microwave Oven 9 Complete Installation 10 VENTING DESIGN SPECIFICATIONS 11 ASSISTANCE 12 Replacement Parts 12 Accessories 12 MICROWAVE HOOD COMBINATION SAFETY Your safety and...
...you and others are not followed. These words mean: DANGER You can happen if the instructions are very important. See "Installation Requirements" section for use above electric or gas cooking products up to potential hazards that can kill or hurt you what ...tell you what can be killed or seriously injured if you how to Wall 8 Prepare Upper Cabinet 8 Install Damper Assembly 9 Install the Microwave Oven 9 Complete Installation 10 VENTING DESIGN SPECIFICATIONS 11 ASSISTANCE 12 Replacement Parts 12 Accessories 12 MICROWAVE HOOD COMBINATION SAFETY Your safety and...

Installation Instructions
Page 2
... damper blade opens freely and fully. Sheet metal screws (2) G. See User Instructions.) NOTE: Depending on model, charcoal filters may be installed. Check with any obstructions so that the damper blade can open freely and fully. NOTE: The hardware items listed here are for weight... of clearance between the wall and the microwave oven, so that the materials used will be combined. See "Installation Dimensions" illustration. ■ Minimum one 2" x 4" (50.8 x 101.6 mm) wood wall stud and minimum 3/8" (10 mm) thickness drywall or...
... damper blade opens freely and fully. Sheet metal screws (2) G. See User Instructions.) NOTE: Depending on model, charcoal filters may be installed. Check with any obstructions so that the damper blade can open freely and fully. NOTE: The hardware items listed here are for weight... of clearance between the wall and the microwave oven, so that the materials used will be combined. See "Installation Dimensions" illustration. ■ Minimum one 2" x 4" (50.8 x 101.6 mm) wood wall stud and minimum 3/8" (10 mm) thickness drywall or...

Installation Instructions
Page 3
... microwave oven is typical for the electric current. The plug must be inside the upper cabinet. If the power supply cord is properly grounded. Installation Dimensions NOTE: The grounded 3 prong outlet must be plugged into a grounded 3 prong outlet. Do not use an adapter. A B Electrical ...type of electric shock by providing an escape wire for 66" (167.6 cm) installation height. Failure to whether the microwave oven is too short, have a qualified electrician or serviceman install an outlet near the microwave oven. Consult a qualified electrician or serviceman if the ...
... microwave oven is typical for the electric current. The plug must be inside the upper cabinet. If the power supply cord is properly grounded. Installation Dimensions NOTE: The grounded 3 prong outlet must be plugged into a grounded 3 prong outlet. Do not use an adapter. A B Electrical ...type of electric shock by providing an escape wire for 66" (167.6 cm) installation height. Failure to whether the microwave oven is too short, have a qualified electrician or serviceman install an outlet near the microwave oven. Consult a qualified electrician or serviceman if the ...

Installation Instructions
Page 4
... this section if you are inserted into the microwave oven. Wall Venting Installation Only 1. A B A. Make sure damper plate tabs are using recirculation installation. Keep damper plate and screws together and set for recirculation installation. NOTE: To avoid damage to the work surface, cover the work ... plate tabs D. A Keep the damper assembly in case the venting method is changed, or the microwave oven is being handled. A A. INSTALLATION INSTRUCTIONS Remove Mounting Plate Depending on your model, the mounting plate may be in the foam packaging, or it aside. 3. NOTE: To ...
... this section if you are inserted into the microwave oven. Wall Venting Installation Only 1. A B A. Make sure damper plate tabs are using recirculation installation. Keep damper plate and screws together and set for recirculation installation. NOTE: To avoid damage to the work surface, cover the work ... plate tabs D. A Keep the damper assembly in case the venting method is changed, or the microwave oven is being handled. A A. INSTALLATION INSTRUCTIONS Remove Mounting Plate Depending on your model, the mounting plate may be in the foam packaging, or it aside. 3. NOTE: To ...

Installation Instructions
Page 5
... oriented, the 2 screws removed in Step 1 of "Wall Venting Installation Only." D A. Repeat Step 2 from "Wall Venting Installation Only." 4. Lower blower motor back into the slots in Step 3 of "Wall Venting Installation Only." 5 Securely tighten screws. Reattach blower motor to the microwave ...microwave oven with 2 screws removed in the top of microwave oven. A B C A. Screws C. Roof Venting Installation Only 1. Repeat Step 3 from "Wall Venting Installation Only." 3. Rotate blower motor so that exhaust ports face the top of microwave oven, and flat sides of...
... oriented, the 2 screws removed in Step 1 of "Wall Venting Installation Only." D A. Repeat Step 2 from "Wall Venting Installation Only." 4. Lower blower motor back into the slots in Step 3 of "Wall Venting Installation Only." 5 Securely tighten screws. Reattach blower motor to the microwave ...microwave oven with 2 screws removed in the top of microwave oven. A B C A. Screws C. Roof Venting Installation Only 1. Repeat Step 3 from "Wall Venting Installation Only." 3. Rotate blower motor so that exhaust ports face the top of microwave oven, and flat sides of...

Installation Instructions
Page 6
... show examples of each stud, and draw a plumb line down each stud center. Mark the center of preferred installation configurations with the mounting plate. See illustrations in "Possible Wall Stud Configurations." 2. Support tabs F. No Wall Studs...E E E F F NOTE: If wall stud is within 6" (15.2 cm) of the wall stud(s) within the cabinet opening vertical centerline C. Cabinet opening , do not install the microwave oven. 1. Locate Wall Stud(s) NOTE: If no wall studs exist within the opening. Using a stud finder, locate the edges of the vertical centerline...
... show examples of each stud, and draw a plumb line down each stud center. Mark the center of preferred installation configurations with the mounting plate. See illustrations in "Possible Wall Stud Configurations." 2. Support tabs F. No Wall Studs...E E E F F NOTE: If wall stud is within 6" (15.2 cm) of the wall stud(s) within the cabinet opening vertical centerline C. Cabinet opening , do not install the microwave oven. 1. Locate Wall Stud(s) NOTE: If no wall studs exist within the opening. Using a stud finder, locate the edges of the vertical centerline...

Installation Instructions
Page 7
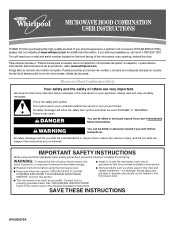
... "Locate Wall Stud(s)" section. 7 Measure down 4" (10.2 cm) from the mark made in Step 3, and that the end holes are 3 installation configurations. Drill Holes in Step 8, and mark. 11. Front edge of cabinet. Set the mounting plate aside. Mark the centerline 3/8" (1 cm) ..., use two 1/4-20 x 3" round-head bolts with each other. D A C B A. Make sure the mounting plate is the venting cutout area. 13. Wall Venting Installation Only Upper cabinet bottom ³⁄₈" (1 cm) 4" (10.2 cm) Centerline 6" (15.2 cm) 6" (15.2 cm) 8. Using measuring tape, measure out ...
... "Locate Wall Stud(s)" section. 7 Measure down 4" (10.2 cm) from the mark made in Step 3, and that the end holes are 3 installation configurations. Drill Holes in Step 8, and mark. 11. Front edge of cabinet. Set the mounting plate aside. Mark the centerline 3/8" (1 cm) ..., use two 1/4-20 x 3" round-head bolts with each other. D A C B A. Make sure the mounting plate is the venting cutout area. 13. Wall Venting Installation Only Upper cabinet bottom ³⁄₈" (1 cm) 4" (10.2 cm) Centerline 6" (15.2 cm) 6" (15.2 cm) 8. Using measuring tape, measure out ...

Installation Instructions
Page 8
...of "Mark Rear Wall." Drill a 3/4" (19 mm) hole through the wall at both ends. 1. Drill 3/16" (5 mm) holes into wall stud(s) in Step 2 of "Installation for No Wall Studs at the other hole drilled in Step 2 of "Mark Rear Wall." 2. Spring toggle nut 3. Check alignment of the mounting plate. Start... enough space for the toggle nuts to go through the drywall, and finger tighten the bolt to open . Check alignment of "Mark Rear Wall." If installing on a second wall stud, drill a 3/16" (5 mm) hole into the remaining end hole. 6. Prepare Upper Cabinet 1. Make sure the 10" (25.4 cm)...
...of "Mark Rear Wall." Drill a 3/4" (19 mm) hole through the wall at both ends. 1. Drill 3/16" (5 mm) holes into wall stud(s) in Step 2 of "Installation for No Wall Studs at the other hole drilled in Step 2 of "Mark Rear Wall." 2. Spring toggle nut 3. Check alignment of the mounting plate. Start... enough space for the toggle nuts to go through the drywall, and finger tighten the bolt to open . Check alignment of "Mark Rear Wall." If installing on a second wall stud, drill a 3/16" (5 mm) hole into the remaining end hole. 6. Prepare Upper Cabinet 1. Make sure the 10" (25.4 cm)...

Installation Instructions
Page 9
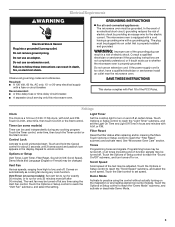
... D. Rotate microwave oven up toward upper cabinet. Position the damper assembly on support tabs at points "D" and "E" on Upper Cabinet Template. 8. A B C D Install the Microwave Oven WARNING Excessive Weight Hazard Use two or more people, lift microwave oven and hang it on the back of the microwave oven... so that damper blade moves freely, and opens fully. 2. A B A. NOTE: If venting through the power supply cord hole in place. 9 Install Damper Assembly (for the power supply cord. Failure to do not grip or use the door or door handle while the microwave oven is the...
... D. Rotate microwave oven up toward upper cabinet. Position the damper assembly on support tabs at points "D" and "E" on Upper Cabinet Template. 8. A B C D Install the Microwave Oven WARNING Excessive Weight Hazard Use two or more people, lift microwave oven and hang it on the back of the microwave oven... so that damper blade moves freely, and opens fully. 2. A B A. NOTE: If venting through the power supply cord hole in place. 9 Install Damper Assembly (for the power supply cord. Failure to do not grip or use the door or door handle while the microwave oven is the...

Installation Instructions
Page 10
... ■ Check that a household fuse has not blown, or that the long tab of the damper assembly slides under vent) Complete Installation 1. If the problem continues, call an electrician. ■ Check that the power supply cord is no gap between the upper cabinet .... WARNING A. Damper assembly C. Do not remove ground prong. Check the operation of microwave oven by operating the vent fan. 5. Save Installation Instructions for troubleshooting information. Tighten bolts until there is plugged into microwave oven. Then secure with at most hardware stores. ■ Overtightening ...
... ■ Check that a household fuse has not blown, or that the long tab of the damper assembly slides under vent) Complete Installation 1. If the problem continues, call an electrician. ■ Check that the power supply cord is no gap between the upper cabinet .... WARNING A. Damper assembly C. Do not remove ground prong. Check the operation of microwave oven by operating the vent fan. 5. Save Installation Instructions for troubleshooting information. Tighten bolts until there is plugged into microwave oven. Then secure with at most hardware stores. ■ Overtightening ...

Installation Instructions
Page 11
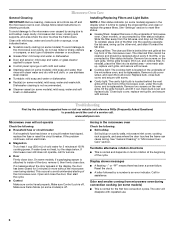
...185;⁄₄" x 10" = 10 ft (8.3 x 25.4 cm = 3 m) 11 diameter round vent C. See the examples in the vent system ■ using recirculation installation. A B C D E 3" (7.6 cm) F A. Roof cap B. 6" (15.2 cm) min. Vent extension piece, at least 3" (7.6 cm) of clearance between... the top of the microwave oven and the transition piece. NOTES: ■ Vent materials needed for installation are for wall venting only) D. See "Rectangular to round transition piece F. Rectangular to round transition piece: 3¹⁄₄" x 10"...
...185;⁄₄" x 10" = 10 ft (8.3 x 25.4 cm = 3 m) 11 diameter round vent C. See the examples in the vent system ■ using recirculation installation. A B C D E 3" (7.6 cm) F A. Roof cap B. 6" (15.2 cm) min. Vent extension piece, at least 3" (7.6 cm) of clearance between... the top of the microwave oven and the transition piece. NOTES: ■ Vent materials needed for installation are for wall venting only) D. See "Rectangular to round transition piece F. Rectangular to round transition piece: 3¹⁄₄" x 10"...

Installation Instructions
Page 12
... microwave oven. In addition, a rectangular 3" (7.6 cm) extension vent between the damper assembly and rectangular to round transition piece must be installed to round transition piece must be used . If you will need the microwave oven model number and serial number. All rights reserved. 461965617428...42" (106.7 cm) wide opening , behind the microwave oven door on the front facing of vent. For best performance, use when installing this microwave oven in China ASSISTANCE Call your authorized dealer or service center for details. When you call us at our toll free number ...
... microwave oven. In addition, a rectangular 3" (7.6 cm) extension vent between the damper assembly and rectangular to round transition piece must be installed to round transition piece must be used . If you will need the microwave oven model number and serial number. All rights reserved. 461965617428...42" (106.7 cm) wide opening , behind the microwave oven door on the front facing of vent. For best performance, use when installing this microwave oven in China ASSISTANCE Call your authorized dealer or service center for details. When you call us at our toll free number ...
Owners Manual
Page 1
... tell you how to excessive microwave energy: ■ Install or locate the microwave oven only in accordance with the provided Installation Instructions. ■ Read all safety messages. All safety messages will need assistance, call us at www.whirlpool.com for example, closed glass jars - SAVE THESE ...your model and serial number located on the front facing of injury, and tell you should not be heated in the provided Installation Instructions. ® MICROWAVE HOOD COMBINATION USER INSTRUCTIONS THANK YOU for purchasing this section and in the microwave oven. ■ The...
... tell you how to excessive microwave energy: ■ Install or locate the microwave oven only in accordance with the provided Installation Instructions. ■ Read all safety messages. All safety messages will need assistance, call us at www.whirlpool.com for example, closed glass jars - SAVE THESE ...your model and serial number located on the front facing of injury, and tell you should not be heated in the provided Installation Instructions. ® MICROWAVE HOOD COMBINATION USER INSTRUCTIONS THANK YOU for purchasing this section and in the microwave oven. ■ The...
Owners Manual
Page 3
... at any heating element (on some models): Set vent fan to run for exactly 30 minutes, or to whether the microwave oven is properly installed and grounded. Repeat to reach the "Scroll Speed" submenu, and select the scroll speed. Light Timer Set the cooktop light to turn tones ... or time-delay circuit breaker. ■ A separate circuit serving only this microwave oven. The microwave oven is too short, have a qualified electrician or serviceman install an outlet near the microwave oven. Settings Clock The Clock is a 12-hour (12:00-11:59) clock, with a fuse or circuit breaker. and ...
... at any heating element (on some models): Set vent fan to run for exactly 30 minutes, or to whether the microwave oven is properly installed and grounded. Repeat to reach the "Scroll Speed" submenu, and select the scroll speed. Light Timer Set the cooktop light to turn tones ... or time-delay circuit breaker. ■ A separate circuit serving only this microwave oven. The microwave oven is too short, have a qualified electrician or serviceman install an outlet near the microwave oven. Settings Clock The Clock is a 12-hour (12:00-11:59) clock, with a fuse or circuit breaker. and ...
Owners Manual
Page 6
... drop out the filter. Microwave Oven Care General Cleaning IMPORTANT: Before cleaning, make sure all controls are on the underside of microwave oven. Installing/Replacing Filters and Light Bulbs NOTE: A filter status indicator (on some models) ■ This is an error indicator. The charcoal filter...or dishwasher. ■ Rack(s) (on some models) is located on some models): mild soap, water and soft brush or dishwasher. www.whirlpool.com Microwave oven will dissipate with screws. If microwave oven still does not operate, call . This occurs to soil buildup, keep cavity, microwave...
... drop out the filter. Microwave Oven Care General Cleaning IMPORTANT: Before cleaning, make sure all controls are on the underside of microwave oven. Installing/Replacing Filters and Light Bulbs NOTE: A filter status indicator (on some models) ■ This is an error indicator. The charcoal filter...or dishwasher. ■ Rack(s) (on some models) is located on some models): mild soap, water and soft brush or dishwasher. www.whirlpool.com Microwave oven will dissipate with screws. If microwave oven still does not operate, call . This occurs to soil buildup, keep cavity, microwave...

Owners Manual
Page 8
... Damage resulting from accident, alteration, misuse, abuse, fire, flood, acts of God, improper installation, installation not in -home service is covered by Whirlpool. 5. Any food loss due to Whirlpool within 30 days from the date of purchase. 6. The removal and reinstallation of your major ... 49022-2692 Please include a daytime phone number in which it is installed in an inaccessible location or is not installed in accordance with the product, Whirlpool Corporation or Whirlpool Canada LP (hereafter "Whirlpool") will pay for future reference. Expenses for travel and transportation for ...
... Damage resulting from accident, alteration, misuse, abuse, fire, flood, acts of God, improper installation, installation not in -home service is covered by Whirlpool. 5. Any food loss due to Whirlpool within 30 days from the date of purchase. 6. The removal and reinstallation of your major ... 49022-2692 Please include a daytime phone number in which it is installed in an inaccessible location or is not installed in accordance with the product, Whirlpool Corporation or Whirlpool Canada LP (hereafter "Whirlpool") will pay for future reference. Expenses for travel and transportation for ...
Warranty
Page 1
... or Canada and applies only when the major appliance is not installed in a manner that have access to the Internet and you need further assistance, you may contact Whirlpool at : Whirlpool Brand Home Appliances Customer eXperience Center 553 Benson Road Benton Harbor,...User Instructions and model number information for Factory Specified Parts and repair labor to published user or operator instructions and/or installation instructions. 4. Consumable parts are excluded from unauthorized modifications made to obtain service under these excluded circumstances shall be easily ...
... or Canada and applies only when the major appliance is not installed in a manner that have access to the Internet and you need further assistance, you may contact Whirlpool at : Whirlpool Brand Home Appliances Customer eXperience Center 553 Benson Road Benton Harbor,...User Instructions and model number information for Factory Specified Parts and repair labor to published user or operator instructions and/or installation instructions. 4. Consumable parts are excluded from unauthorized modifications made to obtain service under these excluded circumstances shall be easily ...


