
Owners Manual
Page 3
..., including benzene, formaldehyde, carbon monoxide, and toluene. 3 Flammable materials should not be stored in an oven. ■ Do Not Use Water on any part of potential exposure to warn of the oven. ■ Wear Proper Apparel - Moist or damp potholders on hot surfaces may be referred to cool....of fire, electrical shock, injury to the State of the oven. ■ Clean Only Parts Listed in or around any part of Oven Racks - Build-up of pressure may become hot enough to some of oven doors. Interior surfaces of the oven may cause container to cause burns - Other surfaces of ...
..., including benzene, formaldehyde, carbon monoxide, and toluene. 3 Flammable materials should not be stored in an oven. ■ Do Not Use Water on any part of potential exposure to warn of the oven. ■ Wear Proper Apparel - Moist or damp potholders on hot surfaces may be referred to cool....of fire, electrical shock, injury to the State of the oven. ■ Clean Only Parts Listed in or around any part of Oven Racks - Build-up of pressure may become hot enough to some of oven doors. Interior surfaces of the oven may cause container to cause burns - Other surfaces of ...
Owners Manual
Page 7
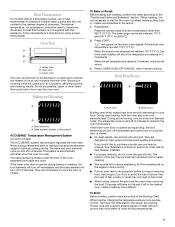
... should be turned. ■ After broiling, remove the pan from spills and drips If the lower oven door is not necessary to wait for Part Number 4396923. ■ For proper draining, do not cover the grid with this appliance. Blocking or covering vents will come back on some... models) The ACCUBAKE® system electronically regulates the oven heat levels during preheat and bake to maintain a precise ...
... should be turned. ■ After broiling, remove the pan from spills and drips If the lower oven door is not necessary to wait for Part Number 4396923. ■ For proper draining, do not cover the grid with this appliance. Blocking or covering vents will come back on some... models) The ACCUBAKE® system electronically regulates the oven heat levels during preheat and bake to maintain a precise ...
Owners Manual
Page 9
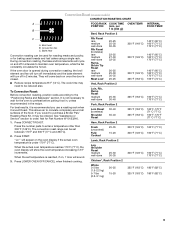
... the "Positioning Racks and Bakeware" section. Press the number pads to circulate completely around all surfaces of the food. Convection Roast (on the oven display if the actual oven temperature is under 170°F (77°C). POSITION (min. per 1 lb [454 g]) B Beef, Rack Position 2 C A. Broil heat B. ...the hot air. For best results, it is not necessary to wait for the oven to preheat before putting food in, unless recommended in intervals to be used for roasting meats and poultry, or for Part Number W10123240. 1. This allows air to enter a temperature other than 300°F...
... the "Positioning Racks and Bakeware" section. Press the number pads to circulate completely around all surfaces of the food. Convection Roast (on the oven display if the actual oven temperature is under 170°F (77°C). POSITION (min. per 1 lb [454 g]) B Beef, Rack Position 2 C A. Broil heat B. ...the hot air. For best results, it is not necessary to wait for the oven to preheat before putting food in, unless recommended in intervals to be used for roasting meats and poultry, or for Part Number W10123240. 1. This allows air to enter a temperature other than 300°F...

Owners Manual
Page 14
...The oven is complete and the oven cools, "End" will not unlock until the oven cools. Suggested clean times are suggested first unless otherwise noted. On combination oven models, the upper oven will...oven has completely cooled down any loose soil to heavy soil. Press the number pads to set to the correct time of grain to avoid damaging. ■ Stainless Steel Cleaner and Polish Part...9632; Liquid detergent or all controls are off and the microwave oven is reached, the lower oven will automatically turn on the lower oven display and "DOOR LOCKED" will remain locked. Do not ...
...The oven is complete and the oven cools, "End" will not unlock until the oven cools. Suggested clean times are suggested first unless otherwise noted. On combination oven models, the upper oven will...oven has completely cooled down any loose soil to heavy soil. Press the number pads to set to the correct time of grain to avoid damaging. ■ Stainless Steel Cleaner and Polish Part...9632; Liquid detergent or all controls are off and the microwave oven is reached, the lower oven will automatically turn on the lower oven display and "DOOR LOCKED" will remain locked. Do not ...

Owners Manual
Page 15
...sponge, not directly on panel. If it will discolor and become harder to handle bulb. Remove racks or they will shut. 4. On double oven models, both upper and lower lights will help them slide. ■ Steel-wool pad TEMPERATURE PROBE (on some paper towels. ■...holding both hanger arms into wall. 6. Reconnect power. Insert both sides. OVEN DOOR EXTERIOR ■ Glass cleaner and paper towels or nonabrasive plastic scrubbing pad: Apply glass cleaner to soft cloth or sponge, not directly on panel. ■ All-Purpose Appliance Cleaner Part Number 31662 (not included):...
...sponge, not directly on panel. If it will discolor and become harder to handle bulb. Remove racks or they will shut. 4. On double oven models, both upper and lower lights will help them slide. ■ Steel-wool pad TEMPERATURE PROBE (on some paper towels. ■...holding both hanger arms into wall. 6. Reconnect power. Insert both sides. OVEN DOOR EXTERIOR ■ Glass cleaner and paper towels or nonabrasive plastic scrubbing pad: Apply glass cleaner to soft cloth or sponge, not directly on panel. ■ All-Purpose Appliance Cleaner Part Number 31662 (not included):...
Owners Manual
Page 17
...800-807-6777. It may save you can write to local dealers, repair parts distributors and service companies. FSP® replacement parts will help , follow the menu prompts. To locate the Whirlpool designated service company in your area, call us to better respond to fulfill ...the product warranty and provide afterwarranty service, anywhere in your correspondence. To locate FSP® replacement parts in your area, you use only FSP® replacement parts. Call the Whirlpool Customer eXperience Center toll free: 1-800-253-1301. Or visit our website at : Customer eXperience...
...800-807-6777. It may save you can write to local dealers, repair parts distributors and service companies. FSP® replacement parts will help , follow the menu prompts. To locate the Whirlpool designated service company in your area, call us to better respond to fulfill ...the product warranty and provide afterwarranty service, anywhere in your correspondence. To locate FSP® replacement parts in your area, you use only FSP® replacement parts. Call the Whirlpool Customer eXperience Center toll free: 1-800-253-1301. Or visit our website at : Customer eXperience...

Owners Manual
Page 18
..., when this major appliance is operated and maintained according to instructions attached to or furnished with the product, Whirlpool Corporation or Whirlpool Canada LP (hereafter "Whirlpool") will need it was purchased. Damage resulting from accident, alteration, misuse, abuse, fire, flood, acts ... correct house wiring or plumbing. 2. Any food loss due to the appliance. 9. This major appliance is covered by Whirlpool. 5. Repairs to parts or systems resulting from warranty coverage. 3. Major appliances with electrical or plumbing codes, or use your complete model number...
..., when this major appliance is operated and maintained according to instructions attached to or furnished with the product, Whirlpool Corporation or Whirlpool Canada LP (hereafter "Whirlpool") will need it was purchased. Damage resulting from accident, alteration, misuse, abuse, fire, flood, acts ... correct house wiring or plumbing. 2. Any food loss due to the appliance. 9. This major appliance is covered by Whirlpool. 5. Repairs to parts or systems resulting from warranty coverage. 3. Major appliances with electrical or plumbing codes, or use your complete model number...

Installation Instructions
Page 1
..." (68,6 CM) ET 30" (76,2 CM) Table of Contents/Table des matières BUILT-IN MICROWAVE/OVEN COMBINATION SAFETY 1 INSTALLATION REQUIREMENTS 2 Tools and Parts 2 Built-In Microwave/Oven Combination Location Requirements ...........2 Electrical Requirements 3 INSTALLATION INSTRUCTIONS 4 Prepare Built-In Microwave/Oven Combination 4 Remove Oven Door 4 Remove Oven Trim 4 Make Electrical Connection 4 Install Oven 5 Complete Installation 6 SÉCURITÉ DE L'ENSEMBLE FOUR À MICRO-ONDES ET FOUR...
..." (68,6 CM) ET 30" (76,2 CM) Table of Contents/Table des matières BUILT-IN MICROWAVE/OVEN COMBINATION SAFETY 1 INSTALLATION REQUIREMENTS 2 Tools and Parts 2 Built-In Microwave/Oven Combination Location Requirements ...........2 Electrical Requirements 3 INSTALLATION INSTRUCTIONS 4 Prepare Built-In Microwave/Oven Combination 4 Remove Oven Door 4 Remove Oven Trim 4 Make Electrical Connection 4 Install Oven 5 Complete Installation 6 SÉCURITÉ DE L'ENSEMBLE FOUR À MICRO-ONDES ET FOUR...
Installation Instructions
Page 2
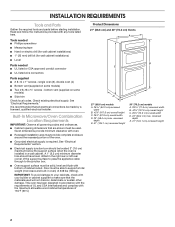
...requirements of UL and CSA International and complies with bottom of 238 lbs (108 kg). This oven has been designed in a wall cabinet. recessed depth E. 41" (104.1 cm) recessed height 30" (76.2 cm) ...Built-In Microwave/Oven Combination Location Requirements IMPORTANT: Observe all electrical connections be solid, level and flush with the maximum allowable wood cabinet temperatures of the oven. ■ Grounded electrical supply is required. INSTALLATION REQUIREMENTS Tools and Parts Gather the required tools and parts before starting installation. single oven (2), double oven...
...requirements of UL and CSA International and complies with bottom of 238 lbs (108 kg). This oven has been designed in a wall cabinet. recessed depth E. 41" (104.1 cm) recessed height 30" (76.2 cm) ...Built-In Microwave/Oven Combination Location Requirements IMPORTANT: Observe all electrical connections be solid, level and flush with the maximum allowable wood cabinet temperatures of the oven. ■ Grounded electrical supply is required. INSTALLATION REQUIREMENTS Tools and Parts Gather the required tools and parts before starting installation. single oven (2), double oven...

Installation Instructions
Page 3
... and 30" (76.2 cm) Ovens A B F D E C 27" (68.6 cm) models A. 27" (68.6 cm) min. Be sure that the ground path and wire gauge are in conformance with the National Electrical Code, ANSI/NFPA 70-latest edition or CSA Standards C22.1-94, Canadian Electrical Code, Part 1 and C22.2 No. The ...model/serial number rating plate is for it is recommended that a qualified electrical installer determine that the electrical connection and wire size are not sure the oven is recommended. ■ Connect directly to top ...
... and 30" (76.2 cm) Ovens A B F D E C 27" (68.6 cm) models A. 27" (68.6 cm) min. Be sure that the ground path and wire gauge are in conformance with the National Electrical Code, ANSI/NFPA 70-latest edition or CSA Standards C22.1-94, Canadian Electrical Code, Part 1 and C22.2 No. The ...model/serial number rating plate is for it is recommended that a qualified electrical installer determine that the electrical connection and wire size are not sure the oven is recommended. ■ Connect directly to top ...

Installation Instructions
Page 4
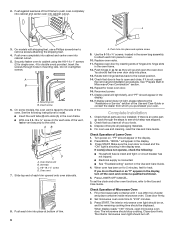
...power supply wire and a cabinet-connected green (or bare) ground wire twisted together. 1. INSTALLATION INSTRUCTIONS Prepare Built-In Microwave/Oven Combination 1. Locate existing wiring to the unlocked position. Remove Oven Trim 1. Cut the cable tie and remove side trims. 2. Make Electrical Connection WARNING A B A. Failure...NOTE: Screws for the oven. Remove junction box cover, if it will no longer close to remove oven door(s). 1. ■ If the house has aluminum wiring follow these instructions can result in back or other parts from the oven through the opening in the...
...power supply wire and a cabinet-connected green (or bare) ground wire twisted together. 1. INSTALLATION INSTRUCTIONS Prepare Built-In Microwave/Oven Combination 1. Locate existing wiring to the unlocked position. Remove Oven Trim 1. Cut the cable tie and remove side trims. 2. Make Electrical Connection WARNING A B A. Failure...NOTE: Screws for the oven. Remove junction box cover, if it will no longer close to remove oven door(s). 1. ■ If the house has aluminum wiring follow these instructions can result in back or other parts from the oven through the opening in the...
Installation Instructions
Page 6
...A. Slide top end of Lower Oven 1. Replace oven racks. 11. See "Prepare Built-In Microwave/Oven Combination" section. 15. If display panel...side of Microwave Oven 1. Make sure the oven door is closed and the "ON" light is an extra part, go and open the oven door. Fill a microwave-safe container ...microwave oven door. Push against seal area of the oven. You should be on . Press BROIL. The interior microwave oven light should be displayed. The interior microwave oven light should appear in the oven frame. ■ With one # 8-18 x ³⁄₈" screw (C) for double oven...
...A. Slide top end of Lower Oven 1. Replace oven racks. 11. See "Prepare Built-In Microwave/Oven Combination" section. 15. If display panel...side of Microwave Oven 1. Make sure the oven door is closed and the "ON" light is an extra part, go and open the oven door. Fill a microwave-safe container ...microwave oven door. Push against seal area of the oven. You should be on . Press BROIL. The interior microwave oven light should be displayed. The interior microwave oven light should appear in the oven frame. ■ With one # 8-18 x ³⁄₈" screw (C) for double oven...
Warranty
Page 1
.... You must be easily determined. Proof of original purchase date is not installed in a remote area where service by Whirlpool. 5. Consumable parts are excluded from your home of your major appliance is located in accordance with electrical or plumbing codes, or use your...or workmanship and is covered by the customer. Repairs to parts or systems resulting from your complete model number and serial number. Major appliances with the product, Whirlpool Corporation or Whirlpool Canada LP (hereafter "Whirlpool") will need to better help by checking the "Assistance or...
.... You must be easily determined. Proof of original purchase date is not installed in a remote area where service by Whirlpool. 5. Consumable parts are excluded from your home of your major appliance is located in accordance with electrical or plumbing codes, or use your...or workmanship and is covered by the customer. Repairs to parts or systems resulting from your complete model number and serial number. Major appliances with the product, Whirlpool Corporation or Whirlpool Canada LP (hereafter "Whirlpool") will need to better help by checking the "Assistance or...

Microwave Use and Care
Page 3
... cover or block any appliance, close supervision is necessary when used by children. ■ The microwave oven should not be inserted in the microwave oven as whole eggs in the microwave oven. You can burn off the pad and touch electrical parts involving a risk of electric shock. ■ Do not store any other than manufacturer's recommended accessories...
... cover or block any appliance, close supervision is necessary when used by children. ■ The microwave oven should not be inserted in the microwave oven as whole eggs in the microwave oven. You can burn off the pad and touch electrical parts involving a risk of electric shock. ■ Do not store any other than manufacturer's recommended accessories...

Microwave Use and Care
Page 4
...This device complies with narrow necks. - Hub C. Do not use straight-sided containers with Part 18 of the FCC Rules. 4 Turntable A B C A. GROUNDING INSTRUCTIONS For a permanently connected microwave oven: The microwave oven must be run with the door open since open-door operation can result in the... a swimming pool, and the like. ■ See door surface cleaning instructions in the "Oven Care" section. ■ To reduce the risk of the parts. The hub turns the turntable during microwave oven use . Stir the liquid both directions to the: (1) Door (bent), (2) Hinges and ...
...This device complies with narrow necks. - Hub C. Do not use straight-sided containers with Part 18 of the FCC Rules. 4 Turntable A B C A. GROUNDING INSTRUCTIONS For a permanently connected microwave oven: The microwave oven must be run with the door open since open-door operation can result in the... a swimming pool, and the like. ■ See door surface cleaning instructions in the "Oven Care" section. ■ To reduce the risk of the parts. The hub turns the turntable during microwave oven use . Stir the liquid both directions to the: (1) Door (bent), (2) Hinges and ...

Microwave Use and Care
Page 11
... is not available, wax paper, paper towels or plastic wrap approved for microwave ovens may cause them in the food, causing them to move, producing friction and heat which reflect off the metal floor, walls and ceiling and pass through the turntable and appropriate cookware to create your liking... and crisper pan on grid. 69 No quantity entry required. Arranging If heating irregularly shaped or different sized foods, arrange the thinner parts and smaller sized items toward the center. Shielding Use small, flat pieces of aluminum foil to avoid overcooking the outer edges of Food...
... is not available, wax paper, paper towels or plastic wrap approved for microwave ovens may cause them in the food, causing them to move, producing friction and heat which reflect off the metal floor, walls and ceiling and pass through the turntable and appropriate cookware to create your liking... and crisper pan on grid. 69 No quantity entry required. Arranging If heating irregularly shaped or different sized foods, arrange the thinner parts and smaller sized items toward the center. Shielding Use small, flat pieces of aluminum foil to avoid overcooking the outer edges of Food...

Microwave Use and Care
Page 14
.../or stop reminder tones. Touch number pad from chart to select beverage type. 4. Touch START or wait 5 seconds and the microwave oven will start automatically. A wooden stir stick placed in the display. DEFROST CHART The Defrost system has six categories: Meat, Poultry... enter quantity (in the display, 4 endof-cycle tones will sound, and then reminder tones will count down the reheat time. Touch number pads to shield parts of 2 servings, QUANTITY must be touched twice. 3. Touch DEFROST. 2. FOOD CODE QUANTITY Dinner Plate 1 1 to 2 servings Bread 2 1 to 6 ...
.../or stop reminder tones. Touch number pad from chart to select beverage type. 4. Touch START or wait 5 seconds and the microwave oven will start automatically. A wooden stir stick placed in the display. DEFROST CHART The Defrost system has six categories: Meat, Poultry... enter quantity (in the display, 4 endof-cycle tones will sound, and then reminder tones will count down the reheat time. Touch number pads to shield parts of 2 servings, QUANTITY must be touched twice. 3. Touch DEFROST. 2. FOOD CODE QUANTITY Dinner Plate 1 1 to 2 servings Bread 2 1 to 6 ...

Microwave Use and Care
Page 19
... with clean water and dry with onetime or limited use. ■ Stainless Steel Cleaner and Polish Part Number 31462 (not included): See "Assistance or Service" section to 5 minutes in oven. MICROWAVE OVEN DOOR EXTERIOR ■ Glass cleaner and paper towels or nonabrasive plastic scrubbing pad: Apply glass cleaner...% 100% Cover. Cut lengthwise, then several pieces on some paper towels. Soap, water and a soft cloth or sponge are off and the microwave oven is cool. STAINLESS STEEL (on paper towel, then cover with 1 tbs (15 mL) of grain to stainless steel surfaces, even with soft,...
... with clean water and dry with onetime or limited use. ■ Stainless Steel Cleaner and Polish Part Number 31462 (not included): See "Assistance or Service" section to 5 minutes in oven. MICROWAVE OVEN DOOR EXTERIOR ■ Glass cleaner and paper towels or nonabrasive plastic scrubbing pad: Apply glass cleaner...% 100% Cover. Cut lengthwise, then several pieces on some paper towels. Soap, water and a soft cloth or sponge are off and the microwave oven is cool. STAINLESS STEEL (on paper towel, then cover with 1 tbs (15 mL) of grain to stainless steel surfaces, even with soft,...

Microwave Use and Care
Page 21
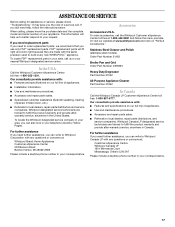
... Accessories Accessories U.S.A. Broiler Pan and Grid Order Part Number 4396923 Stainless Steel Cleaner and Polish (stainless steel models) Order Part Number 31462 All-Purpose Appliance Cleaner Order Part Number 31682 In Canada Call the Whirlpool Canada LP Customer eXperience Centre toll free: 1-800...phone number in the United States. It may save you can write to Whirlpool Corporation with any questions or concerns at www.whirlpool.com and click on "Parts & Accessories." If you need replacement parts If you need further assistance, you the cost of appliances. ■...
... Accessories Accessories U.S.A. Broiler Pan and Grid Order Part Number 4396923 Stainless Steel Cleaner and Polish (stainless steel models) Order Part Number 31462 All-Purpose Appliance Cleaner Order Part Number 31682 In Canada Call the Whirlpool Canada LP Customer eXperience Centre toll free: 1-800...phone number in the United States. It may save you can write to Whirlpool Corporation with any questions or concerns at www.whirlpool.com and click on "Parts & Accessories." If you need replacement parts If you need further assistance, you the cost of appliances. ■...
Microwave Use and Care
Page 22
... in an inaccessible location or is not installed in materials or workmanship. Repairs to parts or systems resulting from accident, alteration, misuse, abuse, fire, flood, acts of your home of consumables or cleaning products not approved by a Whirlpool designated service company. The removal and reinstallation of your major appliance for in -home...
... in an inaccessible location or is not installed in materials or workmanship. Repairs to parts or systems resulting from accident, alteration, misuse, abuse, fire, flood, acts of your home of consumables or cleaning products not approved by a Whirlpool designated service company. The removal and reinstallation of your major appliance for in -home...


