
User Manual
Page 1
Puede encontrar su número de modelo y de serie en la etiqueta ubicada en la parte frontal de la abertura del horno de microondas, detrás de la puerta. Always read and obey all instructions before using electrical appliances basic ... WARNING: To reduce the risk of others . IMPORTANT SAFETY INSTRUCTIONS When using the microwave oven. ■ Read and follow instructions. All safety messages will need assistance, call us at www.whirlpool.com for purchasing this section. ■ The microwave oven must be heated in this manual and on your model and serial number...
Puede encontrar su número de modelo y de serie en la etiqueta ubicada en la parte frontal de la abertura del horno de microondas, detrás de la puerta. Always read and obey all instructions before using electrical appliances basic ... WARNING: To reduce the risk of others . IMPORTANT SAFETY INSTRUCTIONS When using the microwave oven. ■ Read and follow instructions. All safety messages will need assistance, call us at www.whirlpool.com for purchasing this section. ■ The microwave oven must be heated in this manual and on your model and serial number...

User Manual
Page 2
...disconnect the power cord, or shut off the pad and touch electrical parts involving a risk of electric shock. ■ Suitable for use the cavity for storage purposes. Remove wire twist-ties from the microwave oven is necessary when used above both before removing the container. -...9632; Use care when cleaning the vent-hood filter. Do not use corrosive chemicals or vapors in the microwave oven. Carefully attend the microwave oven when paper, plastic, or other part of the oven with narrow necks. - SAVE THESE INSTRUCTIONS PRECAUTIONS TO AVOID POSSIBLE EXPOSURE TO EXCESSIVE...
...disconnect the power cord, or shut off the pad and touch electrical parts involving a risk of electric shock. ■ Suitable for use the cavity for storage purposes. Remove wire twist-ties from the microwave oven is necessary when used above both before removing the container. -...9632; Use care when cleaning the vent-hood filter. Do not use corrosive chemicals or vapors in the microwave oven. Carefully attend the microwave oven when paper, plastic, or other part of the oven with narrow necks. - SAVE THESE INSTRUCTIONS PRECAUTIONS TO AVOID POSSIBLE EXPOSURE TO EXCESSIVE...

User Manual
Page 3
...Tones Programming tones and signals. or 20-amp electrical supply with Part 18 of electric shock by side. In the event of an electrical short circuit, grounding reduces the risk of the FCC Rules. The microwave oven is properly installed and grounded. WARNING: Improper use an... and hold number pad "3" for 3 seconds. Repeat to avoid unintended start. Turntable Turntable may be turned off all cord connected appliances: The microwave oven must be plugged into a grounded 3 prong outlet. Turntable cannot be turned off . Touch CLOCK or the Start control. Touch the Timer...
...Tones Programming tones and signals. or 20-amp electrical supply with Part 18 of electric shock by side. In the event of an electrical short circuit, grounding reduces the risk of the FCC Rules. The microwave oven is properly installed and grounded. WARNING: Improper use an... and hold number pad "3" for 3 seconds. Repeat to avoid unintended start. Turntable Turntable may be turned off all cord connected appliances: The microwave oven must be plugged into a grounded 3 prong outlet. Turntable cannot be turned off . Touch CLOCK or the Start control. Touch the Timer...

User Manual
Page 5
...Make sure Demo Mode (on motor rotation at 100% cooking power. Replacement Parts Accessories ■ Turntable ■ Turntable support & rollers ■ Turntable hub ■ Cooking rack (for assistance. www.whirlpool.com Microwave oven will not operate Check the following : ■ Soil buildup Soil... buildup on and off . Please refer to cool the microwave oven. If the problem continues, call an electrician. ■ ...
...Make sure Demo Mode (on motor rotation at 100% cooking power. Replacement Parts Accessories ■ Turntable ■ Turntable support & rollers ■ Turntable hub ■ Cooking rack (for assistance. www.whirlpool.com Microwave oven will not operate Check the following : ■ Soil buildup Soil... buildup on and off . Please refer to cool the microwave oven. If the problem continues, call an electrician. ■ ...

User Manual
Page 6
... the upper or lower front facing of the microwave oven opening, behind the door. For assistance or service, call 1-800-253-1301. Any food loss due to view FAQs (Frequently Asked Questions), visit www.whirlpool.com. DISCLAIMER OF IMPLIED WARRANTIES; If you ...workmanship. Please keep this User Instructions and model number information for Factory Specified Parts and repair labor to correct defects in accordance with the product, Whirlpool Corporation or Whirlpool Canada LP (hereafter "Whirlpool") will pay for future reference. SOME STATES AND PROVINCES DO NOT ALLOW ...
... the upper or lower front facing of the microwave oven opening, behind the door. For assistance or service, call 1-800-253-1301. Any food loss due to view FAQs (Frequently Asked Questions), visit www.whirlpool.com. DISCLAIMER OF IMPLIED WARRANTIES; If you ...workmanship. Please keep this User Instructions and model number information for Factory Specified Parts and repair labor to correct defects in accordance with the product, Whirlpool Corporation or Whirlpool Canada LP (hereafter "Whirlpool") will pay for future reference. SOME STATES AND PROVINCES DO NOT ALLOW ...

Service Guide
Page 2
GOALS AND OBJECTIVES The goal of this Job Aid is to properly diagnose malfunctions and repair the Microwave Oven Hood Combination. The objectives of the Whirlpool Microwave Oven Hood Combination. The Wiring Diagrams and Strip Circuits used as a training Job Aid and Service Manual. ... supplied with information on our products by anyone other than Authorized In Home Service Professionals. FORWARD This Job Aid, "Whirlpool Microwave Oven Hood Combination," (Part No. 8178573), provides the In Home Service Professional with the product when servicing the unit. It is to provide ...
GOALS AND OBJECTIVES The goal of this Job Aid is to properly diagnose malfunctions and repair the Microwave Oven Hood Combination. The objectives of the Whirlpool Microwave Oven Hood Combination. The Wiring Diagrams and Strip Circuits used as a training Job Aid and Service Manual. ... supplied with information on our products by anyone other than Authorized In Home Service Professionals. FORWARD This Job Aid, "Whirlpool Microwave Oven Hood Combination," (Part No. 8178573), provides the In Home Service Professional with the product when servicing the unit. It is to provide ...
Service Guide
Page 14
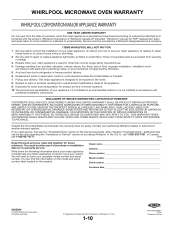
... designed to be repaired in remote locations. 10. Damage resulting from warranty coverage. 3. Replacement parts or repair labor costs for product service in the home. 8. DISCLAIMER OF IMPLIED WARRANTIES; You can be provided by calling Whirlpool. Whirlpool Microwave Oven Warranty WHIRLPOOL CORPORATION MAJOR APPLIANCE WARRANTY ONE YEAR LIMITED WARRANTY For one year from unauthorized modifications...
... designed to be repaired in remote locations. 10. Damage resulting from warranty coverage. 3. Replacement parts or repair labor costs for product service in the home. 8. DISCLAIMER OF IMPLIED WARRANTIES; You can be provided by calling Whirlpool. Whirlpool Microwave Oven Warranty WHIRLPOOL CORPORATION MAJOR APPLIANCE WARRANTY ONE YEAR LIMITED WARRANTY For one year from unauthorized modifications...

Service Guide
Page 20
... to press into the two access holes one by one and release the connector. 4-2 Sharp edges may be careful when handling the sheet metal parts. Remove the ten screws from the bottom cover and partially lower the top edge of the bottom cover. b) There are not careful. 1.... IMPORTANT: When you are two small holes on the microwave oven, be present, and you can access the component wiring below it. 3. Unplug microwave oven or disconnect power. 5. To remove the turntable motor: a) Remove the glass turntable, roller assembly, and...
... to press into the two access holes one by one and release the connector. 4-2 Sharp edges may be careful when handling the sheet metal parts. Remove the ten screws from the bottom cover and partially lower the top edge of the bottom cover. b) There are not careful. 1.... IMPORTANT: When you are two small holes on the microwave oven, be present, and you can access the component wiring below it. 3. Unplug microwave oven or disconnect power. 5. To remove the turntable motor: a) Remove the glass turntable, roller assembly, and...
Service Guide
Page 22
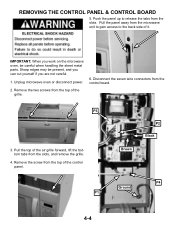
...from the top of the air grille forward, lift the bottom tabs from the slots, and remove the grille. 4. IMPORTANT: When you work on the microwave oven, be present, and you can cut yourself if you are not careful. 1. P3 3. Disconnect the seven wire connectors from the slots. Sharp ...edges may be careful when handling the sheet metal parts. Remove the two screws from the microwave unit to gain access to release the tabs from the control board. Pull the panel away from the top of it. Brown...
...from the top of the air grille forward, lift the bottom tabs from the slots, and remove the grille. 4. IMPORTANT: When you work on the microwave oven, be present, and you can cut yourself if you are not careful. 1. P3 3. Disconnect the seven wire connectors from the slots. Sharp ...edges may be careful when handling the sheet metal parts. Remove the two screws from the microwave unit to gain access to release the tabs from the control board. Pull the panel away from the top of it. Brown...
Service Guide
Page 24
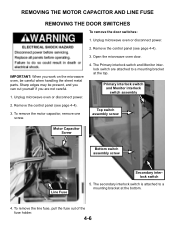
... a mounting bracket at the top. Sharp edges may be careful when handling the sheet metal parts. Remove the control panel (see page 4-4). 3. Remove the control panel (see page 4-4). 3. Unplug microwave oven or disconnect power. 4. To remove the line fuse, pull the fuse out of the...Secondary interlock switch 5. Removing the Motor Capacitor and Line Fuse Removing the Door Switches To remove the door switches: 1. Open the microwave oven door. The secondary interlock switch is attached to a mounting bracket at the bottom. 4. The Primary interlock switch and Monitor interlock...
... a mounting bracket at the top. Sharp edges may be careful when handling the sheet metal parts. Remove the control panel (see page 4-4). 3. Remove the control panel (see page 4-4). 3. Unplug microwave oven or disconnect power. 4. To remove the line fuse, pull the fuse out of the...Secondary interlock switch 5. Removing the Motor Capacitor and Line Fuse Removing the Door Switches To remove the door switches: 1. Open the microwave oven door. The secondary interlock switch is attached to a mounting bracket at the bottom. 4. The Primary interlock switch and Monitor interlock...
Service Guide
Page 26
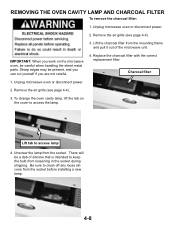
... page 4-4). 3. Be sure to keep the bulb from loosening in the socket during shipping. Unplug microwave oven or disconnect power. 2. To change the oven cavity lamp, lift the tab on the microwave oven, be present, and you can cut yourself if you are not careful. 4. Lift the ... charcoal filter with the correct replacement filter. Lift tab to access the lamp. Charcoal filter 1. There will be a dab of the microwave unit. Unplug microwave oven or disconnect power. 2. Remove the air grille (see page 4-4). 3. Sharp edges may be careful when handling the sheet metal...
... page 4-4). 3. Be sure to keep the bulb from loosening in the socket during shipping. Unplug microwave oven or disconnect power. 2. To change the oven cavity lamp, lift the tab on the microwave oven, be present, and you can cut yourself if you are not careful. 4. Lift the ... charcoal filter with the correct replacement filter. Lift tab to access the lamp. Charcoal filter 1. There will be a dab of the microwave unit. Unplug microwave oven or disconnect power. 2. Remove the air grille (see page 4-4). 3. Sharp edges may be careful when handling the sheet metal...

Service Guide
Page 27
Open the microwave oven door. 3. Remove the one screw that attaches each side of the microwave oven. 4-9 Locate the four oven rack retainers, two on the microwave oven, be present, and you can cut yourself if you work on each rack retainer to the wall of the oven interior. 4. Sharp edges may be careful when handling the sheet metal parts. Unplug microwave oven or disconnect power. 2. Removing the Oven Rack Retainers IMPORTANT: When you are not careful. 1.
Open the microwave oven door. 3. Remove the one screw that attaches each side of the microwave oven. 4-9 Locate the four oven rack retainers, two on the microwave oven, be present, and you can cut yourself if you work on each rack retainer to the wall of the oven interior. 4. Sharp edges may be careful when handling the sheet metal parts. Unplug microwave oven or disconnect power. 2. Removing the Oven Rack Retainers IMPORTANT: When you are not careful. 1.

Service Guide
Page 28
... you are not careful. 1. Remove the 3 screws on the microwave oven, be completely removed from the front corners of the cabinet. Remove the 9 screws around the edge of the microwave unit. 4. Sharp edges may now be careful when handling the sheet metal parts. Unplug microwave oven or disconnect power. 2. Remove the 8 screws visible on...
... you are not careful. 1. Remove the 3 screws on the microwave oven, be completely removed from the front corners of the cabinet. Remove the 9 screws around the edge of the microwave unit. 4. Sharp edges may now be careful when handling the sheet metal parts. Unplug microwave oven or disconnect power. 2. Remove the 8 screws visible on...
Service Guide
Page 29
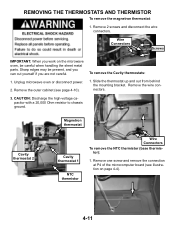
... cut yourself if you are not careful. 1. Remove one screw and remove the connection at P4 of the microcomputer board (see page 4-10). Unplug microwave oven or disconnect power. 2. To remove the Cavity thermostats: 1. Magnetron thermostat Cavity thermostat 2 Cavity thermostat 1 NTC thermistor Wire Connectors To remove the ...base thermistor): 1. Removing the Thermostats and Thermistor To remove the magnetron thermostat: 1. Sharp edges may be careful when handling the sheet metal parts. CAUTION: Discharge the high-voltage capacitor with a 20,000 Ohm resistor to chassis ground.
... cut yourself if you are not careful. 1. Remove one screw and remove the connection at P4 of the microcomputer board (see page 4-10). Unplug microwave oven or disconnect power. 2. To remove the Cavity thermostats: 1. Magnetron thermostat Cavity thermostat 2 Cavity thermostat 1 NTC thermistor Wire Connectors To remove the ...base thermistor): 1. Removing the Thermostats and Thermistor To remove the magnetron thermostat: 1. Sharp edges may be careful when handling the sheet metal parts. CAUTION: Discharge the high-voltage capacitor with a 20,000 Ohm resistor to chassis ground.

Service Guide
Page 30
...high-voltage ca- Remove 2 wire connectors from the thermostat and 2 wire connectors from the magnetron terminals. 4-12 IMPORTANT: When you work on the microwave oven, be present, and you can cut yourself if you are not careful. 1. Remove the four T-20 Torx® screws that secures the... ground wire. Sharp edges may be careful when handling the sheet metal parts. Unplug microwave oven or disconnect power. 2. Remove 3 screws that secure the air shroud and 1 screw that secure the magnetron to the unit. 5. pacitor ...
...high-voltage ca- Remove 2 wire connectors from the thermostat and 2 wire connectors from the magnetron terminals. 4-12 IMPORTANT: When you work on the microwave oven, be present, and you can cut yourself if you are not careful. 1. Remove the four T-20 Torx® screws that secures the... ground wire. Sharp edges may be careful when handling the sheet metal parts. Unplug microwave oven or disconnect power. 2. Remove 3 screws that secure the air shroud and 1 screw that secure the magnetron to the unit. 5. pacitor ...
Service Guide
Page 31
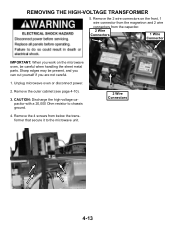
... disconnect power. 2. Sharp edges may be careful when handling the sheet metal parts. Remove the outer cabinet (see page 4-10). 3. CAUTION: Discharge the high-voltage capacitor with a 20,000 Ohm resistor to the microwave unit. 2 Wire Connectors 4-13 Remove the 4 screws from the capacitor. ... Connectors 1 Wire Connector IMPORTANT: When you are not careful. 1. Removing the High-Voltage Transformer 5. Remove the 2 wire connectors on the microwave oven, be present, and you can cut yourself if you work on the front, 1 wire connector from the magnetron and 2 wire connectors...
... disconnect power. 2. Sharp edges may be careful when handling the sheet metal parts. Remove the outer cabinet (see page 4-10). 3. CAUTION: Discharge the high-voltage capacitor with a 20,000 Ohm resistor to the microwave unit. 2 Wire Connectors 4-13 Remove the 4 screws from the capacitor. ... Connectors 1 Wire Connector IMPORTANT: When you are not careful. 1. Removing the High-Voltage Transformer 5. Remove the 2 wire connectors on the microwave oven, be present, and you can cut yourself if you work on the front, 1 wire connector from the magnetron and 2 wire connectors...
Service Guide
Page 32
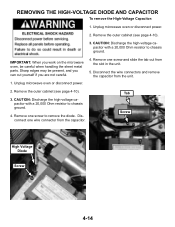
...CAUTION: Discharge the high-voltage capacitor with a 20,000 Ohm resistor to chassis ground. Sharp edges may be careful when handling the sheet metal parts. Unplug microwave oven or disconnect power. 4. Disconnect the wire connectors and remove the capacitor from the slot in the unit. 5. IMPORTANT: When you work... on the microwave oven, be present, and you can cut yourself if you are not careful. 1. Remove one screw and slide the tab out from the ...
...CAUTION: Discharge the high-voltage capacitor with a 20,000 Ohm resistor to chassis ground. Sharp edges may be careful when handling the sheet metal parts. Unplug microwave oven or disconnect power. 4. Disconnect the wire connectors and remove the capacitor from the slot in the unit. 5. IMPORTANT: When you work... on the microwave oven, be present, and you can cut yourself if you are not careful. 1. Remove one screw and slide the tab out from the ...
Service Guide
Page 33
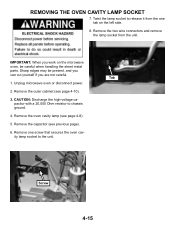
...socket from the one screw that secures the oven cavity lamp socket to chassis ground. 4. Unplug microwave oven or disconnect power. 2. Remove the outer cabinet (see page 4-8). 5. Remove one tab on the microwave oven, be present, and you can cut yourself if you work on the left side. ...8. Tab 1. Sharp edges may be careful when handling the sheet metal parts. IMPORTANT: When you are not careful. CAUTION: Discharge the high-...
...socket from the one screw that secures the oven cavity lamp socket to chassis ground. 4. Unplug microwave oven or disconnect power. 2. Remove the outer cabinet (see page 4-8). 5. Remove one tab on the microwave oven, be present, and you can cut yourself if you work on the left side. ...8. Tab 1. Sharp edges may be careful when handling the sheet metal parts. IMPORTANT: When you are not careful. CAUTION: Discharge the high-...

Service Guide
Page 34
... Blue Green Ground 1. Ground 2 4 5. Disconnect the 5 wire connectors from under the tab to the following wires to remove it. White AC line in 2. Unplug microwave oven or disconnect power. 2. Slide the AC line filter and bracket out from the AC line filter. Remove the outer cabinet (see page 4-10). 3 1 3.... Sharp edges may be present, and you can cut yourself if you work on the microwave oven, be careful when handling the sheet metal parts. AC Line Filter 4-16 Removing the AC Line Filter 6.
... Blue Green Ground 1. Ground 2 4 5. Disconnect the 5 wire connectors from under the tab to the following wires to remove it. White AC line in 2. Unplug microwave oven or disconnect power. 2. Slide the AC line filter and bracket out from the AC line filter. Remove the outer cabinet (see page 4-10). 3 1 3.... Sharp edges may be present, and you can cut yourself if you work on the microwave oven, be careful when handling the sheet metal parts. AC Line Filter 4-16 Removing the AC Line Filter 6.
Service Guide
Page 35
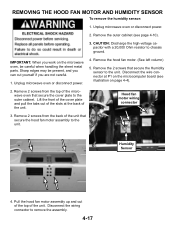
... the high-voltage capacitor with a 20,000 Ohm resistor to remove the assembly. 4-17 Disconnect the wire connector at the back of the microwave oven that secure the Humidity sensor to the outer cabinet. Hood fan motor wiring connector 3. Humidity Sensor 4. Remove the outer cabinet (see ...unit. Disconnect the wiring connector to chassis ground. Sharp edges may be careful when handling the sheet metal parts. Remove 2 screws from the back of the unit. Unplug microwave oven or disconnect power. 2. Lift the front of the cover plate and pull the tabs out of ...
... the high-voltage capacitor with a 20,000 Ohm resistor to remove the assembly. 4-17 Disconnect the wire connector at the back of the microwave oven that secure the Humidity sensor to the outer cabinet. Hood fan motor wiring connector 3. Humidity Sensor 4. Remove the outer cabinet (see ...unit. Disconnect the wiring connector to chassis ground. Sharp edges may be careful when handling the sheet metal parts. Remove 2 screws from the back of the unit. Unplug microwave oven or disconnect power. 2. Lift the front of the cover plate and pull the tabs out of ...


