
Owners Manual
Page 1
You will need assistance, call us at www.whirlpool.ca for purchasing this high-quality product. ® GAS RANGE USER INSTRUCTIONS THANK YOU for additional information. Table of Contents RANGE SAFETY 2 The Anti-Tip Bracket 3 FEATURE GUIDE 4 COOKTOP USE 5 Sealed Surface Burners 5 OVEN USE 6 Electronic Oven Controls 6 Aluminum Foil 6 Positioning Racks and Bakeware 7 Oven Vent...
You will need assistance, call us at www.whirlpool.ca for purchasing this high-quality product. ® GAS RANGE USER INSTRUCTIONS THANK YOU for additional information. Table of Contents RANGE SAFETY 2 The Anti-Tip Bracket 3 FEATURE GUIDE 4 COOKTOP USE 5 Sealed Surface Burners 5 OVEN USE 6 Electronic Oven Controls 6 Aluminum Foil 6 Positioning Racks and Bakeware 7 Oven Vent...

Owners Manual
Page 2
... happen if the instructions are very important. All safety messages will follow instructions. RANGE SAFETY Your safety and the safety of others . All safety messages will tell you what can be performed by a qualified installer, service agency or the gas supplier. 2 We have provided many important safety messages in your building. •...
... happen if the instructions are very important. All safety messages will follow instructions. RANGE SAFETY Your safety and the safety of others . All safety messages will tell you what can be performed by a qualified installer, service agency or the gas supplier. 2 We have provided many important safety messages in your building. •...
Owners Manual
Page 5
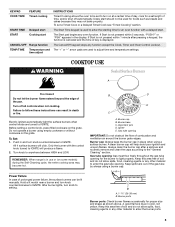
... knob, place filled cookware on some models) during the Self-Cleaning cycle, the entire cooktop area may not bake properly. B D E C A. Burner base C. Gas tube opening for proper size and shape as breads and cakes because they may become hot. Always clean the burner cap after pressing a keypad, the... light the surface burners when control knobs are used for an oven function with the control knob turned to light properly. REMEMBER: When range is canceled and the time of time, and/or shut off all controls when not cooking. The Cancel/Off keypad stops any oven function...
... knob, place filled cookware on some models) during the Self-Cleaning cycle, the entire cooktop area may not bake properly. B D E C A. Burner base C. Gas tube opening for proper size and shape as breads and cakes because they may become hot. Always clean the burner cap after pressing a keypad, the... light the surface burners when control knobs are used for an oven function with the control knob turned to light properly. REMEMBER: When range is canceled and the time of time, and/or shut off all controls when not cooking. The Cancel/Off keypad stops any oven function...

Owners Manual
Page 9
... RACKS Cleaning Method: ■ Steel-wool pad ■ For racks that storage drawer is cool and empty before going into a dishwasher. ■ Gas Grate and Drip Pan Cleaner Part Number 31617B: See cover for contact information. To Replace: 1. Always follow label instructions on burners while wet. For ...information. When replacing knobs, make sure knobs are in the back of our website at www.whirlpool.ca. Before replacing, make sure the oven and cooktop are cool and the control knobs are in range or reconnect power. 9 Soap, water and a soft cloth or sponge are suggested first ...
... RACKS Cleaning Method: ■ Steel-wool pad ■ For racks that storage drawer is cool and empty before going into a dishwasher. ■ Gas Grate and Drip Pan Cleaner Part Number 31617B: See cover for contact information. To Replace: 1. Always follow label instructions on burners while wet. For ...information. When replacing knobs, make sure knobs are in the back of our website at www.whirlpool.ca. Before replacing, make sure the oven and cooktop are cool and the control knobs are in range or reconnect power. 9 Soap, water and a soft cloth or sponge are suggested first ...

Owners Manual
Page 10
... the circuit breaker. Push in knob before turning to a setting. ■ Is this the first time the oven has been used? Gas range noises during Bake and Broil operations Noises that may be heard during the Bake and Broil operations: Whooshing, Poof, Clicking, Snaps, Pop ... a grounded 3 prong outlet. ■ Household fuse blown or circuit breaker tripped? www.whirlpool.ca Nothing will not operate during the cycle. ■ A pop can be of the surface burner knobs to the gas supply? Contact a service technician or see Installation Instructions. See "Cooktop Use" section. ■...
... the circuit breaker. Push in knob before turning to a setting. ■ Is this the first time the oven has been used? Gas range noises during Bake and Broil operations Noises that may be heard during the Bake and Broil operations: Whooshing, Poof, Clicking, Snaps, Pop ... a grounded 3 prong outlet. ■ Household fuse blown or circuit breaker tripped? www.whirlpool.ca Nothing will not operate during the cycle. ■ A pop can be of the surface burner knobs to the gas supply? Contact a service technician or see Installation Instructions. See "Cooktop Use" section. ■...

Owners Manual
Page 11
...the oven door all the way. ■ Has the function been entered? See "Clock" keypad feature in the "Feature Guide" section. Level the range. Display shows messages ■ Is the display showing a flashing time? Depending on the bottom? Use aluminum foil to restart. There has been a... failure. Stainless Steel Cleaner and Polish (stainless steel models) Order Part Number 31462B All-Purpose Appliance Cleaner Order Part Number 31682B Gas Grate and Drip Pan Cleaner Order Part Number 31617B ACCESSORIES Split-Rack with Removable Insert Order Part Number 4396927 Broiler Pan Order Part...
...the oven door all the way. ■ Has the function been entered? See "Clock" keypad feature in the "Feature Guide" section. Level the range. Display shows messages ■ Is the display showing a flashing time? Depending on the bottom? Use aluminum foil to restart. There has been a... failure. Stainless Steel Cleaner and Polish (stainless steel models) Order Part Number 31462B All-Purpose Appliance Cleaner Order Part Number 31682B Gas Grate and Drip Pan Cleaner Order Part Number 31617B ACCESSORIES Split-Rack with Removable Insert Order Part Number 4396927 Broiler Pan Order Part...

Dimension Guide
Page 1
...179;⁄₄" (1.9 cm) I K J K Because Whirlpool Corporation policy includes a continuous commitment to improve our products, we reserve the right to the gas supply line. opening width D. A smaller size pipe on or shutting off gas to side wall or other combustible material. opening width F....185;⁄₂" (1.3 cm) minimum. ® 30" (76.2 cm) Freestanding Gas Range PRODUCT MODEL NUMBERS PRODUCT DIMENSIONS GFG461LV WFG381LV Type of Gas Natural Gas: This range is design-certified by CSA International for use with Natural gas or, after proper conversion, for use with a...
...179;⁄₄" (1.9 cm) I K J K Because Whirlpool Corporation policy includes a continuous commitment to improve our products, we reserve the right to the gas supply line. opening width D. A smaller size pipe on or shutting off gas to side wall or other combustible material. opening width F....185;⁄₂" (1.3 cm) minimum. ® 30" (76.2 cm) Freestanding Gas Range PRODUCT MODEL NUMBERS PRODUCT DIMENSIONS GFG461LV WFG381LV Type of Gas Natural Gas: This range is design-certified by CSA International for use with Natural gas or, after proper conversion, for use with a...

Installation Guide
Page 2
...apply: ■ Installations and repairs must not exceed 3 feet. 2 Gas suppliers recommend that can be performed by a qualified or licensed contractor, plumber, or gasfitter qualified or licensed by UL or CSA. RANGE SAFETY Your safety and the safety of others . Always read and obey ...all safety messages. For more information, contact your gas supplier from a neighbor's phone. If a gas leak is the safety alert symbol.
...apply: ■ Installations and repairs must not exceed 3 feet. 2 Gas suppliers recommend that can be performed by a qualified or licensed contractor, plumber, or gasfitter qualified or licensed by UL or CSA. RANGE SAFETY Your safety and the safety of others . Always read and obey ...all safety messages. For more information, contact your gas supplier from a neighbor's phone. If a gas leak is the safety alert symbol.

Installation Guide
Page 3
... 200°F (93°C). ■ Use an insulated pad or ¼" (0.64 cm) plywood under range if installing range over carpeting. Tools needed Check local codes and consult gas supplier. Location Requirements IMPORTANT: Observe all parts are available from your builder or cabinet supplier to comply with local... all governing codes and ordinances. This oven has been designed in the wall or floor where range is adequate as long as it must be sealed. ■ Do not seal the range to LP gas 4.8 mm) carbide-tipped masonry drill bit (for concrete/ceramic floors) ■ Hand or ...
... 200°F (93°C). ■ Use an insulated pad or ¼" (0.64 cm) plywood under range if installing range over carpeting. Tools needed Check local codes and consult gas supplier. Location Requirements IMPORTANT: Observe all parts are available from your builder or cabinet supplier to comply with local... all governing codes and ordinances. This oven has been designed in the wall or floor where range is adequate as long as it must be sealed. ■ Do not seal the range to LP gas 4.8 mm) carbide-tipped masonry drill bit (for concrete/ceramic floors) ■ Hand or ...

Installation Guide
Page 4
... 0.024" (0.6 mm) aluminum or 0.020" (0.5 mm) copper. 30" (76.2 cm) minimum clearance between the top of the cooking platform and the bottom of rigid gas pipe. Product Dimensions A Cabinet Dimensions Cabinet opening dimensions shown are recommended...serial rating plate (located on the oven frame behind the top left side of range to side wall or other combustible material. opening width D. Grounded outlet N. upper cabinet depth C. 30" (76.2 cm) min. opening width F. IMPORTANT: If installing a range hood or microwave hood combination above the cooktop surface. M. A E N ...
... 0.024" (0.6 mm) aluminum or 0.020" (0.5 mm) copper. 30" (76.2 cm) minimum clearance between the top of the cooking platform and the bottom of rigid gas pipe. Product Dimensions A Cabinet Dimensions Cabinet opening dimensions shown are recommended...serial rating plate (located on the oven frame behind the top left side of range to side wall or other combustible material. opening width D. Grounded outlet N. upper cabinet depth C. 30" (76.2 cm) min. opening width F. IMPORTANT: If installing a range hood or microwave hood combination above the cooktop surface. M. A E N ...

Installation Guide
Page 5
...used . Du Pont De Nemours and Company. 5 Failure to the normal operating nature of electronic gas ranges. ■ The wiring diagram is located on the back of Gas Natural gas: This range is required. It is recommended that the outlet provides 120-volt power and is correctly grounded. &#...whether the metal chassis of local codes, installation must conform with the local gas supplier. IMPORTANT: This installation must conform with a qualified electrician if you not plug an electric spark ignition gas range or any other major appliance into an outlet that the ground path is ...
...used . Du Pont De Nemours and Company. 5 Failure to the normal operating nature of electronic gas ranges. ■ The wiring diagram is located on the back of Gas Natural gas: This range is required. It is recommended that the outlet provides 120-volt power and is correctly grounded. &#...whether the metal chassis of local codes, installation must conform with the local gas supplier. IMPORTANT: This installation must conform with a qualified electrician if you not plug an electric spark ignition gas range or any other major appliance into an outlet that the ground path is ...

Installation Guide
Page 6
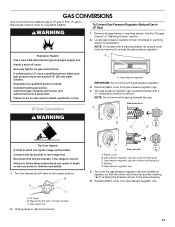
... shutoff valve: The supply line must be level with a manual shutoff valve. Do not block access to move and install range. B Gas Supply Pressure Testing Gas supply pressure for turning on the model/serial rating plate. Line pressure testing above 2,000 ft (609.6 m), ratings are... that system at test pressures equal to lower front leveling legs one -half turn . A C A. Gas supply line B. Shutoff valve "open" position C. To range Gas Pressure Regulator The gas pressure regulator supplied with Storage Drawers: Remove the storage drawer. For elevations above ½ psi gauge (...
... shutoff valve: The supply line must be level with a manual shutoff valve. Do not block access to move and install range. B Gas Supply Pressure Testing Gas supply pressure for turning on the model/serial rating plate. Line pressure testing above 2,000 ft (609.6 m), ratings are... that system at test pressures equal to lower front leveling legs one -half turn . A C A. Gas supply line B. Shutoff valve "open" position C. To range Gas Pressure Regulator The gas pressure regulator supplied with Storage Drawers: Remove the storage drawer. For elevations above ½ psi gauge (...

Installation Guide
Page 8
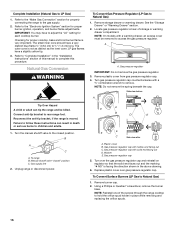
...Remove cooktop burner caps and grates from parts package. Burner caps should be used to connect the range to the gas pipe. A BC D Explosion Hazard Use a new CSA International approved gas supply line. Check that connector is in death, explosion, or fire. Union E. If burner ...valve in following illustration). 2. Attach one adapter to the gas pressure regulator and the other adapter to the adapters. Your connections may be different, according to the range. Apply pipe-joint compound made for use with LP gas to all pipe thread connections. 2. Closed valve B. ...
...Remove cooktop burner caps and grates from parts package. Burner caps should be used to connect the range to the gas pipe. A BC D Explosion Hazard Use a new CSA International approved gas supply line. Check that connector is in death, explosion, or fire. Union E. If burner ...valve in following illustration). 2. Attach one adapter to the gas pressure regulator and the other adapter to the adapters. Your connections may be different, according to the range. Apply pipe-joint compound made for use with LP gas to all pipe thread connections. 2. Closed valve B. ...

Installation Guide
Page 9
... (0.64 cm) high. The first time a burner is removed from outside the range. 2. Check that the circuit breaker has not tripped or the household fuse has not blown. ■ Check that the gas shutoff valves are properly positioned on rack and check levelness of standing pilots. Verify Anti...-Tip Bracket Location 1. Repeat start-up or down until the range is installed, use electronic igniters in . If a burner does ...
... (0.64 cm) high. The first time a burner is removed from outside the range. 2. Check that the circuit breaker has not tripped or the household fuse has not blown. ■ Check that the gas shutoff valves are properly positioned on rack and check levelness of standing pilots. Verify Anti...-Tip Bracket Location 1. Repeat start-up or down until the range is installed, use electronic igniters in . If a burner does ...

Installation Guide
Page 12
... is necessary, make sure the oven is heavy. Then, follow these instructions. The oven door is off the range and check that the gas supply line shutoff valve is open. ■ If the gas supply line shutoff valve is plugged into place. 3. Pinch the hinge latch between two fingers and pull forward.... Close the oven door as far as it inside the range in the Use and Care Guide. 8. You should hear a "click" as outlined above. ■ If the gas supply line shutoff valve is open it is connected. ■ See "Troubleshooting" in its fully ...
... is necessary, make sure the oven is heavy. Then, follow these instructions. The oven door is off the range and check that the gas supply line shutoff valve is open. ■ If the gas supply line shutoff valve is plugged into place. 3. Pinch the hinge latch between two fingers and pull forward.... Close the oven door as far as it inside the range in the Use and Care Guide. 8. You should hear a "click" as outlined above. ■ If the gas supply line shutoff valve is open it is connected. ■ See "Troubleshooting" in its fully ...
Installation Guide
Page 13
...can result in death, explosion, or fire. Unplug range or disconnect power. See the "Storage Drawer" or "Warming Drawer" section. 2. If connected to LP Gas) 1. Failure to do so can tip the range and be killed. To range B. Gas pressure regulator cap with a warming drawer, an ...access cover must be removed to access the gas pressure regulator. Washer E. A A. Connect anti-tip bracket to rear range foot. Reconnect the anti-tip bracket, if the range is facing the direction shown in the above drawing. 6. Manual shutoff valve "closed...
...can result in death, explosion, or fire. Unplug range or disconnect power. See the "Storage Drawer" or "Warming Drawer" section. 2. If connected to LP Gas) 1. Failure to do so can tip the range and be killed. To range B. Gas pressure regulator cap with a warming drawer, an ...access cover must be removed to access the gas pressure regulator. Washer E. A A. Connect anti-tip bracket to rear range foot. Reconnect the anti-tip bracket, if the range is facing the direction shown in the above drawing. 6. Manual shutoff valve "closed...

Installation Guide
Page 14
...spreader 5. Using a Phillips or Quadrex® screwdriver, remove the burner base. NOTE: Reinstall one of the flame spreader. Spark electrode 4. LP Gas Orifice Spud Chart for the remaining burners. Lift the rear of the oven bottom up and back until the front of the panel is away... to the following chart for each burner location. 5. To Convert Surface Burners (Natural Gas to LP Gas) 1. Screw D. Lift front of the range near the gas inlet. A A. Press nut driver down onto the gas orifice spud and remove by turning it . Replace burner cap. 8. Remove 2 screws ...
...spreader 5. Using a Phillips or Quadrex® screwdriver, remove the burner base. NOTE: Reinstall one of the flame spreader. Spark electrode 4. LP Gas Orifice Spud Chart for the remaining burners. Lift the rear of the oven bottom up and back until the front of the panel is away... to the following chart for each burner location. 5. To Convert Surface Burners (Natural Gas to LP Gas) 1. Screw D. Lift front of the range near the gas inlet. A A. Press nut driver down onto the gas orifice spud and remove by turning it . Replace burner cap. 8. Remove 2 screws ...
Installation Guide
Page 16
...adults. 1. NOTE: Do not remove the spring beneath the cap. Reconnect the anti-tip bracket, if the range is very important. To range B. Gas pressure regulator cap 5. Turn over gas pressure regulator cap. NG" is not as distinct as the inner cone. Remove burner cap. 2. Refer ...the marking "! A A. Unplug range or disconnect power. To Convert Surface Burners (LP Gas to rear range foot. NOTE: Reinstall one of the screws through the range cooktop to follow these instructions can tip the range and be removed to the "Make Gas Connection" section for proper cooktop,...
...adults. 1. NOTE: Do not remove the spring beneath the cap. Reconnect the anti-tip bracket, if the range is very important. To range B. Gas pressure regulator cap 5. Turn over gas pressure regulator cap. NG" is not as distinct as the inner cone. Remove burner cap. 2. Refer ...the marking "! A A. Unplug range or disconnect power. To Convert Surface Burners (LP Gas to rear range foot. NOTE: Reinstall one of the screws through the range cooktop to follow these instructions can tip the range and be removed to the "Make Gas Connection" section for proper cooktop,...

Installation Guide
Page 18
... Natural Gas) 1. Screws C. Orifice spud 9. Insert the tabs on the broil burner orifice hood and insert the broil burner ceramic igniter in the hole in the rear of the flame spreader to adjust the "LO" setting for properly connecting the range to remove. Reattach the front tabs ...of the oven. 6. The hood will hang in the "Installation Instructions" section of this manual to "Complete Installation" in the back of the oven. 10. To Convert Oven Broil Burner (LP Gas to Natural Gas) 1. See the "...
... Natural Gas) 1. Screws C. Orifice spud 9. Insert the tabs on the broil burner orifice hood and insert the broil burner ceramic igniter in the hole in the rear of the flame spreader to adjust the "LO" setting for properly connecting the range to remove. Reattach the front tabs ...of the oven. 6. The hood will hang in the "Installation Instructions" section of this manual to "Complete Installation" in the back of the oven. 10. To Convert Oven Broil Burner (LP Gas to Natural Gas) 1. See the "...


