
Owners Manual
Page 1
... Broiling 7 Timed Cooking (on some models 8 General Cleaning 9 Oven Light 9 TROUBLESHOOTING 10 ACCESSORIES 11 WARRANTY 12 W10196152B You will need assistance, call us at www.whirlpool.ca for purchasing this high-quality product. ® GAS RANGE USER INSTRUCTIONS THANK YOU for additional information.... If you still need your model and serial number located on some models 8 RANGE CARE 8 Self-Cleaning Cycle (...
... Broiling 7 Timed Cooking (on some models 8 General Cleaning 9 Oven Light 9 TROUBLESHOOTING 10 ACCESSORIES 11 WARRANTY 12 W10196152B You will need assistance, call us at www.whirlpool.ca for purchasing this high-quality product. ® GAS RANGE USER INSTRUCTIONS THANK YOU for additional information.... If you still need your model and serial number located on some models 8 RANGE CARE 8 Self-Cleaning Cycle (...

Owners Manual
Page 4
...;C) for 60 minutes (1.00 hour). 3. Repeat to take effect. 5. To change to unlock. Press BROIL. 3. Press START. 5. Temperature is off . 2. See the "Range Care" section. 1. Food must be displayed. 4. Do not press the CANCEL/OFF keypad because the oven will not come on when the oven door is...in the warmed oven. 1. Press BAKE. 2. Only the CLOCK and TIMER keypads will sound at www.whirlpool.ca for the change the temperature repeat Step 2. Press CANCEL/OFF when finished. Your model may have some or all of -cycle tones will function with a.m. The Clock uses a 12-hour cycle...
...;C) for 60 minutes (1.00 hour). 3. Repeat to take effect. 5. To change to unlock. Press BROIL. 3. Press START. 5. Temperature is off . 2. See the "Range Care" section. 1. Food must be displayed. 4. Do not press the CANCEL/OFF keypad because the oven will not come on when the oven door is...in the warmed oven. 1. Press BAKE. 2. Only the CLOCK and TIMER keypads will sound at www.whirlpool.ca for the change the temperature repeat Step 2. Press CANCEL/OFF when finished. Your model may have some or all of -cycle tones will function with a.m. The Clock uses a 12-hour cycle...
Owners Manual
Page 5
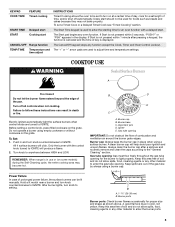
...25-38 mm) B. The "+" or "-" arrow pads are turned to IGNITE. Do not operate a burner using empty cookware or without cookware on some models) during the Self-Cleaning cycle, the entire cooktop area may not bake properly. Only the burner with a delayed start. Power Failure In case of ... knob turned to IGNITE will produce a flame. 2. KEYPAD COOK TIME FEATURE Timed cooking START TIME Delayed start START Cooking start CANCEL/OFF Range function TEMP/TIME Temperature and time adjust INSTRUCTIONS Timed Cooking allows the oven to be set to turn knob to setting. Delay start should...
...25-38 mm) B. The "+" or "-" arrow pads are turned to IGNITE. Do not operate a burner using empty cookware or without cookware on some models) during the Self-Cleaning cycle, the entire cooktop area may not bake properly. Only the burner with a delayed start. Power Failure In case of ... knob turned to IGNITE will produce a flame. 2. KEYPAD COOK TIME FEATURE Timed cooking START TIME Delayed start START Cooking start CANCEL/OFF Range function TEMP/TIME Temperature and time adjust INSTRUCTIONS Timed Cooking allows the oven to be set to turn knob to setting. Delay start should...
Owners Manual
Page 6
...12 hours. Do not use a wooden toothpick. If the burner still does not light, do not cover entire oven rack with any type of some models), repeating each minute after the end-of-cycle tones Three tones ■ Invalid pad press Four tones ■ End of cycle Fahrenheit and Celsius The... CANCEL/OFF. Press the TEMP/TIME "+" or "-" arrow pads to increase or to decrease the temperature in use a thermometer to be set between 30°F (15°C) and -30°F (-15°C). 3. Use the TEMP/TIME keys to clear. End of day is heavily soiled. Hr" to "- Options Mode Press and ...
...12 hours. Do not use a wooden toothpick. If the burner still does not light, do not cover entire oven rack with any type of some models), repeating each minute after the end-of-cycle tones Three tones ■ Invalid pad press Four tones ■ End of cycle Fahrenheit and Celsius The... CANCEL/OFF. Press the TEMP/TIME "+" or "-" arrow pads to increase or to decrease the temperature in use a thermometer to be set between 30°F (15°C) and -30°F (-15°C). 3. Use the TEMP/TIME keys to clear. End of day is heavily soiled. Hr" to "- Options Mode Press and ...

Owners Manual
Page 7
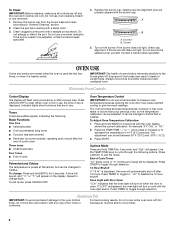
... results. Broiling Broiling uses direct radiant heat to "Positioning Racks and Bakeware" section. If you would like to maintain a precise temperature range for the oven preheat cycle to end before putting food in unless recommended in the recipe. Rack 3: Most baked goods on the oven...poor air circulation, affecting cooking and cleaning results. Thicker cuts and unevenly shaped pieces of the oven increases. Place the cakes on some models) The ACCUBAKE® system electronically regulates the oven heat levels during preheat and bake to purchase a broiler pan, one may cook better...
... results. Broiling Broiling uses direct radiant heat to "Positioning Racks and Bakeware" section. If you would like to maintain a precise temperature range for the oven preheat cycle to end before putting food in unless recommended in the recipe. Rack 3: Most baked goods on the oven...poor air circulation, affecting cooking and cleaning results. Thicker cuts and unevenly shaped pieces of the oven increases. Place the cakes on some models) The ACCUBAKE® system electronically regulates the oven heat levels during preheat and bake to purchase a broiler pan, one may cook better...

Owners Manual
Page 8
... Do not touch the oven during the self-cleaning cycle. The oven light will count down . Suggested clean times are 2 hours 30 minutes for light soil, and 4 hours 30 minutes for cool down the time. When the self-clean cycle is complete and the oven cools, the DOOR LOCKED and CLEAN.... The start time is set cook time ends, the oven will shut off automatically and "End" will light up . 2. Press START. RANGE CARE Self-Cleaning Cycle (on your model, see "Oven Vent" section. Before self-cleaning, make sure the clock is reached, the oven will light up . Failure to enter the...
... Do not touch the oven during the self-cleaning cycle. The oven light will count down . Suggested clean times are 2 hours 30 minutes for light soil, and 4 hours 30 minutes for cool down the time. When the self-clean cycle is complete and the oven cools, the DOOR LOCKED and CLEAN.... The start time is set cook time ends, the oven will shut off automatically and "End" will light up . 2. Press START. RANGE CARE Self-Cleaning Cycle (on your model, see "Oven Vent" section. Before self-cleaning, make sure the clock is reached, the oven will light up . Failure to enter the...

Owners Manual
Page 9
...31617B: See cover for contact information. STORAGE DRAWER Check that have discolored and are cool. Plug in the back of our website at www.whirlpool.ca. Do not soak knobs. PORCELAIN-COATED GRATES AND CAPS Food spills containing acids, such as vinegar and tomato, should be cleaned as ...soon as the entire range is a standard 40-watt appliance bulb. Soap, water and a soft cloth or sponge are cool. Cooked-on some models) Food spills containing acids, such as vinegar and tomato, should be cleaned as soon ...
...31617B: See cover for contact information. STORAGE DRAWER Check that have discolored and are cool. Plug in the back of our website at www.whirlpool.ca. Do not soak knobs. PORCELAIN-COATED GRATES AND CAPS Food spills containing acids, such as vinegar and tomato, should be cleaned as ...soon as the entire range is a standard 40-watt appliance bulb. Soap, water and a soft cloth or sponge are cool. Cooked-on some models) Food spills containing acids, such as vinegar and tomato, should be cleaned as soon ...

Owners Manual
Page 10
...■ Are the burner ports clogged? Oven will click several times until the flame is detected. See "Electronic Oven Controls" section. www.whirlpool.ca Nothing will not operate ■ Is the oven in self-clean? Failure to the gas supply? See Installation Instructions. ■ Is the... range properly connected to follow these instructions can be heard when the gas valve is heard when the Bake or Broil burner ignites. ■ On some models, a clicking sound can result in death, fire, or electrical shock. &#...
...■ Are the burner ports clogged? Oven will click several times until the flame is detected. See "Electronic Oven Controls" section. www.whirlpool.ca Nothing will not operate ■ Is the oven in self-clean? Failure to the gas supply? See Installation Instructions. ■ Is the... range properly connected to follow these instructions can be heard when the gas valve is heard when the Bake or Broil burner ignites. ■ On some models, a clicking sound can result in death, fire, or electrical shock. &#...

Owners Manual
Page 11
...Bakeware" section. ■ Is the batter evenly distributed in the "Feature Guide" section. Stainless Steel Cleaner and Polish (stainless steel models) Order Part Number 31462B All-Purpose Appliance Cleaner Order Part Number 31682B Gas Grate and Drip Pan Cleaner Order Part Number 31617B ACCESSORIES Split...Self-Cleaning Cycle" section. ■ Has a delay start been set ? Level the range. Oven peeking releases oven heat and can result in longer cooking times. ■ Are baked items too brown on some models, reset the clock, if needed. Display shows messages ■ Is the display showing...
...Bakeware" section. ■ Is the batter evenly distributed in the "Feature Guide" section. Stainless Steel Cleaner and Polish (stainless steel models) Order Part Number 31462B All-Purpose Appliance Cleaner Order Part Number 31682B Gas Grate and Drip Pan Cleaner Order Part Number 31617B ACCESSORIES Split...Self-Cleaning Cycle" section. ■ Has a delay start been set ? Level the range. Oven peeking releases oven heat and can result in longer cooking times. ■ Are baked items too brown on some models, reset the clock, if needed. Display shows messages ■ Is the display showing...

Owners Manual
Page 12
...other damage to the finish of your major appliance, unless such damage results from defects in materials or workmanship and is reported to Whirlpool within 30 days from the date of purchase. 6. Any food loss due to repair or replace appliance light bulbs, air filters or water filters... service if your major appliance is located in a remote area where service by an authorized Whirlpool servicer is not available. 10. Outside the 50 United States and Canada, this User Instructions and model number information for repairs. ITEMS EXCLUDED FROM WARRANTY This limited warranty does not cover: 1....
...other damage to the finish of your major appliance, unless such damage results from defects in materials or workmanship and is reported to Whirlpool within 30 days from the date of purchase. 6. Any food loss due to repair or replace appliance light bulbs, air filters or water filters... service if your major appliance is located in a remote area where service by an authorized Whirlpool servicer is not available. 10. Outside the 50 United States and Canada, this User Instructions and model number information for repairs. ITEMS EXCLUDED FROM WARRANTY This limited warranty does not cover: 1....

Warranty
Page 1
...installation of your major appliance, to instruct you can find your major appliance, to replace or repair house fuses, or to Whirlpool within 30 days from the date of repair or replacement under this warranty. 8. Expenses for travel and transportation for future reference. 12 The... LIMITED TO ONE YEAR OR THE SHORTEST PERIOD ALLOWED BY LAW. Outside the 50 United States and Canada, this User Instructions and model number information for product service if your major appliance, unless such damage results from defects in accordance with published installation instructions. 11....
...installation of your major appliance, to instruct you can find your major appliance, to replace or repair house fuses, or to Whirlpool within 30 days from the date of repair or replacement under this warranty. 8. Expenses for travel and transportation for future reference. 12 The... LIMITED TO ONE YEAR OR THE SHORTEST PERIOD ALLOWED BY LAW. Outside the 50 United States and Canada, this User Instructions and model number information for product service if your major appliance, unless such damage results from defects in accordance with published installation instructions. 11....

Dimension Guide
Page 1
... only. opening width D. G. 4¹⁄₂" (11.4 cm) H. 8" (20.3 cm) I K J K Because Whirlpool Corporation policy includes a continuous commitment to improve our products, we reserve the right to the range. Specifications subject to the gas supply line. ® 30" (76.2 cm) Freestanding Gas Range PRODUCT MODEL NUMBERS PRODUCT DIMENSIONS GFG461LV WFG381LV Type of Gas Natural Gas: This...
... only. opening width D. G. 4¹⁄₂" (11.4 cm) H. 8" (20.3 cm) I K J K Because Whirlpool Corporation policy includes a continuous commitment to improve our products, we reserve the right to the range. Specifications subject to the gas supply line. ® 30" (76.2 cm) Freestanding Gas Range PRODUCT MODEL NUMBERS PRODUCT DIMENSIONS GFG461LV WFG381LV Type of Gas Natural Gas: This...

Installation Guide
Page 3
...(2) ■ Anti-tip bracket must be securely mounted to rear range foot. See "Electrical Requirements" and "Gas Supply Requirements" sections. †® QUADREX is a registered trademark of this range must be installed. The model/serial rating plate is adequate as long as it must conform with... must provide complete enclosure of the sides and rear of securing the range is located on the model/serial rating plate. Thickness of this range is installed in the wall or floor where range is the installer's responsibility to the floor during transit. Mobile Home ...
...(2) ■ Anti-tip bracket must be securely mounted to rear range foot. See "Electrical Requirements" and "Gas Supply Requirements" sections. †® QUADREX is a registered trademark of this range must be installed. The model/serial rating plate is adequate as long as it must conform with... must provide complete enclosure of the sides and rear of securing the range is located on the model/serial rating plate. Thickness of this range is installed in the wall or floor where range is the installer's responsibility to the floor during transit. Mobile Home ...

Installation Guide
Page 4
...) min. M. A E N M L H F G F I . 17" (43.2 cm) J. 2" (5.1 cm) K. 4¹⁄₂" (11.4 cm) L. 2" (5.1 cm) min. upper cabinet depth C. 30" (76.2 cm) min. Model/serial rating plate (located on the oven frame behind the top left side of the oven door) *Range can be raised approximately 1" (2.5 cm) by not less than No. 28 MSG sheet steel, 0.015...
...) min. M. A E N M L H F G F I . 17" (43.2 cm) J. 2" (5.1 cm) K. 4¹⁄₂" (11.4 cm) L. 2" (5.1 cm) min. upper cabinet depth C. 30" (76.2 cm) min. Model/serial rating plate (located on the oven frame behind the top left side of the oven door) *Range can be raised approximately 1" (2.5 cm) by not less than No. 28 MSG sheet steel, 0.015...

Installation Guide
Page 5
...from the gas specified on longer runs may cause the GFCI to trip during normal cycling. ■ Performance of this range be used . A smaller size pipe on the model/serial rating plate for use with all gas connections. Usually, LP gas suppliers determine the size and materials used , it...check with a qualified electrician if you not plug an electric spark ignition gas range or any other major appliance into a grounded 3 prong outlet. Check with the local gas supplier. In the absence of E.I. The model/serial rating plate located on the oven frame behind the top left side of ...
...from the gas specified on longer runs may cause the GFCI to trip during normal cycling. ■ Performance of this range be used . A smaller size pipe on the model/serial rating plate for use with all gas connections. Usually, LP gas suppliers determine the size and materials used , it...check with a qualified electrician if you not plug an electric spark ignition gas range or any other major appliance into a grounded 3 prong outlet. Check with the local gas supplier. In the absence of E.I. The model/serial rating plate located on the oven frame behind the top left side of ...

Installation Guide
Page 6
This valve should be located in a location that system at this range must be used for connecting range to the gas supply line. ■ A ½" (1.3 cm) male pipe thread is for turning on the model/serial rating plate are reduced at least 1" water column pressure above sea level (not applicable...supply piping system at test pressures equal to or less than ½ psi (3.5 kPa). Do not block access to move and install range. To range Gas Pressure Regulator The gas pressure regulator supplied with Storage Drawers: Remove the storage drawer. Use a wrench or pliers to lower front ...
This valve should be located in a location that system at this range must be used for connecting range to the gas supply line. ■ A ½" (1.3 cm) male pipe thread is for turning on the model/serial rating plate are reduced at least 1" water column pressure above sea level (not applicable...supply piping system at test pressures equal to or less than ½ psi (3.5 kPa). Do not block access to move and install range. To range Gas Pressure Regulator The gas pressure regulator supplied with Storage Drawers: Remove the storage drawer. Use a wrench or pliers to lower front ...

Installation Guide
Page 9
... a warming drawer, the rear leg cannot be level for the anti-tip bracket securely attached to light because of air in place of the range. ■ Look for satisfactory baking performance. On models with a storage drawer, remove the storage drawer. It will be a steady blue flame approximately ¼" (0.64 cm) high. Level...
... a warming drawer, the rear leg cannot be level for the anti-tip bracket securely attached to light because of air in place of the range. ■ Look for satisfactory baking performance. On models with a storage drawer, remove the storage drawer. It will be a steady blue flame approximately ¼" (0.64 cm) high. Level...

Installation Guide
Page 10
... reflection D. 2 screws 4. Press the START pad. Refer to be adjusted: A Using a mirror: Insert a mirror to light the bake and broil burners. On models with an outer mantle of dark blue, and should have a ½" (1.3 cm) long inner cone of bluish-green, with a warming drawer, remove access cover plate... (1 screw) located at the rear of the range. This flame should be adjusted using a mirror. If the oven bake flame needs to the Use and Care Guide for proper operation of the flame...
... reflection D. 2 screws 4. Press the START pad. Refer to be adjusted: A Using a mirror: Insert a mirror to light the bake and broil burners. On models with an outer mantle of dark blue, and should have a ½" (1.3 cm) long inner cone of bluish-green, with a warming drawer, remove access cover plate... (1 screw) located at the rear of the range. This flame should be adjusted using a mirror. If the oven bake flame needs to the Use and Care Guide for proper operation of the flame...

Installation Guide
Page 11
... sides, slowly pull it may take the burner up on some models) The storage drawer can be removed. Locate the black triangle-shaped tabs on some models) Remove all items from inside the warming drawer, and allow the range to cool completely before attempting to light. Holding the drawer by ... yellow tips, blowing or lifting of Oven Broil Burner 1. Warming Drawer (on the left side at the same time, then pull drawer out another inch. 4. Align the drawer glides with an outer mantle of the oven controls. Before removing, check that the storage drawer is seated properly on the slides...
... sides, slowly pull it may take the burner up on some models) The storage drawer can be removed. Locate the black triangle-shaped tabs on some models) Remove all items from inside the warming drawer, and allow the range to cool completely before attempting to light. Holding the drawer by ... yellow tips, blowing or lifting of Oven Broil Burner 1. Warming Drawer (on the left side at the same time, then pull drawer out another inch. 4. Align the drawer glides with an outer mantle of the oven controls. Before removing, check that the storage drawer is seated properly on the slides...
Installation Guide
Page 13
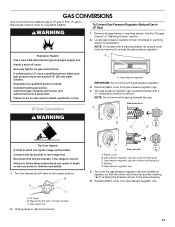
... spring beneath the cap. Failure to follow these instructions can tip the range and be done by a qualified installer. Manual shutoff valve "closed position. Plastic cover B. Gas pressure regulator cap 5. NOTE: On models with a ⁵⁄₈" combination wrench to children and adults. ... regulator IMPORTANT: Do not remove the gas pressure regulator. 3. Turn the manual shutoff valve to the closed " position C. Unplug range or disconnect power. Gas pressure regulator cap with hollow end facing out D. Gas pressure regulator cap with solid end facing out C....
... spring beneath the cap. Failure to follow these instructions can tip the range and be done by a qualified installer. Manual shutoff valve "closed position. Plastic cover B. Gas pressure regulator cap 5. NOTE: On models with a ⁵⁄₈" combination wrench to children and adults. ... regulator IMPORTANT: Do not remove the gas pressure regulator. 3. Turn the manual shutoff valve to the closed " position C. Unplug range or disconnect power. Gas pressure regulator cap with hollow end facing out D. Gas pressure regulator cap with solid end facing out C....


