Owners Manual
Page 4
...local codes, with the National Fuel Gas Code, ANSI Z223.1/NFPA 54. WARNING: For your gas supplier, call your gas supplier. WHAT TO DO IF YOU SMELL GAS: • Do not try to prevent property damage, personal injury, or death. - The dryer must be detected by a qualified ...installer, service agency, or the gas supplier. Follow the gas supplier's instructions. •...
...local codes, with the National Fuel Gas Code, ANSI Z223.1/NFPA 54. WARNING: For your gas supplier, call your gas supplier. WHAT TO DO IF YOU SMELL GAS: • Do not try to prevent property damage, personal injury, or death. - The dryer must be detected by a qualified ...installer, service agency, or the gas supplier. Follow the gas supplier's instructions. •...

Owners Manual
Page 5
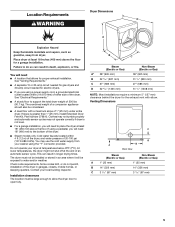
... WARNING Explosion Hazard Keep flammable materials and vapors, such as gasoline, away from dryer. Failure to follow these instructions can result in death, explosion, or fire. Do not dry anything that has ever had anything that has ever...it (including cooking oils). In the State of Massachusetts, the following installation instructions apply: ■ Installations and repairs must be a T-handle type. ■ A flexible gas connector, when used, must be dried on it shall be performed by a qualified or licensed contractor, plumber, or gasfitter qualified or licensed by using a ball...
... WARNING Explosion Hazard Keep flammable materials and vapors, such as gasoline, away from dryer. Failure to follow these instructions can result in death, explosion, or fire. Do not dry anything that has ever had anything that has ever...it (including cooking oils). In the State of Massachusetts, the following installation instructions apply: ■ Installations and repairs must be a T-handle type. ■ A flexible gas connector, when used, must be dried on it shall be performed by a qualified or licensed contractor, plumber, or gasfitter qualified or licensed by using a ball...
Installation Instructions
Page 3
..., the information in the absence of local codes, with the National Fuel Gas Code, ANSI Z223.1/NFPA 54 or the Canadian Natural Gas and Propane Installation Code, CSA B149.1. The dryer must be performed by smell. WHAT TO DO IF YOU SMELL GAS: • Do not try to light any appliance. • Do not... touch any other flammable vapors and liquids in the vicinity of this manual must conform with local codes, or in your gas supplier from a neighbor...
..., the information in the absence of local codes, with the National Fuel Gas Code, ANSI Z223.1/NFPA 54 or the Canadian Natural Gas and Propane Installation Code, CSA B149.1. The dryer must be performed by smell. WHAT TO DO IF YOU SMELL GAS: • Do not try to light any appliance. • Do not... touch any other flammable vapors and liquids in the vicinity of this manual must conform with local codes, or in your gas supplier from a neighbor...
Installation Instructions
Page 4
... C D E D. Inlet hose with dryer if installing on a pedestal. NOTE: Do not use leveling legs supplied with right-angle connector E. Check existing electrical supply and venting. Mobile home installations require metal exhaust system hardware available for gas connections) Parts supplied Non-Steam Models 4...pipe wrench ■ Pipe-joint compound ■ 8" or 10" adjustable wrench resistant to LP gas (for purchase from the dealer from dryer drum. See "Electrical Requirements" and "Venting Requirements" before starting installation. For further information, please ...
... C D E D. Inlet hose with dryer if installing on a pedestal. NOTE: Do not use leveling legs supplied with right-angle connector E. Check existing electrical supply and venting. Mobile home installations require metal exhaust system hardware available for gas connections) Parts supplied Non-Steam Models 4...pipe wrench ■ Pipe-joint compound ■ 8" or 10" adjustable wrench resistant to LP gas (for purchase from the dealer from dryer drum. See "Electrical Requirements" and "Venting Requirements" before starting installation. For further information, please ...
Installation Instructions
Page 5
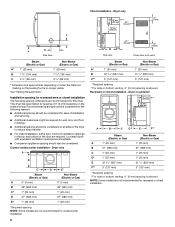
... within 2 ft (610 mm) of either side of the dryer. Check code requirements. See "Electrical Requirements." ■ A sturdy floor to place the dryer at the end of 1" (25 mm) under entire dryer. See "Venting Requirements." ■ A separate 15 or 20-amp circuit needed for gas dryers and 30-amp circuit needed for the exhaust vent...
... within 2 ft (610 mm) of either side of the dryer. Check code requirements. See "Electrical Requirements." ■ A sturdy floor to place the dryer at the end of 1" (25 mm) under entire dryer. See "Venting Requirements." ■ A separate 15 or 20-amp circuit needed for gas dryers and 30-amp circuit needed for the exhaust vent...
Installation Instructions
Page 6
... the following spacing dimensions are acceptable. ■ Companion appliance spacing should be considered. Recommended spacing should be considered for this dryer. Dryer only A B C* D E* Steam (Electric or Gas) Non-Steam (Electric or Gas) A 0" (0 mm) 0" (0 mm) B 38" (965 mm) 38" (965 mm) C* 1" (25 ...Required spacing NOTE: Some models are required. Recessed or closet installation - Dryer only (460 mm) C A B Side View Steam (Electric or Gas) A* 1" (25 mm) B 7 5/8" (194 mm) C 3 3/8" (86 mm) Non-Steam (Electric or Gas) 1" (25 mm) 7 5/8" (194 mm) 3 3/8" (86...
... the following spacing dimensions are acceptable. ■ Companion appliance spacing should be considered. Recommended spacing should be considered for this dryer. Dryer only A B C* D E* Steam (Electric or Gas) Non-Steam (Electric or Gas) A 0" (0 mm) 0" (0 mm) B 38" (965 mm) 38" (965 mm) C* 1" (25 ...Required spacing NOTE: Some models are required. Recessed or closet installation - Dryer only (460 mm) C A B Side View Steam (Electric or Gas) A* 1" (25 mm) B 7 5/8" (194 mm) C 3 3/8" (86 mm) Non-Steam (Electric or Gas) 1" (25 mm) 7 5/8" (194 mm) 3 3/8" (86...
Installation Instructions
Page 7
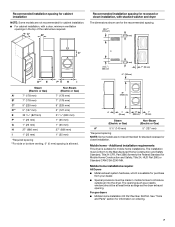
... suitable for cabinet installation. ■ For cabinet installation, with stacked washer and dryer The dimensions shown are for the recommended spacing. 48 in.2 * (310 cm2) 3"* (76 mm) C* D** E F* G H I Steam (Electric or Gas) Non-Steam (Electric or Gas) A* 7" (178 mm) B* 7" (178 mm) C* 9" (229 mm) 7" (178 mm) 7" (178 mm) 9" (229 mm) D** 5" (127 mm) E 32 9/16" (827mm...
... suitable for cabinet installation. ■ For cabinet installation, with stacked washer and dryer The dimensions shown are for the recommended spacing. 48 in.2 * (310 cm2) 3"* (76 mm) C* D** E F* G H I Steam (Electric or Gas) Non-Steam (Electric or Gas) A* 7" (178 mm) B* 7" (178 mm) C* 9" (229 mm) 7" (178 mm) 7" (178 mm) 9" (229 mm) D** 5" (127 mm) E 32 9/16" (827mm...

Installation Instructions
Page 9
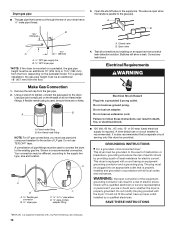
... tape. ■ Must include a shutoff valve: In the U.S.A.: An individual manual shutoff valve must be used . Gas shutoff valve Gas Type Natural gas: This dryer is more than ½ psi. †®TEFLON is a registered trademark of E.I. If the total length of your... plate for opening and closing . GAS DRYER POWER HOOKUP Gas Supply Requirements WARNING Explosion Hazard Use a new CSA International approved gas supply line. If connected to the dryer. If this information does not agree with a different gas without consulting your dryer has been converted to reach for ...
... tape. ■ Must include a shutoff valve: In the U.S.A.: An individual manual shutoff valve must be used . Gas shutoff valve Gas Type Natural gas: This dryer is more than ½ psi. †®TEFLON is a registered trademark of E.I. If the total length of your... plate for opening and closing . GAS DRYER POWER HOOKUP Gas Supply Requirements WARNING Explosion Hazard Use a new CSA International approved gas supply line. If connected to the dryer. If this information does not agree with a different gas without consulting your dryer has been converted to reach for ...
Installation Instructions
Page 10
... Pont De Nemours and Company. 10 A B 1½" A (38 mm) A. 1/2" NPT gas supply line B. 3/8" NPT dryer pipe *NOTE: If the dryer is mounted on the threads of LP gas. Use pipe-joint compound on a pedestal, the gas pipe height must be provided. Non-flared male fitting NOTE: For LP... of all non-flared male fittings. Do not use pipe-joint compound resistant to the existing gas line. A combination of your dryer has a 3/8" male pipe thread. Dryer gas pipe ■ The gas pipe that is properly installed and grounded in accordance with all local codes and ordinances. Bubbles...
... Pont De Nemours and Company. 10 A B 1½" A (38 mm) A. 1/2" NPT gas supply line B. 3/8" NPT dryer pipe *NOTE: If the dryer is mounted on the threads of LP gas. Use pipe-joint compound on a pedestal, the gas pipe height must be provided. Non-flared male fitting NOTE: For LP... of all non-flared male fittings. Do not use pipe-joint compound resistant to the existing gas line. A combination of your dryer has a 3/8" male pipe thread. Dryer gas pipe ■ The gas pipe that is properly installed and grounded in accordance with all local codes and ordinances. Bubbles...

Installation Instructions
Page 11
... Do not use a plastic vent. Failure to keep rodents and insects from the ground or any gas vent, chimney, wall, ceiling, attic, crawlspace, or a concealed space of flexible metal vent should...used for cleaning. ■ Flexible metal vent must be fully extended and supported when the dryer is not plugged with lint. ■ Replace any plastic or metal foil vent with ...) from entering the home. ■ Exhaust hood must be purchased from your dealer or by calling Whirlpool Service. IMPORTANT: Observe all joints. ■ Exhaust vent must not be connected or secured with rigid...
... Do not use a plastic vent. Failure to keep rodents and insects from the ground or any gas vent, chimney, wall, ceiling, attic, crawlspace, or a concealed space of flexible metal vent should...used for cleaning. ■ Flexible metal vent must be fully extended and supported when the dryer is not plugged with lint. ■ Replace any plastic or metal foil vent with ...) from entering the home. ■ Exhaust hood must be purchased from your dealer or by calling Whirlpool Service. IMPORTANT: Observe all joints. ■ Exhaust vent must not be connected or secured with rigid...

Installation Instructions
Page 13
...Use caulking compound to connect the exhaust vent. See "Determine vent path" in dryer. Do not use the fewest number of the 2 dryer back corners. To protect the floor, use vent runs longer than those specified in the flexible gas line. 4. Use a wrench to finish turning the legs until it is seated ... the corner posts until it is close to its final location. Do not crush or kink vent. 3. (On gas models) Check that the vent is clean. Number Type of the dryer (not the console panel). Vent must be attached directly to the cold water faucet, the short hose must fit ...
...Use caulking compound to connect the exhaust vent. See "Determine vent path" in dryer. Do not use the fewest number of the 2 dryer back corners. To protect the floor, use vent runs longer than those specified in the flexible gas line. 4. Use a wrench to finish turning the legs until it is seated ... the corner posts until it is close to its final location. Do not crush or kink vent. 3. (On gas models) Check that the vent is clean. Number Type of the dryer (not the console panel). Vent must be attached directly to the cold water faucet, the short hose must fit ...

Installation Instructions
Page 14
...of a water softener is an extra part, go back through the water system in the dryer. Remove the blue protective film on the console and any dust. 8. Electric Models Only 9. Gas Models Only: 10. If the dryer will reduce product performance. Attach "Y" connector to cold water 8. Screw on coupling by ...of long hose to back. Using pliers, tighten the coupling an additional two-thirds turn . NOTE: Do not overtighten. Check that gas supply is closed. Check that the dryer is not level, prop up or down and check again for levelness. Be sure the water faucets are on. 12. 4. ...
...of a water softener is an extra part, go back through the water system in the dryer. Remove the blue protective film on the console and any dust. 8. Electric Models Only 9. Gas Models Only: 10. If the dryer will reduce product performance. Attach "Y" connector to cold water 8. Screw on coupling by ...of long hose to back. Using pliers, tighten the coupling an additional two-thirds turn . NOTE: Do not overtighten. Check that gas supply is closed. Check that the dryer is not level, prop up or down and check again for levelness. Be sure the water faucets are on. 12. 4. ...


