Specification Sheet
Page 1
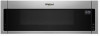
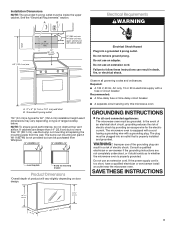
... plates and big bowls in this low profile microwave that quickly gets rid of Speeds Venting Type Dimensions Product Dimensions (H x W x D) Depth with Door Open 90° Cutout Dimensions (W x D) Reference Material Install Guide Use & Care Guide Warranty Over-theRange 400 Halogen 3 ...: White WML55011HW Black WML55011HB Capacity Total 1.1 cu. WML55011HSpecSheetV01. Low Profile Microwave Hood Combination WML55011H Stainless Steel WML55011HS Also available in the U.S.A. ft. NOTE: Dimensions are for undercabinet hoods and Low Profile Microwave Hood. **Performance varies based on 24" ...
... plates and big bowls in this low profile microwave that quickly gets rid of Speeds Venting Type Dimensions Product Dimensions (H x W x D) Depth with Door Open 90° Cutout Dimensions (W x D) Reference Material Install Guide Use & Care Guide Warranty Over-theRange 400 Halogen 3 ...: White WML55011HW Black WML55011HB Capacity Total 1.1 cu. WML55011HSpecSheetV01. Low Profile Microwave Hood Combination WML55011H Stainless Steel WML55011HS Also available in the U.S.A. ft. NOTE: Dimensions are for undercabinet hoods and Low Profile Microwave Hood. **Performance varies based on 24" ...
Installation Instructions
Page 1
... 8 Attach Mounting Plate to and including 36" (91.4 cm) wide. Table of Contents MICROWAVE HOOD COMBINATION SAFETY 1 INSTALLATION REQUIREMENTS 2 Tools and Parts 2 Location Requirements 2 Product Dimensions 3 Electrical Requirements 3 INSTALLATION INSTRUCTIONS 4 Wall Venting Installation Only 4 Install Damper Assembly (for wall venting only 4 Roof Venting Installation Only 4 Install Damper Assembly (for roof venting...
... 8 Attach Mounting Plate to and including 36" (91.4 cm) wide. Table of Contents MICROWAVE HOOD COMBINATION SAFETY 1 INSTALLATION REQUIREMENTS 2 Tools and Parts 2 Location Requirements 2 Product Dimensions 3 Electrical Requirements 3 INSTALLATION INSTRUCTIONS 4 Wall Venting Installation Only 4 Install Damper Assembly (for wall venting only 4 Roof Venting Installation Only 4 Install Damper Assembly (for roof venting...
Installation Instructions
Page 2
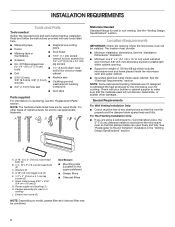
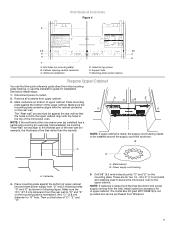
See the "Installation Dimensions" illustration. ■■ Minimum one 2" x 4" (5.1 cm x 10.16 cm) wood wall stud and minimum 3/8" (9.5 mm) thickness drywall or plaster/lath within cabinet... H Materials Needed Standard fittings for wall or ro venting) J. Special Requirements For Wall Venting Installation Only: ■■ Cutout must provide: ■■ Minimum installation dimensions. Sheet metal screws 5/32" x 5/16" (0.4 cm x 0.8 cm) (2) G. See the "Venting Design Specifications" section. J A. 3/16 - 24 x 3" (7.6 cm) round-head bolts (2) B. 1/4 - 20 x 3" (7.6 cm) &#...
See the "Installation Dimensions" illustration. ■■ Minimum one 2" x 4" (5.1 cm x 10.16 cm) wood wall stud and minimum 3/8" (9.5 mm) thickness drywall or plaster/lath within cabinet... H Materials Needed Standard fittings for wall or ro venting) J. Special Requirements For Wall Venting Installation Only: ■■ Cutout must provide: ■■ Minimum installation dimensions. Sheet metal screws 5/32" x 5/16" (0.4 cm x 0.8 cm) (2) G. See the "Venting Design Specifications" section. J A. 3/16 - 24 x 3" (7.6 cm) round-head bolts (2) B. 1/4 - 20 x 3" (7.6 cm) &#...
Installation Instructions
Page 3
...oven. Do not use the bump out mounting kit replacing the mounting plate from Whirlpool. 12" DEEPER 14" 14" DEEPER 15" mounting plate Bump out mounting bracket Product Dimensions *Overall depth of product will vary slightly depending on type of the grounding ...plug can be purchased from the wall. WARNING: Improper use an adapter. Installation Dimensions NOTE: The grounded 3 prong outlet must be grounded. See the "Electrical Requirements" section. A B Electrical Requirements WARNING 60" ( 152.4 cm...
...oven. Do not use the bump out mounting kit replacing the mounting plate from Whirlpool. 12" DEEPER 14" 14" DEEPER 15" mounting plate Bump out mounting bracket Product Dimensions *Overall depth of product will vary slightly depending on type of the grounding ...plug can be purchased from the wall. WARNING: Improper use an adapter. Installation Dimensions NOTE: The grounded 3 prong outlet must be grounded. See the "Electrical Requirements" section. A B Electrical Requirements WARNING 60" ( 152.4 cm...
Installation Instructions
Page 7
... of the tiles rather than the drywall). The Outlet Box Kit (part #W11082816) is not provided but can find the quick reference guide direct from Whirlpool. 7 End holes (on bottom of the rear wall (for "G" hole. Support tabs F. Remove all contents from the rear wall to "D" and "E" on the mounting plate... the mounting plate centerline aligns with the holes in following figure. Cabinet opening vertical centerline C. Wall stud centerlines D. Make sure the 103⁄4" (27.3 cm) dimension from upper cabinet. 3. Power supply cord bushing 5.
... of the tiles rather than the drywall). The Outlet Box Kit (part #W11082816) is not provided but can find the quick reference guide direct from Whirlpool. 7 End holes (on bottom of the rear wall (for "G" hole. Support tabs F. Remove all contents from the rear wall to "D" and "E" on the mounting plate... the mounting plate centerline aligns with the holes in following figure. Cabinet opening vertical centerline C. Wall stud centerlines D. Make sure the 103⁄4" (27.3 cm) dimension from upper cabinet. 3. Power supply cord bushing 5.


