User Guide - Phaser 3100 MFP/S
Page 3
...Phaser 3100MFP/S Contents Contents Operator shocks 13 Moving the machine 13 Handling the print cartridge 13 Dear customer Consumables I Rules for copying 22 4 Resolution setup 22 4 Zoom setup 22 Product Safety Certification 4 Scanned original setup 23 Regulatory Information 5 Contrast setup 23 Certifications in the manual...network 28 Cautions of Conformity 2 Device connection 19 EME Compliance for Canada 2 Device initial setup 19 Laser Safety Information 2 Loading paper in Europe 5 Brightness setup 23 CE Marking Traceability Information (For EU Coun...
...Phaser 3100MFP/S Contents Contents Operator shocks 13 Moving the machine 13 Handling the print cartridge 13 Dear customer Consumables I Rules for copying 22 4 Resolution setup 22 4 Zoom setup 22 Product Safety Certification 4 Scanned original setup 23 Regulatory Information 5 Contrast setup 23 Certifications in the manual...network 28 Cautions of Conformity 2 Device connection 19 EME Compliance for Canada 2 Device initial setup 19 Laser Safety Information 2 Loading paper in Europe 5 Brightness setup 23 CE Marking Traceability Information (For EU Coun...
User Guide - Phaser 3100 MFP/S
Page 4
II - Contents Phaser 3100MFP/S An example of how an AD-HOC network Firmware update 49 may be set up 31 Specifications 50 Setting up a machine 31 Physical specifications 50 ... 36 Configuration requirements 36 Software installation 36 Installing the full software package 36 Installing drivers only 37 Installing the drivers using the Xerox Companion Suite software 37 Installing the drivers manually 39 Connections 39 Software Uninstallation 40 Uninstall the software from your PC 40 Uninstall the drivers from your PC 40 Uninstall...
II - Contents Phaser 3100MFP/S An example of how an AD-HOC network Firmware update 49 may be set up 31 Specifications 50 Setting up a machine 31 Physical specifications 50 ... 36 Configuration requirements 36 Software installation 36 Installing the full software package 36 Installing drivers only 37 Installing the drivers using the Xerox Companion Suite software 37 Installing the drivers manually 39 Connections 39 Software Uninstallation 40 Uninstall the software from your PC 40 Uninstall the drivers from your PC 40 Uninstall...
User Guide - Phaser 3100 MFP/S
Page 8
...need additional information about ozone, please request the Xerox publication Facts About Ozone (part number 610P64653) ...Certification EUROPE: This XEROX product is not described in the United States ...the cartridge. Contact an authorized Xerox Service Representative to correct the problem...breaker, fuse, or other markets, please contact your local Xerox representative. Never throw print cartridges into the machine. •... cartridges, fusers, etc, avoid skin or eye contact. License Phaser 3100MFP/S 3. Keep all consumables away from the electrical outlet(s). Environment ...
...need additional information about ozone, please request the Xerox publication Facts About Ozone (part number 610P64653) ...Certification EUROPE: This XEROX product is not described in the United States ...the cartridge. Contact an authorized Xerox Service Representative to correct the problem...breaker, fuse, or other markets, please contact your local Xerox representative. Never throw print cartridges into the machine. •... cartridges, fusers, etc, avoid skin or eye contact. License Phaser 3100MFP/S 3. Keep all consumables away from the electrical outlet(s). Environment ...
User Guide - Phaser 3100 MFP/S
Page 11
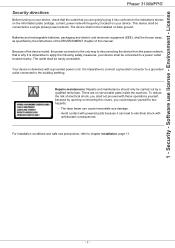
...into conforms to apply the following safety measures: your device. 1 - Environment - License Phaser 3100MFP/S Security directives Before turning on your device shall be thrown away, as specified by ... chapter Installation, page 11. - 7 - There are going to two hazards: - The laser beam can lead to electrical shock with these operations yourself, because by the Instructions of the ...power outlet located nearby. To reduce the risk of this manual. Batteries and rechargeable batteries, packaging and electric and electronic equipment (EEE), shall be connected to...
...into conforms to apply the following safety measures: your device. 1 - Environment - License Phaser 3100MFP/S Security directives Before turning on your device shall be thrown away, as specified by ... chapter Installation, page 11. - 7 - There are going to two hazards: - The laser beam can lead to electrical shock with these operations yourself, because by the Instructions of the ...power outlet located nearby. To reduce the risk of this manual. Batteries and rechargeable batteries, packaging and electric and electronic equipment (EEE), shall be connected to...
User Guide - Phaser 3100 MFP/S
Page 14
... technical evolution, Sagem Communications reserves the right to modify the technical specifications of ScanSoft. Xerox Companion Suite is a registered trademark of this product, at any time and without notice... All the other countries. Copying or printing the following the interpretation or execution of this user manual are registered trademarks of the products and brands that could be submitted to stop its manufacturing at ... by their respective owners. bank notes; - 1 - bonds; - License Phaser 3100MFP/S Applicable law This license is not inclusive. passports; -
... technical evolution, Sagem Communications reserves the right to modify the technical specifications of ScanSoft. Xerox Companion Suite is a registered trademark of this product, at any time and without notice... All the other countries. Copying or printing the following the interpretation or execution of this user manual are registered trademarks of the products and brands that could be submitted to stop its manufacturing at ... by their respective owners. bank notes; - 1 - bonds; - License Phaser 3100MFP/S Applicable law This license is not inclusive. passports; -

User Guide - Phaser 3100 MFP/S
Page 18
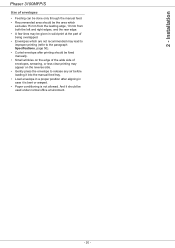
Installation Phaser 3100MFP/S Rules for use symbols WARNING Indicates important safety notes. They can be found in the Safety information section of this manual. Be sure to read these notes. Be sure to read these notes could result in serious injury or death. 2 - Be sure to originals, or loss of this manual. Note Indicates supplementary...
Installation Phaser 3100MFP/S Rules for use symbols WARNING Indicates important safety notes. They can be found in the Safety information section of this manual. Be sure to read these notes. Be sure to read these notes could result in serious injury or death. 2 - Be sure to originals, or loss of this manual. Note Indicates supplementary...
User Guide - Phaser 3100 MFP/S
Page 19
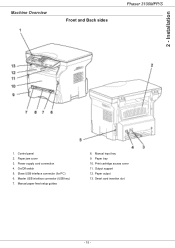
Slave USB interface connector (for PC) 6. Paper output 13. On/Off switch 5. Manual paper feed setup guides 8. Print cartridge access cover 11. Power supply cord connection 4. Master USB interface connector (USB key) 7. Smart card insertion slot - 15 - Paper jam cover 3. Manual input tray 9. 2 - Output support 12. Control panel 2. Installation Machine Overview Front and Back sides Phaser 3100MFP/S 1. Paper tray 10.
Slave USB interface connector (for PC) 6. Paper output 13. On/Off switch 5. Manual paper feed setup guides 8. Print cartridge access cover 11. Power supply cord connection 4. Master USB interface connector (USB key) 7. Smart card insertion slot - 15 - Paper jam cover 3. Manual input tray 9. 2 - Output support 12. Control panel 2. Installation Machine Overview Front and Back sides Phaser 3100MFP/S 1. Paper tray 10.
User Guide - Phaser 3100 MFP/S
Page 23
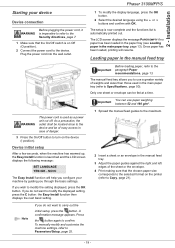
...If you do not want to modify the displayed setting, press the C button: the Easy Install function then displays the next basic setting. 1 Spread the manual feed guides to the maximum. 2 Insert a sheet or an envelope in the main paper tray (refer to modify the setting displayed, press the OK button...the functions list is launched and the LCD screen displays the following message: SET LANGUAGE YES=OK - NO=C The Easy Install function will resume. Installation Phaser 3100MFP/S Starting your machine by guiding you do not want to use paper weighing between 52 and 160 g/m².
...If you do not want to modify the displayed setting, press the C button: the Easy Install function then displays the next basic setting. 1 Spread the manual feed guides to the maximum. 2 Insert a sheet or an envelope in the main paper tray (refer to modify the setting displayed, press the OK button...the functions list is launched and the LCD screen displays the following message: SET LANGUAGE YES=OK - NO=C The Easy Install function will resume. Installation Phaser 3100MFP/S Starting your machine by guiding you do not want to use paper weighing between 52 and 160 g/m².
User Guide - Phaser 3100 MFP/S
Page 24
2 - And it is bent or warped. • Paper conditioning is not allowed. Installation Phaser 3100MFP/S Use of envelopes • Feeding can be done only through the manual feed. • Recommended area should be the area which excludes 15 mm from the leading edge, 10 mm from both the left ... which are not recommended may lead to improper printing (refer to the paragraph Specifications, page 50). • Curled envelope after printing should be fixed manually. • Small wrinkles on the edge of the wide side of envelopes, smearing, or less clear printing may appear on the reverse side. &#...
2 - And it is bent or warped. • Paper conditioning is not allowed. Installation Phaser 3100MFP/S Use of envelopes • Feeding can be done only through the manual feed. • Recommended area should be the area which excludes 15 mm from the leading edge, 10 mm from both the left ... which are not recommended may lead to improper printing (refer to the paragraph Specifications, page 50). • Curled envelope after printing should be fixed manually. • Small wrinkles on the edge of the wide side of envelopes, smearing, or less clear printing may appear on the reverse side. &#...
User Guide - Phaser 3100 MFP/S
Page 25
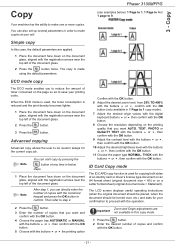
... the button. 3 Press the button. Note After step 1, you want and confirm with the OK button. 4 Choose the paper tray AUTOMATIC or MANUAL with the buttons or , then confirm with the OK button. 5 Choose with the buttons or the printing option Important Zoom and Origin adjustments are ...the paper type NORMAL, THICK with the buttons or , then confirm with the registration arrows near the top left of the document glass. Copy Copy Phaser 3100MFP/S (see examples below steps. 1 Place the document face down on the document glass, aligned with the OK button. - 21 - You can...
... the button. 3 Press the button. Note After step 1, you want and confirm with the OK button. 4 Choose the paper tray AUTOMATIC or MANUAL with the buttons or , then confirm with the OK button. 5 Choose with the buttons or the printing option Important Zoom and Origin adjustments are ...the paper type NORMAL, THICK with the buttons or , then confirm with the registration arrows near the top left of the document glass. Copy Copy Phaser 3100MFP/S (see examples below steps. 1 Place the document face down on the document glass, aligned with the OK button. - 21 - You can...

User Guide - Phaser 3100 MFP/S
Page 26
... with the OK button. Note You can perform a calibration (see Calibrate your document. none TEXT Standard resolution for documents containing photographies. Copy Phaser 3100MFP/S 3 Choose the paper tray AUTOMATIC or MANUAL with the buttons or , then confirm with the OK button. 3 - Make sure that the selected paper tray uses the correct paper size...
... with the OK button. Note You can perform a calibration (see Calibrate your document. none TEXT Standard resolution for documents containing photographies. Copy Phaser 3100MFP/S 3 Choose the paper tray AUTOMATIC or MANUAL with the buttons or , then confirm with the OK button. 3 - Make sure that the selected paper tray uses the correct paper size...

User Guide - Phaser 3100 MFP/S
Page 27
...the button. 1 Press , enter 851 using the keypad. 2 Select the default paper tray to use, AUTOMATIC or MANUAL, with the buttons and . 3 Confirm your output. Manual The manual tray is used . 843 - ADVANCED FCT/SCAN. & PRINT/ FLATBED MARG 1 Press , enter 854 using the keypad... Setup the left / right margins offsets (by 0.5 mm steps) with the buttons and . 3 Confirm your output's contrast. 844 - Copy Phaser 3100MFP/S Scanned original setup If you want to, you to the left or right during printing. 855 - Brightness setup The BRIGHTNESS parameter allows you can...
...the button. 1 Press , enter 851 using the keypad. 2 Select the default paper tray to use, AUTOMATIC or MANUAL, with the buttons and . 3 Confirm your output. Manual The manual tray is used . 843 - ADVANCED FCT/SCAN. & PRINT/ FLATBED MARG 1 Press , enter 854 using the keypad... Setup the left / right margins offsets (by 0.5 mm steps) with the buttons and . 3 Confirm your output's contrast. 844 - Copy Phaser 3100MFP/S Scanned original setup If you want to, you to the left or right during printing. 855 - Brightness setup The BRIGHTNESS parameter allows you can...
User Guide - Phaser 3100 MFP/S
Page 28
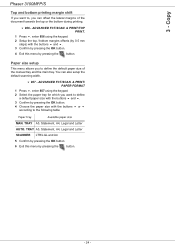
... the OK button. 4 Exit this menu by pressing the button. You can offset the lateral margins of the manual tray and the main tray. TRAY A5, Statement, A4, Legal and Letter AUTO. Copy Phaser 3100MFP/S Top and bottom printing margin shift If you want to define the default paper size of the document...
... the OK button. 4 Exit this menu by pressing the button. You can offset the lateral margins of the manual tray and the main tray. TRAY A5, Statement, A4, Legal and Letter AUTO. Copy Phaser 3100MFP/S Top and bottom printing margin shift If you want to define the default paper size of the document...

User Guide - Phaser 3100 MFP/S
Page 32
...radio transmissions of data in the network. You will find out how to set up the parameters for your device, install the Xerox Companion Suite software onto your computer configuration is also dependent on the standards 802.11b and 802.11g. Important If you have ...connect your multifunction machine to how the network is set up the parameters for your PC, please consult the users' manual for setting up a network. 6 - Network features Phaser 3100MFP/S Network features You may be described as walls or ceilings. The speed of radio network A radio network or WLAN ...
...radio transmissions of data in the network. You will find out how to set up the parameters for your device, install the Xerox Companion Suite software onto your computer configuration is also dependent on the standards 802.11b and 802.11g. Important If you have ...connect your multifunction machine to how the network is set up the parameters for your PC, please consult the users' manual for setting up a network. 6 - Network features Phaser 3100MFP/S Network features You may be described as walls or ceilings. The speed of radio network A radio network or WLAN ...

User Guide - Phaser 3100 MFP/S
Page 34
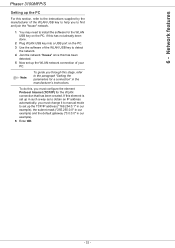
... in the format displayed and confirm with OK. 6 Exit this menu by pressing the key. 2826 - Once the network has been set up the system manually, go to set up, the LED of your network and confirm with OK. 6 Exit this menu by pressing the key. 2825 - SETUP / WLAN / PARAMETERS / SUBNET... without passing through an access point. Enter the new submask of the WLAN USB key should be changed as walls or ceilings. - 30 - Network features Phaser 3100MFP/S 8 IP CONF.: MANU or IP CONF.: AUTO appear on .
... in the format displayed and confirm with OK. 6 Exit this menu by pressing the key. 2826 - Once the network has been set up the system manually, go to set up, the LED of your network and confirm with OK. 6 Exit this menu by pressing the key. 2825 - SETUP / WLAN / PARAMETERS / SUBNET... without passing through an access point. Enter the new submask of the WLAN USB key should be changed as walls or ceilings. - 30 - Network features Phaser 3100MFP/S 8 IP CONF.: MANU or IP CONF.: AUTO appear on .
User Guide - Phaser 3100 MFP/S
Page 36
..., if this has not already been done. 2 Plug WLAN USB key into a USB port on the PC. 3 Use the software of your PC. Network features Phaser 3100MFP/S Setting up the TCP/IP address ("169.254.0.1" in our example), the subnet mask ("255.255.0.0" in our example) and the default gateway ("0.0.0.0" in such... a way as to obtain an IP address automatically, you must change it to manual mode to the paragraph "Setting the parameters for the WLAN connection that has been created. 6 -
..., if this has not already been done. 2 Plug WLAN USB key into a USB port on the PC. 3 Use the software of your PC. Network features Phaser 3100MFP/S Setting up the TCP/IP address ("169.254.0.1" in our example), the subnet mask ("255.255.0.0" in our example) and the default gateway ("0.0.0.0" in such... a way as to obtain an IP address automatically, you must change it to manual mode to the paragraph "Setting the parameters for the WLAN connection that has been created. 6 -
User Guide - Phaser 3100 MFP/S
Page 38
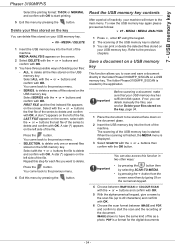
USB memory key Phaser 3100MFP/S Select the printing format: THICK or NORMAL and confirm with OK to delete and confirm with OK. LAST FILE appears on the screen, select with ... the button. Read the USB memory key contents After a period of the machine. The scanning of the USB memory key is started . 3 You can delete manually the files, see section Delete your files stored on the key, page 34. 1 Place the document to be scanned face down on the left side...
USB memory key Phaser 3100MFP/S Select the printing format: THICK or NORMAL and confirm with OK to delete and confirm with OK. LAST FILE appears on the screen, select with ... the button. Read the USB memory key contents After a period of the machine. The scanning of the USB memory key is started . 3 You can delete manually the files, see section Delete your files stored on the key, page 34. 1 Place the document to be scanned face down on the left side...

User Guide - Phaser 3100 MFP/S
Page 41
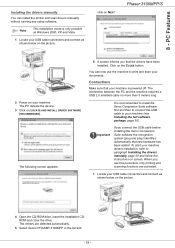
...Phaser 3100MFP/S Installing drivers only This section describes the following screen appears to indicate the progression of the mouse. You can now connect your PC on setup.exe at the CD-ROM's root. 3 A screen titled XEROX COMPANION SUITE appears. Installing the drivers using the Xerox Companion Suite software, • manual... run (Auto run). You can start the machine's management software from the menu START > ALL PROGRAMS > XEROX COMPANION SUITE > PHASER 3100 MFP > COMPANION DIRECTOR or by left-click with left-click of the installation. 6 Click on CUSTOMIZED and...
...Phaser 3100MFP/S Installing drivers only This section describes the following screen appears to indicate the progression of the mouse. You can now connect your PC on setup.exe at the CD-ROM's root. 3 A screen titled XEROX COMPANION SUITE appears. Installing the drivers using the Xerox Companion Suite software, • manual... run (Auto run). You can start the machine's management software from the menu START > ALL PROGRAMS > XEROX COMPANION SUITE > PHASER 3100 MFP > COMPANION DIRECTOR or by left-click with left-click of the installation. 6 Click on CUSTOMIZED and...
User Guide - Phaser 3100 MFP/S
Page 43
... and scanning functions are detected automatically. 5 Select XEROX PHASER 3100MFP in the list and - 39 - The following screen appears: 6 A screen informs you that new hardware has been added. You can install the printer and scan drivers manually without running any setup software. Important If you ...use the machine to paragraph Installing the drivers manually, page 39 and follow the instructions on the picture. click on the CLOSE button. Phaser 3100MFP/S 2 Power on your machine (see Installing the full software package, page 36)....
... and scanning functions are detected automatically. 5 Select XEROX PHASER 3100MFP in the list and - 39 - The following screen appears: 6 A screen informs you that new hardware has been added. You can install the printer and scan drivers manually without running any setup software. Important If you ...use the machine to paragraph Installing the drivers manually, page 39 and follow the instructions on the picture. click on the CLOSE button. Phaser 3100MFP/S 2 Power on your machine (see Installing the full software package, page 36)....

User Guide - Phaser 3100 MFP/S
Page 44
... PANEL > HARDWARE AND SOUND > PRINTERS depending the operating system). 2 Delete the XEROX PHASER 3100MFP icon. 3 In the PRINTERS window, right-click with the Xerox Companion Suite software, see paragraph Uninstall the drivers manually. - 40 - Note You can now use the machine to continue the XEROX PHASER 3100MFP drivers program removal. 2 The uninstall program is finished, a message indicates that...
... PANEL > HARDWARE AND SOUND > PRINTERS depending the operating system). 2 Delete the XEROX PHASER 3100MFP icon. 3 In the PRINTERS window, right-click with the Xerox Companion Suite software, see paragraph Uninstall the drivers manually. - 40 - Note You can now use the machine to continue the XEROX PHASER 3100MFP drivers program removal. 2 The uninstall program is finished, a message indicates that...


