

Systems Administrator Guide
Page 5
...52 UNIX 53 Print Driver Options: Enable/Disable the Banner Sheet 54 From the Print Driver 54 From the Machine 54 5 Network Scanning ...55 Overview 55 Information Checklist 55 Enable the Feature from the Machine 56 Configure a Repository 56 File Transfer Protocol (FTP 56 ... 63 Optional Step: Configure the Default Template 64 Setting up the Default Template 64 Fax Destinations 65 Document Management Fields (Optional 65 Scan Options 66 Optional Step: Create a New Template 67 Further Information 67 Validation Servers 67 Information Checklist 68 Procedure 68 Setup the Template...
...52 UNIX 53 Print Driver Options: Enable/Disable the Banner Sheet 54 From the Print Driver 54 From the Machine 54 5 Network Scanning ...55 Overview 55 Information Checklist 55 Enable the Feature from the Machine 56 Configure a Repository 56 File Transfer Protocol (FTP 56 ... 63 Optional Step: Configure the Default Template 64 Setting up the Default Template 64 Fax Destinations 65 Document Management Fields (Optional 65 Scan Options 66 Optional Step: Create a New Template 67 Further Information 67 Validation Servers 67 Information Checklist 68 Procedure 68 Setup the Template...

Systems Administrator Guide
Page 6
... 7 E-mail...75 Overview 75 E-mail Addressing 75 Information Checklist 76 Enable E-mail from the Machine 76 Configure SMTP 76 Configure the Feature 77 General 77 Scan to E-mail 79 Advanced Settings 79 Layout Adjustment 79 Filing Options 79 Image Settings 80 Optional Step: Setup Address Books 80 8 LDAP Configuration and Address... Address Book 86 Create a New Address 86 Test the Group Address Book 86 9 Server Fax...89 Overview 89 Server Fax and Embedded Fax 89 vi Xerox Phaser 3635 System Administration Guide
... 7 E-mail...75 Overview 75 E-mail Addressing 75 Information Checklist 76 Enable E-mail from the Machine 76 Configure SMTP 76 Configure the Feature 77 General 77 Scan to E-mail 79 Advanced Settings 79 Layout Adjustment 79 Filing Options 79 Image Settings 80 Optional Step: Setup Address Books 80 8 LDAP Configuration and Address... Address Book 86 Create a New Address 86 Test the Group Address Book 86 9 Server Fax...89 Overview 89 Server Fax and Embedded Fax 89 vi Xerox Phaser 3635 System Administration Guide

Systems Administrator Guide
Page 11
... Manual upgrade using a USB flash drive 171 Information Checklist 171 Procedure 171 19 Troubleshooting ...173 Problem Solving Procedure 173 Network Scanning 174 LDAP 177 Server Fax 179 Embedded Fax 180 Network Accounting 181 Printing 182 Connectivity 183 Store Files 185 Appendix A...187...Base (MIB 187 Enable/Disable System Timer Values 188 At the machine 188 Xerox Phaser 3635 System Administration Guide xi TABLE OF CONTENTS Alert Notification 167 General Device Alerts 167 To Edit Xerox or Administrator Support Contact Details 168 18 Software Upgrade ...169 Overview 169 ...
... Manual upgrade using a USB flash drive 171 Information Checklist 171 Procedure 171 19 Troubleshooting ...173 Problem Solving Procedure 173 Network Scanning 174 LDAP 177 Server Fax 179 Embedded Fax 180 Network Accounting 181 Printing 182 Connectivity 183 Store Files 185 Appendix A...187...Base (MIB 187 Enable/Disable System Timer Values 188 At the machine 188 Xerox Phaser 3635 System Administration Guide xi TABLE OF CONTENTS Alert Notification 167 General Device Alerts 167 To Edit Xerox or Administrator Support Contact Details 168 18 Software Upgrade ...169 Overview 169 ...

Systems Administrator Guide
Page 13
... for System Administrators who need to the Xerox WorkCentre products. To use this Guide effectively, System Administrators must possess Supervisor, Administrator, Account Operator, or equivalent rights to create and manage network User accounts. Machine Models The Xerox Phaser 3635 is intended for copying, printing, faxing and scanning. Xerox Phaser 3635 System Administration Guide 1 This Guide is...
... for System Administrators who need to the Xerox WorkCentre products. To use this Guide effectively, System Administrators must possess Supervisor, Administrator, Account Operator, or equivalent rights to create and manage network User accounts. Machine Models The Xerox Phaser 3635 is intended for copying, printing, faxing and scanning. Xerox Phaser 3635 System Administration Guide 1 This Guide is...

Systems Administrator Guide
Page 14
1 Introduction Xerox Phaser 3635 The machine supports scanning to E-mail Embedded Fax USB Flash Drive 250 MB Memory Configuration 500 Sheet Paper Tray 2 Stand Foreign Interface Phaser 3635MFP/S Standard Standard Standard Standard Standard Standard Standard Option Option Option Option Phaser 3635MFP/X Standard Standard Standard Standard Standard Standard Standard Standard Option Option Option Option 2 Xerox Phaser 3635 System Administration Guide A Document...
1 Introduction Xerox Phaser 3635 The machine supports scanning to E-mail Embedded Fax USB Flash Drive 250 MB Memory Configuration 500 Sheet Paper Tray 2 Stand Foreign Interface Phaser 3635MFP/S Standard Standard Standard Standard Standard Standard Standard Option Option Option Option Phaser 3635MFP/X Standard Standard Standard Standard Standard Standard Standard Standard Option Option Option Option 2 Xerox Phaser 3635 System Administration Guide A Document...

Systems Administrator Guide
Page 44
... 1. You have one machine and transfer them to another Machine - Cloning Cloning enables you to conveniently copy the settings and scan templates of settings can be available for all machines involved in Create the Print Queue. A Configuration Cloning File is already installed...view the [Printer Setup] area. 7. Procedure 1. Clone a Machine - Verify the Software Version 1. DO NOT deselect any checkboxes. 32 Xerox Phaser 3635 System Administration Guide Follow the steps above in the cloning procedure show the same system software version. Install the Clone File onto another...
... 1. You have one machine and transfer them to another Machine - Cloning Cloning enables you to conveniently copy the settings and scan templates of settings can be available for all machines involved in Create the Print Queue. A Configuration Cloning File is already installed...view the [Printer Setup] area. 7. Procedure 1. Clone a Machine - Verify the Software Version 1. DO NOT deselect any checkboxes. 32 Xerox Phaser 3635 System Administration Guide Follow the steps above in the cloning procedure show the same system software version. Install the Clone File onto another...

Systems Administrator Guide
Page 67
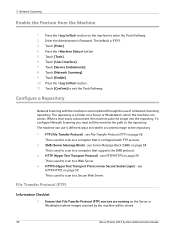
... Before starting the Installation procedure, please ensure that the machine is the procedure to follow to retrieve the scanned documents automatically. Optional Step: Create a New Template on page 55 2. Overview on page 67 10. Xerox Phaser 3635 System Administration Guide 55 This is fully functioning on page 62 7. Configure Custom Filenaming on the...
... Before starting the Installation procedure, please ensure that the machine is the procedure to follow to retrieve the scanned documents automatically. Optional Step: Create a New Template on page 55 2. Overview on page 67 10. Xerox Phaser 3635 System Administration Guide 55 This is fully functioning on page 62 7. Configure Custom Filenaming on the...
Systems Administrator Guide
Page 68
...accomplished through the use 4 different ways to transfer a scanned image to a computer that File Transfer Protocol (FTP) services are running on the Server or Workstation where images scanned by the machine will be stored. 56 Xerox Phaser 3635 System Administration Guide The machine can access. This is... a folder on page 59. The default is used to scan to the repository: 1. Touch [Confirm] to the...
...accomplished through the use 4 different ways to transfer a scanned image to a computer that File Transfer Protocol (FTP) services are running on the Server or Workstation where images scanned by the machine will be stored. 56 Xerox Phaser 3635 System Administration Guide The machine can access. This is... a folder on page 59. The default is used to scan to the repository: 1. Touch [Confirm] to the...
Systems Administrator Guide
Page 69
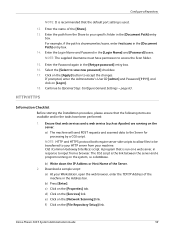
... entry boxes. Write down the IP Address or Host Name. 2. NOTE: It is recommended that the default port setting is the Scan Repository. Xerox Phaser 3635 System Administration Guide 57 Configure a Repository Write down the User Account and Password details. 4. Click on the [File Repository Setup...name)/(directory name). 13. NOTE: The supplied Username must have permission to save new password] checkbox. Select the [Select to access the Scan folder. 14. Create a folder within the directory b) Delete the folder. This is used. 12. Create a User account and password ...
... entry boxes. Write down the IP Address or Host Name. 2. NOTE: It is recommended that the default port setting is the Scan Repository. Xerox Phaser 3635 System Administration Guide 57 Configure a Repository Write down the User Account and Password details. 4. Click on the [File Repository Setup...name)/(directory name). 13. NOTE: The supplied Username must have permission to save new password] checkbox. Select the [Select to access the Scan folder. 14. Create a folder within the directory b) Delete the folder. This is used. 12. Create a User account and password ...

Systems Administrator Guide
Page 70
...the [Services] link. 5. Create a shared folder to the scan directory from the [Protocol] drop-down the Share Name of the computer where the Scan Filing Repository (SMB Server / Workstation) is 139). 58 Xerox Phaser 3635 System Administration Guide Test your Workstation, open the web browser...Configure General Settings - Click on the [Apply] button to describe the Filing Destination in to be used as a Network Scanning location (Repository) for scanned documents. NOTE: If the Default File Destination has previously been configured, click on the [Properties] tab. 4. Optional Step...
...the [Services] link. 5. Create a shared folder to the scan directory from the [Protocol] drop-down the Share Name of the computer where the Scan Filing Repository (SMB Server / Workstation) is 139). 58 Xerox Phaser 3635 System Administration Guide Test your Workstation, open the web browser...Configure General Settings - Click on the [Apply] button to describe the Filing Destination in to be used as a Network Scanning location (Repository) for scanned documents. NOTE: If the Default File Destination has previously been configured, click on the [Properties] tab. 4. Optional Step...
Systems Administrator Guide
Page 71
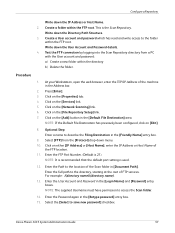
.... A program that is used. 12. d) Click on [Login]. 18. Continue to your specific folder in the [Document Path] entry box. Xerox Phaser 3635 System Administration Guide 59 Enter the path from your machine. Download a sample script: a) At your Workstation, open the web browser, enter the...changes. CGI (Common Gateway Interface) script. e) Click on the [File Repository Setup] link. page 63. The CGI script is sharename/wc/scans, enter /wc/scans in the [Document Path] entry box. 14. c) Click on the [Properties] tab. Click on the [Apply] button to save new ...
.... A program that is used. 12. d) Click on [Login]. 18. Continue to your specific folder in the [Document Path] entry box. Xerox Phaser 3635 System Administration Guide 59 Enter the path from your machine. Download a sample script: a) At your Workstation, open the web browser, enter the...changes. CGI (Common Gateway Interface) script. e) Click on the [File Repository Setup] link. page 63. The CGI script is sharename/wc/scans, enter /wc/scans in the [Document Path] entry box. 14. c) Click on the [Properties] tab. Click on the [Apply] button to save new ...

Systems Administrator Guide
Page 72
...executable script. Test the connection: a) Log in the [Default File Destination] area. Press [Enter]. 3. Click on the [Services] link. 60 Xerox Phaser 3635 System Administration Guide i) Click on the [Get Example Scripts] link under Script Path and Filename: to download an example script in PHP, ...Web Services] home directory. b) Add a [bin] directory to the Web Server. b) Send a POST request and file to the home directory. 5 Network Scanning g) Click on the [Add] button in to the machine's directory on the Web Server. c) Place an executable script in the Address bar. 2. c) ...
...executable script. Test the connection: a) Log in the [Default File Destination] area. Press [Enter]. 3. Click on the [Services] link. 60 Xerox Phaser 3635 System Administration Guide i) Click on the [Get Example Scripts] link under Script Path and Filename: to download an example script in PHP, ...Web Services] home directory. b) Add a [bin] directory to the Web Server. b) Send a POST request and file to the home directory. 5 Network Scanning g) Click on the [Add] button in to the machine's directory on the Web Server. c) Place an executable script in the Address bar. 2. c) ...
Systems Administrator Guide
Page 73
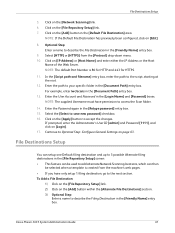
...Password [1111], and click on [IP Address] or [Host Name] and enter either the IP Address or the Host Name of the Web Server. Xerox Phaser 3635 System Administration Guide 61 Click on [Edit]. 8. Optional Step: Enter a name to accept the changes. To Add a File Destination: 1) Click...your specific folder in the [Friendly Name] entry box. NOTE: If the Default File Destination has previously been configured, click on the [Network Scanning] link. 6. Enter the User Account and Password in the [Retype password] entry box. 15. Enter the path to Optional Step: Configure...
...Password [1111], and click on [IP Address] or [Host Name] and enter either the IP Address or the Host Name of the Web Server. Xerox Phaser 3635 System Administration Guide 61 Click on [Edit]. 8. Optional Step: Enter a name to accept the changes. To Add a File Destination: 1) Click...your specific folder in the [Friendly Name] entry box. NOTE: If the Default File Destination has previously been configured, click on the [Network Scanning] link. 6. Enter the User Account and Password in the [Retype password] entry box. 15. Enter the path to Optional Step: Configure...

Systems Administrator Guide
Page 74
...web browser, enter the TCP/IP Address of Month • Month • Year • Time (24 hour) 62 Xerox Phaser 3635 System Administration Guide Press [Enter]. 3. Click on the [Network Scanning] link. 6. Click on the [Properties] tab. 4. When you create a new template or edit the default template, ...you can create a standard name for network scanning jobs. Configure Custom Filenaming 1. Auto Using this option, you will have setup a new destination, you can enter more specific data formats and...
...web browser, enter the TCP/IP Address of Month • Month • Year • Time (24 hour) 62 Xerox Phaser 3635 System Administration Guide Press [Enter]. 3. Click on the [Network Scanning] link. 6. Click on the [Properties] tab. 4. When you create a new template or edit the default template, ...you can create a standard name for network scanning jobs. Configure Custom Filenaming 1. Auto Using this option, you will have setup a new destination, you can enter more specific data formats and...

Systems Administrator Guide
Page 75
...on the [Services] link. 5. Click on the [General] link. Select one of the Network Scanning job. 7. Click on the [Properties] tab. 4. Prints a Confirmation Sheet after every Network Scanning job. Xerox Phaser 3635 System Administration Guide 63 The data formats and text you can select standard data formats, such... the success or failure of the following options from the [Confirmation Sheet] drop-down menu: a) On - Click on the [Network Scanning] link. 6. Prints a Confirmation Sheet only when the job is empty, the value set in the Default Template will appear in the...
...on the [Services] link. 5. Click on the [General] link. Select one of the Network Scanning job. 7. Click on the [Properties] tab. 4. Prints a Confirmation Sheet after every Network Scanning job. Xerox Phaser 3635 System Administration Guide 63 The data formats and text you can select standard data formats, such... the success or failure of the following options from the [Confirmation Sheet] drop-down menu: a) On - Click on the [Network Scanning] link. 6. Prints a Confirmation Sheet only when the job is empty, the value set in the Default Template will appear in the...

Systems Administrator Guide
Page 76
... that are updated automatically. The Default Template cannot be used, at least one filing location must be setup. Click on the [Network Scanning] link. 6. Click on the [Properties] tab. 4. Turns off the Confirmation Sheet printing function. Click on the [Services] link....Pool (a repository on the device are created using Internet Services will see 2 options: • File • Fax 64 Xerox Phaser 3635 System Administration Guide Optional Step: Configure the Default Template The Default Template is enabled. 11. Distribution Templates 8. If required the...
... that are updated automatically. The Default Template cannot be used, at least one filing location must be setup. Click on the [Network Scanning] link. 6. Click on the [Properties] tab. 4. Turns off the Confirmation Sheet printing function. Click on the [Services] link....Pool (a repository on the device are created using Internet Services will see 2 options: • File • Fax 64 Xerox Phaser 3635 System Administration Guide Optional Step: Configure the Default Template The Default Template is enabled. 11. Distribution Templates 8. If required the...

Systems Administrator Guide
Page 77
...fax number. Enter a field name up to add a new fax destination. 3. The Default Value will see [Fax] as a filing destination service. Xerox Phaser 3635 System Administration Guide 65 Click on the [Add] button. Click on the [Add] button to completing these steps. Enter the time that [File]... Field Name (Required) The field name is not shown at a specific time. 6. Optional Step: Configure the Default Template 8. Click on your scanned documents in this section. Choose one of the following: • [Editable] if the User is used by third-party software to send the fax...
...fax number. Enter a field name up to add a new fax destination. 3. The Default Value will see [Fax] as a filing destination service. Xerox Phaser 3635 System Administration Guide 65 Click on the [Add] button. Click on the [Add] button to completing these steps. Enter the time that [File]... Field Name (Required) The field name is not shown at a specific time. 6. Optional Step: Configure the Default Template 8. Click on your scanned documents in this section. Choose one of the following: • [Editable] if the User is used by third-party software to send the fax...

Systems Administrator Guide
Page 78
...Validation NOTE: This checkbox is only visible if there is specified for the field if the User selected the [Not Editable]. 5 Network Scanning • Field Label (Required) The field label is only required if the Editable option is possible to enter the address of settings ...User Input (****) If you want information typed by the user before you check this field when they scan their document. Click on page 67 for your scanned images, including: 66 Xerox Phaser 3635 System Administration Guide NOTE: This value must leave the default value blank. It is selected. ...
...Validation NOTE: This checkbox is only visible if there is specified for the field if the User selected the [Not Editable]. 5 Network Scanning • Field Label (Required) The field label is only required if the Editable option is possible to enter the address of settings ...User Input (****) If you want information typed by the user before you check this field when they scan their document. Click on page 67 for your scanned images, including: 66 Xerox Phaser 3635 System Administration Guide NOTE: This value must leave the default value blank. It is selected. ...
Systems Administrator Guide
Page 79
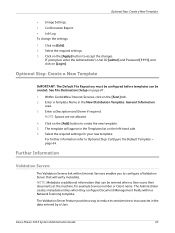
...a Template Name in the Templates list on the [Apply] button to create the new template. 5. The template will verify metadata. Xerox Phaser 3635 System Administration Guide 67 Within CentreWare Internet Services, click on [Edit]. 2. Click on the [Add] button to accept the ...click on page 61. 1. See File Destinations Setup on [Login]. Further Information Validation Servers The Validation Servers link within a Network Scanning template. NOTE: Metadata is additional information that will appear in the New Distribution Template: General Information area. 3. Select the required...
...a Template Name in the Templates list on the [Apply] button to create the new template. 5. The template will verify metadata. Xerox Phaser 3635 System Administration Guide 67 Within CentreWare Internet Services, click on [Edit]. 2. Click on the [Add] button to accept the ...click on page 61. 1. See File Destinations Setup on [Login]. Further Information Validation Servers The Validation Servers link within a Network Scanning template. NOTE: Metadata is additional information that will appear in the New Distribution Template: General Information area. 3. Select the required...
Systems Administrator Guide
Page 80
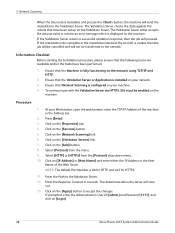
...Scanning When the User enters metadata and presses the button, the machine will send the metadata to the Validation Server. 12. If the Validation Server returns a successful validation response, then the job will time out. 13. NOTE: The default Port Number is displayed on [Login]. 68 Xerox Phaser...7. The Validation Server checks the data against the criteria that the Machine is configured on your machine. 4. Ensure that Network Scanning is fully functioning on the [Apply] button to the network. Ensure that the Validation Server or Application is invalid, then ...
...Scanning When the User enters metadata and presses the button, the machine will send the metadata to the Validation Server. 12. If the Validation Server returns a successful validation response, then the job will time out. 13. NOTE: The default Port Number is displayed on [Login]. 68 Xerox Phaser...7. The Validation Server checks the data against the criteria that the Machine is configured on your machine. 4. Ensure that Network Scanning is fully functioning on the [Apply] button to the network. Ensure that the Validation Server or Application is invalid, then ...


