
Operating Guide
Page 4
...Playing an Audio CD or MP3/WMA file . . . . .25 Programmed Playback 25 Repeat Programmed Tracks 25 Erasing a Track from DVD to VCR 21 On-Screen Display - VCR 12 General Operation 12 CLOCK 12 PROGRAM 12 SETUP 13 Displaying Disc Information on Copyrights 6 Front Panel 7 Remote Control 8 About the... File 26 Zoom 26 Rotating the picture 26 Playing a DVD VR format Disc 27 Maintenance and Service 27 Reference 28 Language Codes 28 Area Codes 28 Troubleshooting 29-30 Specifications 31 4 VCR 21 Additional VCR Information 22 VCR Auto Play System 22 S-VHS Quasi Playback (SQPB 22...
...Playing an Audio CD or MP3/WMA file . . . . .25 Programmed Playback 25 Repeat Programmed Tracks 25 Erasing a Track from DVD to VCR 21 On-Screen Display - VCR 12 General Operation 12 CLOCK 12 PROGRAM 12 SETUP 13 Displaying Disc Information on Copyrights 6 Front Panel 7 Remote Control 8 About the... File 26 Zoom 26 Rotating the picture 26 Playing a DVD VR format Disc 27 Maintenance and Service 27 Reference 28 Language Codes 28 Area Codes 28 Troubleshooting 29-30 Specifications 31 4 VCR 21 Additional VCR Information 22 VCR Auto Play System 22 S-VHS Quasi Playback (SQPB 22...
Operating Guide
Page 7
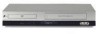
...Point the unit Remote Control here. Press and hold button for a fast forward search. - k INPUT Selects the VCR deck's source. (LINE 1 or LINE 2). j DVD/VCR (output select) Select one of your output sources to the audio/video output of current chapter or track, press twice...timer recording or a timer recording is programmed (VCR part only) : A cassette is in the VCR deck. o LINE2 (VIDEO/AUDIO (L/R) input) Connect to view on the TV screen between DVD and VCR. e Z VCR Ejects the tape in the VCR deck. d Cassette Compartment (VCR deck) Insert a video cassette here. Press repeatedly...
...Point the unit Remote Control here. Press and hold button for a fast forward search. - k INPUT Selects the VCR deck's source. (LINE 1 or LINE 2). j DVD/VCR (output select) Select one of your output sources to the audio/video output of current chapter or track, press twice...timer recording or a timer recording is programmed (VCR part only) : A cassette is in the VCR deck. o LINE2 (VIDEO/AUDIO (L/R) input) Connect to view on the TV screen between DVD and VCR. e Z VCR Ejects the tape in the VCR deck. d Cassette Compartment (VCR deck) Insert a video cassette here. Press repeatedly...

Operating Guide
Page 8
... PROGRAM : Shows or hides Program menu. ZOOM : Enlarges DVD video image. SEARCH : Displays Marker Search menu. INPUT : Selects the VCR deck's source (LINE 1 or LINE 2). SUBTITLE : Selects a subtitle language. DVD : Select the unit function mode to beginning of the remote ...(OK) : Confirms menu selections. x (STOP) : Stops playback or recording. SPEED : Selects recording speed. SETUP/MENU : Accesses or removes DVD Setup menu and VCR menu. m/M (BACKWARD / FORWARD) : - TITLE : Displays the disc's Title menu, if available. CM SKIP : Fast forwards picture search ...
... PROGRAM : Shows or hides Program menu. ZOOM : Enlarges DVD video image. SEARCH : Displays Marker Search menu. INPUT : Selects the VCR deck's source (LINE 1 or LINE 2). SUBTITLE : Selects a subtitle language. DVD : Select the unit function mode to beginning of the remote ...(OK) : Confirms menu selections. x (STOP) : Stops playback or recording. SPEED : Selects recording speed. SETUP/MENU : Accesses or removes DVD Setup menu and VCR menu. m/M (BACKWARD / FORWARD) : - TITLE : Displays the disc's Title menu, if available. CM SKIP : Fast forwards picture search ...

Operating Guide
Page 9
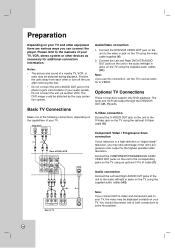
... with audio inputs. e AC Power Cord Plug into the power source. ab cd e f g a VCR IN LINE 1 (VIDEO/AUDIO (Left/Right)) Connect the audio/video output of the jacks on TV. 9 b DVD/VCR OUT (VIDEO/AUDIO (Left/Right)) Connect to a TV with video and audio inputs. d AUDIO OUT ...(Left/Right) (DVD EXCLUSIVE OUT) Connect to digital (coaxial) audio equipment. g S-VIDEO OUT (DVD EXCLUSIVE OUT) Connect to the unit. Electrostatic discharge may...
... with audio inputs. e AC Power Cord Plug into the power source. ab cd e f g a VCR IN LINE 1 (VIDEO/AUDIO (Left/Right)) Connect the audio/video output of the jacks on TV. 9 b DVD/VCR OUT (VIDEO/AUDIO (Left/Right)) Connect to a TV with video and audio inputs. d AUDIO OUT ...(Left/Right) (DVD EXCLUSIVE OUT) Connect to digital (coaxial) audio equipment. g S-VIDEO OUT (DVD EXCLUSIVE OUT) Connect to the unit. Electrostatic discharge may...
Operating Guide
Page 10
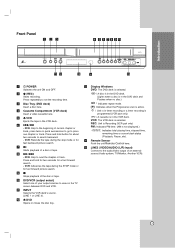
... connection Connect the S-VIDEO OUT jack on the unit to the S-Video jack on the TV using an optional Y Pb Pr cable (C). Connect the DVD/VCR VIDEO OUT jack on the unit to the video in jacks on the TV using the supplied audio cables (A1). Connect the COMPONENT/PROGRESSIVE SCAN... Video / Progressive Scan connection If your television is a high-definition or "digital ready" television, you can connect the player. Connect the Left and Right DVD/VCR AUDIO OUT jacks on the unit to the audio left /right in jacks on the TV using the video cable supplied (V). 2. Do not connect the...
... connection Connect the S-VIDEO OUT jack on the unit to the S-Video jack on the TV using an optional Y Pb Pr cable (C). Connect the DVD/VCR VIDEO OUT jack on the unit to the video in jacks on the TV using the supplied audio cables (A1). Connect the COMPONENT/PROGRESSIVE SCAN... Video / Progressive Scan connection If your television is a high-definition or "digital ready" television, you can connect the player. Connect the Left and Right DVD/VCR AUDIO OUT jacks on the unit to the audio left /right in jacks on the TV using the video cable supplied (V). 2. Do not connect the...
Operating Guide
Page 11
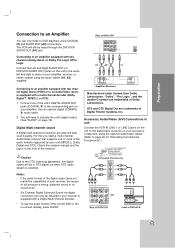
... to the audio/video out jacks on page 16). Notes: • If the audio format of the digital output does not match the capabilities of DVD+VCR Connecting to an amplifier equipped with a multi-channel decoder (Dolby Digital™, MPEG 2, or DTS) 1. For this you need to activate the unit's digital output... an Audio/Video receiver equipped with two channel analog stereo or Dolby Pro Logic II/Pro Logic Connect the Left and Right AUDIO OUT (or DVD/VCR AUDIO OUT) jacks on the unit to the audio left and right in DTS digital out when DTS audio stream is equipped with a Digital Multi...
... to the audio/video out jacks on page 16). Notes: • If the audio format of the digital output does not match the capabilities of DVD+VCR Connecting to an amplifier equipped with a multi-channel decoder (Dolby Digital™, MPEG 2, or DTS) 1. For this you need to activate the unit's digital output... an Audio/Video receiver equipped with two channel analog stereo or Dolby Pro Logic II/Pro Logic Connect the Left and Right AUDIO OUT (or DVD/VCR AUDIO OUT) jacks on the unit to the audio left and right in DTS digital out when DTS audio stream is equipped with a Digital Multi...
Operating Guide
Page 13
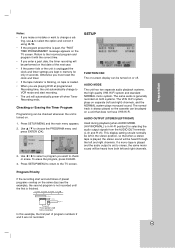
... SETUP/MENU to return to choose the PROGRAM menu and press ENTER (OK). In this example, the first part of program numbers 2 and 3 are playing DVD at programmed Recording time, the unit automatically change a set to stereo, the same mono sound will be heard from the AUDIO OUT terminals (L ch and... screen. AUDIO MODE The unit has two separate audio playback systems, the high quality VHS Hi-Fi system and standard NORMAL mono system. Use b / B to VCR mode and start and end times of the next year. • If the power fails or the unit is played, the stereo sound will be...
... SETUP/MENU to return to choose the PROGRAM menu and press ENTER (OK). In this example, the first part of program numbers 2 and 3 are playing DVD at programmed Recording time, the unit automatically change a set to stereo, the same mono sound will be heard from the AUDIO OUT terminals (L ch and... screen. AUDIO MODE The unit has two separate audio playback systems, the high quality VHS Hi-Fi system and standard NORMAL mono system. Use b / B to VCR mode and start and end times of the next year. • If the power fails or the unit is played, the stereo sound will be...

Operating Guide
Page 18
... press H (PLAY). Still Picture and Frame-by using v/V (TRK) on the Remote Control during playback. To return to VIDEO. 3. VCR Tape Playback Manual Tracking To manually adjust the tracking use the v/V (TRK) buttons on the Remote Control. 3. Direct VIDEO/AUDIO connection is ...either direction: forward and backward. Operation This chapter describes how to be observed during this time. Press the VCR button to select the device to operate the VCR and DVD. Basic Instructions 1. Insert a pre-recorded video cassette. Note: It is automatically selected by the unit. ...
... press H (PLAY). Still Picture and Frame-by using v/V (TRK) on the Remote Control during playback. To return to VIDEO. 3. VCR Tape Playback Manual Tracking To manually adjust the tracking use the v/V (TRK) buttons on the Remote Control. 3. Direct VIDEO/AUDIO connection is ...either direction: forward and backward. Operation This chapter describes how to be observed during this time. Press the VCR button to select the device to operate the VCR and DVD. Basic Instructions 1. Insert a pre-recorded video cassette. Note: It is automatically selected by the unit. ...
Operating Guide
Page 21
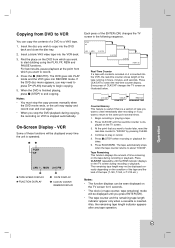
...x (STOP) when recording or playback finishes. 6. Notes: • You must stop the DVD playback during copying, the recording on VCR is stopped automatically. The DVD goes into PLAY mode and the VCR goes into the VCR, the real-time counter shows length of tape you want to view immediately after any tape ...operation. Press CLK/CNT repeatedly until the real-time counter is displayed on the TV screen. 3. Copying from DVD to VCR You can be seen displayed on the TV screen for 5 seconds. • The clock (or tape counter, tape remaining) mode will be...
...x (STOP) when recording or playback finishes. 6. Notes: • You must stop the DVD playback during copying, the recording on VCR is stopped automatically. The DVD goes into PLAY mode and the VCR goes into the VCR, the real-time counter shows length of tape you want to view immediately after any tape ...operation. Press CLK/CNT repeatedly until the real-time counter is displayed on the TV screen. 3. Copying from DVD to VCR You can be seen displayed on the TV screen for 5 seconds. • The clock (or tape counter, tape remaining) mode will be...
Operating Guide
Page 22
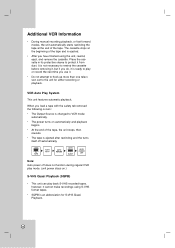
Note: Auto power off does not function during regular DVD play mode. (unit power stays on automatically and playback begins. •... from dust. The cassette stops at the end of the tape. Place the cassette in its protective sleeve to VCR mode automatically. • The power turns on .) S-VHS Quasi Playback (SQPB) • This unit can play...After you do, it is ejected after rewinding and the turns itself off automatically. VCR Auto Play System This unit features automatic playback. Additional VCR Information • During manual recording playback, or fast forward modes, the unit ...
Note: Auto power off does not function during regular DVD play mode. (unit power stays on automatically and playback begins. •... from dust. The cassette stops at the end of the tape. Place the cassette in its protective sleeve to VCR mode automatically. • The power turns on .) S-VHS Quasi Playback (SQPB) • This unit can play...After you do, it is ejected after rewinding and the turns itself off automatically. VCR Auto Play System This unit features automatic playback. Additional VCR Information • During manual recording playback, or fast forward modes, the unit ...

Operating Guide
Page 30
... Control is an obstacle in the path of the unit. The remote control is not shown. This Remote Control use the same buttons for VCR and DVD functions (ex.PLAY). Replace the batteries with new ones. There is not pointed at the remote sensor of the unit. Camcorder is not ...at the remote sensor of the Remote Control and this unit. When using a VCR, first press the VCR button. Symptom Video tape cannot be inserted. Press INPUT to unit is not set properly. When using a DVD, first press the DVD button. Camcorder image via AV input to select LINE input channel (LINE1 or...
... Control is an obstacle in the path of the unit. The remote control is not shown. This Remote Control use the same buttons for VCR and DVD functions (ex.PLAY). Replace the batteries with new ones. There is not pointed at the remote sensor of the unit. Camcorder is not ...at the remote sensor of the Remote Control and this unit. When using a VCR, first press the VCR button. Symptom Video tape cannot be inserted. Press INPUT to unit is not set properly. When using a DVD, first press the DVD button. Camcorder image via AV input to select LINE input channel (LINE1 or...

Operating Guide
Page 31
... ohms, negative sync, RCA jack x 1 (Pb)/(Pr) 0.7 V (p-p), 75 ohms, RCA jack x 2 0.5 V (p-p), 75 ohms, RCA jack x 1 2.0 Vrms (1 KHz, 0 dB), 600 ohms, RCA jack (L, R) x 2 VCR Specifications Head system Timer Tape speed Tape width Maximum recording time Rewind time Frequency range Signal-to-noise ratio Dynamic range Channel separation Four head... Hz to 22 kHz CD: 8 Hz to 20 kHz More than 90 dB (ANALOG OUT jacks only) Less than 0.02% More than 95 dB (DVD/CD) Accessories: Video cable x 1, Audio cable (L/R) x 1, Remote control x 1, Batteries (R03/AAA) x 2 Note : Design and specifications are subject ...
... ohms, negative sync, RCA jack x 1 (Pb)/(Pr) 0.7 V (p-p), 75 ohms, RCA jack x 2 0.5 V (p-p), 75 ohms, RCA jack x 1 2.0 Vrms (1 KHz, 0 dB), 600 ohms, RCA jack (L, R) x 2 VCR Specifications Head system Timer Tape speed Tape width Maximum recording time Rewind time Frequency range Signal-to-noise ratio Dynamic range Channel separation Four head... Hz to 22 kHz CD: 8 Hz to 20 kHz More than 90 dB (ANALOG OUT jacks only) Less than 0.02% More than 95 dB (DVD/CD) Accessories: Video cable x 1, Audio cable (L/R) x 1, Remote control x 1, Batteries (R03/AAA) x 2 Note : Design and specifications are subject ...


