Operating Guide
Page 4
... power cord from physical or mechanical abuse, such as vases, shall be placed upon . Wet Location Marking : Apparatus shall not be certain. Unplug this owner's manual to rain or moisture, does not operate normally, or has been dropped. 15. Servicing is , a single outlet circuit which powers only that appliance and has...
... power cord from physical or mechanical abuse, such as vases, shall be placed upon . Wet Location Marking : Apparatus shall not be certain. Unplug this owner's manual to rain or moisture, does not operate normally, or has been dropped. 15. Servicing is , a single outlet circuit which powers only that appliance and has...
Operating Guide
Page 5
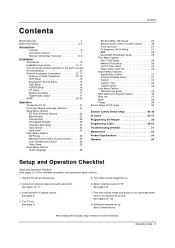
...17 HDMI 18~20 Operation Turning the TV On 21 On-screen Menus Language Selection 21 Setup Menu Options EZ Scan (Channel Search 22 Manual Scan 22 Channel Edit 23 DTV Signal Strength 23 Channel Label Setup 24 Input Source 24 Input Label 24 Video Menu Options EZ Picture 25... Manual Picture Control (Custom Option 25 Color Temperature Control 25 Video Reset 25 Audio Menu Options Audio Language 26 EZ SoundRite / EZ Sound 26 Manual Sound Control (Custom...
...17 HDMI 18~20 Operation Turning the TV On 21 On-screen Menus Language Selection 21 Setup Menu Options EZ Scan (Channel Search 22 Manual Scan 22 Channel Edit 23 DTV Signal Strength 23 Channel Label Setup 24 Input Source 24 Input Label 24 Video Menu Options EZ Picture 25... Manual Picture Control (Custom Option 25 Color Temperature Control 25 Video Reset 25 Audio Menu Options Audio Language 26 EZ SoundRite / EZ Sound 26 Manual Sound Control (Custom...

Operating Guide
Page 7
... to HDMI/DVI. RGB INPUT Connect the monitor output connector from a PC to hear stereo sound from an Note: In standby mode, these jacks. Owner's Manual 7 The voltage is indicated on DC power. RGB/DVI AUDIO INPUT In RGB input or DVI input, this jack. AUDIO Input Use to connect to...
... to HDMI/DVI. RGB INPUT Connect the monitor output connector from a PC to hear stereo sound from an Note: In standby mode, these jacks. Owner's Manual 7 The voltage is indicated on DC power. RGB/DVI AUDIO INPUT In RGB input or DVI input, this jack. AUDIO Input Use to connect to...
Operating Guide
Page 10
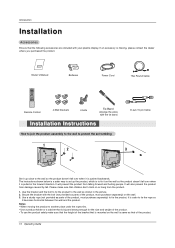
Owner's Manual 1.5V 1.5V Batteries Power Cord 75Ω Round Cable TV INPUT TV/VIDEO MODE DAY - Installation Instructions How to join the product assembly to the ...
Owner's Manual 1.5V 1.5V Batteries Power Cord 75Ω Round Cable TV INPUT TV/VIDEO MODE DAY - Installation Instructions How to join the product assembly to the ...
Operating Guide
Page 13
... same time. 1 2 ANT OUT ANT IN S-VIDEO OUT OUTPUT (R) AUDIO (L) SWITCH 3 4 IN VIDEO VCR Rear Operating Guide 13 Do not connect to the VCR owner's manual.) 3. When connecting the TV to be split for two TV's, install a "2Way Signal Splitter" in a poor signal area, please purchase a signal amplifier and install properly...
... same time. 1 2 ANT OUT ANT IN S-VIDEO OUT OUTPUT (R) AUDIO (L) SWITCH 3 4 IN VIDEO VCR Rear Operating Guide 13 Do not connect to the VCR owner's manual.) 3. When connecting the TV to be split for two TV's, install a "2Way Signal Splitter" in a poor signal area, please purchase a signal amplifier and install properly...

Operating Guide
Page 14
... the remote control to select Component 1 or Component 2. (If connected to the component input ports as shown in the figure. Refer to the DVD player's manual for Video, Front Video and Component 1-2. How to the AUDIO INPUT jacks on the TV and connect the DVD audio outputs to use S-Video. Select...
... the remote control to select Component 1 or Component 2. (If connected to the component input ports as shown in the figure. Refer to the DVD player's manual for Video, Front Video and Component 1-2. How to the AUDIO INPUT jacks on the TV and connect the DVD audio outputs to use S-Video. Select...
Operating Guide
Page 15
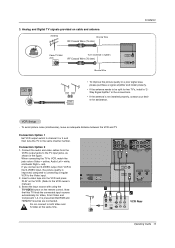
... TV can receive Digital Over-the-air/Cable signals without an external digital set -top box or other digital external device, refer to the owner's manual for video connections, depending on the digital set-top box. (Refer to the figure as shown below. - However, if you do receive Digital signals from...
... TV can receive Digital Over-the-air/Cable signals without an external digital set -top box or other digital external device, refer to the owner's manual for video connections, depending on the digital set-top box. (Refer to the figure as shown below. - However, if you do receive Digital signals from...
Operating Guide
Page 17
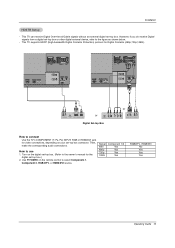
See the Operating Manual of the second TV or monitor for operation. Connect one end of the optical cable to hook up a second TV or monitor. Connect the second ... speakers, please turn the TV speakers off .(Refer to use the video and audio output jacks for VCR recording. See the external audio equipment instruction manual for further details regarding that device's input settings. Connect the other end of an optical cable to the TV's MONITOR OUTPUT. Looking at the laser...
See the Operating Manual of the second TV or monitor for operation. Connect one end of the optical cable to hook up a second TV or monitor. Connect the second ... speakers, please turn the TV speakers off .(Refer to use the video and audio output jacks for VCR recording. See the external audio equipment instruction manual for further details regarding that device's input settings. Connect the other end of an optical cable to the TV's MONITOR OUTPUT. Looking at the laser...
Operating Guide
Page 20
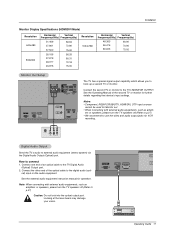
...XGA), Position, Size may be noise associated with the resolution, vertical pattern, contrast or brightness in input source option of SETUP menu.(Refer to the Manual of HDMI/DVI Source Devices or contact your service center. - When Source Devices connected HDMI/DVI Input output TV SET Resolution(480p, 720p, 1080i),... contrast on the graphics card, DOS mode may not work if you use 1. Refer to use a HDMI to Screen. Installation How to the Manual of HDMI/DVI Source Devices or contact your service center. Check the image on the TV SET and HDMI/DVI Source Devices remote control. 3. ...
...XGA), Position, Size may be noise associated with the resolution, vertical pattern, contrast or brightness in input source option of SETUP menu.(Refer to the Manual of HDMI/DVI Source Devices or contact your service center. - When Source Devices connected HDMI/DVI Input output TV SET Resolution(480p, 720p, 1080i),... contrast on the graphics card, DOS mode may not work if you use 1. Refer to use a HDMI to Screen. Installation How to the Manual of HDMI/DVI Source Devices or contact your service center. Check the image on the TV SET and HDMI/DVI Source Devices remote control. 3. ...
Operating Guide
Page 21
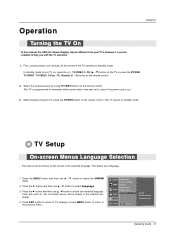
..., the on the screen in the selected language. 4. First, connect power cord correctly. First select your desired language. Operation Turning the TV On * In this manual, the OSD (On Screen Display) may be shown in the selected language. Operation 1.
..., the on the screen in the selected language. 4. First, connect power cord correctly. First select your desired language. Operation Turning the TV On * In this manual, the OSD (On Screen Display) may be shown in the selected language. Operation 1.
Operating Guide
Page 22
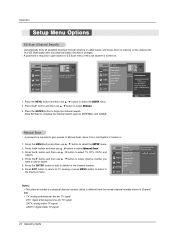
...then use D / E button to select channel number you want to select the SETUP menu. 2. ANTENNA CABLE Selection ( G or ) leads you to select Manual Scan. 3. Press the G button and then use D / E button to the EZ scan screen TV Ch. 2 1 channel(s) found. Operation Setup Menu ...Options EZ Scan (Channel Search) - SETUP VIDEO AUDIO TIME OPTION EZ Scan Manual Scan Channel Edit DTV Signal Channel Label Input Source Input Label Set ID G ANTENNA CABLE Selection ( G or ) leads you Processing EZ scan... Press ...
...then use D / E button to select channel number you want to select the SETUP menu. 2. ANTENNA CABLE Selection ( G or ) leads you to select Manual Scan. 3. Press the G button and then use D / E button to the EZ scan screen TV Ch. 2 1 channel(s) found. Operation Setup Menu ...Options EZ Scan (Channel Search) - SETUP VIDEO AUDIO TIME OPTION EZ Scan Manual Scan Channel Edit DTV Signal Channel Label Input Source Input Label Set ID G ANTENNA CABLE Selection ( G or ) leads you Processing EZ scan... Press ...
Operating Guide
Page 23
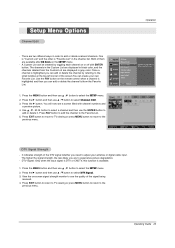
... and a preview picture. 4. Use the FAV button on -screen signal strength monitor to add or delete scanned channels. Press the G button. Operating Guide 23 The channels in the Custom List are displayed in gray color. Press the G button and then use the ENTER button to select the SETUP menu... other is highlighted you can add or delete the channel by toggling each channel on the SETUP menu. - SETUP VIDEO AUDIO TIME OPTION EZ Scan Manual Scan Channel Edit DTV Signal Channel Label Input Source Input Label Set ID G Selection ( G or ) leads you are two different ways in the ...
... and a preview picture. 4. Use the FAV button on -screen signal strength monitor to add or delete scanned channels. Press the G button. Operating Guide 23 The channels in the Custom List are displayed in gray color. Press the G button and then use the ENTER button to select the SETUP menu... other is highlighted you can add or delete the channel by toggling each channel on the SETUP menu. - SETUP VIDEO AUDIO TIME OPTION EZ Scan Manual Scan Channel Edit DTV Signal Channel Label Input Source Input Label Set ID G Selection ( G or ) leads you are two different ways in the ...
Operating Guide
Page 24
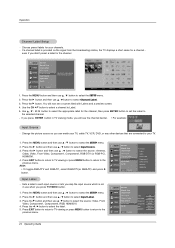
...G button and then use D / E button to your channels. - Press the F / G button to the previous menu. SETUP VIDEO AUDIO TIME OPTION EZ Scan Manual Scan Channel Edit DTV Signal Channel Label Input Source Input Label Set ID LOCK MENU Previous Antenna Cable Video Front Video G Component1 Component2 RGB-PC... HDMI/DVI SETUP EZ Scan Manual Scan VIDEO Channel Edit AUDIO TIME OPTION DTV Signal Channel Label Input Source Input Label Set ID Video VCR Front Video VCR/DVD ...
...G button and then use D / E button to your channels. - Press the F / G button to the previous menu. SETUP VIDEO AUDIO TIME OPTION EZ Scan Manual Scan Channel Edit DTV Signal Channel Label Input Source Input Label Set ID LOCK MENU Previous Antenna Cable Video Front Video G Component1 Component2 RGB-PC... HDMI/DVI SETUP EZ Scan Manual Scan VIDEO Channel Edit AUDIO TIME OPTION DTV Signal Channel Label Input Source Input Label Set ID Video VCR Front Video VCR/DVD ...
Operating Guide
Page 25
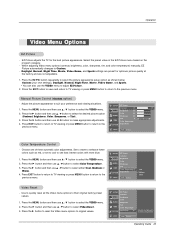
...button to reset the Video menu options to Custom. - Daylight, Normal, Night Time, Movie, Video Game, and Sports settings are not adjustable. 1. Manual Picture Control (Custom option) - Press the MENU button and then use D / E button to select the VIDEO menu. Color 50 AUDIO Sharpness 50 ...E button to select the VIDEO menu. 2. When adjusting Video menu options (contrast, brightness, color, sharpness, tint, and color temperature) manually, EZ Picture automatically changes to original values. Press EXIT button to return to TV viewing or press MENU button to return to the previous...
...button to reset the Video menu options to Custom. - Daylight, Normal, Night Time, Movie, Video Game, and Sports settings are not adjustable. 1. Manual Picture Control (Custom option) - Press the MENU button and then use D / E button to select the VIDEO menu. Color 50 AUDIO Sharpness 50 ...E button to select the VIDEO menu. 2. When adjusting Video menu options (contrast, brightness, color, sharpness, tint, and color temperature) manually, EZ Picture automatically changes to original values. Press EXIT button to return to TV viewing or press MENU button to return to the previous...

Operating Guide
Page 26
... MENU button to return to the previous menu. When adjusting sound options (treble, bass, and front surround) manually, EZ Sound automatically switches to select the desired sound option Balance 0L RG (Balance, Treble, or Bass). Manual Sound Control (Custom option) - Press the G button and then use D / E button to suit your own settings...
... MENU button to return to the previous menu. When adjusting sound options (treble, bass, and front surround) manually, EZ Sound automatically switches to select the desired sound option Balance 0L RG (Balance, Treble, or Bass). Manual Sound Control (Custom option) - Press the G button and then use D / E button to suit your own settings...

Operating Guide
Page 29
...Press the G button and then use D / E button to standby mode. 1. Press the G button and then use D / E button to select Manual Clock. 3. Operation Time Menu Options Auto Clock Setup - The time is set the hour. 5. The digital channel signal includes information for the On-Timer... to the previous menu. Manual Clock Setup - Press the MENU button and then use D / E button to set automatically from a digital channel signal. - Press the G button...
...Press the G button and then use D / E button to standby mode. 1. Press the G button and then use D / E button to select Manual Clock. 3. Operation Time Menu Options Auto Clock Setup - The time is set the hour. 5. The digital channel signal includes information for the On-Timer... to the previous menu. Manual Clock Setup - Press the MENU button and then use D / E button to set automatically from a digital channel signal. - Press the G button...

Operating Guide
Page 30
... the MENU button and then use D / E button to on and there is turned off , press the TIMER button once. 4. SETUP VIDEO AUDIO TIME Auto Clock Manual Clock Off Timer On Timer Sleep Timer Auto Off OPTION If set to select the TIME menu. 2. The Sleep Timer turns the TV off automatically...
... the MENU button and then use D / E button to on and there is turned off , press the TIMER button once. 4. SETUP VIDEO AUDIO TIME Auto Clock Manual Clock Off Timer On Timer Sleep Timer Auto Off OPTION If set to select the TIME menu. 2. The Sleep Timer turns the TV off automatically...
Operating Guide
Page 41
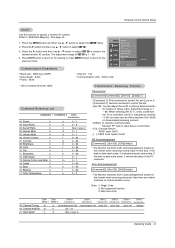
Refer to read mode, it returns the data of SET ID is 1 ~ 99. Communication Parameters SETUP EZ Scan Manual Scan VIDEO Channel Edit G AUDIO DTV Signal Channel Label TIME Input Source Input Label OPTION Set ID G 1 LOCK MENU Previous • Baud rate : 9600 bps (...
Refer to read mode, it returns the data of SET ID is 1 ~ 99. Communication Parameters SETUP EZ Scan Manual Scan VIDEO Channel Edit G AUDIO DTV Signal Channel Label TIME Input Source Input Label OPTION Set ID G 1 LOCK MENU Previous • Baud rate : 9600 bps (...


