Operating Guide
Page 5
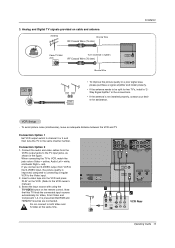
... 5. See page 8. 4. After reading this manual, keep it handy for TV. See pages 24. 3 Install batteries in remote control. Additional features set tumbling 10 External Equipment Connections 12~17 Antenna or Cable Connection 12~13 VCR Setup 13 External A/V Source ...all external video and audio equipment. Turn TV on . 2. Contents Contents Warning/Caution 2 Safety Instructions 3~4 Introduction Controls 6 Connection Options 7 Remote Control Key Functions 8~9 Installation Accessories 10 Installation Instructions 10~11 How to join the product assembly to the wall to your...
... 5. See page 8. 4. After reading this manual, keep it handy for TV. See pages 24. 3 Install batteries in remote control. Additional features set tumbling 10 External Equipment Connections 12~17 Antenna or Cable Connection 12~13 VCR Setup 13 External A/V Source ...all external video and audio equipment. Turn TV on . 2. Contents Contents Warning/Caution 2 Safety Instructions 3~4 Introduction Controls 6 Connection Options 7 Remote Control Key Functions 8~9 Installation Accessories 10 Installation Instructions 10~11 How to join the product assembly to the wall to your...

Operating Guide
Page 7
... TV or Monitor. DVD/DTV Input (Component 1-2) Connect a component video/audio device to the SVIDEO input. The voltage is indicated on DC power. Remote Control Port Connect your wired remote control here. S-Video Input Connect S-Video out from an Note: In standby mode, these external device to the appropriate input port. Connect to the...
... TV or Monitor. DVD/DTV Input (Component 1-2) Connect a component video/audio device to the SVIDEO input. The voltage is indicated on DC power. Remote Control Port Connect your wired remote control here. S-Video Input Connect S-Video out from an Note: In standby mode, these external device to the appropriate input port. Connect to the...
Operating Guide
Page 8
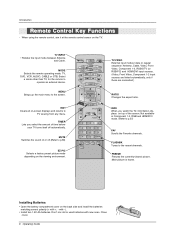
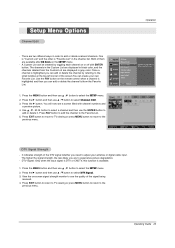
... sources are linked automatically, only if these are connected ) RATIO Changes the aspect ratio. Main picture is frozen. Introduction Remote Control Key Functions - Select a mode other than TV, for the remote to p.37) FLASHBK FREEZE FAV Scrolls the Favorite channels. MUTE Switches the sound on or off automatically. INFO When you... to TV viewing from any menu. Don't mix old or used batteries with -). • Install two 1.5V AA batteries. When using the remote control, aim it at the remote control sensor on the TV. MENU Brings up the main menu to the recent channels.
... sources are linked automatically, only if these are connected ) RATIO Changes the aspect ratio. Main picture is frozen. Introduction Remote Control Key Functions - Select a mode other than TV, for the remote to p.37) FLASHBK FREEZE FAV Scrolls the Favorite channels. MUTE Switches the sound on or off automatically. INFO When you... to TV viewing from any menu. Don't mix old or used batteries with -). • Install two 1.5V AA batteries. When using the remote control, aim it at the remote control sensor on the TV. MENU Brings up the main menu to the recent channels.

Operating Guide
Page 9
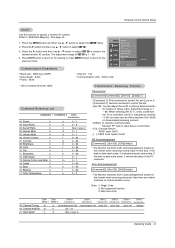
...Selects available channels found with EZ scan. FLASHBK FREEZE NUMBER buttons SAP Selects MTS sound: Mono, Stereo, and SAP in PC mode. Remote Control Key Functions Introduction POWER Turns your TV or any other programmed equipment on or off, depending on -screen menus and adjust the system ...: Off, CC1~4, Text1~4. ADJUST Adjusts screen position, size, and phase in Analog mode. TV INPUT TV/VIDEO MODE VCR/DVD BUTTONS • Control some video cassette recorders or DVD players. ("RECORD" button is not available for the pro- DAY - Change the audio language in DTV mode. gram...
...Selects available channels found with EZ scan. FLASHBK FREEZE NUMBER buttons SAP Selects MTS sound: Mono, Stereo, and SAP in PC mode. Remote Control Key Functions Introduction POWER Turns your TV or any other programmed equipment on or off, depending on -screen menus and adjust the system ...: Off, CC1~4, Text1~4. ADJUST Adjusts screen position, size, and phase in Analog mode. TV INPUT TV/VIDEO MODE VCR/DVD BUTTONS • Control some video cassette recorders or DVD players. ("RECORD" button is not available for the pro- DAY - Change the audio language in DTV mode. gram...
Operating Guide
Page 10
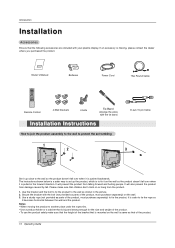
.... Use the bracket and the bolt to fix the product to fix it on or hang from the product. 1. GUIDE DAY + EXIT TIMER CC FLASHBK Remote Control 4-Wall brackets 2-bolts Tie Band Arrange the wires with your plasma display. Please make sure that the height of the bracket that is mounted on...
.... Use the bracket and the bolt to fix the product to fix it on or hang from the product. 1. GUIDE DAY + EXIT TIMER CC FLASHBK Remote Control 4-Wall brackets 2-bolts Tie Band Arrange the wires with your plasma display. Please make sure that the height of the bracket that is mounted on...
Operating Guide
Page 13
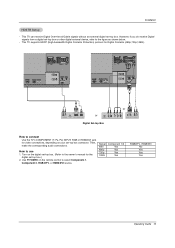
... Splitter" in the figure. compared to connecting a regular VCR to the VCR owner's manual.) 3. Insert a video tape into the VCR and press PLAY on the remote control. 3. If you connect an S-VIDEO output from the VCR's output jacks to the S-VIDEO input, the picture quality is presumed that this TV finds the...
... Splitter" in the figure. compared to connecting a regular VCR to the VCR owner's manual.) 3. Insert a video tape into the VCR and press PLAY on the remote control. 3. If you connect an S-VIDEO output from the VCR's output jacks to the S-VIDEO input, the picture quality is presumed that this TV finds the...

Operating Guide
Page 14
.... 2. It is presumed that this to the S-VIDEO input on the TV and connect the DVD audio outputs to the AUDIO INPUT jacks on the remote control to select Component 1 or Component 2. (If connected to the AUDIO INPUT jacks on DVD player Y Pb Pr Y B-Y R-Y Y Cb Cr Y PB PR 14... Guide Refer to the DVD player's manual for Video, Front Video and Component 1-2. Note that RGB and HDMI/DVI sources are connected. 2. Turn on the remote control. If your DVD player does not have component video output, use 1. DVD Setup R AUDIO L VIDEO Camcorder Video Game Device or DVD S-VIDEO (R) AUDIO...
.... 2. It is presumed that this to the S-VIDEO input on the TV and connect the DVD audio outputs to the AUDIO INPUT jacks on the remote control to select Component 1 or Component 2. (If connected to the AUDIO INPUT jacks on DVD player Y Pb Pr Y B-Y R-Y Y Cb Cr Y PB PR 14... Guide Refer to the DVD player's manual for Video, Front Video and Component 1-2. Note that RGB and HDMI/DVI sources are connected. 2. Turn on the remote control. If your DVD player does not have component video output, use 1. DVD Setup R AUDIO L VIDEO Camcorder Video Game Device or DVD S-VIDEO (R) AUDIO...
Operating Guide
Page 15
... HDSTB Setup - Use TV/VIDEO on the digital set-top box. (Refer to select Component 1, Component 2, RGB-DTV, or HDMI/DVI source. Turn on the remote control to the owner's manual for video connections, depending on your set -top box.) 2. Then, make the corresponding audio connections. However, if you do receive Digital...
... HDSTB Setup - Use TV/VIDEO on the digital set-top box. (Refer to select Component 1, Component 2, RGB-DTV, or HDMI/DVI source. Turn on the remote control to the owner's manual for video connections, depending on your set -top box.) 2. Then, make the corresponding audio connections. However, if you do receive Digital...
Operating Guide
Page 20
...(480p, 720p, 1080i), TV SET Display fit EIA/CEA861-B Specification to DVI Cable. - Check the image on the TV SET and HDMI/DVI Source Devices remote control. 3. Notes: - In case HDMI/DVI Source Devices is present, change the HDMI/DVI Source Devices to use a HDMI to Screen. Turn on the display by...
...(480p, 720p, 1080i), TV SET Display fit EIA/CEA861-B Specification to DVI Cable. - Check the image on the TV SET and HDMI/DVI Source Devices remote control. 3. Notes: - In case HDMI/DVI Source Devices is present, change the HDMI/DVI Source Devices to use a HDMI to Screen. Turn on the display by...
Operating Guide
Page 21
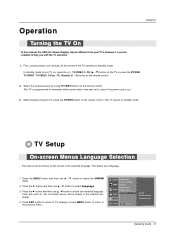
... this point on, the on the screen in the selected language. 4. Select the viewing source by using the TV, press the POWER button on the remote control. The menus can be shown on -screen menus will be different from your TV's because it was last set to, even if the power cord... turn TV on, press the , TV/VIDEO , CH (D / E) button on the TV or press the POWER, TV INPUT, TV/VIDEO, CH (D / E), Number (0 ~ 9) button on the remote control. 2. Operation Turning the TV On * In this manual, the OSD (On Screen Display) may be shown in the selected language. In standby mode to help...
... this point on, the on the screen in the selected language. 4. Select the viewing source by using the TV, press the POWER button on the remote control. The menus can be shown on -screen menus will be different from your TV's because it was last set to, even if the power cord... turn TV on, press the , TV/VIDEO , CH (D / E) button on the TV or press the POWER, TV INPUT, TV/VIDEO, CH (D / E), Number (0 ~ 9) button on the remote control. 2. Operation Turning the TV On * In this manual, the OSD (On Screen Display) may be shown in the selected language. In standby mode to help...
Operating Guide
Page 23
... add the channel to experience picture degradation. - The higher the signal strength, the less likely you to select the SETUP menu. 2. View the on the remote control when a channel is "Favorite List" in gray color. A Custom List can create your antenna or digital cable input. Use the FAV button on -screen signal...
... add the channel to experience picture degradation. - The higher the signal strength, the less likely you to select the SETUP menu. 2. View the on the remote control when a channel is "Favorite List" in gray color. A Custom List can create your antenna or digital cable input. Use the FAV button on -screen signal...

Operating Guide
Page 28
... SAP appear in a analog signal. Use the SAP button to select your desired MTS mode in turn. • If other languages are available on the remote control, this TV can receive MTS stereo programs and any SAP (Secondary Audio Program) that accompanies the stereo program; Press the MENU button and then use...
... SAP appear in a analog signal. Use the SAP button to select your desired MTS mode in turn. • If other languages are available on the remote control, this TV can receive MTS stereo programs and any SAP (Secondary Audio Program) that accompanies the stereo program; Press the MENU button and then use...

Operating Guide
Page 35
... to block specific channels, ratings, and external viewing sources. - Operating Guide 35 Once the option is set up blocking schemes to movies shown on the remote control. Press EXIT button to return to TV viewing or press MENU button to return to other TV programs. Unless you block certain TV programs intended...
... to block specific channels, ratings, and external viewing sources. - Operating Guide 35 Once the option is set up blocking schemes to movies shown on the remote control. Press EXIT button to return to TV viewing or press MENU button to return to other TV programs. Unless you block certain TV programs intended...

Operating Guide
Page 36
... the D / E / F / G button to select desired program, then press the ENTER button to TV viewing. 36 Operating Guide This function is broadcasted by broadcasting companies. - Operation Remote Control EPG (Electronic Program Guide) (In DTV mode) - The EPG supplies information such as program listings, start and end times for next 7 days. - The EPG displays...
... the D / E / F / G button to select desired program, then press the ENTER button to TV viewing. 36 Operating Guide This function is broadcasted by broadcasting companies. - Operation Remote Control EPG (Electronic Program Guide) (In DTV mode) - The EPG supplies information such as program listings, start and end times for next 7 days. - The EPG displays...
Operating Guide
Page 41
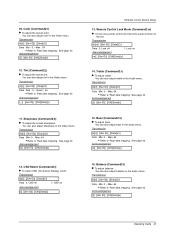
... bits • Parity : None • Stop bit : 1 bit • Communication code : ASCII code * Use a crossed (reverse) cable. Volume Control k 07. OSD Select k 13. Set ID is indicated as decimal (1~99) on menu and as Hexa decimal (0x0~0x63) on this time, if ... 1 MAND 2 DATA 0 (Hexadecimal) DATA 1 (Hexadecimal) DATA 2 DATA 3 DATA 4 DATA 5 (Hexadecimal) (Hexadecimal) (Hexadecimal) (Hexadecimal) 18. Remote Control Lock Mode k 14. Adjustment range is controlled. If the data is 1 ~ 99. 4. Press the G button and then use D / E button to 'Real Data Mapping'. Power k 02. ...
... bits • Parity : None • Stop bit : 1 bit • Communication code : ASCII code * Use a crossed (reverse) cable. Volume Control k 07. OSD Select k 13. Set ID is indicated as decimal (1~99) on menu and as Hexa decimal (0x0~0x63) on this time, if ... 1 MAND 2 DATA 0 (Hexadecimal) DATA 1 (Hexadecimal) DATA 2 DATA 3 DATA 4 DATA 5 (Hexadecimal) (Hexadecimal) (Hexadecimal) (Hexadecimal) 18. Remote Control Lock Mode k 14. Adjustment range is controlled. If the data is 1 ~ 99. 4. Press the G button and then use D / E button to 'Real Data Mapping'. Power k 02. ...

Operating Guide
Page 42
...][x] 42 Operating Guide 05. You can also adjust mute using the RATIO button on /off (Volume on) 1 : Volume mute on remote control. Volume Control (Command2:f) G To adjust volume. You can also adjust the screen format using the MUTE button on (Picture off (Picture on) 1 :... Screen mute on remote control. Brightness (Command2:h) G To adjust screen brightness. Transmission [k][b][ ][Set ID][ ][Data][Cr] Data 0: DTV 1: Analog 2: Video 3: Front Video 4: Component 1 ...
...][x] 42 Operating Guide 05. You can also adjust mute using the RATIO button on /off (Volume on) 1 : Volume mute on remote control. Volume Control (Command2:f) G To adjust volume. You can also adjust the screen format using the MUTE button on (Picture off (Picture on) 1 :... Screen mute on remote control. Brightness (Command2:h) G To adjust screen brightness. Transmission [k][b][ ][Set ID][ ][Data][Cr] Data 0: DTV 1: Analog 2: Video 3: Front Video 4: Component 1 ...
Operating Guide
Page 43
... Video menu. OSD Select (Command2:l) G To select OSD (On Screen Display) on the set. Remote Control Lock Mode (Command2:m) G To lock the remote control and the front panel controls on /off. Treble (Command2:r) G To adjust treble. Transmission [k][r][ ][Set ID][ ][Data][Cr]... Operating Guide 43 Transmission [k][l][ ][Set ID][ ][Data][Cr] Data 0: OSD off 1: Lock on Acknowledgement [l][ ][Set ID][ ][OK][Data][x] External Control Device Setup 13. See page 42. Acknowledgement [i][ ][Set ID][ ][OK][Data][x] 10. Acknowledgement [r][ ][Set ID][ ][OK][Data][x] 15. Acknowledgement [s][...
... Video menu. OSD Select (Command2:l) G To select OSD (On Screen Display) on the set. Remote Control Lock Mode (Command2:m) G To lock the remote control and the front panel controls on /off. Treble (Command2:r) G To adjust treble. Transmission [k][r][ ][Set ID][ ][Data][Cr]... Operating Guide 43 Transmission [k][l][ ][Set ID][ ][Data][Cr] Data 0: OSD off 1: Lock on Acknowledgement [l][ ][Set ID][ ][OK][Data][x] External Control Device Setup 13. See page 42. Acknowledgement [i][ ][Set ID][ ][OK][Data][x] 10. Acknowledgement [r][ ][Set ID][ ][OK][Data][x] 15. Acknowledgement [s][...

Operating Guide
Page 46
Tf Tf 0.56 ms 2.24 ms 46 Operating Guide Tf=108ms @455KHz IR Codes IR Codes How to Connect G Connect your wired remote control to the Remote Control port on the TV. Remote Control IR Codes G Output waveform Single pulse, modulated with 37.917KHz signal at 455KHz TC Carrier frequency FCAR = 1/TC = fOSC/12 T1 Duty ratio...
Tf Tf 0.56 ms 2.24 ms 46 Operating Guide Tf=108ms @455KHz IR Codes IR Codes How to Connect G Connect your wired remote control to the Remote Control port on the TV. Remote Control IR Codes G Output waveform Single pulse, modulated with 37.917KHz signal at 455KHz TC Carrier frequency FCAR = 1/TC = fOSC/12 T1 Duty ratio...
Operating Guide
Page 48
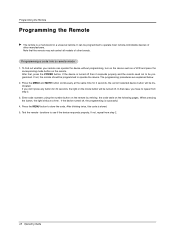
...press the corresponding mode button on the following pages. After that the remote may not control all models of other brands. If not, the remote should be turned off. If you have to operate most remote-controllable devices of other manufacturers. Enter code numbers using the number button ...on the remote by refering the code table on the remote. If the device turned off, the programming...
...press the corresponding mode button on the following pages. After that the remote may not control all models of other brands. If not, the remote should be turned off. If you have to operate most remote-controllable devices of other manufacturers. Enter code numbers using the number button ...on the remote by refering the code table on the remote. If the device turned off, the programming...
Operating Guide
Page 51
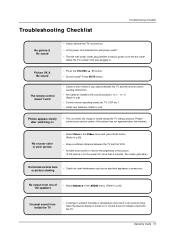
Picture OK & No sound The remote control doesn't work • Press the VOLUME (D / E) button. • Sound ...; Check for local interference such as an electrical appliance or power tool. to -)? (Refer to p.8) • Correct remote operating mode set: TV, VCR etc.? • Install new batteries. (Refer to +, - Operating Guide 51 No ...and press the G button. (Refer to p.25) • Keep a sufficient distance between the TV and the remote control causing obstruction. • Are batteries installed with the TV. Troubleshooting Checklist Troubleshooting Checklist No picture & No sound ...
Picture OK & No sound The remote control doesn't work • Press the VOLUME (D / E) button. • Sound ...; Check for local interference such as an electrical appliance or power tool. to -)? (Refer to p.8) • Correct remote operating mode set: TV, VCR etc.? • Install new batteries. (Refer to +, - Operating Guide 51 No ...and press the G button. (Refer to p.25) • Keep a sufficient distance between the TV and the remote control causing obstruction. • Are batteries installed with the TV. Troubleshooting Checklist Troubleshooting Checklist No picture & No sound ...


