User Guide
Page 3
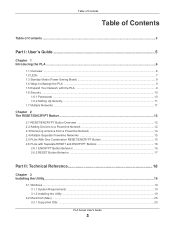
... 15 2.6 PLAs with Separate RESET and ENCRYPT Buttons 16 2.6.1 ENCRYPT Button Behavior ...16 2.6.2 RESET Button Behavior ...17 Part II: Technical Reference 18 Chapter 3 Installing the Utility...19 3.1 Windows ...19 3.1.1 System Requirements ...19 3.1.2 Installing the Utility ...19 3.2 Macintosh (Mac) ...25 3.2.1 Supported OSs ...25 PLA Series User's Guide 3
... 15 2.6 PLAs with Separate RESET and ENCRYPT Buttons 16 2.6.1 ENCRYPT Button Behavior ...16 2.6.2 RESET Button Behavior ...17 Part II: Technical Reference 18 Chapter 3 Installing the Utility...19 3.1 Windows ...19 3.1.1 System Requirements ...19 3.1.2 Installing the Utility ...19 3.2 Macintosh (Mac) ...25 3.2.1 Supported OSs ...25 PLA Series User's Guide 3
User Guide
Page 4
... 4.1 Overview ...28 4.1.1 Powerline Network Security ...28 4.1.2 Device Access Key (DAK) ...29 4.2 Starting the Configuration Utility ...29 4.3 Network Info Screen ...29 4.3.1 Icon View ...30 4.3.2 List View ...31 4.4 Configuration Screen ...32 4.5 ...Adapter 41 5.6 Splitting a Network into Two Networks 43 5.7 Troubleshooting ...45 Chapter 6 Troubleshooting...46 6.1 Power and Light Problems ...46 6.2 Configuration Utility Problems ...47 6.3 Powerline Problems ...48 6.4 RESET/ENCRYPT Button Problems 48 Appendix A Customer Support ...50 Appendix B Legal Information...56 Index ...59 PLA ...
... 4.1 Overview ...28 4.1.1 Powerline Network Security ...28 4.1.2 Device Access Key (DAK) ...29 4.2 Starting the Configuration Utility ...29 4.3 Network Info Screen ...29 4.3.1 Icon View ...30 4.3.2 List View ...31 4.4 Configuration Screen ...32 4.5 ...Adapter 41 5.6 Splitting a Network into Two Networks 43 5.7 Troubleshooting ...45 Chapter 6 Troubleshooting...46 6.1 Power and Light Problems ...46 6.2 Configuration Utility Problems ...47 6.3 Powerline Problems ...48 6.4 RESET/ENCRYPT Button Problems 48 Appendix A Customer Support ...50 Appendix B Legal Information...56 Index ...59 PLA ...

User Guide
Page 9
...modem/router first. The PLA wakes up from a previously working Ethernet connection. See Chapter 3 on page 19 for instructions on installing the utility. 1.5 Expand Your Network with each other electrical outlet in any room of information. The same process occurs when you disconnect the PLA from...of a house, all without the need for instructions on page 12 for any other at high data transfer rates. Use the ZyXEL PLA Series Configuration utility (or utility, for an Ethernet connection. Chapter 1 Introducing the PLA 1.3 Standby Mode (Power Saving Mode) Your PLA is going into an ...
...modem/router first. The PLA wakes up from a previously working Ethernet connection. See Chapter 3 on page 19 for instructions on installing the utility. 1.5 Expand Your Network with each other electrical outlet in any room of information. The same process occurs when you disconnect the PLA from...of a house, all without the need for instructions on page 12 for any other at high data transfer rates. Use the ZyXEL PLA Series Configuration utility (or utility, for an Ethernet connection. Chapter 1 Introducing the PLA 1.3 Standby Mode (Power Saving Mode) Your PLA is going into an ...

User Guide
Page 10
...gateway such as a modem and plug it is printed on your PLA. 1.6.1 Passwords You use two types of passwords in the ZyXEL PLA Series Configuration utility. This password is important to manage the powerline adapters on your home and connecting other outlets in your home. PLA Series User...same powerline network name "HomePlugAV". In order to set up security on the powerline adapter itself. Change the network name via the ZyXEL PLA Series Configuration utility or RESET/ENCRYPT button to add the remote powerline adapters' passwords (those on page 32. Plug a second PLA into an ...
...gateway such as a modem and plug it is printed on your PLA. 1.6.1 Passwords You use two types of passwords in the ZyXEL PLA Series Configuration utility. This password is important to manage the powerline adapters on your home and connecting other outlets in your home. PLA Series User...same powerline network name "HomePlugAV". In order to set up security on the powerline adapter itself. Change the network name via the ZyXEL PLA Series Configuration utility or RESET/ENCRYPT button to add the remote powerline adapters' passwords (those on page 32. Plug a second PLA into an ...

User Guide
Page 11
... network by more information on how to set up security on the powerline network in your home. 1 It's easy and only requires you use the ZyXEL PLA Series Configuration utility to implement multiple powerline networks in your network.
... network by more information on how to set up security on the powerline network in your home. 1 It's easy and only requires you use the ZyXEL PLA Series Configuration utility to implement multiple powerline networks in your network.
User Guide
Page 19
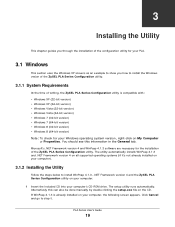
...Windows 8 (64-bit version) Note: To check for the installation of the ZyXEL PLA Series Configuration utility. Click Cancel and go to install WinPcap 4.1.3, .NET Framework version 4 and the ZyXEL PLA Series Configuration utility on your computer. 1 Insert the included CD into your computer's CD-ROM ...screens as an example to show you how to install the Windows vesion of the ZyXEL PLA Series Configuration utility. 3.1.1 System Requirements At the time of writing, the ZyXEL PLA Series Configuration utility is already installed on your computer, the following screen appears. Microsoft's .NET ...
...Windows 8 (64-bit version) Note: To check for the installation of the ZyXEL PLA Series Configuration utility. Click Cancel and go to install WinPcap 4.1.3, .NET Framework version 4 and the ZyXEL PLA Series Configuration utility on your computer. 1 Insert the included CD into your computer's CD-ROM ...screens as an example to show you how to install the Windows vesion of the ZyXEL PLA Series Configuration utility. 3.1.1 System Requirements At the time of writing, the ZyXEL PLA Series Configuration utility is already installed on your computer, the following screen appears. Microsoft's .NET ...

User Guide
Page 20
PLA Series User's Guide 20 Chapter 3 Installing the Utility Otherwise, the WinPcap setup wizard runs automatically. Click Install to start the WinPcap driver at boot time if you want to install WinPcap. Click Next to continue. 2 Review the license agreement, and click I Agree to proceed. 3 Select Automatically start WinPcap automatically when the computer boots.
PLA Series User's Guide 20 Chapter 3 Installing the Utility Otherwise, the WinPcap setup wizard runs automatically. Click Install to start the WinPcap driver at boot time if you want to install WinPcap. Click Next to continue. 2 Review the license agreement, and click I Agree to proceed. 3 Select Automatically start WinPcap automatically when the computer boots.

User Guide
Page 21
PLA Series User's Guide 21 Note: If you to proceed. Review Microsoft's License Agreement, select I want to manually reboot later, and click Finish to exit the wizard. 5 A prompt appears asking you already have read and accept the license terms. and click Intall to install the .NET Framework version 4. Chapter 3 Installing the Utility 4 Select I have .NET Framework version 4 installed on your computer this step can be skipped.
PLA Series User's Guide 21 Note: If you to proceed. Review Microsoft's License Agreement, select I want to manually reboot later, and click Finish to exit the wizard. 5 A prompt appears asking you already have read and accept the license terms. and click Intall to install the .NET Framework version 4. Chapter 3 Installing the Utility 4 Select I have .NET Framework version 4 installed on your computer this step can be skipped.

User Guide
Page 22
Chapter 3 Installing the Utility 6 The next screen allows you to see the progress of the installation. 7 Click Finish to close the window. PLA Series User's Guide 22
Chapter 3 Installing the Utility 6 The next screen allows you to see the progress of the installation. 7 Click Finish to close the window. PLA Series User's Guide 22

User Guide
Page 23
PLA Series User's Guide 23 Click Yes or Next to the default folder. Click Cancel only if you want to abort the installation. 9 Click Install to install the utility to continue through the initial screen. Chapter 3 Installing the Utility 8 The utility installation wizard runs automatically.
PLA Series User's Guide 23 Click Yes or Next to the default folder. Click Cancel only if you want to abort the installation. 9 Click Install to install the utility to continue through the initial screen. Chapter 3 Installing the Utility 8 The utility installation wizard runs automatically.

User Guide
Page 24
Chapter 3 Installing the Utility Figure 7 Install Destination Folder 10 The screen shows you the progress of the installation. Figure 8 Utility Installation Process 11 Click Finish to exit the wizard. PLA Series User's Guide 24
Chapter 3 Installing the Utility Figure 7 Install Destination Folder 10 The screen shows you the progress of the installation. Figure 8 Utility Installation Process 11 Click Finish to exit the wizard. PLA Series User's Guide 24
User Guide
Page 25
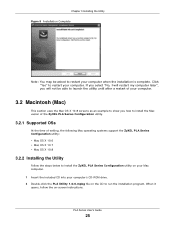
... I will restart my computer later", you how to install the Mac vesion of the ZyXEL PLA Series Configuration utility. 3.2.1 Supported OSs At the time of writing, the following Mac operating systems support the ZyXEL PLA Series Configuration utility: • Mac OS X 10.6 • Mac OS X 10.7 • ...Mac OS X 10.8 3.2.2 Installing the Utility Follow the steps below to install the ZyXEL PLA Series Configuration utility on your Mac computer. 1 Insert the...
... I will restart my computer later", you how to install the Mac vesion of the ZyXEL PLA Series Configuration utility. 3.2.1 Supported OSs At the time of writing, the following Mac operating systems support the ZyXEL PLA Series Configuration utility: • Mac OS X 10.6 • Mac OS X 10.7 • ...Mac OS X 10.8 3.2.2 Installing the Utility Follow the steps below to install the ZyXEL PLA Series Configuration utility on your Mac computer. 1 Insert the...

User Guide
Page 26
Click Close. PLA Series User's Guide 26 to specify a different location on your computer. Chapter 3 Installing the Utility 3 Click Install to install the utility to your computer. 4 When the installation is finished, a screen appears to confirm the PLA Series Configuration Utility has been successfully installed to the default folder, or click Change Install Location ...
Click Close. PLA Series User's Guide 26 to specify a different location on your computer. Chapter 3 Installing the Utility 3 Click Install to install the utility to your computer. 4 When the installation is finished, a screen appears to confirm the PLA Series Configuration Utility has been successfully installed to the default folder, or click Change Install Location ...

User Guide
Page 27
Chapter 3 Installing the Utility 5 After installing the utility, you can find the utility icon in the Launchpad screen. If you are running Mac OS X 10.7 or later, you can also see the utility icon in your Applications folder. PLA Series User's Guide 27
Chapter 3 Installing the Utility 5 After installing the utility, you can find the utility icon in the Launchpad screen. If you are running Mac OS X 10.7 or later, you can also see the utility icon in your Applications folder. PLA Series User's Guide 27
User Guide
Page 28
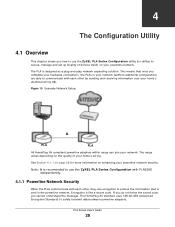
CHAPTER 4 The Configuration Utility 4.1 Overview This chapter shows you how to use the ZyXEL PLA Series Configuration utility (or utility) to secure, manage and set up Quality of your home's wiring. The PLA is like a secret code. The HomePlug AV standard uses 128-bit AES... (Advanced Encryption Standard) to communicate with each other, they use the ZyXEL PLA Series Configuration with ...
CHAPTER 4 The Configuration Utility 4.1 Overview This chapter shows you how to use the ZyXEL PLA Series Configuration utility (or utility) to secure, manage and set up Quality of your home's wiring. The PLA is like a secret code. The HomePlug AV standard uses 128-bit AES... (Advanced Encryption Standard) to communicate with each other, they use the ZyXEL PLA Series Configuration with ...
User Guide
Page 29
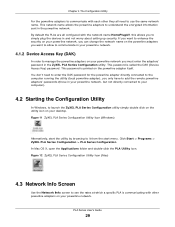
...on your desktop. PLA Series User's Guide 29 Click Start > Programs > ZyXEL PLA Series Configuration > PLA Series Configuration. Figure 11 ZyXEL PLA Series Configuration Utility Icon (Windows) Alternatively, start the utility by browsing to it from the start menu. By default the PLAs are ...in your powerline network, but not directly connected to your computer). 4.2 Starting the Configuration Utility In Windows, to launch the ZyXEL PLA Series Configuration utility simply double click on the utility icon on your powerline network. This password is called the DAK (Device Access Key) password...
...on your desktop. PLA Series User's Guide 29 Click Start > Programs > ZyXEL PLA Series Configuration > PLA Series Configuration. Figure 11 ZyXEL PLA Series Configuration Utility Icon (Windows) Alternatively, start the utility by browsing to it from the start menu. By default the PLAs are ...in your powerline network, but not directly connected to your computer). 4.2 Starting the Configuration Utility In Windows, to launch the ZyXEL PLA Series Configuration utility simply double click on the utility icon on your powerline network. This password is called the DAK (Device Access Key) password...

User Guide
Page 30
...shows you how fast the selected powerline adapter sent information to or receive information from the powerline adapter connected to the computer running the configuration utility to all the Remote powerline adapters. Click Refresh to select a powerline adapter in a list ( ). ) or view transmission/ 4.3.1 Icon... Use the up/down arrow or just click a device icon at the left side to update the screen immediately. Chapter 4 The Configuration Utility You can click a device's Info button to open a screen, where you the network connection status of transmission from this device. The ...
...shows you how fast the selected powerline adapter sent information to or receive information from the powerline adapter connected to the computer running the configuration utility to all the Remote powerline adapters. Click Refresh to select a powerline adapter in a list ( ). ) or view transmission/ 4.3.1 Icon... Use the up/down arrow or just click a device icon at the left side to update the screen immediately. Chapter 4 The Configuration Utility You can click a device's Info button to open a screen, where you the network connection status of transmission from this device. The ...

User Guide
Page 31
Chapter 4 The Configuration Utility Figure 14 Network Info Screen (Icon) > Info 4.3.2 List View Figure 15 Network Info Screen (List) The following table describes the labels in your computer has ...
Chapter 4 The Configuration Utility Figure 14 Network Info Screen (Icon) > Info 4.3.2 List View Figure 15 Network Info Screen (List) The following table describes the labels in your computer has ...

User Guide
Page 32
...Configuration screen to see which communicate in your powerline network but not directly connected to set up when you launch the utility. PLA Series User's Guide 32 This field displays how fast information is on your powerline network. Raw data refers ...data transmission rate / raw data transmission rate". Application data reflects more accurately how fast devices are "0-9" and "a-f"). Chapter 4 The Configuration Utility Table 9 Network Info Screen (List) (continued) LABEL DESCRIPTION Select a powerline adapter from the selected powerline adapter to this table are...
...Configuration screen to see which communicate in your powerline network but not directly connected to set up when you launch the utility. PLA Series User's Guide 32 This field displays how fast information is on your powerline network. Raw data refers ...data transmission rate / raw data transmission rate". Application data reflects more accurately how fast devices are "0-9" and "a-f"). Chapter 4 The Configuration Utility Table 9 Network Info Screen (List) (continued) LABEL DESCRIPTION Select a powerline adapter from the selected powerline adapter to this table are...

User Guide
Page 33
...password of the powerline adapter you have two powerline networks. Different powerline networks are configuring. PLA Series User's Guide 33 The configuration utility automatically updates this screen. This is a read-only field which shows the MAC address of the remote powerline adapter. The fields... FW version DAK Password Scan • Local, if it is identifying the powerline adapter directly connected to the computer running the configuration utility. • Remote, if it is displayed. This is a read -only field which powerline network information is a powerline adapter in...
...password of the powerline adapter you have two powerline networks. Different powerline networks are configuring. PLA Series User's Guide 33 The configuration utility automatically updates this screen. This is a read-only field which shows the MAC address of the remote powerline adapter. The fields... FW version DAK Password Scan • Local, if it is identifying the powerline adapter directly connected to the computer running the configuration utility. • Remote, if it is displayed. This is a read -only field which powerline network information is a powerline adapter in...