Audiovox KLV3913 Support Question
Audiovox KLV3913 Support Question
Find answers below for this question about Audiovox KLV3913 - 12" 720p LCD TV/DVD Combo.Need a Audiovox KLV3913 manual? We have 1 online manual for this item!
Question posted by clairjedrey on March 30th, 2014
Is There A Store In The 02420 Area That Can Look At/repair My Audiovox3913.
My set stopped working yesterday. I have tried everything that I can think of and it just stopped. I had the DVD playing when it broke. TV does not work either. Thank you. Clair Jedrey
Current Answers
Related Audiovox KLV3913 Manual Pages
Owners Manual - Page 1
Please visit online help at http://www.1800customersupport.com/audiovox TM
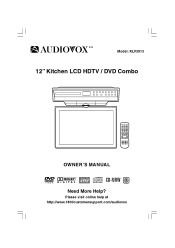
Model: KLV3913
12" Kitchen LCD HDTV / DVD Combo
OWNER'S MANUAL
R
1
Need More Help?
Owners Manual - Page 3
... is connected. • Consult the dealer or an experienced radio/TV technician for a Class B digital device, pursuant to operate the ... broadcast, show, broadcast on , the user is encouraged to try to correct the interference by Macrovision. This equipment generates, uses, ...determined by turning the equipment off and on cable, play in accordance with the Class FCC limits. This product ...
Owners Manual - Page 4
... produce heat.
9. A grounding type plug has two blades and a third grounding prong. Use only with a cart, stand, tripod, bracket, or table specified by the manufacturer.
12. When a cart is damaged, liquid has spilled or objects have fallen into your safety.
Follow all warnings.
4. Unplug this apparatus near any way, such as...
Owners Manual - Page 5
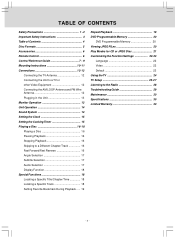
...-11 Connections 12-13
Connecting the TV Antenna 12 Connecting the Unit to a TV or other Video Equipment 12 Connecting the AM LOOP Antenna and FM Wire Antenna 12 Plugging in the Unit 13 Monitor Operation 13 Unit Operation 14 Sound System 14 Setting the Clock 15 Setting the CookingTimer 15 Playing a Disc 16-18 Playing a Disc 1 6 Pausing Playback 16 Stopping Playback...
Owners Manual - Page 6

... to read the documentation provided with the DVD. "Chapters" are sections of this unit if they were purchased from outside your geographic area or made for subtitles
Screen aspect ratio
Multiple camera angles Region code indicator
Note: • When playing a CD-G (Graphics) or CD EXTRA disc, the audio portion will be able to the...
Owners Manual - Page 7

... the same or equivalent type. CAUTION: When discarding batteries, environmental problems must be strictly followed.
- 6 - Insert two AAA batteries. To Install Batteries
1.
In this case, try attaching the magnetic remote control to the side of the refrigerator.
• Point the remote control at the REMOTE SENSOR located on the unit. •...
Owners Manual - Page 8

EXIT
TV MENU
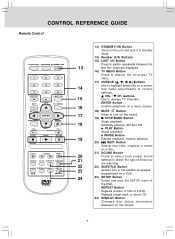
5) DVD MENU Button
4
Press to enter the main menu of the
RETURN
DVD you are recorded on a DVD.
10
FORMAT
10) GOTO Button
11 MTS
Goes directly to a location on a DVD/ CD.
12
11) AUDIO Button
Selects audio soundtracks of a DVD or
change the output mode of a CD. MTS Button
Press to select MONO sound,
STEREO sound...
Owners Manual - Page 9
...
21
settings to match the type of show you
are watching.
22
22) SUBTITLE Button
23
Selects one of the subtitle languages
programmed on a DVD.
24
23) SETUP Button Enters and exits the SETUP menu of a DVD. CH+ / CH-
CONTROL REFERENCE GUIDE
Remote Control
PICTURE
1 4 7
EXIT
2
3
5
6
8
9
LAST CH
0
TV MENU
RETURN
DVD MENU
MUTE
STOP BAND...
Owners Manual - Page 10
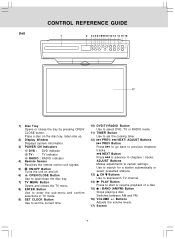
... Stops playing a disc. Use to search for a station automatically or select presetted stations. 13) CH Buttons Use to skip/search TV channel. 14) PLAY ...TV mode.
9) SET CLOCK Button
Use to set the current time.
10) DVD/TV/RADIO Button Use to select DVD, TV or RADIO mode.
11) TIMER Button Use to set the cooking timer.
12) PREV/ NEXT/ ADJUST Buttons PREV Button
Press to go back to certain settings...
Owners Manual - Page 11

... the desired location inside of them . Partially tighten each screw until all four holes marked on the Mounting Template (see Figure 2). b) This unit includes three sets of four spacers of your cabinet does NOT have an overhang:
a) Eight screws are included with 1/4" bit; 2) Phillips-head (cross style) screwdriver. The spacers can...
Owners Manual - Page 12

... down and push the unit and spacers onto the screws, then hold the unit up until they are using the template, cut out the corresponding area on the template, but do not fully tighten the screws until all of them have been started (see Figure 5).
Owners Manual - Page 13

AM: Fully unwind and rotate the loop antenna then position it for the best reception.
- 12 - Connect the VIDEO OUT on your TV or other Video Equipment
Use the Video cable (not supplied).
TV or other Video Equipment
(yellow) Video cable (not supplied)
VIDEO IN
Connecting the AM LOOP Antenna and FM Wire Antenna
Connect the AM LOOP antenna (included...
Owners Manual - Page 14
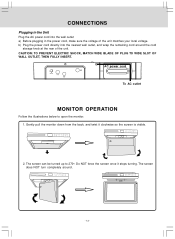
..., MATCH WIDE BLADE OF PLUG TO WIDE SLOT OF WALL OUTLET, THEN FULLY INSERT. Gently pull the monitor down from the back, and twist it stops turning. Do NOT force the screen once it clockwise so the screen is visible.
2. b) Plug the power cord directly into the wall outlet a) Before plugging...
Owners Manual - Page 15

... Dolby Laboratories. 'Dolby' and the double-D symbol are trademarks of excellent quality audio. After a short period of time, "DVD" will appear on the front display and the DVD logo (start-up picture) will begin on the screen.
• Press the DVD/TV/RADIO button (the FUNCTION button on the remote control) to turn the unit...
Owners Manual - Page 16
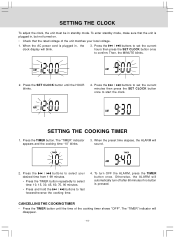
... no button is plugged in, the clock display will blink.
3. The "TIMER" indicator will sound.
2. Then, the MINUTE blinks.
2. Press the TIMER button. Press the SET CLOCK button until the time of the unit matches your desired time from 1-99 minutes.
• Press the TIMER button repeatedly to select time: 10...
Owners Manual - Page 25
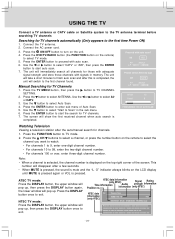
...TV
Connect a TV antenna or CATV cable or Satellite system to the TV antenna terminal before searching TV channels
Searching for TV channels. 7. Press the DVD/TV... the LCD display
until... and store those ...TV channels automatically (Only appears to the first time Power ON)
1. Proceed with auto scan.
6. Connect the TV antenna. 2. Press the ENTER button to TV CHANNEL SETTING.
2. Press the TV...
Owners Manual - Page 27

... will change . 3. Repeat steps 2 to 4 to the factory settings, all your selected mode immediately. Color Mode :
Adjust the three color temperature of TV menu showing on screen. TV SETUP
TV Timer Setting
1.
Use the or button to select the options (Language /
Color Mode / Restore Setting).
4. Note: TV TIMER SETTING is different from English / Français / Españ...
Owners Manual - Page 28
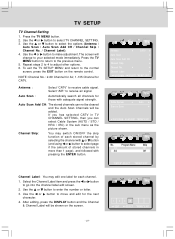
... or button to adjust other options. 6. Repeat steps 2 to 4 to make adjustment.
Use the or button to select TV CHANNEL SETTING. 3. TV SETUP
TV Channel Setting
1. Use the or button to move and edit for each stored channel by selecting the channel with adequate signal strength. NOTE: Channel No. : 2-69 Channel for Air, 1-135 Channel for...
Owners Manual - Page 29

...in a station, the search stops.
• The search may not stop at a station with a very weak signal. Press the DVD/TV/RADIO button (the FUNCTION button...on the front panel or the TUNING buttons on the LCD display until the tuner starts searching for the best reception...select AM or FM. 3. Press the / BAND (AM/FM) button to store other stations.
Press the / BAND (AM/FM) button to a Station ...
Owners Manual - Page 32

...252-6123 or www.1800customersupport.com/audiovox Hours: Monday-Thursday: 9-7, Friday: 9-5, Saturday: 9-12 EST Important: You are warranted to state. PLEASE DO NOT RETURN YOUR UNIT TO VENTURER WITHOUT..., modify or extend the terms of the limited warranties set Serial no Invoice no Date purchased Dealer name
FOR SERVICE AND REPAIR, PLEASE VISIT www.1800customersupport.com/audiovox
- 31 - ...
Similar Questions

Audiovox Klv3913
I Have The Above Model Audiovox 12" Kitchen Lcd Hdtv/dvd Combo.serial #: Hm120hd 100056the Tv Stoppe...
I Have The Above Model Audiovox 12" Kitchen Lcd Hdtv/dvd Combo.serial #: Hm120hd 100056the Tv Stoppe...
(Posted by PSE 5 years ago)


Store Channels In A Ve1040
how to store or delete channels in A VE1040 AUDIOVOX UNDER COUNTER dvd/tv
how to store or delete channels in A VE1040 AUDIOVOX UNDER COUNTER dvd/tv
(Posted by avtmex 11 years ago)

Audiovox Under Cabinet Tv
Have an Audiovox under cabinet tv, 12" LCD TV/DVD combomodel KLV39120CE. When you power it on it goe...
Have an Audiovox under cabinet tv, 12" LCD TV/DVD combomodel KLV39120CE. When you power it on it goe...
(Posted by raverett 11 years ago)

Kvl 3913 Broken Swing Arm
the plastic piece that swivels with the LCD attached broke from our under the cabinet audiovox KVL 3...
the plastic piece that swivels with the LCD attached broke from our under the cabinet audiovox KVL 3...
(Posted by patnat1120 12 years ago)