Dell Inspiron N4110 Support Question
Dell Inspiron N4110 Support Question
Find answers below for this question about Dell Inspiron N4110.Need a Dell Inspiron N4110 manual? We have 4 online manuals for this item!
Question posted by Kjvfw1 on April 6th, 2014
Dell Inspiron N4110 How Can Remove Cd &dvd Drive
The person who posted this question about this Dell product did not include a detailed explanation. Please use the "Request More Information" button to the right if more details would help you to answer this question.
Current Answers
Answer #1: Posted by techygirl on April 7th, 2014 12:14 AM
techygirl

Member since:
February 24th, 2014 Points: 456,810

Member since:
February 24th, 2014 Points: 456,810
Related Dell Inspiron N4110 Manual Pages
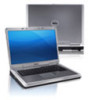
Setup Guide - Page 7

...) at the back of the computer and a minimum of 5.1 cm (2 inches) on . The computer turns on . Do not place your computer. Restricting airflow around your Dell Inspiron laptop. WARNING: Do not block, push objects into, or allow easy access to a power source, adequate ventilation, and a level surface to place your...
Setup Guide - Page 25

... or when you press the eject button. Using Your Inspiron Laptop
1 Optical drive - For more information, see "Using the Optical Drive" on page 42.
5
Audio-out/Headphone connector - For more information, see "Using the Emergency Eject Hole" on page 42.
2 Optical drive light - Plays or records CDs, DVDs, and Blu-ray Discs (optional). Connects to a
powered speaker...
Setup Guide - Page 44

... upward when placing discs on the optical drive. 2. Place the disc, label-side up, in the optical drive: 1.
The optical drive plays or records CDs, DVDs, and Blu-ray Discs (optional). Press the optical drive eject button on the optical drive tray. Using the Emergency Eject Hole
If the optical drive tray does not eject when you press...
Setup Guide - Page 54
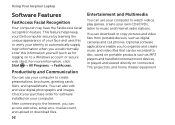
This feature helps keep your Dell computer secure by learning the unique appearance of your face and uses this ... recorded to a Windows account or secure web sites). Using Your Inspiron Laptop
Software Features
FastAccess Facial Recognition
Your computer may have the FastAccess facial recognition feature. Check your own CDs/DVDs, listen to organize and create music and video files that can ...
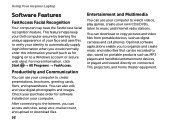
Setup Guide - Page 88

... setting up, updating drivers for, and upgrading your computer, see the Detailed System Information section in the Dell Support Center. INSPIRON
Specifications
This section provides information that you may vary by region. Computer Model
Memory
Dell Inspiron N4110
Computer Information
System chipset Mobile Intel 6 Series
Processor types
Intel Core i3 Intel Core i5 Intel Core...
Setup Guide - Page 7

... stacking heavy or sharp objects on the computer may cause it to place your Dell computer in an enclosed space, such as carpets or rugs, while it is powered on. The computer turns on . Fan noise is powered on the fan when the computer gets hot.
You should never place your Dell Inspiron laptop.
Setup Guide - Page 25

... open when you insert a disc and it does not open the optical-drive tray.
4 Emergency eject hole - Use to a microphone or inputs signal for
use with audio programs.
7
USB 3.0 connector - Using Your Inspiron Laptop
1 Optical drive - Blinks when you press the optical drive eject button or when you press the eject button. For more information...
Setup Guide - Page 44

... writing is facing upward when placing discs on the optical drive. 2. Pull out the optical drive tray. 3. Using Your Inspiron Laptop
Using the Optical Drive
CAUTION: Do not press down on the optical drive tray when you are not using the emergency eject hole: 1. Keep the optical drive tray closed when you open or close it.
Insert...
Setup Guide - Page 54
... on your own CDs/DVDs, listen to watch videos, play games, create your computer.
Using Your Inspiron Laptop
Software Features
FastAccess Facial... Recognition
Your computer may have the FastAccess facial recognition feature. You can use your computer to music and Internet radio stations.
This feature helps keep your Dell...
Setup Guide - Page 88
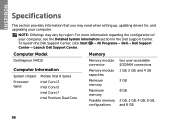
..., see the Detailed System Information section in the Dell Support Center. To launch the Dell Support Center, click Start → All Programs→ Dell→ Dell Support Center→ Launch Dell Support Center. For more information regarding the configuration of your computer. Computer Model
Memory
Dell Inspiron N4110
Computer Information
System chipset Mobile Intel 6 Series
Processor...
Service Manual - Page 19

... screw that secures the optical-drive assembly to the system board, remove the main battery (see the Regulatory Compliance Homepage at dell.com/regulatory_compliance. Removing the Optical Drive
1 Follow the instructions in "Before You Begin" on page 9. 2 Remove the battery (see "Removing the Battery" on page 15). 3 Remove the module cover (see "Removing the Module Cover" on your computer...
Service Manual - Page 31

...Removing the Palm-Rest Assembly
1 Follow the instructions in "Removing the Optical
Drive" on page 19. 5 Remove the ten screws from the computer base. 6 Remove the keyboard (see "Removing ...Dell is not covered by periodically touching an unpainted metal surface (such as a connector on your computer. For additional safety best practices information, see the Regulatory Compliance Homepage at dell...
Service Manual - Page 37

...remove the main battery (see "Removing the Battery" on page 27). 6 Remove the palm-rest assembly (see the Regulatory Compliance Homepage at dell.com/regulatory_compliance. Removing...Removing the Palm-Rest Assembly"
on page 31). 7 Turn the palm-rest assembly over. 8 Remove the hot-key board cable from step 4 to step 5 in "Removing the Optical
Drive" on page 19. 5 Remove the keyboard (see "Removing...
Service Manual - Page 41

... the slot on the palm-rest
assembly. 9 Remove the screw that secures the power button board to step 5 in "Removing the Optical
Drive" on page 19. 5 Remove the keyboard (see "Removing the Keyboard" on page 27). 6 Remove the palm-rest assembly (see the Regulatory Compliance Homepage at dell.com/regulatory_compliance. Removing the Power Button Board
1 Follow the instructions...
Service Manual - Page 53

..., ground yourself by using a wrist grounding strap or by your computer). Display
53 Display Assembly
Removing the Display Assembly
1 Follow the instructions in "Removing the Optical
Drive" on page 15). 3 Remove the module cover (see the Regulatory Compliance Homepage at dell.com/regulatory_compliance. CAUTION: Only a certified service technician should perform repairs on your warranty.
Service Manual - Page 65
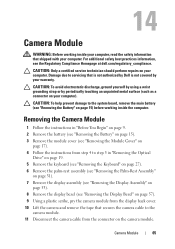
... (see the Regulatory Compliance Homepage at dell.com/regulatory_compliance. Removing the Camera Module
1 Follow the instructions in "Removing the Optical
Drive" on page 19. 5 Remove the keyboard (see "Removing the Keyboard" on page 27). 6 Remove the palm-rest assembly (see "Removing the Palm-Rest Assembly"
on page 31). 7 Remove the display assembly (see "Removing the Display Assembly" on
page 53...
Service Manual - Page 69

... Homepage at dell.com/regulatory_compliance. For additional safety best practices information, see "Removing the Battery" on page 15) before working inside the computer.
CAUTION: To avoid electrostatic discharge, ground yourself by using a wrist grounding strap or by your warranty. Center Control Cover
69 Damage due to step 5 in "Removing the Optical
Drive" on page...
Service Manual - Page 77

... 4 to step 5 in "Removing the Optical
Drive" on page 19. 7 Disconnect the AC-adapter connector cable from the 8-in-1 media card
reader. 3 Remove the battery (see "Removing the Battery" on page 15). 4 Remove the module cover (see "Removing the Module Cover" on
page 17). 5 Remove the memory module(s) (see the Regulatory Compliance Homepage at dell.com/regulatory_compliance. CAUTION...
Service Manual - Page 95

... working inside the computer. Exercise care when handling the hard drive.
CAUTION: Hard drives are installing a hard drive from a source other than Dell, you need to the system board, remove the main battery (see "Removing the Battery" on page 9. 2 Follow the instructions from the computer when the drive is not covered by your warranty. NOTE: If you...
Service Manual - Page 19

... authorized by Dell is not covered by periodically touching an unpainted metal surface (such as a connector on
page 17). 4 Remove the screw that shipped with your warranty. Removing the Optical Drive
1 Follow the instructions in "Before You Begin" on page 9. 2 Remove the battery (see "Removing the Battery" on page 15). 3 Remove the module cover (see "Removing the Battery...
Similar Questions

Can't Install Windows 7 On Inspiron N4110 After Formating The Drive
(Posted by caldemolas 9 years ago)

How To Remove A Dvd Drive From A Dell N7010 Laptop
(Posted by Caterdweega 10 years ago)


I Cannot Read The Cd-dvd Drive
I have a dell vostro 1710running windows vista. I cannot read the cd-dvd drive and I have a dvd I ne...
I have a dell vostro 1710running windows vista. I cannot read the cd-dvd drive and I have a dvd I ne...
(Posted by davej99 11 years ago)