Dell Inspiron One 2320 Support Question
Dell Inspiron One 2320 Support Question
Find answers below for this question about Dell Inspiron One 2320.Need a Dell Inspiron One 2320 manual? We have 3 online manuals for this item!
Question posted by visionsail on February 5th, 2013
Dell Inspiron 2320 Usb Ports And Touch Screen Not Working
Sometimes the system boots and you can use it, and other times the power button is amber. Leave the power out for half an hour and maybe it will boot. Many times it boots but no USB or touch screen. I have up graded the bios to ver AO10 from AO7 but no difference. reinstalled all drivers but still the same. Does my motherboard need replacing?
Current Answers
Answer #1: Posted by NiranjanvijaykumarAtDell on February 6th, 2013 6:08 AM
NiranjanvijaykumarAtDell

Member since:
May 12th, 2012 Points: 807,180

Member since:
May 12th, 2012 Points: 807,180
Hello visionsail,
I am from Dell Social Media and Community.
Follow the link below to run a basic hardware test on your system.
http://support.dell.com/support/topics/global.aspx/support/kcs/document?docid=266787
If you get any error code, you can associate it to the list given in the link below.
http://support.dell.com/support/topics/global.aspx/support/kcs/document?c=us&docid=583411&doclang=en&l=en&s=gen&cs=
If all the tests pass, run a start up repair from windows restore CD.
Follow the link below to fix the OS issue.
http://support.dell.com/support/topics/global.aspx/support/kcs/document?c=us&cs=19&l=en&s=dhs&docid=DSN_343119&isLegacy=true
(Change the operating system as per)
If this has not helped you or if you need any further assistance, feel free to message me on Twitter(@NiranjanatDell). I will be happy to assist.
Dell-Niranjan
NiranjanAtDell
Dell Inc
Related Dell Inspiron One 2320 Manual Pages
Quick Start Guide (PDF) - Page 1

...ício rápido
Uniquely Dell support.dell.com/manuals | www.dell.com
2011 - 07
Printed in China
0GX7TPA00
Adjust the computer stand
Pas de stand van de computer aan Réglez le socle inclinable de l'ordinateur Ajuste el soporte del equipo Ajuste o suporte do computador
Press the power button
Druk op de aan/uit...
Owners Manual - Page 7
... 90
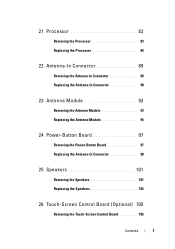
23 Antenna Module 93
Removing the Antenna Module 93 Replacing the Antenna Module 94
24 Power-Button Board 97
Removing the Power-Button Board 97 Replacing the Antenna-In Connector 98
25 Speakers 101
Removing the Speakers 101 Replacing the Speakers 102
26 Touch-Screen Control Board (Optional) 105
Removing the Touch-Screen Control Board 105
Contents
7
Owners Manual - Page 8
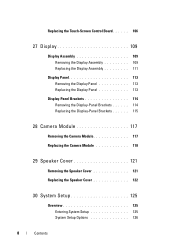
Replacing the Touch-Screen Control Board. . . . . . 106
27 Display 109
Display Assembly 109 Removing the Display Assembly 109 Replacing the Display Assembly 111
Display Panel 113 Removing the Display ...
Owners Manual - Page 12

... instructions for complete information about safety precautions, working inside the computer. CAUTION: To avoid electrostatic discharge, ground yourself by using a wrist grounding strap or by periodically touching an unpainted metal surface (such as a connector on page 11. After the installation is flat and clean to the power source.
See "Turning Off Your Computer" on...
Owners Manual - Page 15
1
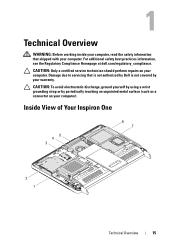
Technical Overview
WARNING: Before working inside your computer, read the safety information that is not authorized by Dell is not covered by periodically touching an unpainted metal surface (such as a connector on your computer. Damage due to servicing that shipped with your computer. Inside View of Your Inspiron One
45 3
6 7
2 1
Technical Overview
15 CAUTION: To...
Owners Manual - Page 16
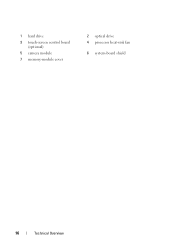
1 hard drive 3 touch-screen control board
(optional) 5 camera module 7 memory-module cover
2 optical drive 4 processor heat-sink fan
6 system-board shield
16
Technical Overview
Owners Manual - Page 18
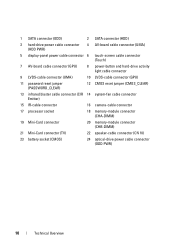
... cable connector (HDD PWR)
4 AV-board cable connector (UMA)
5 display-panel power cable connector 6 touch-screen cable connector (Touch)
7 AV-board cable connector (GPU)
8 power-button and hard-drive activity light cable connector
9 LVDS-cable connector (UMA)
10 LVDS-cable connector (GPU)
11 password reset jumper (PASSWORD_CLEAR)
12 CMOS reset jumper (...
Owners Manual - Page 19

...to the computer. CAUTION: To avoid electrostatic discharge, ground yourself by using a wrist grounding strap or by your computer. CAUTION: Before opening your... to servicing that is not authorized by Dell is not covered by periodically touching an unpainted metal surface (such as a connector on page 11. 2
Back Cover
WARNING: Before working inside your computer, read the safety information...
Owners Manual - Page 23
... by using a wrist grounding strap or by your warranty.
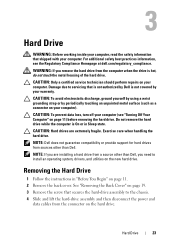
3
Hard Drive
WARNING: Before working inside your computer, read the safety information that is not authorized by Dell is not covered by periodically touching an ..., turn off your computer (see the Regulatory Compliance Homepage at dell.com/regulatory_compliance. WARNING: If you need to the chassis. 4 Slide and lift the hard...
Owners Manual - Page 27

... discharge, ground yourself by using a wrist grounding strap or by periodically touching an unpainted metal surface (such as a connector on the optical
drive. 4 Remove the screw that is not authorized by Dell is not covered by your computer.
See "Removing the Back Cover" on page 19. 3 Disconnect the power and data cables from the...
Owners Manual - Page 31

.... See "Removing the Back Cover" on page 19. 3 Using the slots on page 11. 2 Remove the back cover.
Memory Module(s)
31 5
Memory Module(s)
WARNING: Before working inside your computer, read the safety information that is not authorized by Dell is not covered by periodically touching an unpainted metal surface (such as a connector on your...
Owners Manual - Page 35

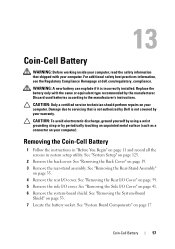
...To avoid electrostatic discharge, ground yourself by using a wrist grounding strap or by your warranty. 6
Rear-Stand Assembly
WARNING: Before working inside your computer, read the safety ...information that secure the rear-stand assembly to servicing that is not authorized by Dell is not covered by periodically touching an unpainted ...
Owners Manual - Page 37

...computer. Damage due to the chassis.
CAUTION: To avoid electrostatic discharge, ground yourself by using a wrist grounding strap or by your warranty. VESA Mount
37 CAUTION: Only a ...assembly. 7
VESA Mount
WARNING: Before working inside your computer, read the safety information that is not authorized by Dell is not covered by periodically touching an unpainted metal surface (such as...
Owners Manual - Page 57
... on your computer. See "System Setup" on page 11 and record all the screens in system setup utility. Damage due to the manufacturer's instructions. CAUTION: To avoid electrostatic discharge, ground yourself by using a wrist grounding strap or by periodically touching an unpainted metal surface (such as a connector on your computer). See "Removing the...
Owners Manual - Page 105

..., ground yourself by using a wrist grounding strap or by your warranty. See "Removing the Back Cover" on page 19. 3 Disconnect the cables from the chassis. 25
Touch-Screen Control Board (Optional)
WARNING: Before working inside your computer, read the safety information that is not authorized by Dell is not covered by periodically touching an unpainted metal...
Owners Manual - Page 106
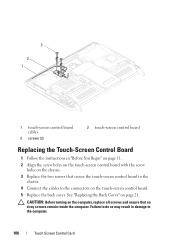
... damage to the connectors on the computer, replace all screws and ensure that no stray screws remain inside the computer.
CAUTION: Before turning on the touch-screen control board. 5 Replace the back cover. See "Replacing the Back Cover" on page 21. Failure to do so may result in "Before You Begin" on...
Owners Manual - Page 107
Touch Screen Control Card
107
6 Connect your computer and all attached devices to electrical outlets, and turn them on.
Owners Manual - Page 110

... 13 screws that secure the chassis to the display bezel.
110
Display See "Removing the Middle Frame" on the system board, touch-screen control board, AV board, and the converter board.
3 2
1
4
5
1 touch-screen control board cables (optional) (2)
3 IR receiver cable (optional) 5 backlight cable
2 camera cable 4 LVDS cable
14 Remove the middle frame. NOTE: The...
Owners Manual - Page 111
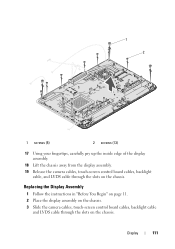
... You Begin" on page 11. 2 Place the display assembly on the chassis. 3 Slide the camera cables, touch-screen control board cables, backlight cable
and LVDS cable through the slots on the chassis. 1 2
1 screws (5)
2 screws (13)
17 Using your fingertips, carefully pry up the inside edge of the display assembly.
18 Lift the chassis...
Owners Manual - Page 112

...computer and all screws and ensure that secure the chassis to the display bezel. 7 Route the camera cables, touch-screen control board cables, backlight
cable and LVDS cable through the routing guides. 8 Connect the cables to the ...the computer. See "Replacing the Rear I/O Cover" on the system board, touch-screen
control board, AV board, and the converter board. 9 Replace the middle frame.
Similar Questions


Dell Inspiron 2320 How Activate Touch Screen Not Working
(Posted by gpeSc 10 years ago)

What Vista Driver Do I Need For A Dell 990 Serial Port
(Posted by cmanbama 10 years ago)

