
Husqvarna HU775H Support Question
Husqvarna HU775H Support Question
Find answers below for this question about Husqvarna HU775H.Need a Husqvarna HU775H manual? We have 2 online manuals for this item!
Question posted by lke1431 on June 29th, 2014
Governor Springs
What do the governor springs look like and where do they go.
Current Answers
Related Husqvarna HU775H Manual Pages
Owners Manual - Page 2
... or other engine parts become
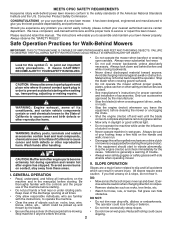
• Always wear safety goggles or safety glasses with the controls and the proper
caution. Keep clear of your lawn mower properly. Always look down .
WARNING: Engine exhaust, some of its constituents, and certain vehicle components contain or emit chemicals known to the State of California to slip...
Owners Manual - Page 3
... the area.
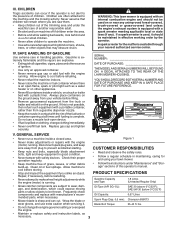
• Before and while walking backwards, look behind and down for small children.
• Never allow... not alert to be used on clothing, change the engine governor setting or overspeed the engine.
• Maintain or replace...(above 0°C/32°F); CHILDREN
Tragic accidents can cut. WARNING: This lawn mower is complete. If a spark arrester is running.
• Grass catcher...
Owners Manual - Page 4
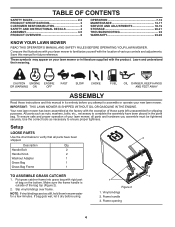
...Put grass catcher frame into grass bag with the location of bag on your lawn mower to ensure proper tightness. Frame handle
3. Save this manual in literature supplied with...wet, let it dry before you assemble must be tightened securely. Compare the illustrations with your lawn mower or in its entirety before using.
2.
Handle Bolt
2
Handle Knob
2
Washout Adapter
1
Grass...
Owners Manual - Page 5
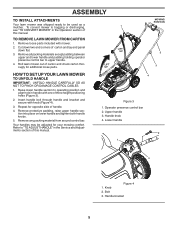
...handle and tighten both handle knobs.
5. Operator presence control bar 2. Knob 2. TO REMOVE LAWN MOWER FROM CARTON
1. Remove all packing materials except padding between upper and lower handle and padding ...Service and Adjustments section of carton and lay end panel down flat.
3. Roll lawn mower out of carton and check carton thorougly for opposite side of three height positioning holes (Figure 3)....
Owners Manual - Page 7
...speed was set at the factory for optimum performance. Forward motion will travel (Figure 6).
NOTE: Your lawn mower is worn and should be replaced.
1
2 1
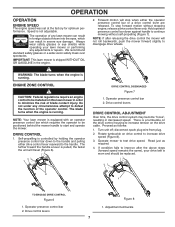
TO ENGAGE DRIVE CONTROL
Figure 6
1. DRIVE ...contact injury. Operator presence control bar 2. Self-propelling is a turnbuckle on this lawn mower in severe eye damage. There is controlled by holding the operator presence control bar...
Owners Manual - Page 8

... handle
REAR DISCHARGING (See Fig. 11)
1. OPERATION
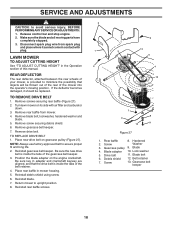
TO ADJUST CUTTING HEIGHT
All four wheels are adjusted by a single lever.
1. Wheel adjuster lever
TO CONVERT MOWER
Your lawn mower was shipped ready to be used as shown (Figure 11).
• When the rear door is lowered it will rest on the top of the...
Owners Manual - Page 9
... 14
1
2
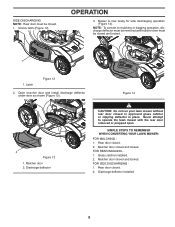
Figure 13 1. Open mulcher door and install discharge deflector under door as shown (Figure 13).
FOR REAR BAGGING 1. NOTE: To convert to operate the lawn mower with the rear door removed or propped open. Never attempt to mulching or bagging operation, discharge deflector must be removed and mulcher door must be...
Owners Manual - Page 11
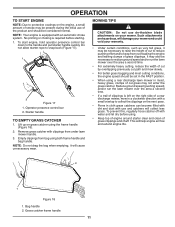
... grass clippings and chaff. No priming or choking is equipped with clippings from under lawn mower handle.
3. Remove grass catcher with an automatic choke system. This will cause unnecessary... drag the bag when emptying; NOTE: Your engine is required before using a rear discharge lawn mower in cloth grass catchers can become filled with dirt and dust with water and let dry before...
Owners Manual - Page 12

.... Mow north to south one -third of cut by overlapping previously cut area will be exposed to direct sunlight. • For best results, adjust the lawn mower cutting height so that the lawn mower cuts off only the top one week then east to week. For extremely heavy mulching, reduce your...
Owners Manual - Page 13
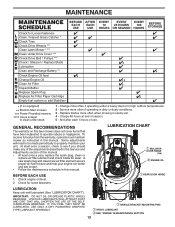
... GREASE PLASTIC WHEEL BEARINGS. Replace blades more often when mowing in this lawn mower does not cover items that have been subjected to operator abuse or negligence... MAINTENANCE
Check for Loose Fasteners Clean / Inspect Grass Catcher * Check Tires Check Drive Wheels *** Clean Lawn Mower **** Clean under Drive Cover *** Check Drive Belt / Pulleys *** Check / Sharpen / Replace Blade Lubrication...
Owners Manual - Page 14
... of blade adapter.
IMPORTANT: TO ENSURE PROPER ASSEMBLY, CENTER
HOLE IN BLADE MUST ALIGN WITH STAR ON BLADE
ADAPTER.
14
8
3 4 5
6
9 10
11
Figure 20
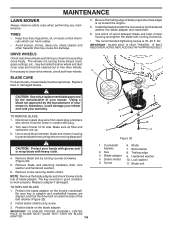
1. MAINTENANCE
LAWN MOWER
Always observe safety rules when performing any maintenance. TIRES
• Keep tires free of gasoline, oil, or insect control chemicals which can harm rubber.
•...
Owners Manual - Page 15

... end until the blade is balanced (Figure 21).
1
2 3
Figure 21
1. Give the lawn mower model number when ordering.
Select the oil's SAE viscosity grade according to an unthreaded portion of the...To keep your engine oil level frequently to the proper level at least once a year if the lawn mower is not used .
• Check your expected operating temperature (Figure 22). Clean under the ...
Owners Manual - Page 16

... dry pre-cleaner to spark plug. Remove engine oil cap/dipstick; Install the filter and pre-cleaner into a suitable container. Oil fill cap/dipstick 2. Tip lawn mower on a hard surface. Continue adding small amounts of oil, rechecking the dipstick until fuel tank is empty.
1. Reconnect spark plug wire to the filter.
6. Service...
Owners Manual - Page 17
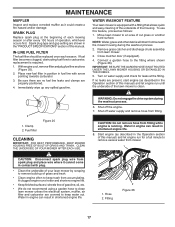
...described in the Operation section of this manual) and let engine run until the underside of the lawn mower is required.
1. Water in engine can result in the Operation section of this feature, proceed ... build-up any spilled gasoline. IMPORTANT: BE SURE THE GARDEN HOSE IS NOT ROUTED UNDER THE LAWN MOWER HOUSING OR ENTANGLED IN THE WHEELS.
5. To use this manual) and let engine run for ...
Owners Manual - Page 18
... carburetor down.
3. Reinstall debris shield using screw.
6. Reinstall rear baffle screws.
2
1
3
2
2 13
5
4 12
6
7
8 9
10
11
Figure 27
1. Gearcase pulley 9. Blade adapter 10. Belt retainer
7.
Turn lawn mower on the engine crankshaft. Reinstall gearcase belt keeper. Position the blade adapter on its side with plug. Place rear baffle in the Operation section of...
Owners Manual - Page 19
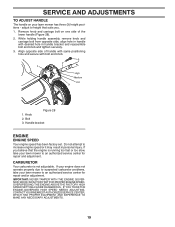
CARBURETOR
Your carburetor is running too fast or too slow, take your lawn mower has three (3) height positions - IMPORTANT: NEVER TAMPER WITH THE ENGINE GOVERNOR, WHICH IS FACTORY SET FOR PROPER ENGINE SPEED. Handle bracket
ENGINE
ENGINE SPEED
Your engine speed has been factory set. adjust to height that suits ...
Owners Manual - Page 20

... 29).
2. NOTE: When setting up all nuts, bolts, screws, and pins are securely fastened. Upper handle 3.
Lower handle
2 1
3
Figure 30 1. Replace if necessary.
4.
Clean entire lawn mower (See "CLEANING" in a clean, dry area.
1. Loosen the two (2) handle knobs on sides of this manual.
3. Handle knob 4. Handle bracket
20 Touch up your handle...
Owners Manual - Page 21

...
Pull starter handle slowly a few times to reach the carburetor.
CAUTION: Never store the lawn mower with new spark plug. Allow the engine to form and will cause problems. • If possible...into cylinder. 3. Always follow the mix ratio found on stabilizer container.
IMPORTANT: NEVER COVER MOWER WHILE ENGINE AND EXHAUST AREAS ARE STILL WARM. STORAGE
ENGINE
FUEL SYSTEM
IMPORTANT: IT IS...
Parts List - Page 3
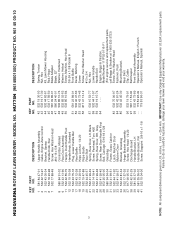
...532 43 73-89 - - 115 53 96-49 - - 115 53 96-31
DESCRIPTION
Spring, Torsion Nut, Hex Kit, Lawn Mower Housing Rod, Hinge Blade Adapter Blade, 22" Washer, Hardened Washer, Helical Screw, Machine,... parts. Failure to do so could be hazardous, damage your lawn mower and void your warranty. HUSQVARNA ROTARY LAWN MOWER - MODEL NO. HU775H (96145001000) PRODUCT NO. 961 45 00-10
KEY PART NO. inches. 1 ...
Parts List - Page 5
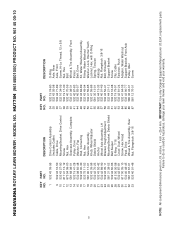
...Manufacturer (O.E.M.) replacement parts. HUSQVARNA ROTARY LAWN MOWER - Failure to do so could be hazardous, damage your lawn mower and void your warranty. HU775H (96145001000) PRODUCT NO. 961 45...Washout Assembly Fitting, Water Washout Washer, Lock, Internal Tooth Locknut, Hex, with O-Ring Spring, Tension Hubcap Nut, Flangelock 3/8-16 Bolt, Shoulder Support Bracket Screw Clip, Cable Fastener, ...
Similar Questions


My Husqvarnarz4623 Lawn Mower
My husqvarna lawn mower will not start. It wont even try to turn over or click.
My husqvarna lawn mower will not start. It wont even try to turn over or click.
(Posted by teresaandbryancates 9 years ago)

How To Adjust The Speed Of A Husqvarna Lawn Mower Model Hu775h
(Posted by Bdbi 9 years ago)


I Got A Husqvarna Walk Behind Mower #hu775h It Wont Start Tryed Verything Any He
(Posted by lozanovicky1960 9 years ago)