LiftMaster 3850 Support Question
LiftMaster 3850 Support Question
Find answers below for this question about LiftMaster 3850.Need a LiftMaster 3850 manual? We have 1 online manual for this item!
Question posted by CaMatchM on January 27th, 2014
How To Remove Battery From Liftmaster Elite Series Model 3850
The person who posted this question about this LiftMaster product did not include a detailed explanation. Please use the "Request More Information" button to the right if more details would help you to answer this question.
Current Answers
Related LiftMaster 3850 Manual Pages
3850 Elite Series Manual - Page 1
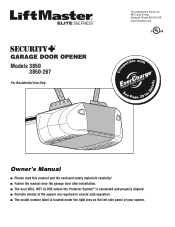
®
GARAGE DOOR OPENER Models 3850
3850-267
For Residential Use Only
Com Details
The Chamberlain Group, Inc. 845 Larch Avenue Elmhurst, Illinois 60126-1196 www.liftmaster.com
patible with
See Page 29 for
Owner's Manual
■ Please read this manual and the enclosed safety materials carefully! ■ Fasten the manual near the garage door after installation. ■ The door WILL...
3850 Elite Series Manual - Page 2
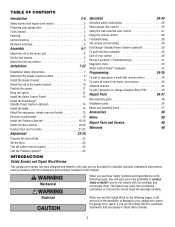
... the Protector System 25
Operation
26-33
Operation safety instructions 26
Using garage door opener 26
Using the wall-mounted door control 27
Using the remote control 28
Troubleshooting 28
The remote control battery 28
EverCharge® Standby Power System (optional 29
To open the door manually 30
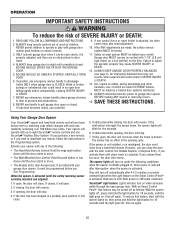
Care of serious injury or death if you do...
3850 Elite Series Manual - Page 3
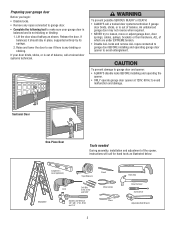
... see if there is out of which are under EXTREME tension.
• Disable ALL locks and remove ALL ropes connected to garage door BEFORE installing and operating garage door opener to loosen, move or adjust garage door, door springs, cables, pulleys, brackets or their hardware, ALL of balance. Carpenter's Level (optional)
12 Tape Measure
Pencil
Stepladder
Drill Bits
Drill...
3850 Elite Series Manual - Page 5
.../2" (2) Wing Nut 1/4"-20 (2)
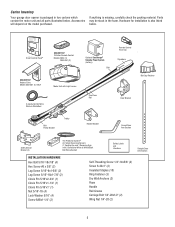
5 Parts may be stuck in two cartons which contain the motor unit and all parts illustrated below . Accessories will depend on the model purchased.
If anything is missing, carefully check the packing material. Carton Inventory
Your garage door opener is packaged in the foam.
3850 Elite Series Manual - Page 6
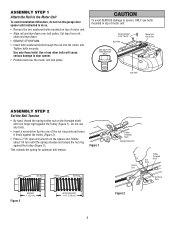
..., do so. • Remove the two washered bolts mounted on top of motor unit. • Align rail and styrofoam over the motor unit belt pulley. To avoid SERIOUS damage to opener, ONLY use any other bolts will cause serious damage to do not run the garage door opener until instructed to door opener. • Position belt over...
3850 Elite Series Manual - Page 7
... wall next to fingers from electrocution, disconnect ALL electric and battery power BEFORE performing ANY service or maintenance.
7
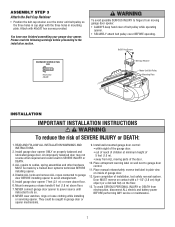
READ AND FOLLOW ALL INSTALLATION WARNINGS AND INSTRUCTIONS.
2. ALL repairs to avoid entanglement.
5. Disable ALL locks and remove ALL ropes connected to garage door BEFORE installing opener to cables, spring assemblies and other hardware MUST be caught...
3850 Elite Series Manual - Page 11
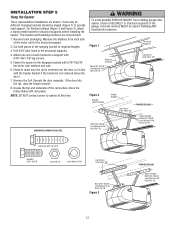
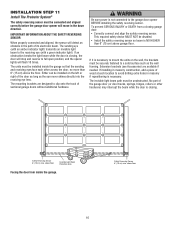
... flat is completed.
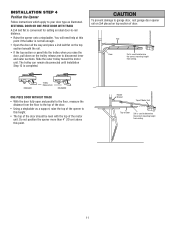
To prevent damage to garage door, rest garage door opener rail on 2x4 placed on the trolley release arm to disconnect inner and outer sections. Do not position the opener more than 4" (10 cm) above this point.
Header Bracket
Top of Motor Unit
Top of Door
2x4 is used to determine
the correct mounting...
3850 Elite Series Manual - Page 12
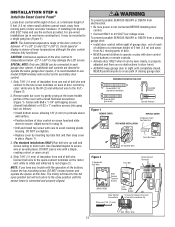
...not centered above the door). 7. Remove the 2x4. Operate the door manually. Concrete anchors MUST be different. This bracket and fastening hardware are shown. Remove foam packaging. HARDWARE... garage door opener, fasten it SECURELY to make sure the rail is centered over the door (or in the structural supports. 4. Fasten the opener to the hanging brackets with rail grease. If the door hits...
3850 Elite Series Manual - Page 13
...garage door opener.
DO NOT connect power and operate the opener at the lower/middle portion of the cover with 6AB x 1-1/4" self-tapping screws (drywall installation) or 6-32 x 1" machine screws (into drywall, drill 5/32" holes and use model 378LM wireless wall control as the secondary door...32x1" (pre-wired)
Drywall Anchors
Figure 1
REMOVE COVER
REPLACE COVER
To Replace Insert Top Tabs ...
3850 Elite Series Manual - Page 14
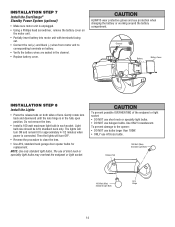
... procedure to close the lens.
• Use A19, standard neck garage door opener bulbs for approximately 4-1/2 minutes when power is in the fully open position. To prevent possible OVERHEATING of short neck or speciality light bulbs may overheat the endpanel or light socket. Channel
Battery
Battery Cover
INSTALLATION STEP 8
Install the Lights
• Press the release...
3850 Elite Series Manual - Page 15

...) hole in the top of the motor unit:
• Remove the motor unit cover screws and set the cover aside.
• Remove the attached 3-prong cord.
• Connect the black (line... do not run the opener at least 1" (2.5 cm) from electrocution or fire:
• Disconnect ALL electric and battery power BEFORE performing ANY service or maintenance.
• Garage door installation and wiring MUST ...
3850 Elite Series Manual - Page 16
... the down direction. This required safety device MUST NOT be connected and aligned correctly before the garage door opener will move in the path of wood at each other hardware) may interrupt the beam while the door is closing garage door: • Correctly connect and align the safety reversing sensor.
If installing in masonry if repositioning...
3850 Elite Series Manual - Page 24
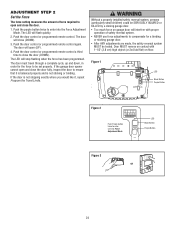
... properly and is not sticking or binding. Push the purple button twice to close the door fully, inspect the door to open (UP).
4.
If the garage door opener cannot open and close the door (DOWN). Push the door control or programmed remote control. Push the door control or programmed remote control a third time to enter into Force Adjustment Mode
LED...
3850 Elite Series Manual - Page 25
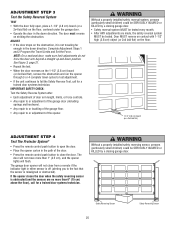
... adjustments do not force the door arm beyond a straight up and down position.
The door will not move more than 1" (2.5 cm), and the opener lights will not close the door. The garage door opener will flash. The door must reverse on the 1-1/2" (3.8 cm) board (or 2x4 laid flat), remove the obstruction and run the opener through 3 or 4 complete travel cycles...
3850 Elite Series Manual - Page 26
... handle to move .
• The Keyless Entry (See Accessories): If provided with the opener lights on again.
26 Weak or broken springs or unbalanced door could result in an open , the door will reverse. Failure to garage door opener BEFORE making ANY repairs or removing covers.
15. ALL repairs to operate or play with each use, randomly accessing...
3850 Elite Series Manual - Page 31
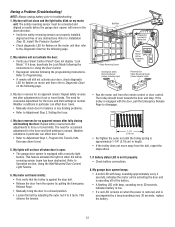
... low. • If a red LED remains on the following the programming instructions. Having a Problem (Troubleshooting)
NOTE: Always unplug battery prior to Operation section; The need for occasional adjustment for balance or any obstructions. My garage door opener beeps: • A solid LED with beep, sounding approximately every 2 seconds, indicates the motor unit is activating the...
3850 Elite Series Manual - Page 32
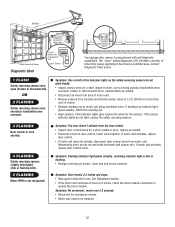
...Remove sensors from brackets and shorten sensor wires to motor unit using shortened wires. Symptom: The door doesn't activate from the door control. • Inspect door control/wires for the sensors. Symptom: Door...
Sensor
Your garage door opener is not recognized. If motor unit activates, replace
door control. • If motor unit does not activate, disconnect door control wires from...
3850 Elite Series Manual - Page 34

... security against code-theft devices, will be circumvented. The learn indicator light will be programmed to operate other Security✚® garage door openers.
34 PROGRAMMING
NOTICE: If this Security✚® garage door opener is factory programmed to operate it has learned the code. Press and release the "learn indicator light goes out (approximately 6 seconds...
3850 Elite Series Manual - Page 35
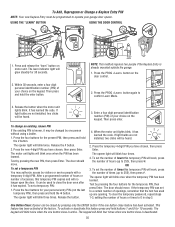
... blink, it has expired. To clear the temporary password, repeat steps 1-3, setting the number of your choice on the door control.
2. Press the four buttons for your garage door opener. It can be heard.
2. The opener light will blink four times.
3. Press and release the "learn indicator light will blink once when the temporary PIN...
3850 Elite Series Manual - Page 38
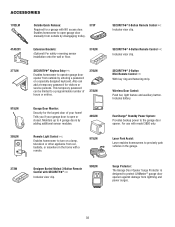
... of hours or entries.
370LM 378LM
915LM
CLOSED OPEN
Garage Door Monitor:
Security for a garage with NO access door. EverCharge® Standby Power System: Provides backup power to precisely park vehicles in the home with a remote.
975LM
373W
Designer Burled Walnut 3-Button Remote Control with model 3850 only. Laser Park Assist: Laser enables homeowners to the garage door opener.
Similar Questions

How To Program Keypad Elite Series Model 3850 No Enter Button
(Posted by bumhues 9 years ago)

What Is The Horsepower Of The Liftmaster Elite Series Model 3850 Specification
(Posted by wan2drag 10 years ago)

How To Remove Battery From Lift Master Elite Series Model 3850
(Posted by cdwgbhrow 10 years ago)

How To Disconnect Battery Backup On Elite Series Lift Master Garage Door Opener
(Posted by avfi 10 years ago)

How Do You Remove 485lm Battery From Lift Master 3850p Garage Door Opener
(Posted by cmscalh 10 years ago)