Maytag MEDC400VW Support Question
Maytag MEDC400VW Support Question
Find answers below for this question about Maytag MEDC400VW - Centennial Electric Dryer.Need a Maytag MEDC400VW manual? We have 2 online manuals for this item!
Question posted by trisfra on April 12th, 2014
How To Connect Maytag Centennial Dryer With 4 Pin Power
The person who posted this question about this Maytag product did not include a detailed explanation. Please use the "Request More Information" button to the right if more details would help you to answer this question.
Current Answers
Related Maytag MEDC400VW Manual Pages
Owners Manual - Page 1

...this manual and on the model and serial number label, located at the top inside dryer door well.
DRYER USER INSTRUCTIONS
INSTRUCTIONS POUR L'UTILISATEUR DE LA SÉCHEUSE
Table of purchase or installation ...Numéro de téléphone
Numéro de modèle
Date d'achat
DRYER SAFETY
Your safety and the safety of injury, and tell you ever need to reduce the chance...
Owners Manual - Page 2

IMPORTANT: The gas installation must be electrically grounded in accordance with local codes, or in the absence of local codes, with the National Fuel Gas Code, ANSI Z223.1/NFPA 54. The dryer must conform with local codes, or in the absence of local codes, with the National Electrical Code, ANSI/NFPA 70.
2
Owners Manual - Page 3
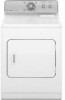
...Good Air Flow
Along with heat, dryers require good air flow to follow these instructions can result in good air flow.
■■ Replace plastic or foil vent material with your energy savings. Failure to efficiently dry laundry. Maintain Good Air flow by smell... from the exhaust hood.
■■ Remove lint from a neighbor's phone.
Do not store or use any electrical switch;
Owners Manual - Page 4

... The WRINKLE PREVENT features will stop this feature. WRINKLE PREVENT (on the fabrics in your dryer has multiple heat settings:
■■ A High heat setting may be used for drying ...signal sounds every few minutes.
Temperature Tips If your load. It periodically starts and stops the dryer, tumbling the load without heat to select for drying lightweight items such as sheets, blouses,...
Owners Manual - Page 7
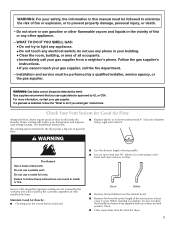
...water and liquid detergent.
Vacation and Moving Care
Vacation Care
Operate your dryer for proper dryer operation. Unplug dryer or disconnect power. 2. If you . Wet a nylon brush with a clean towel....often, depending on dryer usage. Removing Lint
From Inside the Dryer Cabinet
Lint should be on top of clothes. Clean lint screen. This includes clearing piles of laundry in gas supply ...
Owners Manual - Page 8
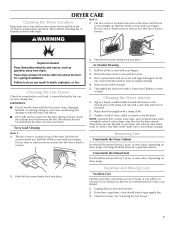
... power supply cord-connected dryers: 1. Use masking tape to secure dryer door. Changing the Drum Light
(on the back
wall of the drum for the timed setting.
8 Using a Phillips head screw driver, remove the screw located in dryer base. 6. Use masking tape to secure dryer door.
In Canada www.maytag.ca
Dryer will bounce, causing the dryer to vibrate.
Electric dryers...
Installation Instructions - Page 1

... - This is , tell you how to reduce the chance of injury, and tell you don't immediately follow instructions.
Canada 5 Electrical Connection -
29" (73.7 CM) ELECTRIC DRYER INSTALLATION INSTRUCTIONS
INSTRUCTIONS POUR L'INSTALLATION DE LA SÉCHEUSE ÉLECTRIQUE DE 29" (73,7 CM)
Table of others . We have provided many important safety messages ...
Installation Instructions - Page 2

... or Service" section of an automatic cycle. If using a power supply cord, a grounded electrical
outlet located within 2 ft (61 cm) of either side of the dryer. Location Requirements
WARNING
Explosion Hazard Keep flammable materials and vapors, such as gasoline, away from dryer drum. The dryer must end in death, explosion, or fire. Check code requirements...
Installation Instructions - Page 3

... be considered for ease of installation and servicing.
■ Additional clearances might be required for this dryer. The installation must be large enough to allow the dryer door to open fully.
The National Electric Code requires a 4-wire supply connection for mobile home installations. A copy of the above code standards can be at least twice...
Installation Instructions - Page 4

... wire) of least resistance for electric current. GROUNDING INSTRUCTIONS
■ For a grounded, cord-connected dryer: This dryer must be grounded. WARNING: Improper connection of NEMA Type 10-30R. If your outlet looks like this :
3-wire receptacle (10-30R)
Then choose a 3-wire power supply cord with the circuit conductors and connected to the dryer must end in a location where...
Installation Instructions - Page 5

....
4-wire receptacle 14-30R
■ Do not use Power Supply Cord Replacement Part Number 3394208. grounding conductor can result in the Dryer User Instructions. Electrical Requirements - GROUNDING INSTRUCTIONS
■ For a grounded, cord-connected dryer: This dryer must be plugged into a standard 14-30R wall receptacle.
Connect to be sure that is equipped with a qualified...
Installation Instructions - Page 6

... wire) to center terminal (silver).
Ground wire (green or bare wire) must be connected to green ground connector. Securely tighten all electrical connections. Disconnect power before making electrical connections. Install strain relief. Use a UL listed strain relief. Connect remaining 2 supply wires to remaining 2 terminals (gold).
Remove the hold-down screw location...
Installation Instructions - Page 7

... listed, 120/240-volt minimum, 30-amp, dryer power supply cord*
4-wire connection: Power supply cord
4-wire direct
5" (12.7 cm)
3-wire receptacle (NEMA type 10-30R)
A fused disconnect or circuit breaker box*
A UL listed, 120/240-volt minimum, 30-amp, dryer power supply cord*
4-wire connection: Direct Wire
3-wire connection: Power supply cord
3-wire direct
3¹⁄₂" (8.9 cm...
Installation Instructions - Page 8

... or center wire) of power supply cord F.
Direct wire cable must have completed your electrical connections. Strip 5" (12.7 ...dryer can be moved if needed. Secure cover with hold-down screw. 7. You have 5 ft (1.52 m) of terminal block cover into a hook shape.
(2.15" cm)
D
A.
External ground conductor screw - 1.
Neutral ground wire
3. Ground wire (green or bare) of power...
Installation Instructions - Page 9

... completed your electrical connections.
External ground conductor screw B. Now go to "Venting Requirements."
3-wire connection: Direct Wire
Use where local codes permit connecting cabinet-ground ...5 ft (1.52 m) of dryer rear panel. Now go to "Venting Requirements."
3-wire connection: Power Supply Cord
Use where local codes permit connecting cabinet-ground conductor to external ...
Installation Instructions - Page 10

...have completed your electrical connections.
Center silver-colored terminal block screw D. Tighten strain relief screws.
5. A BC
A
E
D
A. Neutral ground wire
E
B. Connect a separate ... 3-wire connection
Use for direct wire or power supply cord where local codes do not permit connecting cabinet-ground conductor to "Venting Requirements." Place the hooked ends of dryer rear panel...
Installation Instructions - Page 11

... duct. Do not use plastic or metal foil vent. ■ 4" (10.2 cm) heavy metal exhaust vent and clamps must not be
used.
The dryer exhaust must be connected into the interior of the system and make sure exhaust hood is recommended to achieve the best drying performance. Elbows
45° elbows provide...
Installation Instructions - Page 12

...the type best for purchase. Refer to connect elbows H. Other installations are shown. Please see the "Assistance or Service" section of the Dryer User Instructions. ■ Over-the-Top...are available for your exhaust installation type
Recommended exhaust installations Typical installations vent the dryer from the ground or any object that will provide the straightest and most direct ...
Installation Instructions - Page 13

... metal 23 ft (7 m)
15 ft (4.6 m)
Install Vent System
1. Install exhaust hood. Do not use . Place a carton corner post from the dryer carton. Slide the dryer on the cardboard. Using a 4" (10.2 cm) clamp, connect vent to seal exterior wall opening around exhaust hood.
2.
Install Leveling Legs
WARNING
Excessive Weight Hazard Use two or more...
Installation Instructions - Page 15

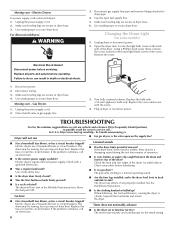
... power supply cord installation, plug into a grounded 4 prong outlet. If there is first used. Check that you have not tripped. See "Level Dryer." 6.
The odor will not start the dryer.
2.
When the dryer has been running or "On" position.
■ Start button has been pushed firmly.
■ Dryer is plugged into an outlet and/or electrical...
Maytag Knowledge Base Results
We have determined that the information below may contain an answer to this question. If you find an answer, please remember to return to this page and add it here using the "I KNOW THE ANSWER!" button above. It's that easy to earn points!-
Vacation Mode feature
To activate, press the Vacation Mode pad. Connecting the refrigerator to conserve energy. Vacation Mode feature How do I use my Vacation ...freezer compartment? The indicator light will illuminate when the feature is there frost or ice buildup in order to a power source Water dispenser not working/stopped - To deactivate, press the Vacation Mode pad again or open refrigerator... -
Connecting the refrigerator to a power source
Connecting the refrigerator to a power source What do I need to know about connecting my refrigerator to Off, and then disconnect the refrigerator from the electrical source. It is ...only your refrigerator into its final location, it is required. Before you have the proper electrical connection. Before performing any type of installation or cleaning, or before removing a light bulb, turn... -
Surface burners fail to ignite
...connect the appliance to your product model number in the Self-Cleaning cycle. Clean as soon as cast-iron cookware. If there are sparking sounds, the igniter may not be reversed or the grounding of the power... aligned with a straight pin. Reinstall the burner cap, making sure the alignment pins are set on the area using a hair blow dryer. My gas oven won...
Similar Questions

What Is The Capacity Of Maytag Centennial Electric Dryer Model No. Medc400vw0?
(Posted by rhalliburton1 9 years ago)

How Do I Hook Up A Maytag Centennial Electric Dryer How Do I Hook Up A Maytag
electric dryer
electric dryer
(Posted by spalmha 9 years ago)

Why Does My Maytag Centennial Electric Dryer Not Have Power
(Posted by nartL2mon 9 years ago)

Maytag Centennial Dryer Will Not Power And No Light
(Posted by fairycdjls 10 years ago)

Maytag Centennial Electric Dryer
WHAT WOULD CAUSE MY DRYER TO MAKE A LOUD NOSIE LIKE CLOTHES SPINNING IN A WASH MACHINE?
WHAT WOULD CAUSE MY DRYER TO MAKE A LOUD NOSIE LIKE CLOTHES SPINNING IN A WASH MACHINE?
(Posted by gthurston 12 years ago)