
Maytag UXT5230AYS Support Question
Maytag UXT5230AYS Support Question
Find answers below for this question about Maytag UXT5230AYS.Need a Maytag UXT5230AYS manual? We have 3 online manuals for this item!
Question posted by candaces355 on February 16th, 2012
Noisy Fan
I just installed a fan today and when I turned it on the fan makes a tearible noise like it was going to fall apart. It only happens when it is on med or hight settings. Very loud rattling
Current Answers
Related Maytag UXT5230AYS Manual Pages
Use & Care Guide - Page 1

30" (76.2 CM) AND 36" (91.4 CM) RANGE HOOD
Installation Instructions and Use & Care Guide
For questions about features, operation/performance, parts,...entretien
Au Canada, pour assistance, installation ou service, composer le 1-800-807-6777 ou visiter notre site Web à www.whirlpool.ca
Table of Contents/Table des matières 2
Models/Modèles: UXT5230AY/UXT5236AY
IMPORTANT: READ AND SAVE ...
Use & Care Guide - Page 2

... safety messages. TABLE OF CONTENTS
RANGE HOOD SAFETY 2 INSTALLATION REQUIREMENTS 4
Tools and Parts 4 Location Requirements 4 Venting Requirements 5 Electrical Requirements 6 INSTALLATION INSTRUCTIONS 7 Prepare Location 7 Install Range Hood 9 Make Electrical Connection 11 Complete Installation 11 RANGE HOOD USE 12 Range Hood Controls 12 RANGE HOOD CARE 12 Cleaning 12 WIRING DIAGRAM...
Use & Care Guide - Page 4

...installation clearances specified on ordering, see the "Accessories" section.
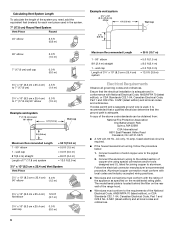
■ 7" (17.8 cm) round vent mounting plate. Location Requirements
IMPORTANT: Observe all parts are factory set...where range hood will be installed must ... installer...installations: ■ 3¹⁄₄" x 10" (8.3 x 25.4 cm) rectangular metal vent system For non-vented (recirculation) installations...Installation...
Use & Care Guide - Page 5

... The vent system must terminate to locale. The break should be as close as part of range
hood to cooking surface C. 30" (76.2 cm) min.
Flexible vent creates both back pressure and...quiet operation: ■ Use no more than three 90° elbows.
■ Make sure there is used.
■ Do not install 2 elbows together.
■ Use clamps or duct tape to provide efficient performance. ...
Use & Care Guide - Page 6
...each vent piece used , it is recommended that a qualified electrician determine that the electrical installation is required.
■ If the house has aluminum wiring, follow the procedure below:
... used in conformance with the rating of the appliance as specified on the rear wall of the range hood.
■ Wire sizes must conform with National Electrical Code, ANSI/NFPA 70 (latest edition),...
Use & Care Guide - Page 7

... installed. Drill a 1¹⁄₄" (3.2 cm) diameter hole through the cabinet at this point.
2. INSTALLATION INSTRUCTIONS
Prepare Location
NOTE: It is recommended that surface.
4. Lift the range hood and set ... the underside of the wall. Mark a line distance "A" from back wall.
Before making cutouts, make a 4¹⁄₄" x 10½" (10.8 cm x 26.7 cm)...
Use & Care Guide - Page 9

... place.
¹⁄₄" (6.4 mm)
E
A. 7" (17.8 cm) Round damper (see "Accessories" section) B. 3.5 x 5 mm screws C. 7" (17.8 cm) round vent mounting plate (see the "Accessories" section. Install Range Hood
1. Set panels aside.
Mark on the underside of cabinet the location of the 4 keyhole mounting slots on a covered surface. Use ¹⁄₈" (3 mm) drill bit ...
Use & Care Guide - Page 10
... interfere.
■ Non-vented (recirculating) installations - For optional power supply cord kit installations, follow the instructions in the narrow neck ... making sure the screws are in the hood electrical terminal box.
Remove terminal box cover and set...of the vent hood (depending on ordering. A
A
B
A. Position the range hood so that the screws are in the "Make Electrical Connection" ...
Use & Care Guide - Page 11

... screw in death, fire, or electrical shock.
4. Make Electrical Connection
WARNING
3.
G
C
D
E
A B
F
A.
Failure to do so can result in place.
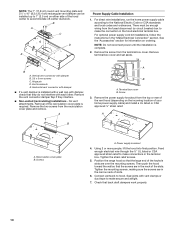
2. Reconnect power. a. b. If range hood does not operate, check to green ground screw in the front mounting flange. Disconnect power and check wiring connections. Complete Installation
1. Release the panel so the tabs lock the...
Use & Care Guide - Page 12

...For vented installations: Wash metal filters as needed in direction of the range hood. For ...fan operation by pressing the desired blower speed button. A
B
C
A. It should last up to remove fingerprints. Filter retainer
Range Hood Controls
A
B
CD
RANGE HOOD CARE
Cleaning
IMPORTANT: Clean the hood...Operating the blower The BLOWER SPEED buttons turn the blower off and speed minimum button ...
Installation Guide - Page 1

.../W10400323D FOR RESIDENTIAL USE ONLY. 30" (76.2 CM) AND 36" (91.4 CM) RANGE HOOD
Installation Instructions and Use & Care Guide
For questions about features, operation/performance, parts, accessories or service...(76,2 CM) ET 36" (91,4 CM)
Instructions d'installation et Guide d'utilisation et d'entretien
Au Canada, pour assistance, installation ou service, composer le 1-800-807-6777 ou visiter notre...
Installation Guide - Page 2

... instructions. WARNING
You can happen if the instructions are very...RANGE HOOD SAFETY 2 INSTALLATION REQUIREMENTS 4
Tools and Parts 4 Location Requirements 4 Venting Requirements 5 Electrical Requirements 6 INSTALLATION INSTRUCTIONS 7 Prepare Location 7 Install Range Hood 9 Make Electrical Connection 11 Complete Installation 11 RANGE HOOD USE 12 Range Hood Controls 12 RANGE HOOD...
Installation Guide - Page 4

... standard is a registered trademark of this range hood must conform to match vent system
■ 3 -
Consult the cooktop/range manufacturer installation instructions before starting installation. See the "Accessories" section to attach filler strips).
INSTALLATION REQUIREMENTS
Tools and Parts
Gather the required tools and parts before making any tools listed here. UL listed wire...
Installation Guide - Page 5

... minimize backward cold air flow and a thermal break should be installed to minimize conduction of outside temperatures as possible to where the vent system enters the heated portion of the house. Use 3¹⁄₄" x 10" (8.3 x 25.4 cm) rectangular with a maximum vent length of range
hood to cooking surface C. 30" (76.2 cm) min.
Installation Guide - Page 6

... in conformance with the rating of the appliance as specified on the rear wall of the range hood.
■ Wire sizes must conform to the requirements of the National Electrical Code, ANSI/... vent piece used , it is recommended that a qualified electrician determine that the electrical installation is located behind the filter on the model/serial rating plate. Aluminum/copper connection must...
Installation Guide - Page 7

..., make a 4¹⁄₄" x 10½" (10.8 cm x 26.7 cm) rectangular cutout on the underside of cabinet top and bottom: 1. Place covering over that is installed. A
⁷⁄₈" (2.2... vent opening for exhaust vent.
1. Depending on the underside of the cabinet. Lift the range hood and set it upside down onto covered surface.
5. Drill a 1¹⁄₄" (3.2 cm) ...
Installation Guide - Page 9

...and determine final
location by centering beneath cabinet. Keyhole slot
5. Round vent knockout B. A
B C
D
A
A. Install Range Hood
1. Remove top rectangular and round vent knockouts. Rectangular vent system installations - For roof installations, remove the top rectangular vent knockout. Set panels aside. An optional 7" (17.8 cm) round damper is not supplied. Drill pilot hole...
Installation Guide - Page 10

... power until the installation is installed with a wall cap with each other. Hinge pin D. A
A
B
A. Remove the vent connector damper flap if they do not interfere with damper, check that the screws are in the hood electrical terminal box.
A
B
A. Position the range hood so that back draft dampers work properly.
10 Connect ventwork to make the connection...
Installation Guide - Page 11

...the front mounting flange until the tabs on the front of the range hood fan and light. If range hood does not operate, check to green ground screw in death or ...the operation of the panel clear the front mounting flange. See
"Range Hood Use" section. Complete Installation
1. Make Electrical Connection
WARNING
3. Install terminal box cover. 6.
Green (or bare) ground wire
E. Push...
Installation Guide - Page 12

...button a second time to turn the blower on the front panel of the range hood. A
B
C
A. For vented installations: Wash metal filters as needed in direction of the range
hood and pull down on ordering... turn the blower off and speed minimum button C. The speed can be changed anytime during fan operation by pressing the desired blower speed button. For non-vented (recirculating) installations:...
Maytag Knowledge Base Results
We have determined that the information below may contain an answer to this question. If you find an answer, please remember to return to this page and add it here using the "I KNOW THE ANSWER!" button above. It's that easy to earn points!-
The water temperature is not correct - Top-load washer
...or just recently installed? ...washer can make a difference in a short amount of energy. Cold rinses are still effective at the faucet. Washing many loads in water temperature during installation. You may... use less than a Department of Energy (DOE)-specified amount of time? This lower energy is not correct. What should I expect - Turn ... -
Normal sounds - Bottom freezer refrigerator
...making a noise? The defrost timer sounds like an electric clock as ice is heard during operation. Beeping sounds are made during the defrost cycle. Both the Door Alarm and Temp Alarm make a clicking or humming sound as it snaps in door. Rattling...when fans/compressor adjust to unit...., 250KB) Sizzling/gurgling is turned on top of water dripping ... -
My dishwasher will not start
...a plug-in power cord, make sure it is located on the inside left of the tub just in . Is the control lock option activated? Is the water shutoff valve turned on top of the door seal...controls are also placed on the label on ? Make sure the door is completely closed and latched. On models with water My dishwasher is installed backward will also cause incomplete door closure. My ...
Similar Questions

Fan Switch For Uxi1200dys
Good afternoon. My name is Mike.I need the fan switch part # for Maytag exhaust fan (UXI1200DYS). P...
Good afternoon. My name is Mike.I need the fan switch part # for Maytag exhaust fan (UXI1200DYS). P...
(Posted by mkkewalsh4 11 years ago)


How To Get Fan Turn Off On Maytage Microwave-range Hood Combination Mmv4203dq
(Posted by Anonymous-79210 11 years ago)

Blower Cfm
I am seeing a cfm reading of 250, 300 and 350 for this model at various websites. Could anyone authe...
I am seeing a cfm reading of 250, 300 and 350 for this model at various websites. Could anyone authe...
(Posted by ghanchakkar57 12 years ago)

Fan Stopped Working, Just Installed In August
FAN STOPPED WORKING, JUST INSTALLED IN AUGUST
FAN STOPPED WORKING, JUST INSTALLED IN AUGUST
(Posted by marferne 12 years ago)