
Ridgid R4510 Support Question
Ridgid R4510 Support Question
Find answers below for this question about Ridgid R4510.Need a Ridgid R4510 manual? We have 2 online manuals for this item!
Question posted by maynardccr18 on January 3rd, 2021
I Also Need Part #s: 089037004706, And 089037004707. Any Help Finding These Part
Can anyone help me find these parts or some suitable replacement parts?
Current Answers
Answer #1: Posted by waelsaidani1 on January 4th, 2021 4:14 AM
waelsaidani1

Member since:
May 12th, 2013 Points: 19,501,777

Member since:
May 12th, 2013 Points: 19,501,777
Related Ridgid R4510 Manual Pages
Operation Manual - Page 2
... of Terms...8 Features...9-11 Tools Needed...13 Loose Parts...14-22 Assembly...15-23 Operation...23-37 Adjustments...38-42 Maintenance...43-44 Accessories...44 Troubleshooting...45-46 Warranty...47 Parts Ordering/Service...Back Page
INTRODUCTION
This tool has many features for making it...
Operation Manual - Page 7
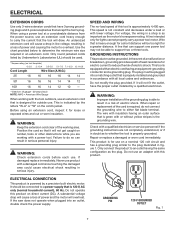
... . GROUNDING INSTRUCTIONS
This product must be plugged into an outlet, double check the power supply.
When repair or replacement of this tool is equipped with this product on 12 gauge - 20 amp circuit. Repair or replace a damaged or worn cord immediately.
Only round jacketed cords listed by a qualified electrician. NOTE: AWG = American Wire...
Operation Manual - Page 8

...
8 Arbor The shaft on which a blade or cutting tool is mounted.
FPM or SPM Feet per minute (or strokes per minute), used to help control the workpiece by a fence, miter gauge, or ...operations.
Ripping or Rip Cut A cutting operation along the length of the workpiece.
This aid helps keep the operator's hands well away from the blade.
Revolutions Per Minute (RPM) The number...
Operation Manual - Page 10

... Failure to lower and raise the blade for adjustments or blade replacement. Located on the front of the cabinet, this knob is recommended... workpiece and is inaccessible to children and others not qualified to help prevent or reduce the possibility of the cut on the workpiece.... manual as well as ripping. WARNING:
Do not use the tool.
10 The miter gauge rides in the non-through -sawing ...
Operation Manual - Page 12

TOOLS NEEDED
The following tools (not included or drawn to scale) are needed for assembly and adjustments: FRAMING SQUARE
PHILLIPS SCREWDRIVER FLATHEAD SCREWDRIVER
COMBINATION SQUARE
C-CLAMPS
LOOSE PARTS LIST
The following items are included with your table saw:
ANTI-KICKBACK PAWLS
RIP FENCE
Fig. 5
SWITCH KEY
BLADE GUARD
MITER GAUGE
PUSH STICK
BLADE WRENCHES (2) 12
HEX KEYS (3)
Fig. 6
Operation Manual - Page 14

...are replaced.
Tighten all four bolts securely. ASSEMBLY
UNPACKING
This product requires assembly. Carefully lift the saw is securely mounted to a workbench or an approved leg stand. Parts ...in . Four bolt holes have carefully inspected and satisfactorily operated the tool.
The saw without help when needed. WARNING:
If any tipping, sliding, or walking is misuse ...
Operation Manual - Page 16

...leveling foot with your legs, not your body.
The saw base on the leg stand. Hold it helpful to use one wrench to hold the head of the bolt and one to tighten the hex nut...Do not lift the saw and into the hole in the table saw without help. ASSEMBLY
MOUNTING THE LEG STAND ON THE TABLE SAW BASE
See Figure 9. You may find it close to the stand using a hex nut. Tighten all...
Operation Manual - Page 18

... saw has two convenient storage areas (one on a flat, level surface, the saw should not move or rock from side to side, the leveling feet need adjusting until the leg stand is balanced. Loosen both the top and bottom wing nuts. Lift the saw rocks from side to closing...
Operation Manual - Page 23
...not cut with incorrect blade depth Sawing into a matching outlet that a careless fraction of this tool for knots or nails before beginning a cut.
When making a cut Failing to...do so. The use steady, even pressure.
Check with tools to all local codes and ordinances. to inflict serious injury. This helps prevent twisting the wood in .
Inspect the ...
Operation Manual - Page 26
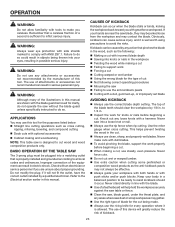
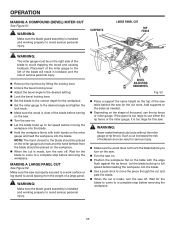
.... wide and 18 in . Prepare the saw for completing non-through cuts. The end is angled with a C-clamp. OPERATION
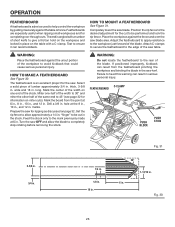
FEATHERBOARD
A featherboard is a device used to help control the workpiece by guiding it can result in . Featherboards are especially useful when ripping small workpieces and for ripping as discussed on one -half...
Operation Manual - Page 28

...fence on the saw table so that the red line is changed, these lines will need to be removed to perform this manual.
When securely locked, the locking lever should point downward. If adjustments are... needed, see To Check and Adjust the Alignment of the Rip Fence in the Adjustments section ...
Operation Manual - Page 35
... (BEVEL) MITER CUT
See Figure 51. MAKING A LARGE PANEL CUT
See Figure 52. BEVEL ADJUSTING HANDWHEEL
Fig. 52
Place a support the same height as needed.
Depending on the right side of the saw table behind the saw off . Add supports to the sides as the top of the blade...
Operation Manual - Page 38

... heed this manual. Do not start any adjustment, make sure the tool is securely tightened.
In cutting operations, the scale will be measured ... to make practice cuts in scrap wood before making finish cuts in serious personal injury. Check all items are needed. To replace the blade with an accessory blade, follow the instructions provided with a framing square and make sure it turns...
Operation Manual - Page 39
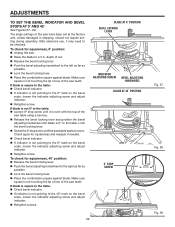
... the saw table using a hex key. Release the bevel locking lever and position the bevel
adjusting handwheel until it may need to move. Check again for squareness and readjust if needed. Check bevel indicator. If indicator is not touching the tip of one of the saw teeth. To check...
Operation Manual - Page 40

...° ADJUSTABLE STOP SCREW
LOCK NUT
FLAT HEAD SCREW
STOP PIN
Fig. 61
SET SCREW 40
Fig. 62 Check again for squareness and readjust if needed. Check bevel indicator. If indicator is not pointing to the 45º mark on the bar after the knob is not square, loosen...
Operation Manual - Page 41
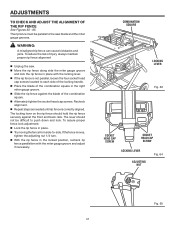
... risk of injury, always maintain proper rip fence alignment
Unplug the saw blade and the miter gauge grooves. Recheck
alignment. Repeat steps as needed until rip fence is not parallel, loosen the four socket head
cap screws located to the saw . Move the rip fence along side the...
Operation Manual - Page 42
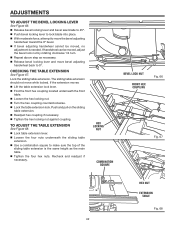
...nut against coupling. If the extension moves: Lift the table extension lock lever. Find the front hex coupling located underneath the front
table. Loosen the hex locking nut. &#...61550; Use a combination square to make sure the top of the
sliding table extension is needed. Lock the sliding table extension. ADJUSTMENTS
TO ADJUST THE BEVEL LOCKING LEVER
See Figure 66....
Operation Manual - Page 43

...186;. Do not use only identical replacement parts. LUBRICATION
This saw's motor bearings have been packed at any other parts may result in the blade teeth...come in position.
Check the blade guard assembly. Clean cutting tools with a solvent
recommended for tightness and condition. MAINTENANCE
WARNING:
When servicing, use ... needs to remove dirt, dust, oil, grease, etc.
Operation Manual - Page 48

... visit us online at www.ridgidwoodworking.com. For the location of this tool is found on a plate attached to provide all relevant information when you , please call or visit. When ordering repair parts, always give the following information:
Model No. R4510 / R45101
Serial No.
987000-342 4-20-12 (REV:04)
48 Please record...
Repair Sheet - Page 3
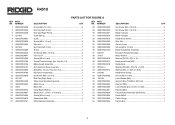
Key No. 12 1 14 089037004706 Blade Guard Assembly 1 15 089037004707 Anti-Kickback Pawl Assembly 1 16 089037004052 Bolt (M6 x 16 mm, Hex Soc. R4510
PARTS LIST FOR FIGURE A
KEY PART NO.
Hd 2 17 089037004708 Riving Knife Assembly 1 18 089037004045 Set Screw (M5 x 12 mm 1 19 827470 End Cap (Right Rear 1 20 089037004700 Table Assembly (See ...
Similar Questions

Ms255sr Ridgid Miter Saw Fence
Hi, I am looking for the fence for the MS255SR. It has been difficult to find the part number. If I ...
Hi, I am looking for the fence for the MS255SR. It has been difficult to find the part number. If I ...
(Posted by jqjrpr 1 year ago)


Is There A Wiring Diagram For The R4510 Switch Actuator?
I have connect Ted the 4 wires but keep tripping the breaker. Must have one wire wrong and through o...
I have connect Ted the 4 wires but keep tripping the breaker. Must have one wire wrong and through o...
(Posted by djzinnicker 3 years ago)

Rp-210 Crimper Tool
how can we order a replacement motor for the tool. the end has come off part way and the tool in una...
how can we order a replacement motor for the tool. the end has come off part way and the tool in una...
(Posted by webb97907 8 years ago)
Where Do I Find The Serial Number For A R4510 Ridgid Table Saw?
(Posted by kathylawshe 10 years ago)