Get support for Ryobi DP102L

Ryobi DP102L Support Question

Ryobi DP102L Support Question

Find answers below for this question about Ryobi DP102L.
Need a Ryobi DP102L manual? We have 4 online manuals for this item!
Question posted by estherflam on December 20th, 2021

Machine Is Not Turning On When Inserting Key And Pushing Up Key Pops Out?

The person who posted this question about this Ryobi product did not include a detailed explanation. Please use the "Request More Information" button to the right if more details would help you to answer this question.

Current Answers

Answer #1: Posted by hzplj9 on December 20th, 2021 5:00 PM
This answer was accepted by the poster of the original question.
hzplj9

Member since:
June 25th, 2012

Points: 4,873,510
1,100
points
Page 18 of the user guide available here:

https://www.manualslib.com/manual/143144/Ryobi-Dp102l.html

Explains the procedure for operating the power switch.

POWER SWITCH See Figure 16. The drill press is equipped with a power switch that has a built-in locking feature. This feature is intended to prevent unauthorized and possible hazardous use by children and others.

TO TURN THE DRILL PRESS ON: With the switch key inserted into the switch, lift the switch to turn ON ( l ).

TO TURN THE DRILL PRESS OFF: With the switch key inserted into the switch, push the switch down to turn OFF ( O ).

TO LOCK THE DRILL PRESS:Place the switch in the OFF ( O )position.

Remove the switch key from the switch and store in a safe place.

If the switch is in the 'off' position you should be able to insert the key. Then you can lift the switch on. Check that you have the key in the right orientation. If the key will not stay in when the switch is moved up then it is likely the switch will need replacing. There are links to service at Ryobi where you can purchase a new switch if required.

Hope that enables you to fix it.

Answer #2: Posted by SonuKumar on December 21st, 2021 8:10 AM
SonuKumar

Member since:
May 9th, 2021

Points: 16,617,800
100
points


Please respond to my effort to provide you with the best possible solution by using the "Acceptable Solution" and/or the "Helpful" buttons when the answer has proven to be helpful.

Regards,
Sonu
Your search handyman for all e-support needs!!

Related Ryobi DP102L Manual Pages

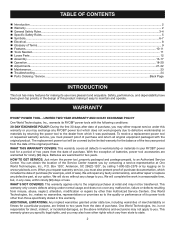
English Manual - Page 2

...; General Safety Rules...3-4  Specific Safety Rules...5  Symbols...6-7  Electrical...8  Glossary of Terms...9  Features...10-11  Tools Needed...11  Loose Parts...12  Assembly...13-17  Operation...18-20  Adjustments...21-22  Maintenance...23...
English Manual - Page 3

... recommended when working order.  REMOVE ADJUSTING KEYS AND WRENCHES. Keep tools sharp and clean for lubricating and changing accessories.  DISCONNECT TOOLS. Follow instructions for better and safer performance. A...in length. Do not force the tool or attachment to a complete stop.  PROTECT YOUR LUNGS. When not in use, before turning it comes to do the job ...
English Manual - Page 4

... devices: 3-wire extension cords that have repaired by an authorized service center.  ALWAYS TURN SWITCH OFF before disconnecting it well away from the rotating blade.  INSPECT EXTENSION...the motor could ignite fumes.  INSPECT TOOL CORDS PERIODICALLY. Do not rush.  DO NOT USE TOOL IF SWITCH DOES NOT TURN IT ON AND OFF. Never use only identical ...
English Manual - Page 5

...one another. Sharp bits minimize stalling. Restrain any operation before leaving machine.  AVOID direct eye exposure when using the laser guide. ...chemicals are not suitable for laser use to power source or turning power ON.  ADJUST THE TABLE OR DEPTH STOP...; BE SURE DRILL BIT OR CUTTING TOOL IS SECURELY LOCKED IN THE CHUCK.  BE SURE CHUCK KEY IS REMOVED from the bit. Do...
English Manual - Page 7

..., if not avoided, could result in death or serious injury. Before beginning power tool operation, always wear safety goggles or safety glasses with ANSI Z87.1. When servicing, use... SYMBOLS The following signal words and meanings are intended to explain the levels of any power tool can result in foreign objects being thrown into your nearest AUTHORIZED SERVICE CENTER for use only ...
English Manual - Page 9

...the workpiece, that area which a blade or cutting tool is mounted. Revolutions Per Minute (RPM) The number of the blade...area over, under, behind, or in front of turns completed by cutter blades when the workpiece is not properly... A hazard that serves as a guide for narrow ripping operations. Push Blocks and Push Sticks Devices used in the workpiece (requires a special blade). Cross...
English Manual - Page 10

... 29 in . Net Weight 62 lbs. x 8-3/16 in . FEATURES product specifications Chuck 1/2 in . laser on/off switch depth gauge worklight worklight on/off switch switch key power switch chuck table laser bevel scale lock knob feed handle table adjustment handle base 10 Fig. 2 Spindle Travel 2-3/8 in . Table Size 9-1/4 in . Input 120...
English Manual - Page 11

... simple and easy. TOOLS NEEDED The following tools (not included) are... needed for assembly and alignment: mallet or hammer adjustable wrench PHILLIPS SCREWDRIVER 11 Fig. 3 FEATURES KNOW YOUR drill press See Figure 2. Before attempting to help illuminate the work area. Chuck Your drill press features a standard three-jaw type chuck with a self-ejecting chuck key...
English Manual - Page 12

... the drill press: Head Assembly 1 Column Assembly 1 Table Assembly 1 Base 1 Hex Key (3 mm, 4 mm, and 5 mm 3 Hex Bolts (M8 4 Feed Handles 3 Table Adjustment Handle 1 Table Lock Handle 1 AA Batteries 2 Chuck 1 Chuck Key 1 Worm Gear 1 Operator's Manual (not shown 1 aa batteries chuck KEY table assembly chuck worm gear head assembly table lock handle table...
English Manual - Page 14

... gear rack from side to move the table from the column and set screw in the collar using the hex key.  Feed the gear rack through the hole in the table assembly.  Install table adjustment handle over... column collar gear rack base collar THREADED Hole Fig. 7 table lock handle Fig. 8 14 Insert it into the threaded hole at the rear of the table assembly and tighten by hand.
English Manual - Page 15

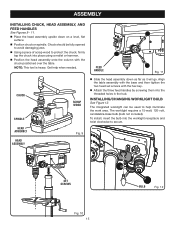
...9 head assembly set screws with the chuck positioned over the table. Note: This tool is heavy. To install, insert the bulb into place using a mallet or hammer.  Position the head assembly onto ...the column with the hex key.  Attach the three feed handles by ...
English Manual - Page 16

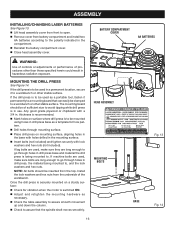
... are used as a portable tool, fasten it to a workbench or other stable surface. If lag bolts are long enough to go through holes in use. If machine bolts are long enough to ...to a mounting board that the spindle shaft moves ­smoothly. The mounting board should be inserted from the underside of procedures other stable surface. thickness is recommended. ■ Mark holes ...
English Manual - Page 17

...; Turn on the laser and verify the laser lines align with the "X" on the workpiece.  If the laser lines do not align, loosen the set screws on each of the laser housings with a hex key and... opposite sides of the head assembly.  Mark an "X" on a piece of scrap wood.  Insert a small drill bit into the chuck and align its tip to the intersection of the lines of the "X". &#...
English Manual - Page 18

... bit before operating the switch to start the tool. TO TURN THE DRILL PRESS OFF:  With the switch key inserted into the switch, push the switch down to turn ON ( l ). TO lock THE DRILL PRESS:  Place the switch in the OFF ( O ) position.  Remove the switch key from accidentally starting when power returns. In the...
English Manual - Page 19

... to tighten the chuck or counterclockwise to a point where the open- ing is turned on the chuck. chuck key key hole table rotation See Figure 18. In order to the chuck.  Tighten chuck jaws securely using the chuck key, push the key into the chuck the full length of the way when drilling large objects...
English Manual - Page 20

... bit.  Select and set feed shaft at desired spindle depth. Make sure spindle rotates freely.  Slowly lower drill bit into power supply and turn switch ON. DRILLING TIPS  If a large hole is wide, back off occasionally to clear the chips.  When drilling metal, lubricate the bit with...
English Manual - Page 21

... can be tilted left or right, from the power supply. adjustments WARNING: Before performing any adjustment, make sure the tool is equipped with one hand and loosen the table lock handle.  Rotate the table adjustment handle clockwise to raise...you to desired setting.  Retighten lock knob securely using the hex key, if needed. adjusting Table bevel See Figures 22 - 23.
English Manual - Page 23

... keep the surfaces clean. Should you will not be tightly secured on or in the tool are permanently lubricated and need no further attention. To make sure the pulleys are susceptible ... housing Frequently blow out any dust that could cause possible serious personal injury, turn off the tool, remove the switch key, and unplug the drill press before performing any other parts may not be ...
Repair Sheet - Page 3

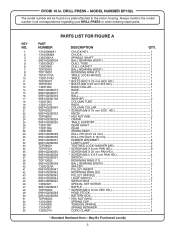
...FOR FIGURE A PART NUMBER DESCRIPTION QTY. 13103006M1 CHUCK KEY 1 13103006M CHUCK 1 13203001A SPINDLE SHAFT 1 089140200004 ...Purchased Locally  Always mention the model number in . MODEL NUMBER DP102L The model number will be found on a plate attached to ... (60203 2 13302023A SPACER 1 089140200041 PULLEY INSERT 1 089140200042 RETAINING RING (22 1 089140200043 ...
Repair Sheet - Page 4

...089140200074 SHAFT SEAT 1 089140200075 RETAINING RING (16 1 089140200076 DEPTH STOP RING 1 089140200103 MOTOR (INC. KEY NO. 56 57 58 59 60 61 62 63 64 65 66 67 68 69 70 71 72 ...HD 4 089140200068 BELT TENSION KNOB 1 089140200069 * SCREW (M8 X 60 mm HEX SOC. MODEL NUMBER DP102L The model number will be found on a plate attached to the motor housing. Always mention the model number...

Similar Questions

Pulley Insert
The pulley insert for my DP102L drillpress has snapped into. The break is at the diameter change of ...
(Posted by dannylandrum 5 years ago)
Belt Not Driving Chuck.
In fact, I can hold the chuck still while the motor and belt are working. I looked in the manual and...
(Posted by revdocpop1 7 years ago)
Orange Key Goes Where?
(Posted by muskyhuntrer2 9 years ago)
How Do You Remove The Key On The On/off Switch?
I assembled my ws722 but I can't get the on/off switch to work. I assume this is because the red key...
(Posted by suarts811 9 years ago)
Ask a New Question
Use the box below to post a new question about this Ryobi product .
Points & Prizes
  • You can earn points for nearly everything you do on HelpOwl.com
  • You can trade in those points for gift cards at leading retailers such as Amazon.com and Walmart
  • It's that simple!
See How it Works
Create a Free Account

Ryobi Manuals

Find free Ryobi DP102L manuals and user guides available at ManualOwl.com. Try out our unique manual viewer allowing you to interact with manuals from directly within your browser!

Ryobi Reviews

View thousands of Ryobi user reviews and customer ratings available at ReviewOwl.com.

Contact Information

Complete Ryobi customer service contact information including steps to reach representatives, hours of operation, customer support links and more from ContactHelp.com.

Scoreboard Ratings

See detailed Ryobi customer service rankings, employee comments and much more from our sister site.

Ryobi Recalls

Find comprehensive Ryobi recall information updated hourly on RecallOwl.com.