Singer 4423 Heavy Duty Support Question
Singer 4423 Heavy Duty Support Question
Find answers below for this question about Singer 4423 Heavy Duty.Need a Singer 4423 Heavy Duty manual? We have 1 online manual for this item!
Question posted by Catchapuppy on December 29th, 2016
I Am Looking For The Power Chord For The Pixie Plus Cfaft Machine. And The Foot
Pixie Plus Power Chord, And Foot Pedal........serial # Mic14505038760.
Current Answers
Answer #1: Posted by Odin on December 30th, 2016 6:52 AM
Odin

Member since:
April 10th, 2010 Points: 41,236,660

Member since:
April 10th, 2010 Points: 41,236,660
These are likely available from the manufacturer: use the contact information here--https://www.contacthelp.com/singer/customer-service. If not, ask for a part number and follow the applicable suggestions at this previous answer.
Hope this is useful. Please don't forget to click the Accept This Answer button if you do accept it. My aim is to provide reliable helpful answers, not just a lot of them. See https://www.helpowl.com/profile/Odin.
Related Singer 4423 Heavy Duty Manual Pages
Instruction Manual - Page 2

... or push fabric while stitching. To unplug, grasp the plug, not the cord. 16. Special care is 75dB(A). 17. Keep ventilation openings of the sewing machine and foot controller free from all instructions before cleaning. 3. An appliance should always be used by persons (including children) with reduced physical, sensory or mental capabilities, or...
Instruction Manual - Page 6

... Basics Principle Parts of the Machine ...2/4 Connecting Machine to Power Source...6 Two Step Presser Foot Lifter/ Adjusting Presser Foot Pressure...8 Accessories...10
Threading the Machine Winding the Bobbin...12 Inserting the Bobbin ...14 Threading the Upper Thread...16 Automatic Needle Threader ...18 Raising the Bobbin Thread ...20 Thread Tension ...22
Sewing How to Choose Your Pattern...24...
Instruction Manual - Page 9

...
5
13
9. Pattern selector dial
8
14. Three needle position dial
6
10. One step buttonhole lever
14
15
2 Thread take-up lever 2
10
4. Needle plate cover
8. Presser foot
4
12
7. Reverse sewing lever
11
3
5. Stitch width dial
7
12. EN Principal Parts of the Machine
1. Bobbin stopper
11. Automatic threader 15.
Instruction Manual - Page 11

... plug socket
23. Presser foot lifter 22
28. Hole for second spool pin
17
19. Bobbin thread guide
24. Handle
21
27. Horizontal spool pin
17. Bobbin winding spindle
16
18. Handwheel
20. EN Principal Parts of the Machine
16. Face plate
20
26. Power and light switch 19
22. Power cord
4
23 24...
Instruction Manual - Page 13
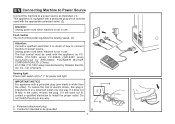
... foot control pedal regulates the sewing speed. (3)
Attention: Consult a qualified electrician if in use . IMPORTANT NOTICE For appliance with a polarized plug (one way. Do not modify the plug in any way. If it does not fit fully in the outlet, reverse the plug. Polarized attachment plug
b. EN Connecting Machine to Power Source
Connect the machine to a power...
Instruction Manual - Page 15
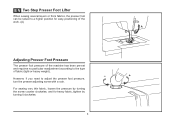
... work. (A)
A
Adjusting Presser Foot Pressure
The presser foot pressure of fabric (light-or-heavy weight). EN Two Step Presser Foot Lifter
When sewing several layers or thick fabrics, the presser foot can be raised to a higher position for heavy fabric, tighten by turning it clockwise.
8 However, if you need to the type of the machine has been pre...
Instruction Manual - Page 17

... foot p. Blind hem foot s. Edge/ quilting guide g. they are not supplied with this machine; Quilting/ straight stitch foot ...foot q. Spool holders i. L-screwdriver k. Zipper foot c. Even Feed foot w. EN Accessories
Standard accessories (1) a. Auxiliary Spool Pin l. Gathering foot u. Pack of needles h. Button sewing foot e. Satin stitch foot o. Cording foot...
Instruction Manual - Page 19

Thread bobbin as illustrated and place on foot control pedal. (8)
- Step on spindle. (5)
- EN Winding the Bobbin
- Snap thread into thread guide. (3)
- Push bobbin spindle to the left (10) and remove. Cut thread. (9) 2
- To start sewing, push the bobbin winder spindle to right. (6)
- Hold thread end. (7) 1
-
Place thread and corresponding spool holder on to...
Instruction Manual - Page 21

Pull out about 15 cm (6 inches) of thread and attach the bobbin cover plate. (C)
Attention:
1
Turn power switch to off ("O") before inserting or
removing the bobbin. Insert the bobbin in the bobbin case with the thread running counterclockwise direction (arrow).
2.
Pull the ...
Instruction Manual - Page 23

... off the spool as shown. Lift up lever and then 1 downwards again. (6)
- Start by not doing so several sewing problems could result.
- Raise the presser foot to length with the thread coming off the power before threading.
- For small thread spools, place small side of thread to the rear beyond the needle
eye...
Instruction Manual - Page 25

... to the threading position
(B). -
A C
B D
A
2 18 EN Automatic Needle Threader
- Raise the needle to off ("O")! Release lever (A). - Pull the thread through the needle eye.
1 Attention: Turn power switch to its highest position. - Pass the thread in front of the needle around thread guide (C). - Press lever (A) down as far as it will go...
Instruction Manual - Page 27

... pull on the upper thread to bring the bobbin thread up through the needle plate hole. (2) Lay both threads to the back under the presser foot. (3)
2
3
20 EN Raising the Bobbin Thread
Hold the upper thread with the left hand.
Instruction Manual - Page 37
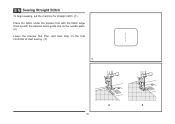
EN Sewing Straight Stitch
To begin sewing, set the machine for straight stitch. (1) Place the fabric under the presser foot with the fabric edge lined up with the desired seam guide line on the needle plate. (2) Lower the presser foot lifter, and then step on the foot controller to start sewing. (3)
1
2
3
30
Instruction Manual - Page 39

... a seam, press down to its highest position, raise the
presser foot and remove work behind the needle and presser 1
2
foot. (2)
Cutting the Thread
Pull the threads under and behind the presser foot. Pull threads down
the reverse sewing lever (A). A
Release the lever and the machine will sew forward again. (1)
Removing the Work
Turn the handwheel toward...
Instruction Manual - Page 43
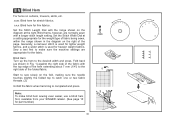
...hem sewing even easier, use a blind hem foot, ...available from your SINGER retailer. (See page 10 for stretch fabrics. Blind hems, however, are
appropriate for the fabric. Generally, a narrower stitch is used for lighter weight
fabrics, and a wider stitch is completed and press.
2 Note: To make sure the machine settings are normally sewn
with a longer stitch length setting. Sew...
Instruction Manual - Page 45
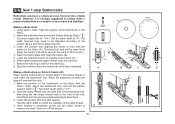
...fabric, hook heavy thread or
cord under the buttonhole foot. Lower ...foot,
insert them into the grooves and temporarily tie them there.
3. Lower the presser foot aligning the marks on foot with the mark on the
fabric. 2. EN Sew 1-step Buttonholes
Buttonhole sewing is done in the order (D). 8. Open the button plate and insert the button (B). 5. Lower the presser foot and start the machine...
Instruction Manual - Page 49
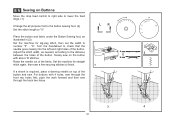
... the button and fabric under the Button Sewing foot, as needed, according to "0". Adjust the stitch width, as illustrated in (3). Slowly sew on the button with 4 holes, sew through the front two holes first, push the work forward and then sew through the back two holes.
3
4
42 Set the machine for straight
a
2
ba b
stitch again, then...
Instruction Manual - Page 53

... shank (b) as needed for hems, pleats, quilting, etc. (4)
Attention: Turn power switch to off ("O") when carrying out any of the above the pin (d). (2) The presser foot (f) will engage automatically. e
3
46
a
e b
d
2
c f
g 4 Removing the presser foot
Raise the presser foot using the presser foot lifter, until the cut-out (c) is directly above operations! b
Attaching the edge/ quilting...
Instruction Manual - Page 62
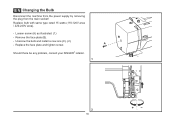
... watts (110-120V area / 220-240V area).
- B A
Should there be any problem, consult your SINGER® retailer. 1
C
2
55 EN Changing the Bulb
Disconnect the machine from the power supply by removing the plug from the main socket!
Replace the face plate and tighten screw. Loosen screw (A) as illustrated. (1) - Remove the face plate (B). -
Instruction Manual - Page 64

... needle. The machine is caught in the hook.
57
Correction
1. The thread tension is damaged. The needle is too tight. 3. The needle is too thick for the fabric. 4. Remove and reinsert the bobbin case and pull on the fabric while sewing, let the feed dogs pull
the fabric under the foot.
1. The needle...
Similar Questions

Replacement Foot Pedal And Power Cord. Pixie Plus
can you tell me how to get a replacement power cord and a foot pedal for a pixie plus kid sewing mac...
can you tell me how to get a replacement power cord and a foot pedal for a pixie plus kid sewing mac...
(Posted by Judya51 1 year ago)
Need Replacement Foot Pedal And Plug In Electric Cord For Pixie Plus
(Posted by Judya51 1 year ago)

My Singer Sewing Machine 4423 Will Not Do Anything. All You Can Hear Is Motor
I hear motor the shaft spins how to change bel
I hear motor the shaft spins how to change bel
(Posted by Marybeverly4576477 8 years ago)

I Can't Get The Buttonhole Foot To Work Properly
I cannot get the foot to make a proper buttonhole. It makes the stitches correctly, but does not sha...
I cannot get the foot to make a proper buttonhole. It makes the stitches correctly, but does not sha...
(Posted by aagray2 8 years ago)

Machine Will Sew With Automatic Button But Not With Foot Controller,machine Is A
(Posted by maryllanez 10 years ago)