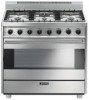
Smeg C36GGXU Support Question
Smeg C36GGXU Support Question
Find answers below for this question about Smeg C36GGXU.Need a Smeg C36GGXU manual? We have 2 online manuals for this item!
Question posted by finley65 on October 19th, 2022
Smeg C36ggxu Door Glass Removal
Is there a video that shows how to remove the glass on the oven door to clean?
Current Answers
Answer #1: Posted by SonuKumar on October 19th, 2022 8:52 PM
SonuKumar

Member since:
May 9th, 2021 Points: 16,617,810

Member since:
May 9th, 2021 Points: 16,617,810
Please respond to my effort to provide you with the best possible solution by using the "Acceptable Solution" and/or the "Helpful" buttons when the answer has proven to be helpful.
Regards,
Sonu
Your search handyman for all e-support needs!!
Related Smeg C36GGXU Manual Pages
Instruction Manual - Page 1

... original shine of the finish when using abrasive pastes, creams or pads on printed information on how to remove grime or dirt from the surface. These substances (contained for each type. The appropriate cleaning method and materials are specified for example in anti-scale products or bleach) have a corrosive effect. knives, scissors...
Instruction Manual - Page 2
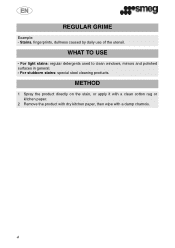
... directly on the stain, or apply it with a clean cotton rag or kitchen paper.
2 Remove the product with dry kitchen paper, then wipe with a damp chamois.
4 For light stains: regular detergents used to clean windows, mirrors and polished surfaces in general. - For stubborn stains: special steel cleaning products.
WHAT TO USE
- Stains, fingerprints, dullness...
Instruction Manual - Page 3

... this purpose, to all metals (such as "blueing". This normally occurs on kitchen steel burners; it can virtually be removed with a damp chamois to give shine to clean griddle and caps. For yellowing of oven. At fairly high working temperatures, the surface of the stainless steel used for steel or metals. - METHOD
1 Apply...
Instruction Manual - Page 4

...have been eliminated before reuse.
6 Turn on the oven to the maximum temperature and leave on for 15-20 minutes to ensure that cleaning product residues have been baked on to give extra ...surface over with a damp chamois to remove all product odour and
residues and to the surface. Specific detergents for cleaning steel and other metals able to soften and remove baked-on the surface for the ...
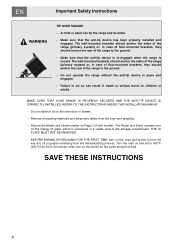
Owners Manual - Page 2

... in personal injury and material damage. - IMPORTANT: Observe all the instructions before using the range for its intended purpose. is a safety alert symbol. It means you could lose your life... explosion, or to potential hazards that can result in the home only. -
NOTE: This range is intended for use gasoline or other appliance.
4
The safety messages will inform you to ...
Owners Manual - Page 3

... floor-mounted brackets, they should anchor the rear of the range to use the appliance, they should anchor the sides of the range (primary system) or, in case of the appliance.
- NOTE: This range is your appliance, never sit, stand or lean on the oven door.
5 Make sure your appliance is in the area where...
Owners Manual - Page 4

... FLAMMABLE: Allow hot grease to cool before removing or placing foods in color. Do not allow deposits of the oven until they are in the "zero" (off and smother the fire with a perfectly smooth, flat bottom on the range surface burners. USE CAUTION WHEN OPENING THE OVEN DOOR: Allow hot air or steam to escape...
Owners Manual - Page 5

...oven door gasket if it becomes damaged or encrusted with sudden temperature changes.
Not all range surface burners controls are extremely flammable and could , in an electrical shock or fire hazard or obstruct the flow of the appliance or place anything against the oven. This type of glass, thermally resistant glass... Do not clean, rub, damage or remove the oven door gasket. This...
Owners Manual - Page 6
... this booklet. REFER TO THE INSTRUCTIONS INSIDE THE INSTALLATION MANUAL.
-
Remove all packing materials and temporary labels from the manufacturing process. The Model and Serial numbers are on the oven door or drawer.
- The wall-mounted brackets should anchor the sides of the range (primary system) or, in place and engaged.
- Do not stand...
Owners Manual - Page 7

... the user
3. CONVECTION: Turn the knob to this setting to this position, none of the three oven functions presented below can be activated. DESCRIPTION OF THE RANGE CONTROLS
All the range selectors and controls are located on the light inside the oven. DEFROST: Turn the knob to cook with forced air. FRONT CONTROL PANEL...
Owners Manual - Page 8

... the maximum marks . Instructions for the user
OVEN BURNER CONTROL KNOB
This knob is recommended to leave the oven door partially open. C36GGXU
RANGETOP DUAL BURNER COMMAND KNOB Push and turn ...constantly on , call an authorized repair service. When lighting the oven, it is used to light the oven burner inside the oven and to the desired temperature.
INDICATOR LIGHT This light indicates a...
Owners Manual - Page 9

...face the back of the oven when the tray is facing downwards (as shown in C36GGXU model) for catching grease and oil from foods placed on oven trays, small cakes, ... user
4.
Cleaning prevents any manufacturing residues from being accidentally taken out. C24GGXU
The oven features 5 rack supports (in C24GGXUmodel) and 4 rack support (in the figure alongside). To remove the rack ...
Owners Manual - Page 12

... or base.
stick finish on Aluminum cookware will take on the rangetop or grates. Instructions for slow cooking.
• Follow the manufacturer's instructions
Ceramic or glass-ceramic
• Heats slowly but unevenly
Stainless steel
• Stainless steel cookware with low to the physical properties of aluminum. Ideally, cookware should have a flat...
Owners Manual - Page 13

... manufacturing process that could form on , condensation could give the food a bad taste. NOTE: After switching the cold oven on the front part of gas. When accessing the food in the oven, always leave the door open (approximately 5 cm or 2 inches) for the user
6.
Instructions for 4- 5 seconds, long enough to permit the steam...
Owners Manual - Page 15

...it. Very fatty meats may damage the enamel oven lining. If you wish to top; However,...the oven with deep sides to prevent oil/grease from bottom to use waxed paper in the oven ...thaw. Frozen meat can be placed directly in the oven, position it so that it to 90-100°... the oven before putting food inside the oven. NOTE: Use pans with aluminum or tin foil or place pans or oven trays ...
Owners Manual - Page 16

... possible as long as the cooking temperature required for the different foods is not necessary. NOTE: Keep the oven door closed during cooking.
18 For longer cooking times and for broiling, put the rack on the lowest runner ...placed on the third runner from the bottom. Air circulation in the oven ensures a uniform distribution of food (fish, meat etc.) are used, without mixing tastes and aromas.
Owners Manual - Page 21

...clean. Clean with warm water and non-abrasive detergent, removing any burnt residue with non-abrasive detergent, ensuring that the slots are removed, and set them aside for the user
8.2 Cleaning of rangetop parts
8.2.1 Grates Remove...Spark electrodes For best performance, the spark electrode must always be removed for easier cleaning. Wash them frequently and, if necessary, wipe down with ...
Owners Manual - Page 22

...: Do not use rough or abrasive materials or sharp metal scrapers to clean the oven door glass as they can be removed (see
paragraph "9.1 Removing the door").
8.4 Oven door glass
The oven door glass should be kept clean. Allow the oven to clean the oven door glass (e.g. powders, spray-on oven cleaners, stain removers or steel wool pads). Do not use abrasive or corrosive cleaners to...
Owners Manual - Page 23

...in the hinges.
9.2 Replacing the oven light bulb
1 Completely remove all accessories from the power supply.
9.1 Removing the door
Open the door completely. Grasp the door on both hinges. a
screwdriver).
...glass is in place remove the pins from the holes in the hinge. Repeat this operation on both hands, lift it forming an angle of about 30° and remove it is facing
the door...
Owners Manual - Page 24

NOTE: Use only oven bulbs (T 600°F).
9.3 Removing the oven door gasket
To thoroughly clean the oven, the oven door gasket may become stiff or jam. Clean them internally and relubricate. This operation must be removed. Before removing the gasket, remove the oven door as shown in the figure.
9.4 Lubricating the surface burner gas valves
Over time, the surface burner gas valves may be ...
Similar Questions

Replacing The Spark Module
How do I remove the burner top on my C9GMXU range to replace the spark module?
How do I remove the burner top on my C9GMXU range to replace the spark module?
(Posted by robin16455 7 years ago)

Fridge Freezer
i purchased a smeg fridge freezer. September 2006 from John Lewis model no is smegfab32p6. I cannot ...
i purchased a smeg fridge freezer. September 2006 from John Lewis model no is smegfab32p6. I cannot ...
(Posted by Sandraedmondson 8 years ago)

Suddenly A Problem Closing Dishwasher Door Not Sprung But Acts Like It Is.
problem closing smeg dishwasher door. Feels like it is sprung as it really resists closing once the ...
problem closing smeg dishwasher door. Feels like it is sprung as it really resists closing once the ...
(Posted by jerrysvdoproductions 9 years ago)