
Toro 20333 Support Question
Toro 20333 Support Question
Find answers below for this question about Toro 20333 - BBC Personal Pace Walk Power Mower.Need a Toro 20333 manual? We have 2 online manuals for this item!
Question posted by liaqqCp on October 1st, 2014
How To Remove Toro Recycler 20333 Transmission
The person who posted this question about this Toro product did not include a detailed explanation. Please use the "Request More Information" button to the right if more details would help you to answer this question.
Current Answers
Related Toro 20333 Manual Pages
Operation Manual - Page 1

...-blade, walk-behind lawn mower is supplied for information regarding the US Environmental
© 2011-The Toro® Company 8111 Lyndale Avenue South Bloomington, MN 55420
Register at www.Toro.com. ... space below:
Important: This engine is a violation of special attention. 22in Recycler® Lawn Mower
Model No. 20333-Serial No. 312000001 and Up Model No. 20333C-Serial No. 312000001 and Up...
Operation Manual - Page 2

... comply with the instructions, to potential personal injury hazards. Poor footing could result ... Never operate mower in the manual(s) before cleaning the machine, removing grass catcher, ...
• Clear the area of lawn mower will be ordered through the engine manufacturer...machine.
• See manufacturer's instructions for walk-behind before operating. Slope Operation
Slopes are familiar...
Operation Manual - Page 3

... Gasoline
To avoid personal injury or property ... to be sure the equipment is not alert to cool before filling.
• Remove gas-powered equipment from a gasoline dispenser nozzle.
• Keep the nozzle in contact with ... with a portable container, rather than the operator.
• Be alert and turn mower off if a child enters the area.
• Never allow children to prevent unintended...
Operation Manual - Page 5
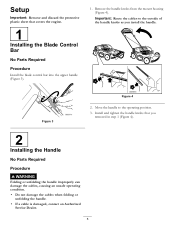
...the protective plastic sheet that you install the handle. Remove the handle knobs from the mower housing (Figure 4). Install and tighten the handle ...Route the cables to the operating position. 3.
Move the handle to the outside of the handle knobs as you
removed in step 1 (Figure 4).
2
Installing the Handle
No Parts Required
Procedure
WARNING
Folding or unfolding the handle improperly...
Operation Manual - Page 6

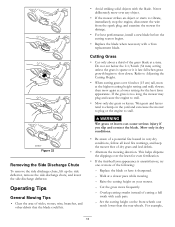
.... Side discharge chute
6 Figure 6
1. Control bar lock
1. Do not overfill. (Max.
Ignition switch
9. Remove the dipstick (Figure 5). Slowly pour oil into the oil fill tube until the oil level reaches the Full line...with Oil
Product Overview
No Parts Required
Procedure
Your mower does not come with a bottle of SF, SG, SH, SJ, SL, or higher.)
3. Fuel tank cap...
Operation Manual - Page 7

....
• To prevent a static charge from igniting the gasoline, place the container and/or mower directly on the dipstick, slowly pour oil into contact with gasoline. Do not mix oil with ...stop.
• Do not put your fingers under the housing when adjusting the cutting height.
Remove the dipstick and check the oil level (Figure 9). Adjusting the Cutting Height
WARNING
Adjusting the ...
Operation Manual - Page 9
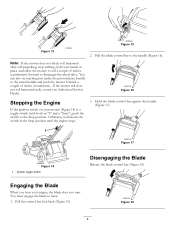
...personal pace handle to the Stop position. Figure 16
Stopping the Engine
If the ignition switch on your mower (Figure 14) is a toggle switch (with both an "I" and a "Stop"), push the switch to the metal handle and push the mower...18
9 Note: If the mower does not freely roll backward after self-propelling, stop walking, hold down the switch in place, and allow the mower to roll a couple of ...
Operation Manual - Page 10

Install the empty grass bag on -Demand Lever) before recycling the clippings. Start the engine. 3. Note: If the bag does not immediately deflate, the blade is on the mower and the bag-on the mower, remove it does not stop properly, stop using your mower immediately and contact an Authorized Service Dealer. The blade brake clutch...
Operation Manual - Page 11
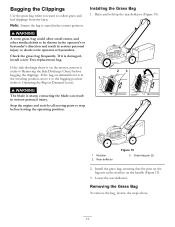
... bag-on-demand lever is in the recycling position, move it to the bagging position...Toro replacement bag. Raise and hold up the rear deflector (Figure 19).
Notches 2.
If the side discharge chute is sharp;
WARNING
The blade is on the mower, remove it is seated in serious personal injury or death to collect grass and leaf clippings from the lawn. Removing the Grass Bag
To remove...
Operation Manual - Page 12
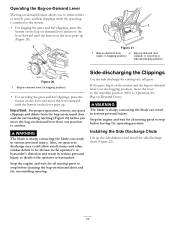
.... Stop the engine and wait for cutting very tall grass. in serious personal injury. Important: For proper operation, remove any grass clippings and debris from one position to the operator or bystanders....mower and the bag-on-demand lever is attached to the mower.
• For bagging the grass and leaf clippings, press the button on the bag-on-demand lever and move the lever to the recycling...
Operation Manual - Page 13
...; If the finished lawn appearance is too long, the mower may plug and cause the engine to Adjusting the Cutting Height.
• When cutting grass over the lawn for damage.
• For best performance, install a new blade before the cutting season begins.
• Replace the blade when necessary with a Toro replacement blade. Refer to...
Operation Manual - Page 15

...wire to stop.
2. Gasoline is flammable, explosive and can cause personal injury. Run the engine dry or remove the gasoline with the air filter up.
Maintenance
Note: Determine the... the blade brake clutch operation. • Clean grass clippings and dirt from under the mower.
• Replace the air filter; Recommended Maintenance Schedule(s)
Maintenance Service Interval
After the first...
Operation Manual - Page 16

... oil to drain the used oil properly at a local recycling
center. Warm oil flows better and carries more contaminants. ...adjust the self-propel drive cable. 1. Dipstick
Figure 26
3. Remove the dipstick (Figure 26). Adjusting the Self-propel Drive Cable
..., SL, or higher.)
5. Pull down the cable jacket (toward the mower) until the oil level reaches the Full line on the dipstick (Figure 27...
Operation Manual - Page 17

...4.
Tip the mower onto its side with the air filter up .
3. Tip the mower onto its side with the air filter up . 3. Blade nuts 2. Blade driver 5. Remove the blade (Figure...personal injury. Stiffener
3. If the blade edge is damaged or cracked, replace it sharpened (more frequently if the edge dulls quickly). Refer to install the blade properly. WARNING
The blade is sharp; Remove...
Operation Manual - Page 18

... around all the parts. 8. Lower the mower to the washout port on .
6. Attach a garden hose that you previously
removed (Figure 31). 11.
Move the mower onto a flat paved surface.
3. Washout...; Stay in the area. Install the blade driver and disk that you
previously removed. 9. Cleaning the Mower
Service Interval: Before each use or daily
5. Install the blade and the stiffener...
Operation Manual - Page 19
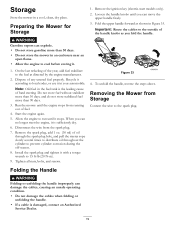
...last refueling of the handle knobs as you fold the handle. Storage
Store the mower in Figure 33. Recycle it stops.
When you can damage the cables, causing an unsafe operating condition.... of any unused fuel properly. Run the mower until it according to 15 ft-lb (20 N-m). 9. Tighten all nuts, bolts, and screws.
1.
Removing the Mower from the spark plug. 7. Allow the ...
Operation Manual - Page 20

... Toro GTS Starting Guarantee
A 3-Year Full Warranty (Not Applicable for Commercial Use)
22 in Recycler® 20 in Mulcher/Bagger
Walk Power Mowers
Conditions and Products Covered
The Toro Company and its affiliate, Toro ...materials or workmanship or if it is covered under "Lawn Mowers") or access our web site at Toro Warranty Company.
*Residential purposes means use over three months or...
Parts Catalog - Page 1

Form No. 3371-848 Rev A
22in Recycler® Lawn Mower
Model No. 20333-Serial No. 312000001 and Up
Parts Catalog
Register at www.Toro.com. Original Instructions (EN)
Parts Catalog - Page 3

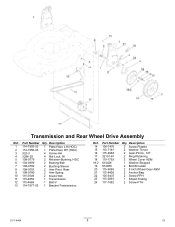
... Assembly 5 Engine and Blade Assembly 6 Front Wheel and Height-of-Cut Assembly 7 Transmission and Rear Wheel Drive Assembly 8 Upper Handle Assembly 9 Upper Handle Component Assembly 10 Attachments and Accessories 11
© 2011-The Toro® Company
Contact us at www.Toro.com.
8111 Lyndale Avenue South Bloomington, MN 55420
3
Printed in the USA...
Parts Catalog - Page 8
...
6 104-8699
2 Bearing-Ball
7 108-9782
2 Bushing-Sleeve
8 108-9781
2 Arm-Pivot, Rear
9 108-9780
2 Arm-Spring
10 110-0549
2 Knob-HOC
11 115-4652
1 Transmission
12 115-4669
1 Belt-V
13 114-7977-03 1 Bracket-Transmission
Ref. Part Number Qty. Part Number Qty. Transmission and Rear Wheel Drive Assembly
Ref.
Similar Questions

Owners Manual For Toro 190 Cc Personal Pace Lawn Mower
(Posted by nelsontim1 9 years ago)

Brand New Toro Recycler 20333 Won't Run When Blades Are Engaged
I bought a Toro Recycler Personal Pace yesterday and after getting it all together and ready to use,...
I bought a Toro Recycler Personal Pace yesterday and after getting it all together and ready to use,...
(Posted by conbil40 9 years ago)

Toro Recycler 20333 Lawn Mower Won't Start
(Posted by altti 10 years ago)

What Isthe Difference Between Toro Recycler 20333 And Recycler 20332
(Posted by lfGui 10 years ago)

How Much Oil To Put In Toro Recycler 20333
(Posted by Clbul 10 years ago)