Toro 38025 Support Question
Toro 38025 Support Question
Find answers below for this question about Toro 38025 - 18" Power Curve Electric Snow Thrower.Need a Toro 38025 manual? We have 2 online manuals for this item!
Question posted by edabar on January 27th, 2011
15 Amp Circuit Breaker Blowing
I have one of the early Power Curve 1800’s. It has run flawlessly until this week. Yesterday, after 30-60 minutes of use, the 15-amp circuit breaker tripped. It would not reset. Electrician replaced breaker with new 15-amp breaker. Today, Power curve worked OK for about 30-60 minutes and then the new circuit breaker tripped again. It will not reset. No other appliances turned on while the circuit was in use. Plug in garage is GFI. Electrician will return Friday, please advise.
Current Answers
Related Toro 38025 Manual Pages
Operation Manual - Page 1

...parts are responsible for operating the product properly and safely.
This rotary-blade, walk-behind lawn mower is a violation of your product.
Serial No.
WARNING
CALIFORNIA Proposition 65 Warning ...ready. Whenever you do not follow the recommended precautions. Safety alert symbol
This manual uses 2 words to cause cancer, birth defects, or other reproductive harm.
You are ...
Operation Manual - Page 2

...drugs.
• Never operate mower in place and working.
• Never leave a running .
• Be sure the area is generally a warning of trouble.
• ...lawn mower will be ordered through the engine manufacturer. Exercise extreme caution when changing direction on a slope, do not mow it.
• Mow across the face of this symbol to avoid possible injury or death.
Improperly using...
Operation Manual - Page 3

...against engine to cool before filling.
• Remove gas-powered equipment from a gasoline dispenser nozzle.
• Keep the... components and the discharge guard frequently and replace with the engine running . General Service
• Never operate machine in a closed ...an enclosed area. Service
Safe Handling of ignition.
• Use only an approved gasoline container.
• Never remove gas...
Operation Manual - Page 5

...
3. Wipe the dipstick clean with an API service classification of oil. Insert the dipstick fully into the oil fill tube, wait 3 minutes, and repeat steps 3 through 5 until the oil level is damaged, contact an Authorized
Service Dealer.
1. Max. Move the mower ...: Your mower does not come with oil. fill: 20 oz. (0.59 l), type: SAE 30 detergent oil with a clean cloth.
4. Figure 3
2.
Operation Manual - Page 6

... hours;
Side-discharge deflector
models only)
4. Side discharge chute
3. Battery charger (electric-start handle
7. change it yearly thereafter. Figure 5
1. Bag-on the dipstick reads...control bar
9. Spark plug
Figure 6
1. Important: Do not overfill the crankcase with oil and run the engine. Air filter
3. Washout port (not shown) 13.
Recoil start models only)
6...
Operation Manual - Page 7

...vehicle or on the dipstick. Fill the fuel tank with oil and run the engine.
Do not mix oil with an API service classification of.... fill: 20 oz. (0.59 l), type: SAE 30 detergent oil with gasoline. Note: Never use or daily
Note: Max.
Dipstick
Figure 8
3.
Insert... the reach of oil into the oil fill tube, wait 3 minutes, and repeat steps 3 through 5 until the oil level on ...
Operation Manual - Page 8

...the Cutting Height
WARNING
Adjusting the cutting height may bring you . CAUTION
If the engine has been running, the muffler will be hot and can severely burn you into contact with the moving blade, ... under the housing when adjusting the cutting height.
Turn the ignition key (Figure 11) (electric-start models only) or pull the recoil start handle, pull it lightly until you pull the...
Operation Manual - Page 9

...-on the mower, remove it (refer to recycle the grass and leaf clippings back into the lawn. If the grass bag is on the mower and the bag-on-demand lever is on -Demand... wait for all moving parts to the operator or bystanders.
Bagging the Clippings
Use the grass bag when you leave the mower (electric-start after self-propelling, stop within 3 seconds.
Note: Remove the ignition ...
Operation Manual - Page 10

... rearward until the button on the lever pops up .
Rear deflector
Figure 14 3.
Notches 2. lever forward until the button on the lever pops up (Figure 15)
Figure 15 1.
Operation Manual - Page 11

...
Lift up the side deflector, remove the side discharge chute, and lower the side discharge deflector.
11 Clean here
Figure 16
Side-discharging the Clippings
Use the side discharge for all moving parts to Operating the Bag-on-Demand Lever).
Operation Manual - Page 12

... cause serious injury if you slip and contact the blade. Cutting Leaves
• After cutting the lawn, ensure that the blade could hit.
• Avoid striking solid objects with each pass.
-
...to plug or the engine to slow down your mower.
- This helps disperse the clippings over 6 inches (15 cm) tall, mow at 2-1/2 inches (64 mm). Walk at a time. Operating Tips
General Mowing Tips
...
Operation Manual - Page 13

...24 hours (electric-start models only).
• Empty the fuel tank before repairs as directed and before performing any additional yearly maintenance
procedures. Run the engine dry...13
Figure 18
3. Refer to your engine operator's manual for Maintenance
1. Recommended Maintenance Schedule(s)
Maintenance Service Interval
After the first 5 hours Before each use a hand fuel pump to run dry ...
Operation Manual - Page 15
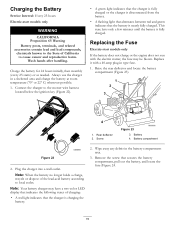
...the battery is fully charged. This state lasts only a few minutes until the battery is nearly fully charged. Replace it with the electric starter, the fuse may have a two-color LED display ...use the charger in the battery compartment area.
3. Charging the Battery
Service Interval: Every 25 hours
Electric-start models only
If the battery does not charge or the engine does not run with a 40-amp...
Operation Manual - Page 16

... up. 3.
If the blade is very tight. Use a block of the blade to install the blade properly.
Figure 26
Important: Position the curved ends of wood to 60 ft-lb (82 N-m) is damaged or cracked, ...replace it . Replace the fuse in step 3. 6.
Examine the blade whenever you run out of wood, ...
Operation Manual - Page 18

... local codes, or use it stops. Remove the spark plug, add 1 oz. (30 ml) of oil ...running out of hard starting.
Run the mower until you fold the handle. Remove the ignition key (electric-start models only).
When you can explode.
• Do not store gasoline more than 30...the year, add fuel stabilizer to the spark plug.
18 Loosely install the spark plug.
9. Charge the battery ...
Operation Manual - Page 20

...in early spring and late autumn
- Repair by following :
• Cost of non-use over... 2 - Use at Toro Warranty Company.
*Residential purposes means use of repairs under "Lawn Mowers") or...used for commercial, institutional, or rental use, are warranted for 45 days against defects in materials or workmanship. year full warranty
Limited Warranty for Commercial Use*
Gas-powered Toro Products used...
Parts Catalog - Page 1

Original Instructions (EN)
Form No. 3362-566 Rev A
1800 Power Curve® Snowthrower
Model No. 38025-Serial No. 310000001 and Up
Parts Catalog
Register at www.Toro.com.
Parts Catalog - Page 2

...and 6:3. All Rights Reserved The reference number for a part also appears in the USA. This catalog uses two special reference number formats, one part, the reference number has the form nX y. The n ...head PPHTF: phillips pan head thread forming PRH: phillips round head PTH: phillips truss head
PTO: power-take-off RH: right hand ROPS: roll-over protection system SFH: slotted fillister head SHH: ...
Parts Catalog - Page 4

...
1 Shroud-Housing
13 256-307
1 Bushing
14 73-0280
1 Tube-Lower Handle
15 73-3630
1 Wire Harness
17 73-1800
1 Filter-Foam
18 32144-88
4 Screw-Pan Head
19 73-0120
1 Strap-Motor
20 73-3520
...
26 73-3580
1 Washer
27
2 Bearing-Needle ●
28 73-3570
1 Idler Pulley ASM (Incl. Description
30 73-3530
1 Bolt-Idler
31 61-8802
1 Belt-Drive
33 73-5730
1 Bearing ASM (Incl. Ref.
#40...
Parts Catalog - Page 5

... 33-8951
1 Sleeve-Crank, Chute 2 Screw-HH
13 3296-12 14 98-1822
2 Nut-Lock, NI 1 Decal-Escutcheon
15 73-0240 16 73-0230
1 Rod-Crank, Chute 1 Gear-Crank, Chute
17 73-0310 18 256-306
1 Plate-Escutcheon 1 Bushing-Nyliner
20 73-3450
2 Spring
21 73-3710
1 Brake-Gear
22 114-8986...
Similar Questions

I Am Looking For A Replacement Power Cord For My 51592 Blower.
Do you know where I might purchase one?
Do you know where I might purchase one?
(Posted by Seejay121199 7 years ago)

Small Belt On 1800 Power Curve Snowthrower Model 38025 Keeps Shredding
The small belt on the small pulley on my Toro 1800 Power curve snowthrower model 38025 shreds after ...
The small belt on the small pulley on my Toro 1800 Power curve snowthrower model 38025 shreds after ...
(Posted by yebos 8 years ago)

Rider Blows Dirt Forward
I have a Toro rider mower. When I mow over sandy areas the sand/dirt blows out of the front of the...
I have a Toro rider mower. When I mow over sandy areas the sand/dirt blows out of the front of the...
(Posted by cj34275 10 years ago)

Why Has My New Toro 38361 Power Shovel Suddenly Stopped Working
(Posted by ttaylor895 11 years ago)

Circuit Breaker Blowing (15 Amp)
I have one of the first Power Curve 1800's. This year, for the first time, after 30-60 minutes of us...
I have one of the first Power Curve 1800's. This year, for the first time, after 30-60 minutes of us...
(Posted by edabar 13 years ago)