iRobot Roomba 530 Support Question
iRobot Roomba 530 Support Question
Find answers below for this question about iRobot Roomba 530.Need a iRobot Roomba 530 manual? We have 1 online manual for this item!
Question posted by bdx6Ma on May 22nd, 2014
How Can I Replace The Sensors On The Roomba 530
The person who posted this question about this iRobot product did not include a detailed explanation. Please use the "Request More Information" button to the right if more details would help you to answer this question.
Current Answers
Related iRobot Roomba 530 Manual Pages
Product Manual - Page 3

...best performance from you! Don't miss out on your Roomba online right now at www.irobot.com for purchasing an iRobot Roomba vacuum cleaning robot. You've joined the millions of the ...register. Register your business, feedback and loyalty. Here's to our robots based on your Roomba; Dear iRobot Roomba Owner,
Thank you for more information. Please take a few moments to read this manual...
Product Manual - Page 4

... a cleaning cycle, press CLEAN again. Battery Life To extend Roomba's battery life and keep Roomba cleaning at peak performance: • Always keep Roomba cleaning where
you need to activate Roomba by removing the battery pull tab. DO NOT submerge Roomba or spray it . • Use your Roomba frequently. Charge Roomba overnight before first time use . • Recharge...
Product Manual - Page 5

... Wall® Lighthouses 15-16 Home Base 17 Wiresless Command Center 18 Remote Control 19 Scheduling Roomba (selected models 20-21 Regular Maintenance 22-24 Language Selection Mode (selected models 25 Troubleshooting 26-27 Replaceable Modules 28-32 Frequently Asked Questions 33 Important Safety Instructions 34 iRobot Customer Care 35
For more...
Product Manual - Page 6

iRobot Roomba Anatomy
Faceplate
Infrared Sensor
Bin Release Button Bin
Power Supply Socket
Buttons and Lights
(Models 500 - 549)
(Models.../DOCK Button (varies by model)
CLEAN/Power Button
DOCK Button (models 550-599) MAX Button (models 600+)
Cliff Sensor Openings
Edge-Cleaning Side Brush
Right Wheel Module
Bottom View
Contact Points for Home Base (selected models)
Removable Caster Wheel
...
Product Manual - Page 7

... the room to one room.
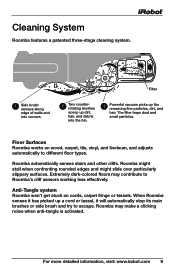
TIP: F or most people clean their floors. Dirt Detection (selected models): When Roomba senses dirt, the blue Dirt Detect™ light is a robot that area. Cleaning Pattern
Roomba is lit and Roomba cleans more detailed information, visit: www.irobot.com 7 TIP: R oomba takes approximately 25 minutes to clean...
Product Manual - Page 8

.... Scheduled Cleaning Mode (Models 550 and above) When a future cleaning time is programmed, Roomba enters Scheduled Cleaning Mode. When scheduled to clean, Roomba will occasionally flash its next cleaning time to remind you select. Clean Mode (all models) Roomba will clean based on the cleaning mode you of its Home Base, cleans, and...
Product Manual - Page 9
...
scoop up dirt,
hair, and debris
into the bin.
3
Powerful vacuum picks up a cord or tassel, it will automatically stop its main brushes or side brush and try to Roomba's cliff sensors working less effectively. Roomba automatically senses stairs and other cliffs. When Roomba senses it has picked up the remaining fine particles, dirt, and...
Product Manual - Page 10

..., or when cleaning bigger pieces of debris. Aero-VacTM Vacuum Cleaning Bin
Original Vacuum Cleaning Bin
High-Capacity Sweeper Bin 10 iRobot Roomba 500 Series The dual action, counter-rotating brushes pick up debris, while the vacuum sucks up the dirt and dust.
Cleaning Bins
Roomba is compatible with three interchangeable cleaning bins. High-Capacity...
Product Manual - Page 11

...: F or storage off the power supply or Home Base for at least one full clean cycle. 16-Hour Refresh Charge If Roomba has been left off the power supply, remove the battery from Roomba and store in . For more detailed information, visit: www.irobot.com 11
Cleaning Time You should fully charge...
Product Manual - Page 12

... Solid red Amber pulse Solid green Quick amber pulse
Battery status Battery empty Charging Fully charged 16-hour refresh charge
CLEAN/Power Button
12 iRobot Roomba 500 Series
Charging Roomba Charge Roomba in one of the battery. Use this chart to indicate that the Home Base power light is charging. Charging Lights...
Product Manual - Page 13

...area, and prevent it from getting too close .
A higher range will soon need replacement.
Note that Roomba will not cross. Original Virtual Wall The Virtual Wall requires 2 "D" batteries and ...to block. Use the slider bar to adjust the length of protection around itself, preventing Roomba from getting too close to electrical or computer cords, delicate objects on the outside of ...
Product Manual - Page 14

... both iRobot logos located on by hand at the beginning of the cleaning cycle to indicate that it needs new batteries. Battery Compartment
14 iRobot Roomba 500 Series
Two "C" Alkaline Batteries
(not included) Virtual Wall®
(continued)
Compact Manual Virtual Wall A Manual Virtual Wall must be turned on either side of...
Product Manual - Page 15

...
Lighthouse
Virtual Wall
0-3"
0-1.5m
4-7"
1.5-3m
8"+
3m+
Distance
Two "C" Alkaline Batteries
(not included)
Lighthouse Mode
In Lighthouse mode, the Virtual Wall Lighthouse helps Roomba navigate around your home and allows Roomba to clean room-to the Home Base for recharging. A Virtual Wall Lighthouse can be used in two modes, either in lighthouse mode...
Product Manual - Page 22

... brushes.
22 iRobot Roomba 500 Series Clean or replace filter*
Empty bin
*Replace filter every 2 months
B.
Clean filter compartment
Visit www.irobot.com/support for information on keeping Roomba running at peak performance. Regularly pull out and clean Roomba's front wheel. Push down and remove to remove bin.
2 Clean Roomba's filter
Aero-Vac Vacuum Bin A. Tip: B in...
Product Manual - Page 23

... bearings, contact iRobot Customer Care for the yellow parts.
If you empty Roomba's bin. Brush Bearings
Brush Caps
Tip: W hen maintaining Roomba, look for replacement bearings. Bearings
D. Remove and clean Roomba's brush caps.
C. Remove and clean hair and dirt from Roomba's bristle brush by lifting both yellow tabs.
E. Use the included cleaning tool to easily...
Product Manual - Page 24

...debris from its housing and clear any hair wrapped around the axle. Clean Roomba's front wheel
1 Pull firmly on the wheel axle to remove it completely....
Clean Roomba's cliff sensors
1 Wipe all four cliff sensors with hair and debris could result in floor damage. Push firmly on Roomba's front wheel to remove it from the robot.
Cliff Sensor Openings
24 iRobot Roomba 500 Series...
Product Manual - Page 26

... or its bumper is stuck hanging over a cliff. Clean hair and debris from Roomba's front wheel. Wipe Roomba's cliff sensors with a wheel hanging down or Roomba is stuck. Start Roomba in a new location. Remove and clean hair and debris from Roomba's side wheels.
If Roomba is wrong with a two-tone "uh-oh" sound followed by a series of...
Product Manual - Page 27

... and try charging again.
Inspect and clean Roomba's cliff sensors. Charging Roomba's battery is not Error 1.
Please inspect and clean Roomba's cliff sensors. charging error.
Charging Roomba's battery is too Error 6.
Ensure Roomba is discharged.
Charging Roomba has a Error 3. Remove the bottom cover of Roomba to charge. Roomba's battery is starting with a dry cloth...
Product Manual - Page 28

...
28 iRobot Roomba 500 Series
To access Roomba's replaceable modules, remove the bottom cover of modules that holds the spinning side brush. Replaceable Modules
Roomba has a number of Roomba by removing the four screws that hold down the bottom cover and the screw that can be replaced, including its drive wheels, side brush, main cleaning head, vacuum bin...
Product Manual - Page 32

3 Unscrew the four screws shown below and remove Roomba's bottom cover.
4 Remove Roomba's battery.
5 Reinstall Roomba's battery with the iRobot logo facing up. 6 Replace Roomba's bottom cover and the four screws. 7 Replace Roomba's side brush and the side brush screw. 32 iRobot Roomba 500 Series
Similar Questions


My Roomba 530 Keeping Saying Every Hour Or So Number 5. Does That Mean New Time
for a battery
for a battery
(Posted by makeeley 12 years ago)