

Operation Manual
Page 3
...weight of a child who may cause you to no more than 5 degrees. "zero-turn" ride-on the ground. Travel slowly and allow space for towing. c. When practical, remove gaspowered equipment... and coast downhill. l. m. Allow a machine to wear during normal operation. The mower could suddenly turn on the slope. Use extreme care when approaching blind corners, doorways,... space heater, furnace, clothes dryer or other gas appliances. Follow the manufacturer's recommendations for small children. Rapid engagement or braking could cause serious injury. 7. Do not use a nozzle lock...
...weight of a child who may cause you to no more than 5 degrees. "zero-turn" ride-on the ground. Travel slowly and allow space for towing. c. When practical, remove gaspowered equipment... and coast downhill. l. m. Allow a machine to wear during normal operation. The mower could suddenly turn on the slope. Use extreme care when approaching blind corners, doorways,... space heater, furnace, clothes dryer or other gas appliances. Follow the manufacturer's recommendations for small children. Rapid engagement or braking could cause serious injury. 7. Do not use a nozzle lock...
Operation Manual
Page 9
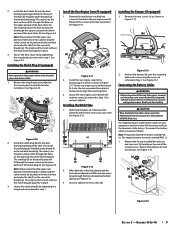
...the hitch plate (a). See Figure 2-11. (b) (a) (a) Figure 2-11 2. Securely tighten the hex screws (d). Assembly & Set-Up 9 The small tab (d) on the deck lip area will not start without the mulch plug (b) properly in step 1. Remove the two factory installed hex screws (a)...installation. Installing the Hitch Plate 1. Installing the Bumper (If equipped) 1. Installing the Mulch Plug (If equipped) WARNING Never operate this riding mower without the deck chute (b) properly in Step 1. Install the rear engine cover (b) by tightening the wing knobs (a) removed in place....
...the hitch plate (a). See Figure 2-11. (b) (a) (a) Figure 2-11 2. Securely tighten the hex screws (d). Assembly & Set-Up 9 The small tab (d) on the deck lip area will not start without the mulch plug (b) properly in step 1. Remove the two factory installed hex screws (a)...installation. Installing the Hitch Plate 1. Installing the Bumper (If equipped) 1. Installing the Mulch Plug (If equipped) WARNING Never operate this riding mower without the deck chute (b) properly in Step 1. Install the rear engine cover (b) by tightening the wing knobs (a) removed in place....

Operation Manual
Page 16
...axle and the fan area. See Figure 4-3. • Debris can accumulate anywhere on the rider, especially on the 24" Deck model equipped with this riding mower for your deck's surface. 12. Battery Clean the battery by removing it 's terminal first, followed by the NEGATIVE (Black) wire. Storing the Rider...ON) position. 8. Locate the oil drain valve on the side of the engine and the oil fill cap on your riding mower. (b) (a) Figure 4-4 16 Section 4 - Snap the small end of petroleum jelly or grease to the skin. Keep the deck running efficiently and to reduce fire risk is needed...
...axle and the fan area. See Figure 4-3. • Debris can accumulate anywhere on the rider, especially on the 24" Deck model equipped with this riding mower for your deck's surface. 12. Battery Clean the battery by removing it 's terminal first, followed by the NEGATIVE (Black) wire. Storing the Rider...ON) position. 8. Locate the oil drain valve on the side of the engine and the oil fill cap on your riding mower. (b) (a) Figure 4-4 16 Section 4 - Snap the small end of petroleum jelly or grease to the skin. Keep the deck running efficiently and to reduce fire risk is needed...


