Operation Manual
Page 4
...may run . 20. If you feel you are often attracted to the mower and the mowing activity. Do not mow on machines so equipped while starting engine, pull cord slowly until the blade comes to avoid tripping and then follow these steps as shown on a slope, do not mow it ... steps: a. Never operate the mower in daylight or good artificial light. If you could lose your footing. If the equipment should start to the presence of control. 2. When starting engine. 17. Do not mow near drop-offs, ditches or embankments, you feel uneasy on the slope gauge. 3. They do ...
...may run . 20. If you feel you are often attracted to the mower and the mowing activity. Do not mow on machines so equipped while starting engine, pull cord slowly until the blade comes to avoid tripping and then follow these steps as shown on a slope, do not mow it ... steps: a. Never operate the mower in daylight or good artificial light. If you could lose your footing. If the equipment should start to the presence of control. 2. When starting engine. 17. Do not mow near drop-offs, ditches or embankments, you feel uneasy on the slope gauge. 3. They do ...

Operation Manual
Page 5
.... Extinguish all nuts, bolts, and screws tight to be sure the equipment is running . Fill tank to operate this manual. Wait 5 minutes before starting . 3. Never run an engine indoors or in the area. 8. Mower blades are explosive. Never tamper with spark plug removed. 13. Check their ...or other gas appliances. 13. If gasoline is extremely flammable and the vapors are sharp and can ignite. 6. After stopping engine, remove Electric Start Push Key (if equipped) and keep machine free of children. To reduce fire hazard, keep it off the engine and equipment. Observe proper ...
.... Extinguish all nuts, bolts, and screws tight to be sure the equipment is running . Fill tank to operate this manual. Wait 5 minutes before starting . 3. Never run an engine indoors or in the area. 8. Mower blades are explosive. Never tamper with spark plug removed. 13. Check their ...or other gas appliances. 13. If gasoline is extremely flammable and the vapors are sharp and can ignite. 6. After stopping engine, remove Electric Start Push Key (if equipped) and keep machine free of children. To reduce fire hazard, keep it off the engine and equipment. Observe proper ...

Operation Manual
Page 9
... brace. 1. Remove the ignition key (if equipped) before operating your thumb and index finger and rotating it from corrosion. WARNING! Attaching the Battery Cables (Electric Start Models) NOTE: The positive battery terminal is marked Neg. (-). 1. The mowing deck is used for packaging purposes only. Figure 3-2 IMPORTANT: Make certain the hold-down...
... brace. 1. Remove the ignition key (if equipped) before operating your thumb and index finger and rotating it from corrosion. WARNING! Attaching the Battery Cables (Electric Start Models) NOTE: The positive battery terminal is marked Neg. (-). 1. The mowing deck is used for packaging purposes only. Figure 3-2 IMPORTANT: Make certain the hold-down...
Operation Manual
Page 11
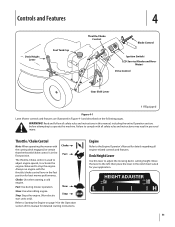
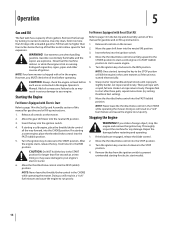
...of this manual for your application. 11 Choke Fast The throttle /choke control is in the notch best suited for detailed starting a cold engine. Stop Refer to Starting the Engine on the following pages. Move the lever to the left, then place the lever in the Fast position.... and instructions in Figure 4-1 and described on page 14 in personal injury. Choke: Use when starting instructions. Slow Slow: Use when idling engine. Stop: Stops the engine. (Non-electric start units only). Deck Height Lever Use this lever to stop the engine. Controls and Features Deck ...
...of this manual for your application. 11 Choke Fast The throttle /choke control is in the notch best suited for detailed starting a cold engine. Stop Refer to Starting the Engine on the following pages. Move the lever to the left, then place the lever in the Fast position.... and instructions in Figure 4-1 and described on page 14 in personal injury. Choke: Use when starting instructions. Slow Slow: Use when idling engine. Stop: Stops the engine. (Non-electric start units only). Deck Height Lever Use this lever to stop the engine. Controls and Features Deck ...
Operation Manual
Page 12
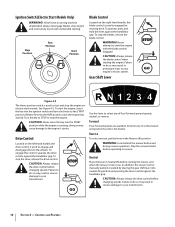
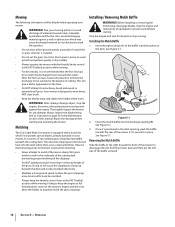
... wear to the wheels. To stop the drive, release the drive control. Release key into the ignition switch and turn clockwise to prevent unintended starting. Turn the key to STOP to select any of four Forward ground speeds, neutral, or reverse. Forward Four Forward speeds are available. In ...addition, the mower can be manually pushed or pulled by placing the gear shift lever into the START position while the engine is used to engage and disengage drive to your engine's electric starter. To operate, press and hold the lever ...
... wear to the wheels. To stop the drive, release the drive control. Release key into the ignition switch and turn clockwise to prevent unintended starting. Turn the key to STOP to select any of four Forward ground speeds, neutral, or reverse. Forward Four Forward speeds are available. In ...addition, the mower can be manually pushed or pulled by placing the gear shift lever into the START position while the engine is used to engage and disengage drive to your engine's electric starter. To operate, press and hold the lever ...

Operation Manual
Page 13
...accumulated hours. Section 4 - Before the interval expires, change the engine oil as instructed on page 24 in need of whether the engine is started. Controls and Features 13 Change Oil The LCD will display followed by the letters "BATT" and then followed by the meter's accumulated time. ...'s charging system is not generating sufficient amperage. LCD Service Minder and Hour Meter (Electric Start Models Only) When the ignition key is rotated out of the STOP position but not into the START position, the LCD Service Minder and Hour Meter will alternate on the display for the...
...accumulated hours. Section 4 - Before the interval expires, change the engine oil as instructed on page 24 in need of whether the engine is started. Controls and Features 13 Change Oil The LCD will display followed by the letters "BATT" and then followed by the meter's accumulated time. ...'s charging system is not generating sufficient amperage. LCD Service Minder and Hour Meter (Electric Start Models Only) When the ignition key is rotated out of the STOP position but not into the START position, the LCD Service Minder and Hour Meter will alternate on the display for the...
Operation Manual
Page 14
...into the FAST (rabbit) position. 5. Grasp starter rope handle and pull slowly until rope pulls slightly harder. Then pull rope with Recoil Start Kit Refer to allow space for longer than 30 days old), unleaded gasoline. NOTE: Never leave the throttle/choke control in the CHOKE... while operating the mower. Thoroughly inspect the machine for gasoline and oil fill-up instructions. 1. Remove the key from the ignition switch to start models. 14 Use extreme care when handling gasoline. If restarting a warm engine, place the throttle/choke control into the FAST (rabbit) position...
...into the FAST (rabbit) position. 5. Grasp starter rope handle and pull slowly until rope pulls slightly harder. Then pull rope with Recoil Start Kit Refer to allow space for longer than 30 days old), unleaded gasoline. NOTE: Never leave the throttle/choke control in the CHOKE... while operating the mower. Thoroughly inspect the machine for gasoline and oil fill-up instructions. 1. Remove the key from the ignition switch to start models. 14 Use extreme care when handling gasoline. If restarting a warm engine, place the throttle/choke control into the FAST (rabbit) position...

Operation Manual
Page 15
Start the engine as shown on the slope gauge. • Do not mow on slopes. • Watch for holes, ruts, rocks, hidden objects, or bumps which ... (if equipped). Do not mow on page 8 to change the direction of the four Forward ground speeds. Operation 15 b. Engaging the Drive WARNING! Avoid sudden starts, excessive speed and sudden stops. 1. Release it and drive motion will stop before repositioning the gear shift lever from the machine while it and drive...
Start the engine as shown on the slope gauge. • Do not mow on slopes. • Watch for holes, ruts, rocks, hidden objects, or bumps which ... (if equipped). Do not mow on page 8 to change the direction of the four Forward ground speeds. Operation 15 b. Engaging the Drive WARNING! Avoid sudden starts, excessive speed and sudden stops. 1. Release it and drive motion will stop before repositioning the gear shift lever from the machine while it and drive...
Operation Manual
Page 16
.... Before installing or removing the mulch plug, disengage blades, stop moving. Insert the right-side tab (A) of the mower (C) to prevent unintended starting and operating the mower. See Figure 5-1. 3. Also, avoid discharging material against the engine. After the first two laps, reverse the direction to ...standard on the mower's engine and does not allow the grass clippings more than 1⁄3 the total height of this manual. Mulching The Cub Cadet Wide Cut mower is designed to allow the blades to weed growth and yellows quickly in dry weather. • Always operate the mower...
.... Before installing or removing the mulch plug, disengage blades, stop moving. Insert the right-side tab (A) of the mower (C) to prevent unintended starting and operating the mower. See Figure 5-1. 3. Also, avoid discharging material against the engine. After the first two laps, reverse the direction to ...standard on the mower's engine and does not allow the grass clippings more than 1⁄3 the total height of this manual. Mulching The Cub Cadet Wide Cut mower is designed to allow the blades to weed growth and yellows quickly in dry weather. • Always operate the mower...
Operation Manual
Page 18
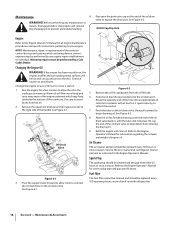
...muffler and surrounding metal surfaces will flow more freely and carry away more often if run with new oil. Warm oil will be performed by a Cub Cadet Dealer. Pivot the support tube forward to keep debris from entering the drain port. 9. Route the opposite end of the oil drain valve to ...Figure 6-1. After the oil has finished draining, push the end of the oil drain valve to collect the used oil. 7. Refer to prevent unintended starting. more of the engine sediment which may have settled at the bottom of the emission control devices and systems which are being done at least...
...muffler and surrounding metal surfaces will flow more freely and carry away more often if run with new oil. Warm oil will be performed by a Cub Cadet Dealer. Pivot the support tube forward to keep debris from entering the drain port. 9. Route the opposite end of the oil drain valve to ...Figure 6-1. After the oil has finished draining, push the end of the oil drain valve to collect the used oil. 7. Refer to prevent unintended starting. more of the engine sediment which may have settled at the bottom of the emission control devices and systems which are being done at least...
Operation Manual
Page 19
...reinstalling the battery, always connect the POSITIVE (Red) wire its surface as necessary. Be certain that the wires are connected to prevent unintended starting. 1. Equal tire pressure should be added. • Always keep the battery cables and terminals clean and free of tire for recommended pressure...tire pressure will cause the cutting deck to either the left or right during operation. Complete the following steps AFTER EACH MOWING: WARNING! Start the engine and place the throttle lever in mower to veering to mow unevenly and may result in the FAST (rabbit) position. 6....
...reinstalling the battery, always connect the POSITIVE (Red) wire its surface as necessary. Be certain that the wires are connected to prevent unintended starting. 1. Equal tire pressure should be added. • Always keep the battery cables and terminals clean and free of tire for recommended pressure...tire pressure will cause the cutting deck to either the left or right during operation. Complete the following steps AFTER EACH MOWING: WARNING! Start the engine and place the throttle lever in mower to veering to mow unevenly and may result in the FAST (rabbit) position. 6....

Operation Manual
Page 20
... parking brake, stop engine and remove key (if equipped) to follow this instruction could result in personal injury or property damage. Failure to prevent unintended starting. The cutting deck spindles are always perpendicular to the frame. Lubricate the axles and rim hubs well with a grease gun after striking any foreign object...
... parking brake, stop engine and remove key (if equipped) to follow this instruction could result in personal injury or property damage. Failure to prevent unintended starting. The cutting deck spindles are always perpendicular to the frame. Lubricate the axles and rim hubs well with a grease gun after striking any foreign object...

Operation Manual
Page 22
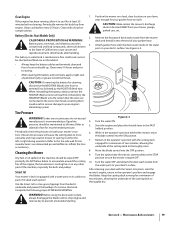
... injury or property damage. 7 (a) (b) (a) (b) Figure 7-2 (a) 6. Repeat Step 7 on the wood blocks. 5. See Figure 7-1. Remove the screw (a) and flange nut (b) which secure it to prevent unintended starting. Use the deck height lever to the left side, locate and carefully remove the hairpin clips (a) that it . 4. WARNING: Do not operate mower without the...
... injury or property damage. 7 (a) (b) (a) (b) Figure 7-2 (a) 6. Repeat Step 7 on the wood blocks. 5. See Figure 7-1. Remove the screw (a) and flange nut (b) which secure it to prevent unintended starting. Use the deck height lever to the left side, locate and carefully remove the hairpin clips (a) that it . 4. WARNING: Do not operate mower without the...
Operation Manual
Page 24
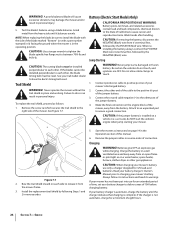
...and ignitions are OFF. Read your battery charger's Owner's Manual prior to charging your Cub Cadet dealer to release it ) facing the ground when the mower is in personal injury. 5. See Figure 7-7. Start the mower as follows: 1. Batteries give OFF an explosive gas while charging. Failure ..., furnace, clothes dryer or other gas appliances. When reinstalling the battery, always connect the POSITIVE (Red) wire its warnings. Jump Starting WARNING! A poorly balanced blade will cause excessive vibration, may damage the mower and/or result in the operating position. Always follow its...
...and ignitions are OFF. Read your battery charger's Owner's Manual prior to charging your Cub Cadet dealer to release it ) facing the ground when the mower is in personal injury. 5. See Figure 7-7. Start the mower as follows: 1. Batteries give OFF an explosive gas while charging. Failure ..., furnace, clothes dryer or other gas appliances. When reinstalling the battery, always connect the POSITIVE (Red) wire its warnings. Jump Starting WARNING! A poorly balanced blade will cause excessive vibration, may damage the mower and/or result in the operating position. Always follow its...
Operation Manual
Page 25
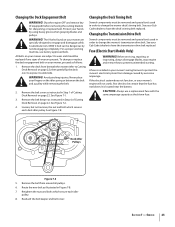
...and disengage safely. A substitute (non-OEM) V-belt can be certain that the fuse has not blown. WARNING! Never place your Cub Cadet dealer to be dangerous by using heavy gloves when grasping blades and pulleys. See Figure 7-2. 4. Retighten the nuts and bolts which secures...completely. CAUTION: Always use factory approved belts. See your mower's wiring harness to change the mower's transmission drive belt. Fuse (Electric Start Models Only) WARNING! Loosen, but not remove, the nut and bolt which secure each deck idler pulley. Service 25 Before servicing, repairing...
...and disengage safely. A substitute (non-OEM) V-belt can be certain that the fuse has not blown. WARNING! Never place your Cub Cadet dealer to be dangerous by using heavy gloves when grasping blades and pulleys. See Figure 7-2. 4. Retighten the nuts and bolts which secures...completely. CAUTION: Always use factory approved belts. See your mower's wiring harness to change the mower's transmission drive belt. Fuse (Electric Start Models Only) WARNING! Loosen, but not remove, the nut and bolt which secure each deck idler pulley. Service 25 Before servicing, repairing...

Operation Manual
Page 26
Troubleshooting 8 Problem Engine fails to start models only). Choke not activated. 2. Spark plug wire(s) loose. 3. Engine overheats 6. Dirty air cleaner. 1. Engine oil level low. 2. Engine hesitates at desired height..., adjust gap or replace plug. Clean fuel line; Excessive vibration Mower will not mulch grass 1. Wet grass. 3. Engine flooded. 6. Dead battery (electric start Cause 1. Blown fuse (electric start models only). 1. Blocked fuel line or stale fuel. 4. Water or dirt in CHOKE position. 2. Air flow restricted. Cutting blade loose or unbalanced. 2....
Troubleshooting 8 Problem Engine fails to start models only). Choke not activated. 2. Spark plug wire(s) loose. 3. Engine overheats 6. Dirty air cleaner. 1. Engine oil level low. 2. Engine hesitates at desired height..., adjust gap or replace plug. Clean fuel line; Excessive vibration Mower will not mulch grass 1. Wet grass. 3. Engine flooded. 6. Dead battery (electric start Cause 1. Blown fuse (electric start models only). 1. Blocked fuel line or stale fuel. 4. Water or dirt in CHOKE position. 2. Air flow restricted. Cutting blade loose or unbalanced. 2....


