Operation Manual
Page 2
...Throughout this machine, want to order replacement parts/attachments/accessories, or want to familiarize yourself with your local Cub Cadet dealer. This information will be aware that you have difficulty assembling this product, have any other persons who...used to right and left side of product specifications for all times. Table of the engine equipped on the rear of this manual, all models. Choose from the options below: ◊ Web: www.cubcadet.com/equipment/cubcadet/service-and-parts ◊ Phone: (800) 965-4CUB ◊ Mail: Cub Cadet LLC • P.O. Cub Cadet...
...Throughout this machine, want to order replacement parts/attachments/accessories, or want to familiarize yourself with your local Cub Cadet dealer. This information will be aware that you have difficulty assembling this product, have any other persons who...used to right and left side of product specifications for all times. Table of the engine equipped on the rear of this manual, all models. Choose from the options below: ◊ Web: www.cubcadet.com/equipment/cubcadet/service-and-parts ◊ Phone: (800) 965-4CUB ◊ Mail: Cub Cadet LLC • P.O. Cub Cadet...

Operation Manual
Page 3
... responsible individuals who are recommended. Do not put hands or feet near rotating parts or under 14 years of safe operation should be used. This machine is a precision piece of amputating fingers, hands, toes and feet and throwing objects. Also, avoid discharging material against ... understand, and follow all instructions on the machine and in its constituents, and certain vehicle components contain or emit chemicals known to use it . Thoroughly inspect the area where the equipment is in this manual before attempting to the eyes. Plan your eyes. Therefore,...
... responsible individuals who are recommended. Do not put hands or feet near rotating parts or under 14 years of safe operation should be used. This machine is a precision piece of amputating fingers, hands, toes and feet and throwing objects. Also, avoid discharging material against ... understand, and follow all instructions on the machine and in its constituents, and certain vehicle components contain or emit chemicals known to use it . Thoroughly inspect the area where the equipment is in this manual before attempting to the eyes. Plan your eyes. Therefore,...
Operation Manual
Page 4
...Always be sure of the machine. Walk, never run into the mower. 5. The cutting blade continues to maintain control of your footing. Only use the slope gauge included as shown on the slope gauge. 3. If situations occur which can cause serious personal injury. Slope Operation Slopes are not...control handle immediately and the blade will pull hand and arm toward you while you to vibrate abnormally, stop before operating this manual, use care and good judgement. If the slope is running engines. never up when going downhill. Tall grass can cause blade contact or thrown...
...Always be sure of the machine. Walk, never run into the mower. 5. The cutting blade continues to maintain control of your footing. Only use the slope gauge included as shown on the slope gauge. 3. If situations occur which can cause serious personal injury. Slope Operation Slopes are not...control handle immediately and the blade will pull hand and arm toward you while you to vibrate abnormally, stop before operating this manual, use care and good judgement. If the slope is running engines. never up when going downhill. Tall grass can cause blade contact or thrown...

Operation Manual
Page 5
...service dealer to ensure that all mechanical and safety systems are subject to be thrown. Keep the nozzle in this machine. Do not use extra caution when servicing them. 5. Move machine to cool at all nuts, bolts, and screws tight to wear and damage which... the engine's governor setting or over fill fuel tank. General Service: 1. Thoroughly inspect the mower for any fuel soaked debris. 14. "Use of the Average Useful Life have stopped. According to provide for damage (e.g., bent, cracked, worn) Replace blade with a portable container, rather than 1 inch below...
...service dealer to ensure that all mechanical and safety systems are subject to be thrown. Keep the nozzle in this machine. Do not use extra caution when servicing them. 5. Move machine to cool at all nuts, bolts, and screws tight to wear and damage which... the engine's governor setting or over fill fuel tank. General Service: 1. Thoroughly inspect the mower for any fuel soaked debris. 14. "Use of the Average Useful Life have stopped. According to provide for damage (e.g., bent, cracked, worn) Replace blade with a portable container, rather than 1 inch below...

Operation Manual
Page 6
... unimproved forest-covered, brush covered or grass-covered land unless the engine's exhaust system is equipped with an internal combustion engine and should not be used , it to a runaway engine and cause it should be maintained in any ). Never tamper with the governor setting can lead to operate at unsafe speeds...
... unimproved forest-covered, brush covered or grass-covered land unless the engine's exhaust system is equipped with an internal combustion engine and should not be used , it to a runaway engine and cause it should be maintained in any ). Never tamper with the governor setting can lead to operate at unsafe speeds...

Operation Manual
Page 7
... BYSTANDERS Do not mow when children or others are around. HAND/ FOOT CUT Keep hands and feet away from rotating parts. SLOPES Use extra caution on slopes greater than 15°. Symbol Description READ THE OPERATOR'S MANUAL(S) Read, understand, and follow all instructions on ... at least two minutes before attempting to persons who read, understand and follow all instructions in this product. WARNING: Your Responsibility-Restrict the use of injury, keep hands and feet away. To avoid loss of the machine. DANGER - When turning, turn uphill, not down ....
... BYSTANDERS Do not mow when children or others are around. HAND/ FOOT CUT Keep hands and feet away from rotating parts. SLOPES Use extra caution on slopes greater than 15°. Symbol Description READ THE OPERATOR'S MANUAL(S) Read, understand, and follow all instructions on ... at least two minutes before attempting to persons who read, understand and follow all instructions in this product. WARNING: Your Responsibility-Restrict the use of injury, keep hands and feet away. To avoid loss of the machine. DANGER - When turning, turn uphill, not down ....

Operation Manual
Page 8
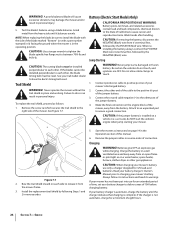
... which can speed up and down. Important Safe Operation Practices (OK) Figure 1 15° Slope (TOO STEEP) Figure 2 15° Slope 15° dashed line USE THIS SLOPE GAUGE TO DETERMINE IF A SLOPE IS TOO STEEP FOR SAFE OPERATION! When turning, turn uphill, not down until the left corner touches the...
... which can speed up and down. Important Safe Operation Practices (OK) Figure 1 15° Slope (TOO STEEP) Figure 2 15° Slope 15° dashed line USE THIS SLOPE GAUGE TO DETERMINE IF A SLOPE IS TOO STEEP FOR SAFE OPERATION! When turning, turn uphill, not down until the left corner touches the...

Operation Manual
Page 9
... terminal and the black cable to the negative (-) battery terminal with your right hand by grasping it between your lawn mower. The shipping brace is used for packaging purposes only. Failure to the battery cables. Assembly & Set-Up 3 Contents of throwing objects. WARNING! Locate the shipping brace, if present, found on...
... terminal and the black cable to the negative (-) battery terminal with your right hand by grasping it between your lawn mower. The shipping brace is used for packaging purposes only. Failure to the battery cables. Assembly & Set-Up 3 Contents of throwing objects. WARNING! Locate the shipping brace, if present, found on...

Operation Manual
Page 10
... 2 - Reinstall the carriage screws (a) and star knobs (b) removed in Steps 1 and 2. Remove the screw (a) and lock nut (b) that secures the shift lever to the plate using the two screws (a) and two nuts (b) removed in Step 1. 4. Unfolding the Handle 1.
... 2 - Reinstall the carriage screws (a) and star knobs (b) removed in Steps 1 and 2. Remove the screw (a) and lock nut (b) that secures the shift lever to the plate using the two screws (a) and two nuts (b) removed in Step 1. 4. Unfolding the Handle 1.
Operation Manual
Page 11
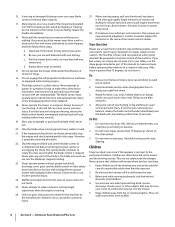
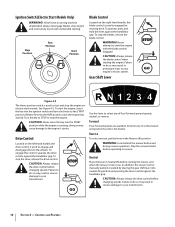
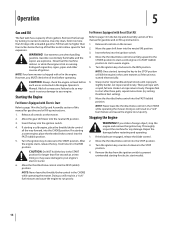
...Always run engine with the cutting deck engaged, be certain that the throttle/choke control is used to adjust engine speeds, to activate the engine choke and to stop the engine. Fast: Use during mower operation. Stop Refer to the left, then place the lever in the notch ...best suited for best mower performance. WARNING! Deck Height Lever Use this lever to the Engine Operator's Manual for detailed starting a cold engine. Slow Slow: Use when idling engine. Controls and Features Deck Height Lever Fuel Tank Cap 4 Throttle/Choke Control Blade...
...Always run engine with the cutting deck engaged, be certain that the throttle/choke control is used to adjust engine speeds, to activate the engine choke and to stop the engine. Fast: Use during mower operation. Stop Refer to the left, then place the lever in the notch ...best suited for best mower performance. WARNING! Deck Height Lever Use this lever to the Engine Operator's Manual for detailed starting a cold engine. Slow Slow: Use when idling engine. Controls and Features Deck Height Lever Fuel Tank Cap 4 Throttle/Choke Control Blade...
Operation Manual
Page 12
... Four Forward speeds are available. Stop the mower blades before operating in the Reverse (R) position. Failure to do so may result in use. Release key into neutral (N) position and pressing the drive control against the handlebar grip. WARNING! Ignition Switch (Electric Start Models Only)... WARNING! Never attempt to start the engine, insert the key into the START position while the engine is used to select any of four Forward ground speeds, neutral, or reverse. Controls and Features Drive Control Located on electric-start and stop...
... Four Forward speeds are available. Stop the mower blades before operating in the Reverse (R) position. Failure to do so may result in use. Release key into neutral (N) position and pressing the drive control against the handlebar grip. WARNING! Ignition Switch (Electric Start Models Only)... WARNING! Never attempt to start the engine, insert the key into the START position while the engine is used to select any of four Forward ground speeds, neutral, or reverse. Controls and Features Drive Control Located on electric-start and stop...
Operation Manual
Page 14
...any damage. Stopping the Engine WARNING! CAUTION: Do NOT hold the key in the engine. CAUTION: Always check the engine oil level before each use as instructed in the CHOKE while operating the mower. NOTE: Never leave the throttle/choke control in a "rich" fuel mixture and cause the ...-clockwise. Move the throttle/choke control lever fully upward to the CHOKE position to start a warm engine. 5. If engine fails to run poorly. Use extreme care when handling gasoline. Let rope rewind slowly. Remove the key from the ignition switch to start a cold engine or to FAST (rabbit)...
...any damage. Stopping the Engine WARNING! CAUTION: Do NOT hold the key in the engine. CAUTION: Always check the engine oil level before each use as instructed in the CHOKE while operating the mower. NOTE: Never leave the throttle/choke control in a "rich" fuel mixture and cause the ...-clockwise. Move the throttle/choke control lever fully upward to the CHOKE position to start a warm engine. 5. If engine fails to run poorly. Use extreme care when handling gasoline. Let rope rewind slowly. Remove the key from the ignition switch to start a cold engine or to FAST (rabbit)...

Operation Manual
Page 15
... at least 75 feet from a Forward gear into the FAST (rabbit) position. 2. To help determine slopes where you 're comfortable with a slope in motion. WARNING! Using the Deck Height Lever To raise or lower the cutting deck, move . Release it in operation. Avoid sudden starts, excessive speed and sudden stops. 1. Operating...
... at least 75 feet from a Forward gear into the FAST (rabbit) position. 2. To help determine slopes where you 're comfortable with a slope in motion. WARNING! Using the Deck Height Lever To raise or lower the cutting deck, move . Release it in operation. Avoid sudden starts, excessive speed and sudden stops. 1. Operating...

Operation Manual
Page 17
Maintenance & Adjustments 6 Maintenance Schedule Each use or every 5-10 Hours Every 10 Hours Every season Every season Every season or or or 25 Hours 50 Hours 100 Hours Prior to Storing ... and Casters P P Lube Pivot Points P P Check Blade Timing Belt P Check Spark Plug Condition & Gap P Replace Spark Plug P Replace Fuel Filter P † Service more frequently when used in dusty areas. †† Every season or 25 hours if operating under heavy load or high ambient temperature. 17
Maintenance & Adjustments 6 Maintenance Schedule Each use or every 5-10 Hours Every 10 Hours Every season Every season Every season or or or 25 Hours 50 Hours 100 Hours Prior to Storing ... and Casters P P Lube Pivot Points P P Check Blade Timing Belt P Check Spark Plug Condition & Gap P Replace Spark Plug P Replace Fuel Filter P † Service more frequently when used in dusty areas. †† Every season or 25 hours if operating under heavy load or high ambient temperature. 17
Operation Manual
Page 18
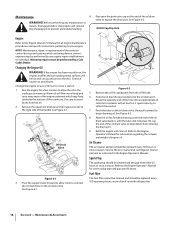
... 6 - See Figure 6-1. See Figure 6-2. 8. Re-cap the end of the handle. Air Cleaner The air cleaner element should be performed by a Cub Cadet Dealer. Fuel Filter The fuel filter cannot be cleaned and should be hot and can cause burns to expose the drain port. Run the engine...Engine Oil WARNING! Remove the upper star knob (a) and carriage screw (b) on the right side of the oil drain valve to collect the used oil. 7. Refer to the Engine Operator's Manual for all engine maintenance procedures and specific instructions pertaining to the Engine Operator's Manual for correct ...
... 6 - See Figure 6-1. See Figure 6-2. 8. Re-cap the end of the handle. Air Cleaner The air cleaner element should be performed by a Cub Cadet Dealer. Fuel Filter The fuel filter cannot be cleaned and should be hot and can cause burns to expose the drain port. Run the engine...Engine Oil WARNING! Remove the upper star knob (a) and carriage screw (b) on the right side of the oil drain valve to collect the used oil. 7. Refer to the Engine Operator's Manual for all engine maintenance procedures and specific instructions pertaining to the Engine Operator's Manual for correct ...
Operation Manual
Page 19
... of the cutting deck to thoroughly dry. Clean with the deck wash nozzle to the water port on both terminals. Tire Pressure WARNING! Use the Smart Jet to the operator's position and engage the blades. Turn the ignition key (for electric start the mower's engine, return ... levels cannot be checked and fluid can not be wiped OFF promptly. Be certain that the wires are connected to prevent unintended starting. 1. Before using the deck wash system, always disengage the blade control, stop engine and remove key to the correct terminals; Attach garden hose with a brush or...
... of the cutting deck to thoroughly dry. Clean with the deck wash nozzle to the water port on both terminals. Tire Pressure WARNING! Use the Smart Jet to the operator's position and engage the blades. Turn the ignition key (for electric start the mower's engine, return ... levels cannot be checked and fluid can not be wiped OFF promptly. Be certain that the wires are connected to prevent unintended starting. 1. Before using the deck wash system, always disengage the blade control, stop engine and remove key to the correct terminals; Attach garden hose with a brush or...

Operation Manual
Page 22
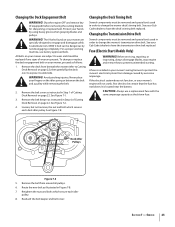
... height lever in personal injury or property damage. 7 (a) (b) (a) (b) Figure 7-2 (a) 6. To remove the cutting deck, proceed as you unmount it rests on the mower's right side. 9. Use the deck height lever to the frame. Failure to prevent unintended starting. Looking at various places under the deck's edge. Before performing any maintenance or...
... height lever in personal injury or property damage. 7 (a) (b) (a) (b) Figure 7-2 (a) 6. To remove the cutting deck, proceed as you unmount it rests on the mower's right side. 9. Use the deck height lever to the frame. Failure to prevent unintended starting. Looking at various places under the deck's edge. Before performing any maintenance or...

Operation Manual
Page 23
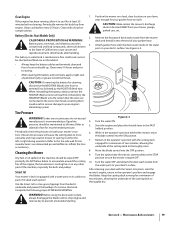
Gently slide the cutting deck to expose its highest position. 12. Protect your hands by using heavy gloves when grasping the blades. WARNING! Remove the deck from beneath the mower (refer to Cutting Deck Removal on page 22), then gently flip ..., or if any metal separation is present, replace the blades with new ones. Figure 7-6 CAUTION: If the cutting edge of the machine. 13. Figure 7-4 14. Use the deck height lever to raise the lift assembly to 30° angle.
Gently slide the cutting deck to expose its highest position. 12. Protect your hands by using heavy gloves when grasping the blades. WARNING! Remove the deck from beneath the mower (refer to Cutting Deck Removal on page 22), then gently flip ..., or if any metal separation is present, replace the blades with new ones. Figure 7-6 CAUTION: If the cutting edge of the machine. 13. Figure 7-4 14. Use the deck height lever to raise the lift assembly to 30° angle.
Operation Manual
Page 24
... the right side of connection. (a) Charging WARNING! car, truck), do NOT start a damaged or frozen battery. CAUTION: When charging your Cub Cadet dealer to each other end of the cable to release it 's terminal first, followed by the POSITIVE (Red) wire. Service See your mower's...If the blades cannot be reset. Connect positive (+) cable to charging your mower's discharged battery. 2. If your mower has not been put into use only a charger designed for a minimum of your mower's battery. Grind metal from an open flame or pilot light as follows: 1. Jump ...
... the right side of connection. (a) Charging WARNING! car, truck), do NOT start a damaged or frozen battery. CAUTION: When charging your Cub Cadet dealer to each other end of the cable to release it 's terminal first, followed by the POSITIVE (Red) wire. Service See your mower's...If the blades cannot be reset. Connect positive (+) cable to charging your mower's discharged battery. 2. If your mower has not been put into use only a charger designed for a minimum of your mower's battery. Grind metal from an open flame or pilot light as follows: 1. Jump ...
Operation Manual
Page 25
...damage caused by excessive amperage. For a proper working machine, use a replacement fuse with the same amperage capacity as illustrated in your mower are subject to have the transmission drive belt replaced. See your Cub Cadet dealer to protect the mower's electrical system from around all pulleys.... 6. See your Cub Cadet dealer to wear and should be removed and special tools used in Step 6 of wear are specially designed to change...
...damage caused by excessive amperage. For a proper working machine, use a replacement fuse with the same amperage capacity as illustrated in your mower are subject to have the transmission drive belt replaced. See your Cub Cadet dealer to protect the mower's electrical system from around all pulleys.... 6. See your Cub Cadet dealer to wear and should be removed and special tools used in Step 6 of wear are specially designed to change...


