Quick Start Guide
Page 1
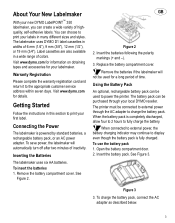
... section to print your labels in many different sizes and styles. Remove the battery compartment cover. Insert the battery pack. Visit www.dymo.com for your first label. Insert the batteries following the polarity markings (+ and -). 3. Remove the batteries if the labelmaker will ... though the battery pack is powered by standard batteries, a rechargeable battery pack, or an AC power adapter. Visit www.dymo.com for information on obtaining tapes and accessories for details. Open the battery compartment door. 2. To charge the battery pack, connect the AC adapter as described...
... section to print your labels in many different sizes and styles. Remove the battery compartment cover. Insert the battery pack. Visit www.dymo.com for your first label. Insert the batteries following the polarity markings (+ and -). 3. Remove the batteries if the labelmaker will ... though the battery pack is powered by standard batteries, a rechargeable battery pack, or an AC power adapter. Visit www.dymo.com for information on obtaining tapes and accessories for details. Open the battery compartment door. 2. To charge the battery pack, connect the AC adapter as described...
Quick Start Guide
Page 2
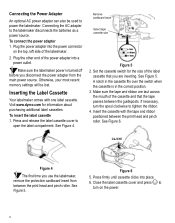
...before you disconnect the power adapter from between the print head and pinch roller. To insert the label cassette 1. Remove cardboard insert Select tape cassette size Figure 5 2. CLICK! Press firmly until cassette clicks into the power connector on the power. 4 Close the label cassette ... 4. Set the cassette switch for information about purchasing additional label cassettes. Plug the other end of the labelmaker. 2. A 6. Visit www.dymo.com for the size of the cassette and that you use the labelmaker, remove the protective cardboard insert from the main power source. Make ...
...before you disconnect the power adapter from between the print head and pinch roller. To insert the label cassette 1. Remove cardboard insert Select tape cassette size Figure 5 2. CLICK! Press firmly until cassette clicks into the power connector on the power. 4 Close the label cassette ... 4. Set the cassette switch for information about purchasing additional label cassettes. Plug the other end of the labelmaker. 2. A 6. Visit www.dymo.com for the size of the cassette and that you use the labelmaker, remove the protective cardboard insert from the main power source. Make ...

Quick Start Guide
Page 6
... > 1. Select a frame style and then press OK . Creating Multiple-Line Labels The number of lines you can print on a label depends on the size label tape you are left justified and the default spacing is the current line on the label. Press . To insert a tab 1. Enter your labels. A label can be...
... > 1. Select a frame style and then press OK . Creating Multiple-Line Labels The number of lines you can print on a label depends on the size label tape you are left justified and the default spacing is the current line on the label. Press . To insert a tab 1. Enter your labels. A label can be...

Quick Start Guide
Page 8
... for a specific purpose that follows any letter, space, or punctuation will print as 123-998, 123-999, 123-1000, and so on 19 mm (3/4") label tape; Select ON to turn Fixed Length OFF; Press the down arrow key to set the fixed length. 6. Printing Barcode Labels The labelmaker can print barcodes...
... for a specific purpose that follows any letter, space, or punctuation will print as 123-998, 123-999, 123-1000, and so on 19 mm (3/4") label tape; Select ON to turn Fixed Length OFF; Press the down arrow key to set the fixed length. 6. Printing Barcode Labels The labelmaker can print barcodes...
Quick Start Guide
Page 10
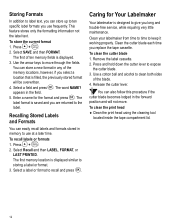
... specific label formats you use at a later time. To clean the print head ♦ Clean the print head using the cleaning tool located inside the tape compartment lid. 12 This feature stores only the formatting information not the label text. To clean the cutter blade 1. Press and hold down the cutter... FORMAT. The first memory location is displayed. 3. Release the cutter lever. To store the current format 8 1. Clean the cutter blade each time you replace the tape cassette. The first of the blade. 4. appears in the field. 5.
... specific label formats you use at a later time. To clean the print head ♦ Clean the print head using the cleaning tool located inside the tape compartment lid. 12 This feature stores only the formatting information not the label text. To clean the cutter blade 1. Press and hold down the cutter... FORMAT. The first memory location is displayed. 3. Release the cutter lever. To store the current format 8 1. Clean the cutter blade each time you replace the tape cassette. The first of the blade. 4. appears in the field. 5.

Quick Start Guide
Page 11
... following : • Adjust the fixed-length label setting appropriately, or • Select a narrower font size. Insert a new tape cassette Battery low Batteries almost discharged. Replace batteries or connect AC power adapter. Problem/Error Message Solution No display • Ensure ...; Replace discharged batteries. Too many lines Exceeded maximum number of the following possible solutions if you still need assistance, contact DYMO Customer Support. Printing No action required. Do one of lines allowed. Too many pages Exceeded masimum number of characters in...
... following : • Adjust the fixed-length label setting appropriately, or • Select a narrower font size. Insert a new tape cassette Battery low Batteries almost discharged. Replace batteries or connect AC power adapter. Problem/Error Message Solution No display • Ensure ...; Replace discharged batteries. Too many lines Exceeded maximum number of the following possible solutions if you still need assistance, contact DYMO Customer Support. Printing No action required. Do one of lines allowed. Too many pages Exceeded masimum number of characters in...


