
Owner's Manual
Page 3
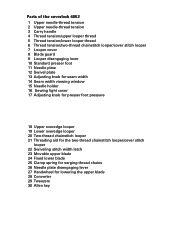
Parts of the coverlock 4852 1 Upper needle-thread tension 2 Upper needle-thread tension 3 Carry handle 4 Thread tension/upper looper thread 5 Thread tension/lower looper thread 6 Thread tension/two-thread chainstitch looper/cover stitch looper 7 Looper cover 8 Blade guard 9 Looper disengaging lever 10 Standard presser foot 11... 17 Adjusting knob for presser foot pressure 18 Upper overedge looper 19 Lower overedge looper 20 Two-thread chainstitch looper 21 Threading aid for the two-thread chainstitch looper/cover stitch looper 22 Swiveling stitch width latch 23 Movable upper blade 24 Fixed lower ...
Parts of the coverlock 4852 1 Upper needle-thread tension 2 Upper needle-thread tension 3 Carry handle 4 Thread tension/upper looper thread 5 Thread tension/lower looper thread 6 Thread tension/two-thread chainstitch looper/cover stitch looper 7 Looper cover 8 Blade guard 9 Looper disengaging lever 10 Standard presser foot 11... 17 Adjusting knob for presser foot pressure 18 Upper overedge looper 19 Lower overedge looper 20 Two-thread chainstitch looper 21 Threading aid for the two-thread chainstitch looper/cover stitch looper 22 Swiveling stitch width latch 23 Movable upper blade 24 Fixed lower ...

Owner's Manual
Page 5
... cord. To reduce the risk of burns, fire, electric shock, or injury to persons: • Do not allow to be used as threading needle, changing needle, threading bobbin, or changing presser foot, etc. • Always unplug sewing machine from the electrical outlet when removing covers, lubricating, or when making any air...
... cord. To reduce the risk of burns, fire, electric shock, or injury to persons: • Do not allow to be used as threading needle, changing needle, threading bobbin, or changing presser foot, etc. • Always unplug sewing machine from the electrical outlet when removing covers, lubricating, or when making any air...

Owner's Manual
Page 8
Contents Page Accessories ...6 Accessories, optional 62, 63 Accessory box...6 Adjusting the machine to Prog. 01, 02 34, 35 Changing a spool on a threaded machine 24 Clamp spring...29 Cleaning the machine 58 Cone thread adapter 10 Converter, attaching 32 Cover stitch, important notes on sewing 44, 45 Differential feed ...36, 37 Edge guide ...45...
Contents Page Accessories ...6 Accessories, optional 62, 63 Accessory box...6 Adjusting the machine to Prog. 01, 02 34, 35 Changing a spool on a threaded machine 24 Clamp spring...29 Cleaning the machine 58 Cone thread adapter 10 Converter, attaching 32 Cover stitch, important notes on sewing 44, 45 Differential feed ...36, 37 Edge guide ...45...

Owner's Manual
Page 9
... length, adjusting 38 Stitch width latch, swivelling 31 Telescoping thread guide 9 Thread chain cutter ...29 Thread chart ...57 Thread guide, clip on 10 Thread net ...9 Thread tensions, setting 39 Thread unreeling disc 9 Threading aid for the 2 thread chain stitch looped/cover stitch looped 19, 21 Threading paths/overview 26 - 28 Threading the 2 thread chain stitch looped/cover stitch looped (violet 18 - 21...
... length, adjusting 38 Stitch width latch, swivelling 31 Telescoping thread guide 9 Thread chain cutter ...29 Thread chart ...57 Thread guide, clip on 10 Thread net ...9 Thread tensions, setting 39 Thread unreeling disc 9 Threading aid for the 2 thread chain stitch looped/cover stitch looped 19, 21 Threading paths/overview 26 - 28 Threading the 2 thread chain stitch looped/cover stitch looped (violet 18 - 21...

Owner's Manual
Page 10
...process is attached. The accessories should be found behind the swivel plate. 8 The following accessories can be stored in the box: 1 Thread nets (5) 2 Overlock needle system EL X 705, cat. The spool stand 34 must be found in the accessory box or compartments ... Allen key Machine cover The machine cover protects the machine from dust and dirt. no. 2002 3 Thread unreeling discs (5) 4 Transparent presser foot (F) for cover stitch and two thread chainstitch 5 Clip on thread guide 6 Cleaning brush 7 Screw driver 8 Machine oil 9 Needlethreader 10 Needle inserting tool 11 Wrench ...
...process is attached. The accessories should be found behind the swivel plate. 8 The following accessories can be stored in the box: 1 Thread nets (5) 2 Overlock needle system EL X 705, cat. The spool stand 34 must be found in the accessory box or compartments ... Allen key Machine cover The machine cover protects the machine from dust and dirt. no. 2002 3 Thread unreeling discs (5) 4 Transparent presser foot (F) for cover stitch and two thread chainstitch 5 Clip on thread guide 6 Cleaning brush 7 Screw driver 8 Machine oil 9 Needlethreader 10 Needle inserting tool 11 Wrench ...

Owner's Manual
Page 12
... lower part of the container until the lower latches flick into the upper slot of the looper cover. Five types of stitches and their threading paths are portrayed in the reverse order. 10
... lower part of the container until the lower latches flick into the upper slot of the looper cover. Five types of stitches and their threading paths are portrayed in the reverse order. 10
Owner's Manual
Page 13
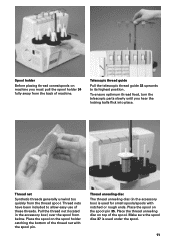
... parts slowly until you must pull the spool holder 34 fully away from the back of these threads. Telescopic thread guide Pull the telescopic thread guide 32 upwards to allow easy use of machine. Place the thread unreeling disc on the spool pin 35. Make sure the spool dise 37 is used under the... spool. 11 Spool holder Before placing thread cones/spools on machine you hear the locking balls flick into place. Pull the thread net (located in the accessory box) is used for small spools/spools with the spool pin...
... parts slowly until you must pull the spool holder 34 fully away from the back of these threads. Telescopic thread guide Pull the telescopic thread guide 32 upwards to allow easy use of machine. Place the thread unreeling disc on the spool pin 35. Make sure the spool dise 37 is used under the... spool. 11 Spool holder Before placing thread cones/spools on machine you hear the locking balls flick into place. Pull the thread net (located in the accessory box) is used for small spools/spools with the spool pin...

Owner's Manual
Page 14
... front part of 6.5 mm for the presser foot for particularly thick fabrics can be raised if you activate the foot control. Clip on thread guide Use the clip on thread guide accessory when sewing with large spools (5,000 10,000 m). Presser foot lifter The presser foot can be achieved by pressing the... presser foot lifter towards the rear. 12 Once an initial thread chain has been created, the presser foot lifter no longer needs to use the spool dise 37 when sewing with decorative...
... front part of 6.5 mm for the presser foot for particularly thick fabrics can be raised if you activate the foot control. Clip on thread guide Use the clip on thread guide accessory when sewing with large spools (5,000 10,000 m). Presser foot lifter The presser foot can be achieved by pressing the... presser foot lifter towards the rear. 12 Once an initial thread chain has been created, the presser foot lifter no longer needs to use the spool dise 37 when sewing with decorative...

Owner's Manual
Page 15
... foot lever to the presser foot holder. The presser foot will be used for the cover stitch (Prog. 02), the 2 thread chainstitch (Prog. 01), the 5 thread safety stitch seam (Prog. 09) and the 4 thread safety stitch seam (Prog. 08). Transparent presser foot F from the accessories can also be released automatically from you . Presserfoot...
... foot lever to the presser foot holder. The presser foot will be used for the cover stitch (Prog. 02), the 2 thread chainstitch (Prog. 01), the 5 thread safety stitch seam (Prog. 09) and the 4 thread safety stitch seam (Prog. 08). Transparent presser foot F from the accessories can also be released automatically from you . Presserfoot...

Owner's Manual
Page 18
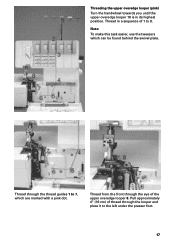
... slips under the thread guide. Threading the thread guides Place the spools on pages 9 and 10. Thread through the underside of 1 to the front following the colored threading paths. You will find information on the thread net, thread unreeling disc, spool disc and cone thread adapter on the spool... pins 35. Note: Thread in a sequence of the carrying handle and through the rear thread guides 44 using both hands ...
... slips under the thread guide. Threading the thread guides Place the spools on pages 9 and 10. Thread through the underside of 1 to the front following the colored threading paths. You will find information on the thread net, thread unreeling disc, spool disc and cone thread adapter on the spool... pins 35. Note: Thread in a sequence of the carrying handle and through the rear thread guides 44 using both hands ...
Owner's Manual
Page 19
Thread from the front through the thread guides 1 to 7, which can be found behind the swivel plate. Thread through the eye of the upper overedge looper 8. Threading the upper overedge looper (pink) Turn the handwheel towards you until the upper overedge looper 18 is in a sequence of thread through the looper and place it to 8. Pull approximately 4" (10 cm) of 1 to the left under the presser foot. 17 Thread in its highest position. Note: To make this task easier, use the tweezers which are marked with a pink dot.
Thread from the front through the thread guides 1 to 7, which can be found behind the swivel plate. Thread through the eye of the upper overedge looper 8. Threading the upper overedge looper (pink) Turn the handwheel towards you until the upper overedge looper 18 is in a sequence of thread through the looper and place it to 8. Pull approximately 4" (10 cm) of 1 to the left under the presser foot. 17 Thread in its highest position. Note: To make this task easier, use the tweezers which are marked with a pink dot.

Owner's Manual
Page 20
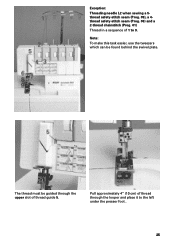
Note: To make this task easier, use the tweezers which can be found behind the swivel plate. 18 Threading the lower overedge looper (yellow) Turn the handwheel towards you until the lower overedge looper 19 is on the extreme right. Thread in a sequence of 1 to 10.
Note: To make this task easier, use the tweezers which can be found behind the swivel plate. 18 Threading the lower overedge looper (yellow) Turn the handwheel towards you until the lower overedge looper 19 is on the extreme right. Thread in a sequence of 1 to 10.

Owner's Manual
Page 21
Pull approximately 4" (10 cm) of the lower overedge looper C (= threading point 10). Thread from the front through the eye of thread through the looper and place it to 8, marked yellow. Thread through the thread guides 1 to the left under the presser foot. 19 Press lever A downwards and hook the thread into guide B. Please also refer to its position as soon as you start sewing. Note: The lever returns automatically to the drawing below.
Pull approximately 4" (10 cm) of the lower overedge looper C (= threading point 10). Thread from the front through the eye of thread through the looper and place it to 8, marked yellow. Thread through the thread guides 1 to the left under the presser foot. 19 Press lever A downwards and hook the thread into guide B. Please also refer to its position as soon as you start sewing. Note: The lever returns automatically to the drawing below.

Owner's Manual
Page 22
Thread in a sequence of 1 to 11. Note: To make this task easier, use the tweezers which can be found behind the swivel plate. 20 Threading the two thread chainstitch looper and cover stitch looper (violet) for the chainstitch Turn the handwheel towards you until the two thread chainstitch looper 20 is on the extreme right.
Thread in a sequence of 1 to 11. Note: To make this task easier, use the tweezers which can be found behind the swivel plate. 20 Threading the two thread chainstitch looper and cover stitch looper (violet) for the chainstitch Turn the handwheel towards you until the two thread chainstitch looper 20 is on the extreme right.

Owner's Manual
Page 23
Thread from the front through the looper and place it to 9. Also refer to its position as soon as you start sewing. Pull approximately 4" (10 cm) of thread through eye C of 1 to the left under the presser foot. 21 Note: The lever returns automatically to the drawing below. Push lever A upward and hook the thread into slot B. Thread the thread guides which are marked with a violet square in a sequence of the two thread chainstitch looper and the cover stitch looper (= threading point 11).
Thread from the front through the looper and place it to 9. Also refer to its position as soon as you start sewing. Pull approximately 4" (10 cm) of thread through eye C of 1 to the left under the presser foot. 21 Note: The lever returns automatically to the drawing below. Push lever A upward and hook the thread into slot B. Thread the thread guides which are marked with a violet square in a sequence of the two thread chainstitch looper and the cover stitch looper (= threading point 11).

Owner's Manual
Page 24
Note: To make this task easier, use the tweezers which can be found behind the swivel plate. 22 Thread in a sequence of 1 to 10. Exception: Threading the two-thread chainstitch looper and cover stitch looper for the cover stitch (violet) (Prog. 02) Turn the handwheel towards you until the two thread chainstitch looper 20 is on the extreme right.
Note: To make this task easier, use the tweezers which can be found behind the swivel plate. 22 Thread in a sequence of 1 to 10. Exception: Threading the two-thread chainstitch looper and cover stitch looper for the cover stitch (violet) (Prog. 02) Turn the handwheel towards you until the two thread chainstitch looper 20 is on the extreme right.

Owner's Manual
Page 25
Press lever A upward and hook the thread into slot B. Pull approximately 4" (10 cm) of thread through eye C of the two-thread chainstitch looper and the cover stitch looper (= threading point 10). Also refer to its position as soon as shown in the diagram, in a sequence of the threads guides are marked with a violet square. Thread from the front through the looper and place it to 8. Note: The lever returns automatically to the drawing below. Some of 1 to the left under the presser foot. 23 Thread the thread guides, as you start sewing.
Press lever A upward and hook the thread into slot B. Pull approximately 4" (10 cm) of thread through eye C of the two-thread chainstitch looper and the cover stitch looper (= threading point 10). Also refer to its position as soon as shown in the diagram, in a sequence of the threads guides are marked with a violet square. Thread from the front through the looper and place it to 8. Note: The lever returns automatically to the drawing below. Some of 1 to the left under the presser foot. 23 Thread the thread guides, as you start sewing.

Owner's Manual
Page 26
Pull approximately 4" (10 cm) of thread through the looper and place it to 8. The thread must also be guided through the lower slot of thread guide 4. Note: To make this task easier, use the tweezers which can be guided through the lower thread guide 7. 24 Note: For the cover stitch the thread must be found behind the swivel plate. Threading the needles Thread in a sequence of 1 to the left under the presser foot.
Pull approximately 4" (10 cm) of thread through the looper and place it to 8. The thread must also be guided through the lower slot of thread guide 4. Note: To make this task easier, use the tweezers which can be guided through the lower thread guide 7. 24 Note: For the cover stitch the thread must be found behind the swivel plate. Threading the needles Thread in a sequence of 1 to the left under the presser foot.
Owner's Manual
Page 27
Pull approximately 4" (10 cm) of thread through the upper slot of 1 to the left under the presser foot . 25 The thread must be found behind the swivel plate. Note: To make this task easier, use the tweezers which can be guided through the looper and place it to 9. Exception: Threading needle L2 when sewing a 5thread safety-stitch seam (Prog. 09), a 4thread safety-stitch seam (Prog. 08) and a 2-thread chainstitch (Prog. 01) Thread in a sequence of thread guide 5.
Pull approximately 4" (10 cm) of thread through the upper slot of 1 to the left under the presser foot . 25 The thread must be found behind the swivel plate. Note: To make this task easier, use the tweezers which can be guided through the looper and place it to 9. Exception: Threading needle L2 when sewing a 5thread safety-stitch seam (Prog. 09), a 4thread safety-stitch seam (Prog. 08) and a 2-thread chainstitch (Prog. 01) Thread in a sequence of thread guide 5.

Owner's Manual
Page 28
... to the spool and replace with the new threads, and pull the threads out of the needle eye, rethread the loopier thread and then rethread the needle threads. If the looper threads break, you must always be threaded last so that the needle threads do not run under the looper thread as seen in drawing 1, but instead over...
... to the spool and replace with the new threads, and pull the threads out of the needle eye, rethread the loopier thread and then rethread the needle threads. If the looper threads break, you must always be threaded last so that the needle threads do not run under the looper thread as seen in drawing 1, but instead over...


