
Owner's Manual
Page 3
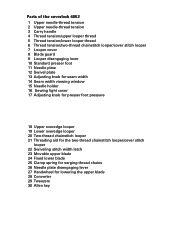
Parts of the coverlock 4852 1 Upper needle-thread tension 2 Upper needle-thread tension 3 Carry handle 4 Thread tension/upper looper thread 5 Thread tension/lower looper thread 6 Thread tension/two-thread chainstitch ...
Parts of the coverlock 4852 1 Upper needle-thread tension 2 Upper needle-thread tension 3 Carry handle 4 Thread tension/upper looper thread 5 Thread tension/lower looper thread 6 Thread tension/two-thread chainstitch ...

Owner's Manual
Page 5
... cleaning. • Always unplug before using an electrical appliance, basic safety precautions should never be used as contained in this sewing machine from all moving parts. WARNING - To reduce the risk of electric shock: • A sewing machine should always be followed, including the following: Read all controls to the off ("0") when...
... cleaning. • Always unplug before using an electrical appliance, basic safety precautions should never be used as contained in this sewing machine from all moving parts. WARNING - To reduce the risk of electric shock: • A sewing machine should always be followed, including the following: Read all controls to the off ("0") when...

Owner's Manual
Page 12
... plate 12 is no longer possible. sewing with the machine is opened, for safety reasons, i.e. Looper cover Push the looper cover 7 fully to the lower part of the container until the lower latches flick into the upper slot of the looper cover 7. Note: The electricity supply of the looper cover...
... plate 12 is no longer possible. sewing with the machine is opened, for safety reasons, i.e. Looper cover Push the looper cover 7 fully to the lower part of the container until the lower latches flick into the upper slot of the looper cover 7. Note: The electricity supply of the looper cover...
Owner's Manual
Page 13
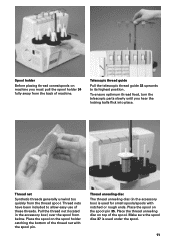
... to allow easy use of the spool. Place the thread unreeling disc on top of these threads. To ensure optimum thread feed, turn the telescopic parts slowly until you must pull the spool holder 34 fully away from the thread spool. Place the spool on the spool holder catching the bottom...
... to allow easy use of the spool. Place the thread unreeling disc on top of these threads. To ensure optimum thread feed, turn the telescopic parts slowly until you must pull the spool holder 34 fully away from the thread spool. Place the spool on the spool holder catching the bottom...

Owner's Manual
Page 14
... the threads. Clip this , place the cone thread adapter 36 onto the spool pin 35. It is sufficient to gently lift the front part of 6.5 mm for the presser foot for particularly thick fabrics can be raised if you activate the foot control. The maximum vertical lift of the...
... the threads. Clip this , place the cone thread adapter 36 onto the spool pin 35. It is sufficient to gently lift the front part of 6.5 mm for the presser foot for particularly thick fabrics can be raised if you activate the foot control. The maximum vertical lift of the...

Owner's Manual
Page 57
The upper looper thread (pink) only partly loops around the fabric edge. Set the pink thread tension to a lower value and/or the yellow thread tension to a higher value. Set the green thread tension to a higher value. The lower looper thread (yellow) appears on the top side of the fabric. 3-thread rolled hem (folded) Program 15 The upper needle thread (green) is too loose. Set the yellow thread tension to a higher value and/or the pink one to a lower value. 55
The upper looper thread (pink) only partly loops around the fabric edge. Set the pink thread tension to a lower value and/or the yellow thread tension to a higher value. Set the green thread tension to a higher value. The lower looper thread (yellow) appears on the top side of the fabric. 3-thread rolled hem (folded) Program 15 The upper needle thread (green) is too loose. Set the yellow thread tension to a higher value and/or the pink one to a lower value. 55

Owner's Manual
Page 62
...power Remove the waste container and open the looper cover and swivel plate. Lubricate the points shown above with alcohol. One or two drops of PFAFF sewing machine oil are manufactured from special materials and do not require any waste thread from time to time with the oil provided (located in... the accessory box) every time you clean the machine. All other parts are sufficient. Disengage the upper blade (see page 30) and remove the presser foot and the needle plate. Use the accessory brush ...
...power Remove the waste container and open the looper cover and swivel plate. Lubricate the points shown above with alcohol. One or two drops of PFAFF sewing machine oil are manufactured from special materials and do not require any waste thread from time to time with the oil provided (located in... the accessory box) every time you clean the machine. All other parts are sufficient. Disengage the upper blade (see page 30) and remove the presser foot and the needle plate. Use the accessory brush ...

Owner's Manual
Page 70
Parts of the coverlock 4852 31 Thread guides with color coding 32 Telescoping thread guide 33 Thread chain cutter 34 Thread spool stand 35 Thread spool pin 36 Cone thread adapter 37 Spool disc 38 Electrical power master switch 39 Machine socket, foot control 40 Handwheel 41 Regulator wheel for differential feed 42 Stitch length adjustment knob 43 Presser foot lifter 44 Rear thread guides 45 Waste container 46 Foot control 47 Foot control plug for machine 48 Power cord 49 Accessory box 50 Power table
Parts of the coverlock 4852 31 Thread guides with color coding 32 Telescoping thread guide 33 Thread chain cutter 34 Thread spool stand 35 Thread spool pin 36 Cone thread adapter 37 Spool disc 38 Electrical power master switch 39 Machine socket, foot control 40 Handwheel 41 Regulator wheel for differential feed 42 Stitch length adjustment knob 43 Presser foot lifter 44 Rear thread guides 45 Waste container 46 Foot control 47 Foot control plug for machine 48 Power cord 49 Accessory box 50 Power table


