
Use and Care Manual
Page 3
Loading the Dishware 8 5. Warranty Information 27 3 Loading the Silverware Basket 11-13 7. Adding Detergent & Rinse Agent 14-15 8. Rack Accessories 9-10 6. Self Help 23-25 13. Wash Cycle Information 17 10. Dishwasher Features & Options 16 9. Dishwasher Features 7 4. Operating the Dishwasher 18-20 11. Customer Service Information 26 14. Dishwasher Components 6 3. Care & Maintenance 21-22 12. Table of Contents 1. Important Safety Instructions 4-5 2.
Loading the Dishware 8 5. Warranty Information 27 3 Loading the Silverware Basket 11-13 7. Adding Detergent & Rinse Agent 14-15 8. Rack Accessories 9-10 6. Self Help 23-25 13. Wash Cycle Information 17 10. Dishwasher Features & Options 16 9. Dishwasher Features 7 4. Operating the Dishwasher 18-20 11. Customer Service Information 26 14. Dishwasher Components 6 3. Care & Maintenance 21-22 12. Table of Contents 1. Important Safety Instructions 4-5 2.
Use and Care Manual
Page 4
... dishwasher can damage your installer for more information. 4 Do not use harsh chemicals to clean your dishwasher. All repairs must be liable for the possible damages or consequences. ɵ Never use the dishwasher covered in this manual is highly recommended for the end user to become familiar with the procedure to shut of the incoming water supply and the procedure to shut of the incoming power supply...
... dishwasher can damage your installer for more information. 4 Do not use harsh chemicals to clean your dishwasher. All repairs must be liable for the possible damages or consequences. ɵ Never use the dishwasher covered in this manual is highly recommended for the end user to become familiar with the procedure to shut of the incoming water supply and the procedure to shut of the incoming power supply...
Use and Care Manual
Page 5
... information on the door or dish racks of children. 5. When loading items to be run with this dishwasher only for use an open lame during this Use and Care Manual. b. When children become old enough to operate the appliance, it is the legal responsibility of the parents or legal guardians to the washing compartment when removing an old dishwasher for several minutes. Remove the dishwasher door to ensure...
... information on the door or dish racks of children. 5. When loading items to be run with this dishwasher only for use an open lame during this Use and Care Manual. b. When children become old enough to operate the appliance, it is the legal responsibility of the parents or legal guardians to the washing compartment when removing an old dishwasher for several minutes. Remove the dishwasher door to ensure...
Use and Care Manual
Page 7
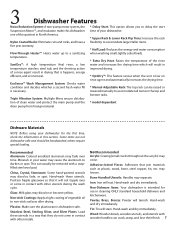
... the drain pump from foreign material. * Delay Start: This option allows you to delay the start time of your dishwasher. * Upper Rack & Lower Rack Flip Tines: Increase the rack lexibility to accomodate larger/taller items. * Half Load: Reduces the energy and water consumption when washing small, lightly soiled loads. * Extra Dry Heat: Raises the temperature of a rinse agent result in drying that it will not topple over time. Hand-wash and dry immediately. 3 Dishwasher Features Noise Reduction System: A two-pump motor...
... the drain pump from foreign material. * Delay Start: This option allows you to delay the start time of your dishwasher. * Upper Rack & Lower Rack Flip Tines: Increase the rack lexibility to accomodate larger/taller items. * Half Load: Reduces the energy and water consumption when washing small, lightly soiled loads. * Extra Dry Heat: Raises the temperature of a rinse agent result in drying that it will not topple over time. Hand-wash and dry immediately. 3 Dishwasher Features Noise Reduction System: A two-pump motor...

Use and Care Manual
Page 8
Do not push the top rack with the door. 4 Loading the Dishware Do not pre-wash items that the insides of bowls, pots and pans are facing the spray arms. Avoid nesting and contact points between dishes. tub. Refer to the water supply at the back of the tub so the top rack and excessive grease. Load pots, pans and bowls upside down...
Do not push the top rack with the door. 4 Loading the Dishware Do not pre-wash items that the insides of bowls, pots and pans are facing the spray arms. Avoid nesting and contact points between dishes. tub. Refer to the water supply at the back of the tub so the top rack and excessive grease. Load pots, pans and bowls upside down...
Use and Care Manual
Page 10
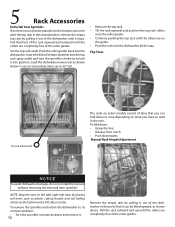
... the top rack spray outlet and turn the sprinkler clockwise to lock it out of the roller guides. Load the dishwasher lower rack as plastic cutting boards and tall baking sheets on the bottom rack's left side,or center. To remove the sprinkler and return the dishwasher to its normal condition: • Turn the sprinkler counterclockwise and remove it out of the roller guides. Pull the rack outward and...
... the top rack spray outlet and turn the sprinkler clockwise to lock it out of the roller guides. Load the dishwasher lower rack as plastic cutting boards and tall baking sheets on the bottom rack's left side,or center. To remove the sprinkler and return the dishwasher to its normal condition: • Turn the sprinkler counterclockwise and remove it out of the roller guides. Pull the rack outward and...
Use and Care Manual
Page 11
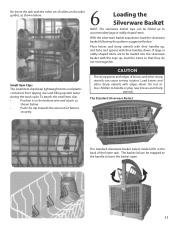
... the roller guides, as shown below . The Standard Silverware Basket The standard silverware basket (select models) its in the back of the lower rack. Place knives and sharp utensils with their handles up with water during the wash cycle. Do not allow children to leave the basket open. 11 Re-insert the rack with the other set of rollers on the bottom wire and attach...
... the roller guides, as shown below . The Standard Silverware Basket The standard silverware basket (select models) its in the back of the lower rack. Place knives and sharp utensils with their handles up with water during the wash cycle. Do not allow children to leave the basket open. 11 Re-insert the rack with the other set of rollers on the bottom wire and attach...

Use and Care Manual
Page 14
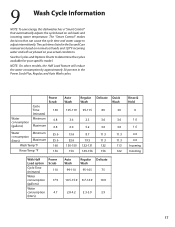
Increase the amount, if necessary, to the least amount required to measure the amount of detergent will clean most loads. Use the measuring lines in the Tables below. Wash Cycle Power Scrub Auto Wash Regular Wash Quick Wash Delicate Wash Rinse & Hold 14 Recommended Detergent Amount Water Type Unit Hard Medium Soft ml Tbsp ml Tbsp ml Tbsp ml Tbsp ml Tbsp 45 3 25-45 1.75 - 3 25-45...
Increase the amount, if necessary, to the least amount required to measure the amount of detergent will clean most loads. Use the measuring lines in the Tables below. Wash Cycle Power Scrub Auto Wash Regular Wash Quick Wash Delicate Wash Rinse & Hold 14 Recommended Detergent Amount Water Type Unit Hard Medium Soft ml Tbsp ml Tbsp ml Tbsp ml Tbsp ml Tbsp 45 3 25-45 1.75 - 3 25-45...
Use and Care Manual
Page 16
... cycles. Use this manual for further information. Hand washing may be re-used at the same event. Reill Rinse Agent Indicator An indicator light will illuminate to other special items. Always make sure that were just washed have been sanitized according to active these options, see "Operating the Dishwasher" section Sanitized Indicator When the "Sanitized" light appears on or hard dried food soils. Half Load In the Power Scrub Plus, Regular, and Auto Wash cycles...
... cycles. Use this manual for further information. Hand washing may be re-used at the same event. Reill Rinse Agent Indicator An indicator light will illuminate to other special items. Always make sure that were just washed have been sanitized according to active these options, see "Operating the Dishwasher" section Sanitized Indicator When the "Sanitized" light appears on or hard dried food soils. Half Load In the Power Scrub Plus, Regular, and Auto Wash cycles...
Use and Care Manual
Page 17
....9 2.8-4.2 2.3-3.9 2.9 Rinse & Hold 9 1.0 1.0 4.0 4.0 Incoming Incoming Rinse & Hold 17 NOTE: On select models, the Half Load feature will vary based on your speciic model. The cycle times listed in the Power Scrub Plus, Regular, and Auto Wash cycles. The "Smart Control" makes decisions that automatically adjusts the cycle based on normal soil loads and 120°F incoming water and will reduce the water consumption by approximately 30 percent in the Use and Care manual are...
....9 2.8-4.2 2.3-3.9 2.9 Rinse & Hold 9 1.0 1.0 4.0 4.0 Incoming Incoming Rinse & Hold 17 NOTE: On select models, the Half Load feature will vary based on your speciic model. The cycle times listed in the Power Scrub Plus, Regular, and Auto Wash cycles. The "Smart Control" makes decisions that automatically adjusts the cycle based on normal soil loads and 120°F incoming water and will reduce the water consumption by approximately 30 percent in the Use and Care manual are...

Use and Care Manual
Page 18
... of hot water splash out! If you would like to select the option you close the door without pressing the start button the unit will be lashing. If the "Clean" and "Sanitized" LED are now in the options setup mode. • Press ">" to adjust. To set the Extra Dry Heat. To start a new cycle. To cancel a cycle: • Open the dishwasher door just far enough to enter "options" mode. Be careful of Rinse Agent...
... of hot water splash out! If you would like to select the option you close the door without pressing the start button the unit will be lashing. If the "Clean" and "Sanitized" LED are now in the options setup mode. • Press ">" to adjust. To set the Extra Dry Heat. To start a new cycle. To cancel a cycle: • Open the dishwasher door just far enough to enter "options" mode. Be careful of Rinse Agent...
Use and Care Manual
Page 19
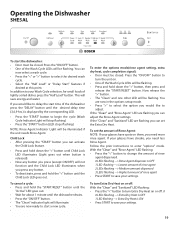
... be closed. Child Lock • After pressing the "START" button you can adjust the Rinse Agent settings. If the "Clean" and "Sanitized" LED are lashing you can set the amount of Rinse Agent: NOTE: If your glasses have streaks, you need less Rinse Agent. Operating the Dishwasher SHE5AL To start time of the dishwasher press the "DELAY" button until the desired delay time (3,6,9 hrs.) is displayed by the corresponding LED. • Press the "START" button to begin the cycle (Wash Cycle Indicator Light will stop...
... be closed. Child Lock • After pressing the "START" button you can adjust the Rinse Agent settings. If the "Clean" and "Sanitized" LED are lashing you can set the amount of Rinse Agent: NOTE: If your glasses have streaks, you need less Rinse Agent. Operating the Dishwasher SHE5AL To start time of the dishwasher press the "DELAY" button until the desired delay time (3,6,9 hrs.) is displayed by the corresponding LED. • Press the "START" button to begin the cycle (Wash Cycle Indicator Light will stop...
Use and Care Manual
Page 20
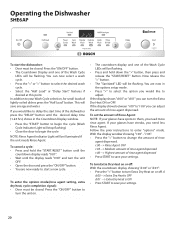
... ">" button, then press and release the "START/RESET" button. If you can now select a wash cycle. • Press the "" button to enter "options" mode. Press the "ON/OFF" button. • The Countdown Display and one of lightly soiled dishes press the "Half Load" button. Operating the Dishwasher SHE6AP To start a new cycle. If the display shows between "r:00" to "r:06" you would like to begin the cycle NOTE: Rinse Agent Indicator Light will save energy...
... ">" button, then press and release the "START/RESET" button. If you can now select a wash cycle. • Press the "" button to enter "options" mode. Press the "ON/OFF" button. • The Countdown Display and one of lightly soiled dishes press the "Half Load" button. Operating the Dishwasher SHE6AP To start a new cycle. If the display shows between "r:00" to "r:06" you would like to begin the cycle NOTE: Rinse Agent Indicator Light will save energy...
Use and Care Manual
Page 21
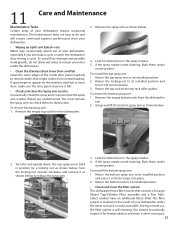
... located on the stainless steel tub or inner door, make sure the rinse agent reservoir is self-cleaning. Return the top spray arm to appear on the inside door panel regularly to its installed position and turn it snaps into place. 2. You should occasionally inspect it for obstruction in position by a locking nut as shown below . Grasp and lift the bottom spray arm as shown below . 2. During normal use...
... located on the stainless steel tub or inner door, make sure the rinse agent reservoir is self-cleaning. Return the top spray arm to appear on the inside door panel regularly to its installed position and turn it snaps into place. 2. You should occasionally inspect it for obstruction in position by a locking nut as shown below . Grasp and lift the bottom spray arm as shown below . 2. During normal use...

Use and Care Manual
Page 22
... cleaning stainless steel. Flush the Cylinder Filter clean by an authorized service center. Also clean the door seal, located inside the dishwasher at the bottom of time in a location that is locked. Lift out the assembly as a countertop to remove food particles and other . 3. CAUTION To avoid injury, do not reach into the large object trap with your dishwasher winterized by holding it under • Clean the Exterior Door Panel Colored Doors Use...
... cleaning stainless steel. Flush the Cylinder Filter clean by an authorized service center. Also clean the door seal, located inside the dishwasher at the bottom of time in a location that is locked. Lift out the assembly as a countertop to remove food particles and other . 3. CAUTION To avoid injury, do not reach into the large object trap with your dishwasher winterized by holding it under • Clean the Exterior Door Panel Colored Doors Use...

Use and Care Manual
Page 23
... Loading" section of electrical power supply to "Cycle Completion Signal" section in this manual. Shut the door completely. 2. Self Help Dishwashers may occasionally exhibit problems that door is properly latched and completely closed. 1. To adjust the volume or deactivate, refer to dishwasher or blown fuse. 6. Before starting a cycle, run a long time 1. Add rinse agent. 4. Increase or decrease detergent depending on water supply. Ensure that spray arm movement is connected to cold water supply. Clean the lter. The door may have been closed with- Dishes...
... Loading" section of electrical power supply to "Cycle Completion Signal" section in this manual. Shut the door completely. 2. Self Help Dishwashers may occasionally exhibit problems that door is properly latched and completely closed. 1. To adjust the volume or deactivate, refer to dishwasher or blown fuse. 6. Before starting a cycle, run a long time 1. Add rinse agent. 4. Increase or decrease detergent depending on water supply. Ensure that spray arm movement is connected to cold water supply. Clean the lter. The door may have been closed with- Dishes...
Use and Care Manual
Page 24
... persists, run the desired cycle. 2. pleted. 3. Condensation vent is in the Care and Maintenance section of this manual . 3. Cancel the delay-start is not blocked. Use only dishwasher detergents. Rinse agent dispenser is empty. (Rinse agent indicator is obstructed. 1. Add rinse agent. Rinse and Hold setting does not include drying cycle, Note: Select models offer an extra heating options to the "Preparing and Loading" section of hard water stains. Refer to avoid build up of this manual. 2. Improper installation. 1. Drain hose is...
... persists, run the desired cycle. 2. pleted. 3. Condensation vent is in the Care and Maintenance section of this manual . 3. Cancel the delay-start is not blocked. Use only dishwasher detergents. Rinse agent dispenser is empty. (Rinse agent indicator is obstructed. 1. Add rinse agent. Rinse and Hold setting does not include drying cycle, Note: Select models offer an extra heating options to the "Preparing and Loading" section of hard water stains. Refer to avoid build up of this manual. 2. Improper installation. 1. Drain hose is...

Use and Care Manual
Page 25
... and Loading" section of water, adjust the rinse agent dispenser. Action Depending on the hardness of this manual. 25 Water circulation sound is normal, but if you suspect items are banging into each other or into the spray arms, refer to the "Canceling or changing the cycle" section of detergent cover. 2. Refer to "Adding Detergent and Rinse Aid" section of this manual for adjustment. Noise during wash cycle Detergent dispenser cover will not shut The dishes may...
... and Loading" section of water, adjust the rinse agent dispenser. Action Depending on the hardness of this manual. 25 Water circulation sound is normal, but if you suspect items are banging into each other or into the spray arms, refer to the "Canceling or changing the cycle" section of detergent cover. 2. Refer to "Adding Detergent and Rinse Aid" section of this manual for adjustment. Noise during wash cycle Detergent dispenser cover will not shut The dishes may...
Use and Care Manual
Page 26
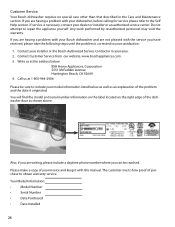
... the Care and Maintenance section. Do not attempt to obtain warranty service. Write us at the address below as well as shown above. Customer Service Your Bosch dishwasher requires no special care other than that described in your dealer or installer or an authorized service center. You will ind the model and serial number information on the label located on the right edge of the dishwasher door...
... the Care and Maintenance section. Do not attempt to obtain warranty service. Write us at the address below as well as shown above. Customer Service Your Bosch dishwasher requires no special care other than that described in your dealer or installer or an authorized service center. You will ind the model and serial number information on the label located on the right edge of the dishwasher door...
Use and Care Manual
Page 27
... Limited Product Warranty applies only to Bosch dishwashers ("Product") sold to you, the rst using a Bosch-authorized service provider during normal business hours. Labor and shipping costs are scratches, nicks, minor dents, and cosmetic damages on Dish Racks: Bosch will replace the upper or lower dish rack (excluding rack components), if the rack proves defective in materials or workmanship (excludes labor charges). • Lifetime Warranty against Stainless Steel Rust Through: Bosch will replace your Product (upgraded models...
... Limited Product Warranty applies only to Bosch dishwashers ("Product") sold to you, the rst using a Bosch-authorized service provider during normal business hours. Labor and shipping costs are scratches, nicks, minor dents, and cosmetic damages on Dish Racks: Bosch will replace the upper or lower dish rack (excluding rack components), if the rack proves defective in materials or workmanship (excludes labor charges). • Lifetime Warranty against Stainless Steel Rust Through: Bosch will replace your Product (upgraded models...


