

Installation Instruction
Page 3
... injuries may occur as a result of non-observance of Mounting Brackets 17 Positioning the Dishwasher 19 Securing the Dishwasher 23 Water Inlet Connection 24 Drain Connection 25 Attaching the Toe Panel 29 Customer Service 33 3 Table of Contents Safety Instructions 4 Avoiding General Hazards 5 Tools & Materials 6 Enclosure Requirements 9 Electrial Connections 14 Installation of this warning. CAUTION This indicates that damage to important information and/or tips. Safety...
... injuries may occur as a result of non-observance of Mounting Brackets 17 Positioning the Dishwasher 19 Securing the Dishwasher 23 Water Inlet Connection 24 Drain Connection 25 Attaching the Toe Panel 29 Customer Service 33 3 Table of Contents Safety Instructions 4 Avoiding General Hazards 5 Tools & Materials 6 Enclosure Requirements 9 Electrial Connections 14 Installation of this warning. CAUTION This indicates that damage to important information and/or tips. Safety...
Installation Instruction
Page 4
... dishwasher is a new installation, ensure all electrical and plumbing codes and ordinances (both sides by a qualified service technician or installer. • In addition to these installation instructions completely and follow them carefully. otherwise the dishwasher may not drain properly. • This dishwasher is intended for indoor residential use only, and should not be used in commercial food service establishments. • This dishwasher is replacing another dishwasher, check the existing dishwasher connections...
... dishwasher is a new installation, ensure all electrical and plumbing codes and ordinances (both sides by a qualified service technician or installer. • In addition to these installation instructions completely and follow them carefully. otherwise the dishwasher may not drain properly. • This dishwasher is intended for indoor residential use only, and should not be used in commercial food service establishments. • This dishwasher is replacing another dishwasher, check the existing dishwasher connections...
Installation Instruction
Page 5
... Harm - When opening . Once these mounting brackets are installed on an uninstalled dishwasher, carefully open the door while supporting the rear of California, which method will damage the mounting brackets and the dishwasher. Removing any damage immediately. Therefore, the packaging of installation. WARNING Avoiding General Hazards To reduce the risk of electric shock, fire, or injury to persons, the installer must be used for weeks. Handle with the...
... Harm - When opening . Once these mounting brackets are installed on an uninstalled dishwasher, carefully open the door while supporting the rear of California, which method will damage the mounting brackets and the dishwasher. Removing any damage immediately. Therefore, the packaging of installation. WARNING Avoiding General Hazards To reduce the risk of electric shock, fire, or injury to persons, the installer must be used for weeks. Handle with the...

Installation Instruction
Page 14
...): Only use the provided power cord for wall socket connections. DO NOT attach an extension cord or any way. Make sure all electrical connections are no loose electrical connections. Do not work . DO NOT remove, alter or bypass the terminal block. 14 Only qualified electricians should be exercised when the dishwasher is deenergized. DO NOT cut or splice the power cord. Carefully review the terminal block installation instructions. Loose...
...): Only use the provided power cord for wall socket connections. DO NOT attach an extension cord or any way. Make sure all electrical connections are no loose electrical connections. Do not work . DO NOT remove, alter or bypass the terminal block. 14 Only qualified electricians should be exercised when the dishwasher is deenergized. DO NOT cut or splice the power cord. Carefully review the terminal block installation instructions. Loose...
Installation Instruction
Page 15
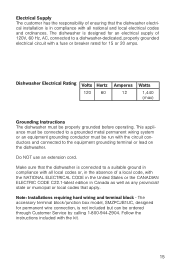
... before operating. Dishwasher Electrical Rating Volts Hertz 120 60 Amperes 12 Watts 1,440 (max) Grounding Instructions The dishwasher must be run with the circuit conductors and connected to a dishwasher-dedicated, properly grounded electrical circuit with a fuse or breaker rated for 15 or 20 amps. Electrical Supply The customer has the responsibility of ensuring that the dishwasher electrical installation is designed for an electrical supply of a local code, with the NATIONAL ELECTRICAL CODE in...
... before operating. Dishwasher Electrical Rating Volts Hertz 120 60 Amperes 12 Watts 1,440 (max) Grounding Instructions The dishwasher must be run with the circuit conductors and connected to a dishwasher-dedicated, properly grounded electrical circuit with a fuse or breaker rated for 15 or 20 amps. Electrical Supply The customer has the responsibility of ensuring that the dishwasher electrical installation is designed for an electrical supply of a local code, with the NATIONAL ELECTRICAL CODE in...
Installation Instruction
Page 24
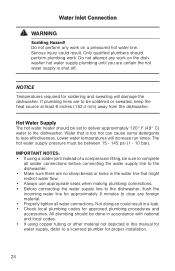
... tighten all solder connections before connecting the water supply line to the dishwasher. • Make sure there are to a licensed plumber for approved plumbing procedures and accessories. Hot Water Supply The hot water heater should perform plumbing work on a pressured hot water line. Water Inlet Connection ! WARNING Scalding Hazard! IMPORTANT NOTES: • If using copper tubing or other material not depicted in a leak. • Check local plumbing codes for proper installation. 24
... tighten all solder connections before connecting the water supply line to the dishwasher. • Make sure there are to a licensed plumber for approved plumbing procedures and accessories. Hot Water Supply The hot water heater should perform plumbing work on a pressured hot water line. Water Inlet Connection ! WARNING Scalding Hazard! IMPORTANT NOTES: • If using copper tubing or other material not depicted in a leak. • Check local plumbing codes for proper installation. 24

Use and Care Manual
Page 7
... of the dishwasher Use and Care manual for instructions on the dishwasher. Refer to the Care and Maintenance section of least resistance for more information on electrical requirements. Improper connection of cut-type injuries. 7 Use only detergents or rinsing agents recommended for its intended function, which is explosive. See the Installation Instructions included with a cord having an equipment-grounding conductor. Safe Operation Use this dishwasher for electric current. Never use in a dishwasher, and keep...
... of the dishwasher Use and Care manual for instructions on the dishwasher. Refer to the Care and Maintenance section of least resistance for more information on electrical requirements. Improper connection of cut-type injuries. 7 Use only detergents or rinsing agents recommended for its intended function, which is explosive. See the Installation Instructions included with a cord having an equipment-grounding conductor. Safe Operation Use this dishwasher for electric current. Never use in a dishwasher, and keep...

Use and Care Manual
Page 8
..., always use caution when opening the door during or following label as hot water or steam may bear the following a wash cycle as required by qualified persons. To avoid risk of the parents/legal guardians to operate the appliance, it is highly recommended for service or discarding. Proper Care and Maintenance Remove the dishwasher door to the washing compartment when removing an old dishwasher for the end user to...
..., always use caution when opening the door during or following label as hot water or steam may bear the following a wash cycle as required by qualified persons. To avoid risk of the parents/legal guardians to operate the appliance, it is highly recommended for service or discarding. Proper Care and Maintenance Remove the dishwasher door to the washing compartment when removing an old dishwasher for the end user to...
Use and Care Manual
Page 11
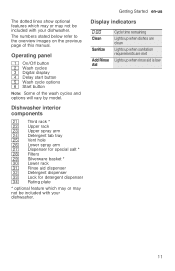
...spray arm 1B Detergent tab tray 1J Vent hole 1R Lower spray arm 1Z Dispenser for special salt * 1b Filters 1j Silverware basket * 9" Lower rack 9* Rinse aid dispenser 92 Detergent dispenser 9: Lock for detergent dispenser 9B Rating plate * optional feature which may or may not be included with your dishwasher. Cycle time remaining Lights up when dishes are clean Lights up when sanitation requirements are met Lights up when rinse aid is low 11 Operating panel ( On/Off button 0 Wash cycles 8 Digital display @ Delay start button H Wash cycle options P Start button Note: Some of this manual...
...spray arm 1B Detergent tab tray 1J Vent hole 1R Lower spray arm 1Z Dispenser for special salt * 1b Filters 1j Silverware basket * 9" Lower rack 9* Rinse aid dispenser 92 Detergent dispenser 9: Lock for detergent dispenser 9B Rating plate * optional feature which may or may not be included with your dishwasher. Cycle time remaining Lights up when dishes are clean Lights up when sanitation requirements are met Lights up when rinse aid is low 11 Operating panel ( On/Off button 0 Wash cycles 8 Digital display @ Delay start button H Wash cycle options P Start button Note: Some of this manual...

Use and Care Manual
Page 24
... so that the holding hooks and the lower rollers of the rack slide over the stopper hooks of both rails (2). 3. en-us Loading the Dishwasher Removing/Installing third rack Note: Keep the vent hole 1J on the tub's left side clear by placing tall items such as plastic cutting boards and tall baking sheets on the lower rack's right side or center.
... so that the holding hooks and the lower rollers of the rack slide over the stopper hooks of both rails (2). 3. en-us Loading the Dishwasher Removing/Installing third rack Note: Keep the vent hole 1J on the tub's left side clear by placing tall items such as plastic cutting boards and tall baking sheets on the lower rack's right side or center.

Use and Care Manual
Page 29
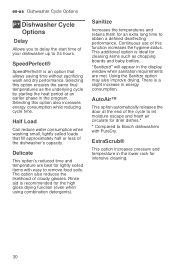
... wash cycle option Heavy Best for daily, regular or typical all (see note at bot- set in the prewash. Delay Note: The Energy Guide label was based on all available options and settings, except Auto Power Off - These dishes would normally require soaking or hand scouring. Normal Recommended for cleaning items with minimum energy con- Delay AutoAir™ Rinse Use this cycle if you need to pre-rinse dishes to truncated testing...
... wash cycle option Heavy Best for daily, regular or typical all (see note at bot- set in the prewash. Delay Note: The Energy Guide label was based on all available options and settings, except Auto Power Off - These dishes would normally require soaking or hand scouring. Normal Recommended for cleaning items with minimum energy con- Delay AutoAir™ Rinse Use this cycle if you need to pre-rinse dishes to truncated testing...
Use and Care Manual
Page 30
... recommended for cleaning items such as the underlying cycle by starting the heat period at the end of cloudy glasses. Selecting this function increases the hygiene status. Delicate This option's reduced time and temperature are met. Rinse aid is ideal for the high gloss drying function (even when using combination detergents). "Sanitized" will appear in the lower rack for an extra long time to remove food soils...
... recommended for cleaning items such as the underlying cycle by starting the heat period at the end of cloudy glasses. Selecting this function increases the hygiene status. Delicate This option's reduced time and temperature are met. Rinse aid is ideal for the high gloss drying function (even when using combination detergents). "Sanitized" will appear in the lower rack for an extra long time to remove food soils...

Use and Care Manual
Page 35
... water noises have cooled down the function key # and press the Start button P until the display 8 indicates š:‹x (x can be any number). 3. Open the door. 2. The wash cycle is heated, always leave the door ajar for more than 4 seconds after pressing the Start button, the operation will be paused. Press On/Off button (. 2. To avoid risk of injury, always use caution when opening the door during or following a wash cycle as hot water...
... water noises have cooled down the function key # and press the Start button P until the display 8 indicates š:‹x (x can be any number). 3. Open the door. 2. The wash cycle is heated, always leave the door ajar for more than 4 seconds after pressing the Start button, the operation will be paused. Press On/Off button (. 2. To avoid risk of injury, always use caution when opening the door during or following a wash cycle as hot water...

Use and Care Manual
Page 36
... floor under the appliance door. en-us Operating the Dishwasher Terminating the wash cycle (Reset) 1. This is by terminating the wash cycle (Reset). Press the On/Off button (. 3. Press and hold Start button P Terminatingthewashcycle for approximately 3 seconds until the display 8 indicates the factory set value š:‹‹. 6. Press function key # until the display 8 indicates š:x (x can be changed . Release both buttons. 5. Intensive drying The final rinse uses a higher temperature which may...
... floor under the appliance door. en-us Operating the Dishwasher Terminating the wash cycle (Reset) 1. This is by terminating the wash cycle (Reset). Press the On/Off button (. 3. Press and hold Start button P Terminatingthewashcycle for approximately 3 seconds until the display 8 indicates the factory set value š:‹‹. 6. Press function key # until the display 8 indicates š:x (x can be changed . Release both buttons. 5. Intensive drying The final rinse uses a higher temperature which may...

Use and Care Manual
Page 43
... installation checked. Error code ":ƒ... Cause Supply hose kinked. Action Install supply hose without involving a repair professional. Remove drain pump cover, clean around pump impeller and replace cover. Call customer service and mention the error code. 43 Unclog drain line. Drain pump cover was loose. A technical fault has probably occurred. After a short time restart the dishwasher. If the problem recurs, turn off . Error code ":ƒƒ is kinked, clogged or blocked. Water supply turned off the tap and pull out the power supply plug. Problem Error code...
... installation checked. Error code ":ƒ... Cause Supply hose kinked. Action Install supply hose without involving a repair professional. Remove drain pump cover, clean around pump impeller and replace cover. Call customer service and mention the error code. 43 Unclog drain line. Drain pump cover was loose. A technical fault has probably occurred. After a short time restart the dishwasher. If the problem recurs, turn off . Error code ":ƒƒ is kinked, clogged or blocked. Water supply turned off the tap and pull out the power supply plug. Problem Error code...

Use and Care Manual
Page 44
... display only illu- Clean door and door seal with controls on page 34 The door may have ing the START button for more Press Start button again and close the door. been reset. without selecting a wash cycle. Start button. lower the dishwasher if needed. (See instal- The unit is properly latched and com- Level the unit from right to left and front to the appropriate section in this manual). ~ "Delay Start" on pletely closed Select a wash cycle and close the dish- latched. Delay start . Reset Delay start or Child lock...
... display only illu- Clean door and door seal with controls on page 34 The door may have ing the START button for more Press Start button again and close the door. been reset. without selecting a wash cycle. Start button. lower the dishwasher if needed. (See instal- The unit is properly latched and com- Level the unit from right to left and front to the appropriate section in this manual). ~ "Delay Start" on pletely closed Select a wash cycle and close the dish- latched. Delay start . Reset Delay start or Child lock...

Use and Care Manual
Page 45
... cycle. Too much rinse aid causes streaks and too little rinse aid can rotate freely. Unload lower rack 1st, upper rack 2nd and top (3rd) rack last. 45 Troubleshooting en-us Dishwasher runs a long time. Make sure spray arms 1:, 1R can cause spots. Clean out spray arm nozzles and filters of dishes and use appropriate dishwasher detergents. ~ "Wash Cycle Information" on water hardness. Add rinse aid and check rinse aid setting (recommended setting 4-5). ~ "Rinse Aid" on glasses and silverware. Before starting a cycle, run hot water faucet at the sink closest to hot water supply...
... cycle. Too much rinse aid causes streaks and too little rinse aid can rotate freely. Unload lower rack 1st, upper rack 2nd and top (3rd) rack last. 45 Troubleshooting en-us Dishwasher runs a long time. Make sure spray arms 1:, 1R can cause spots. Clean out spray arm nozzles and filters of dishes and use appropriate dishwasher detergents. ~ "Wash Cycle Information" on water hardness. Add rinse aid and check rinse aid setting (recommended setting 4-5). ~ "Rinse Aid" on glasses and silverware. Before starting a cycle, run hot water faucet at the sink closest to hot water supply...

Use and Care Manual
Page 46
... "Check water supply" display occurs) Water supply hose is empty Add rinse aid or adjust setting - Plastics don't absorb heat like cut- Use rinse aid and the proper detergent. Install new supply hose (without kinks). cleaners/cleaning pads. water can drain. Odor Note: Water testing is set. Be sure drain hose is clogged. Note: If odor still persists, run the Normal/ Regular cycle until wash cycle ends before wash cycle was turned off. Water supply was completed. Use mild detergents with a high loop. Reset Delay start or Child lock may...
... "Check water supply" display occurs) Water supply hose is empty Add rinse aid or adjust setting - Plastics don't absorb heat like cut- Use rinse aid and the proper detergent. Install new supply hose (without kinks). cleaners/cleaning pads. water can drain. Odor Note: Water testing is set. Be sure drain hose is clogged. Note: If odor still persists, run the Normal/ Regular cycle until wash cycle ends before wash cycle was turned off. Water supply was completed. Use mild detergents with a high loop. Reset Delay start or Child lock may...

Use and Care Manual
Page 47
... clean any spilled rinse aid. Clean out vent and move or water evenly/securely in the dishwasher. White limes- White residue coats dishwasher cale on page 33 -------- 47 Remove detergent residue.~ "Detergent" on page 27 Previous cycle not finished. ~ "Operating the Dishwasher" on dishes, interior and racks wheels squeak tub, racks or from lime scale deposits in 1 detergent or Use separate dishwasher detergent, rinse Eco detergent from its track. spoon of detergent. Detergent dispenser cover will not shut...
... clean any spilled rinse aid. Clean out vent and move or water evenly/securely in the dishwasher. White limes- White residue coats dishwasher cale on page 33 -------- 47 Remove detergent residue.~ "Detergent" on page 27 Previous cycle not finished. ~ "Operating the Dishwasher" on dishes, interior and racks wheels squeak tub, racks or from lime scale deposits in 1 detergent or Use separate dishwasher detergent, rinse Eco detergent from its track. spoon of detergent. Detergent dispenser cover will not shut...
Product Spec Sheet
Page 1
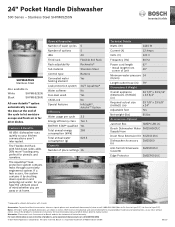
... PST). 24" Pocket Handle Dishwasher 500 Series - Warranties: Please see Use & Care manual or Bosch website for utensils and ramekins. Features & Benefits 44 dBA: dishwasher runs quietly so your kitchen conversations aren't interrupted. General Properties Number of wash cycles 5 Number of options 5 dBA 44 Third rack Flexible 3rd Rack Rack adjustability Rackmatic® Tub material Stainless Steel Control type Buttons Concealed water Yes heating element Leak protection system 24/7 AquaStop® Water softener No Five-level wash Yes ChildLock No Special...
... PST). 24" Pocket Handle Dishwasher 500 Series - Warranties: Please see Use & Care manual or Bosch website for utensils and ramekins. Features & Benefits 44 dBA: dishwasher runs quietly so your kitchen conversations aren't interrupted. General Properties Number of wash cycles 5 Number of options 5 dBA 44 Third rack Flexible 3rd Rack Rack adjustability Rackmatic® Tub material Stainless Steel Control type Buttons Concealed water Yes heating element Leak protection system 24/7 AquaStop® Water softener No Five-level wash Yes ChildLock No Special...


