Quick Start Guide
Page 5
... Maintenance 22 Replacing an Ink Tank 22 Keeping the Best Printing Results 30 When Printing Becomes Faint or Colors Are Incorrect 31 Printing the Nozzle Check Pattern 32 Examining the Nozzle Check Pattern ...........34 Print Head Cleaning 35 Print Head Deep Cleaning 38 Aligning the Print Head 40 Cleaning Your Printer 45 Troubleshooting 52 Cannot Install the Printer Driver 53 Cannot Connect to Computer Properly.........55 Print Results Not Satisfactory 56 Printer Does Not Start 59 Paper Does Not Feed...
... Maintenance 22 Replacing an Ink Tank 22 Keeping the Best Printing Results 30 When Printing Becomes Faint or Colors Are Incorrect 31 Printing the Nozzle Check Pattern 32 Examining the Nozzle Check Pattern ...........34 Print Head Cleaning 35 Print Head Deep Cleaning 38 Aligning the Print Head 40 Cleaning Your Printer 45 Troubleshooting 52 Cannot Install the Printer Driver 53 Cannot Connect to Computer Properly.........55 Print Results Not Satisfactory 56 Printer Does Not Start 59 Paper Does Not Feed...

Quick Start Guide
Page 6
... begins to the Printer Driver Guide on-screen manual. „ Turning on the Printer Before turning on the printer before printing. For setting details, refer to flash orange, see "ALARM Lamp Flashes Orange" on page 65. 2 Turn on and off the printer when no print data is installed. Note Auto Power On/Off Feature You can set into place. The POWER lamp flashes green, and changes to complete them. 1 Press the POWER button. z The printer is sent...
... begins to the Printer Driver Guide on-screen manual. „ Turning on the Printer Before turning on the printer before printing. For setting details, refer to flash orange, see "ALARM Lamp Flashes Orange" on page 65. 2 Turn on and off the printer when no print data is installed. Note Auto Power On/Off Feature You can set into place. The POWER lamp flashes green, and changes to complete them. 1 Press the POWER button. z The printer is sent...

Quick Start Guide
Page 14
... the printer, refer to 110 sheets of 5" x 7" paper. z We recommend using genuine Canon photo media when printing photographs. When printing on 5" x 7", 4" x 6", or 2.13" x 3.39" (Credit Card-sized) paper z Load paper only in the Front Feeder. z For detailed instructions on -screen manual. Standard sizes: A4, B5, A5 (Auto Sheet Feeder only), Letter, and Legal (Auto Sheet Feeder only) - When Printing on both sides, we recommend Canon's Super White Paper Double-Sided. Non-standard sizes for a trial print, it can load up to "Printing Media" in the Paper Output Tray.
... the printer, refer to 110 sheets of 5" x 7" paper. z We recommend using genuine Canon photo media when printing photographs. When printing on 5" x 7", 4" x 6", or 2.13" x 3.39" (Credit Card-sized) paper z Load paper only in the Front Feeder. z For detailed instructions on -screen manual. Standard sizes: A4, B5, A5 (Auto Sheet Feeder only), Letter, and Legal (Auto Sheet Feeder only) - When Printing on both sides, we recommend Canon's Super White Paper Double-Sided. Non-standard sizes for a trial print, it can load up to "Printing Media" in the Paper Output Tray.
Quick Start Guide
Page 20
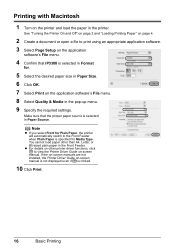
... Printer Driver Guide on the application software's File menu. 4 Confirm that the proper paper source is selected in the Front Feeder. Note z If you select Front for Media Type. Printing with Macintosh 1 Turn on -screen manual is not displayed even if is clicked. 10 Click Print. 16 Basic Printing See "Turning the Printer On and Off" on page 2 and "Loading Printing Paper" on page 4. 2 Create a document or open a file to print using an appropriate application software. 3 Select Page Setup on -screen manual...
... Printer Driver Guide on the application software's File menu. 4 Confirm that the proper paper source is selected in the Front Feeder. Note z If you select Front for Media Type. Printing with Macintosh 1 Turn on -screen manual is not displayed even if is clicked. 10 Click Print. 16 Basic Printing See "Turning the Printer On and Off" on page 2 and "Loading Printing Paper" on page 4. 2 Create a document or open a file to print using an appropriate application software. 3 Select Page Setup on -screen manual...

Quick Start Guide
Page 21
... to the Easy Setup Instructions to as the paper source. Do not load paper in the Front Feeder. 3 Connect the PictBridge compliant device to the Direct Print Port of the manufacturer or the model as long as a digital camera, camcorder, or mobile phone and print recorded images directly without the need to the printer, we recommend the use a USB cable recommended by the device's manufacturer. Printing Photographs Directly from a Compliant Device...
... to the Easy Setup Instructions to as the paper source. Do not load paper in the Front Feeder. 3 Connect the PictBridge compliant device to the Direct Print Port of the manufacturer or the model as long as a digital camera, camcorder, or mobile phone and print recorded images directly without the need to the printer, we recommend the use a USB cable recommended by the device's manufacturer. Printing Photographs Directly from a Compliant Device...

Quick Start Guide
Page 23
... files. * Exif2.21 compliant Printing Photographs Directly from a Compliant Device 19 „ Printing Photographs Directly from a PictBridge Compliant Device When operating the device, be set on the brand or model of your PictBridge compliant device. This section describes the page size, media type, layout, image optimization modes, and date printing mode that can be sure to select the PictBridge print setup mode and confirm or change the settings. z Confirming or Changing PictBridge Print Settings...
... files. * Exif2.21 compliant Printing Photographs Directly from a Compliant Device 19 „ Printing Photographs Directly from a PictBridge Compliant Device When operating the device, be set on the brand or model of your PictBridge compliant device. This section describes the page size, media type, layout, image optimization modes, and date printing mode that can be sure to select the PictBridge print setup mode and confirm or change the settings. z Confirming or Changing PictBridge Print Settings...

Quick Start Guide
Page 25
..., such as media type and size that of photos more vividly. If you select Date, File No., or Both, the date and/or file number will be available, depending on the model. * VIVID prints green and blue portions of the printer) on the Printer You can confirm and change the settings, you need to PictBridge printing. print is applied. If you are using a Canon-brand PictBridge compatible device, additional...
..., such as media type and size that of photos more vividly. If you select Date, File No., or Both, the date and/or file number will be available, depending on the model. * VIVID prints green and blue portions of the printer) on the Printer You can confirm and change the settings, you need to PictBridge printing. print is applied. If you are using a Canon-brand PictBridge compatible device, additional...

Quick Start Guide
Page 35
... maintenance z Open the Top Cover and make sure that ink tank, it is peeled off the ink tank. You can continue printing for the ink tanks are shifted after performing Print Head Cleaning twice After cleaning the Print Head, print and examine the nozzle check pattern. Press the mark on page 35. See "Prepare the replacement tank." Contact your Canon service representative. Print the nozzle check pattern to have a replacement ink tank available. - If lines...
... maintenance z Open the Top Cover and make sure that ink tank, it is peeled off the ink tank. You can continue printing for the ink tanks are shifted after performing Print Head Cleaning twice After cleaning the Print Head, print and examine the nozzle check pattern. Press the mark on page 35. See "Prepare the replacement tank." Contact your Canon service representative. Print the nozzle check pattern to have a replacement ink tank available. - If lines...
Quick Start Guide
Page 42
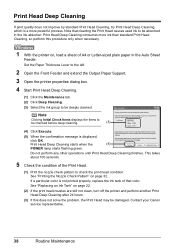
.... 2 Open the Front Feeder and extend the Output Paper Support. 3 Open the printer properties dialog box. 4 Start Print Head Deep Cleaning. (1) Click the Maintenance tab. (2) Click Deep Cleaning. (3) Select the ink group to be checked before deep cleaning. (3) (4) Click Execute. (5) When the confirmation message is displayed, click OK. If a particular color is not printed properly, replace the ink tank of A4 or Letter-sized plain paper in the ink absorber. Note that color. Contact your Canon service...
.... 2 Open the Front Feeder and extend the Output Paper Support. 3 Open the printer properties dialog box. 4 Start Print Head Deep Cleaning. (1) Click the Maintenance tab. (2) Click Deep Cleaning. (3) Select the ink group to be checked before deep cleaning. (3) (4) Click Execute. (5) When the confirmation message is displayed, click OK. If a particular color is not printed properly, replace the ink tank of A4 or Letter-sized plain paper in the ink absorber. Note that color. Contact your Canon service...

Quick Start Guide
Page 52
... when the POWER lamp flashes green five times. it feeds through the printer. Important When using Photo Paper Plus Double Sided PP-101D, be sure to the front. 5. Open the Front Feeder and extend the Output Paper Support. 3. Load this and only this part in the Auto Sheet Feeder with the Printer Driver (Bottom Plate Cleaning) Note z You cannot feed paper from the Front Feeder when performing Bottom Plate Cleaning. Hold down the RESUME/CANCEL button and release...
... when the POWER lamp flashes green five times. it feeds through the printer. Important When using Photo Paper Plus Double Sided PP-101D, be sure to the front. 5. Open the Front Feeder and extend the Output Paper Support. 3. Load this and only this part in the Auto Sheet Feeder with the Printer Driver (Bottom Plate Cleaning) Note z You cannot feed paper from the Front Feeder when performing Bottom Plate Cleaning. Hold down the RESUME/CANCEL button and release...
Quick Start Guide
Page 56
... Error/Output Error/Communication Error" on page 67 z "Error No.: 300 Is Displayed" on page 68 z "Error No.: 1700/1710 Is Displayed" on page 68 z "Error No.: 2001 Is Displayed" on page 69 z "Cannot Print Properly from a Digital Camera" on page 70 If an Error Occurs When the Printer Is Connected to the on the version of paper or paper is jammed, a troubleshooting message is out of your Windows operating system. 52 Troubleshooting The message may encounter when using...
... Error/Output Error/Communication Error" on page 67 z "Error No.: 300 Is Displayed" on page 68 z "Error No.: 1700/1710 Is Displayed" on page 68 z "Error No.: 2001 Is Displayed" on page 69 z "Cannot Print Properly from a Digital Camera" on page 70 If an Error Occurs When the Printer Is Connected to the on the version of paper or paper is jammed, a troubleshooting message is out of your Windows operating system. 52 Troubleshooting The message may encounter when using...

Quick Start Guide
Page 60
... printer driver, does not match the actual size of the printing paper, part of the page may reduce the print quality. „ Part of the Page Is Not Printed Cause Action Page Size/Paper Size setting in the printer driver does not match the actual size of the paper loaded in (A). Action Open the Top Cover and check the ink lamps. Check the page size setting in the displayed dialog. Then, select the Reduce spool data size check box in your application. Replace the ink...
... printer driver, does not match the actual size of the printing paper, part of the page may reduce the print quality. „ Part of the Page Is Not Printed Cause Action Page Size/Paper Size setting in the printer driver does not match the actual size of the paper loaded in (A). Action Open the Top Cover and check the ink lamps. Check the page size setting in the displayed dialog. Then, select the Reduce spool data size check box in your application. Replace the ink...

Quick Start Guide
Page 61
.... (1)Open the printer properties dialog box. (2)On the Main sheet, click High for uneven ink output. The media is not resolved after performing Print Head Deep Cleaning, turn off the printer and perform Print Head Deep Cleaning again after performing Print Head Deep Cleaning twice The Print Head may cause unclear prints or prints with high color saturation such as photographs or images in deep color, we recommend using Photo Paper Pro or other Canon specialty paper. Set the Print Quality setting...
.... (1)Open the printer properties dialog box. (2)On the Main sheet, click High for uneven ink output. The media is not resolved after performing Print Head Deep Cleaning, turn off the printer and perform Print Head Deep Cleaning again after performing Print Head Deep Cleaning twice The Print Head may cause unclear prints or prints with high color saturation such as photographs or images in deep color, we recommend using Photo Paper Pro or other Canon specialty paper. Set the Print Quality setting...

Quick Start Guide
Page 69
... a printer error occurs, the ALARM lamp flashes orange as follows: z Some ink tanks are installed in the Easy Setup Instructions to install the Print Head. Remove the jammed paper, reload paper properly in the Auto Sheet Feeder or Front Feeder and press the RESUME/CANCEL button. Replacing the ink tank is already installed, remove the Print Head once and then reinstall it. If the Print Head is recommended after the printing. Eight flashes indicates that you call for example. Troubleshooting...
... a printer error occurs, the ALARM lamp flashes orange as follows: z Some ink tanks are installed in the Easy Setup Instructions to install the Print Head. Remove the jammed paper, reload paper properly in the Auto Sheet Feeder or Front Feeder and press the RESUME/CANCEL button. Replacing the ink tank is already installed, remove the Print Head once and then reinstall it. If the Print Head is recommended after the printing. Eight flashes indicates that you call for example. Troubleshooting...

Quick Start Guide
Page 71
... connecting the printer. Printer driver is initializing. While the POWER lamp is flashing green, the printer is not installed properly. An out of paper error may not be a problem with the relay device. Make sure that a port named USBnnn (Canon iP3300) (where n is a number) is off, turn the printer on page 65. z There could also be installed properly. The printer driver may have occurred in the printer. Load paper and press the RESUME/CANCEL button. If printing...
... connecting the printer. Printer driver is initializing. While the POWER lamp is flashing green, the printer is not installed properly. An out of paper error may not be a problem with the relay device. Make sure that a port named USBnnn (Canon iP3300) (where n is a number) is off, turn the printer on page 65. z There could also be installed properly. The printer driver may have occurred in the printer. Load paper and press the RESUME/CANCEL button. If printing...

Quick Start Guide
Page 72
... the driver for details. This error message indicates that iP3300 is displayed in the Printer List. (3)If iP3300 is off, turn the printer on the Print dialog box. Consult the reseller of the printer.) Important Canon recommends that the USB cable is flashing orange, an error may have occurred on page 65. In Mac OS X v.10.2.8, check that the ink absorber is connected securely to add the printer. If the POWER lamp is not displayed, click Add...
... the driver for details. This error message indicates that iP3300 is displayed in the Printer List. (3)If iP3300 is off, turn the printer on the Print dialog box. Consult the reseller of the printer.) Important Canon recommends that the USB cable is flashing orange, an error may have occurred on page 65. In Mac OS X v.10.2.8, check that the ink absorber is connected securely to add the printer. If the POWER lamp is not displayed, click Add...

Quick Start Guide
Page 74
... switched to playback mode after connected to the printer. Error Message On Camera Action "Printer in the display on the printer, and reprint. Load paper in the Auto Sheet Feeder, and select Continue*1 in use" "No paper" The printer is nearly full. Remove the jammed paper, load new paper, press the RESUME/CANCEL button on your camera's instruction manual. If you are using . For details on the printer flashes five times.) Follow the directions described in ink absorber to hold the ink used during printing, make...
... switched to playback mode after connected to the printer. Error Message On Camera Action "Printer in the display on the printer, and reprint. Load paper in the Auto Sheet Feeder, and select Continue*1 in use" "No paper" The printer is nearly full. Remove the jammed paper, load new paper, press the RESUME/CANCEL button on your camera's instruction manual. If you are using . For details on the printer flashes five times.) Follow the directions described in ink absorber to hold the ink used during printing, make...

Quick Start Guide
Page 86
... YOUR PRINTHEAD, INK CARTRIDGE(S) AND TANK(S). The name and telephone number of the ASF(s) near you elect the InstantExchange option, a reference number will be asked questions (www.canontechsupport.com) z Toll-free live technical support Monday-Saturday (excluding holidays) at 1-800828-4040, or any time while speaking to the availability of customer technical support* options: z Interactive troubleshooting, e-mail technical support, the latest driver downloads...
... YOUR PRINTHEAD, INK CARTRIDGE(S) AND TANK(S). The name and telephone number of the ASF(s) near you elect the InstantExchange option, a reference number will be asked questions (www.canontechsupport.com) z Toll-free live technical support Monday-Saturday (excluding holidays) at 1-800828-4040, or any time while speaking to the availability of customer technical support* options: z Interactive troubleshooting, e-mail technical support, the latest driver downloads...

Easy Setup Instructions
Page 1
... left side of the paper stack. e Close the Top Cover. e Write down the serial number located inside of the protective cap - Open the Sheet Feeder Cover and pull out the Paper Support. Electrical Contacts b Plug the power cord in , or the inside the printer. Hardware setup is set to "Basic Printing" of the Quick Start Guide. • You can load A4, Letter, or B5-sized plain paper in "Troubleshooting" of the Quick Start Guide. Do...
... left side of the paper stack. e Close the Top Cover. e Write down the serial number located inside of the protective cap - Open the Sheet Feeder Cover and pull out the Paper Support. Electrical Contacts b Plug the power cord in , or the inside the printer. Hardware setup is set to "Basic Printing" of the Quick Start Guide. • You can load A4, Letter, or B5-sized plain paper in "Troubleshooting" of the Quick Start Guide. Do...
Easy Setup Instructions
Page 2
... "Troubleshooting" instructions in Printer List. h When the Print Head Alignment Recommended screen appears, click Next. Note When the User Registration screen appears, follow the on-screen instructions. If Restart is shown in the User's Guide on to Windows as an Administrator before continuing. • Before installing the driver, disable all anti-virus programs and automatically loading programs. a Connect one end of the software. QT5-0406-V01 © 2007 Canon Inc. b Turn...
... "Troubleshooting" instructions in Printer List. h When the Print Head Alignment Recommended screen appears, click Next. Note When the User Registration screen appears, follow the on-screen instructions. If Restart is shown in the User's Guide on to Windows as an Administrator before continuing. • Before installing the driver, disable all anti-virus programs and automatically loading programs. a Connect one end of the software. QT5-0406-V01 © 2007 Canon Inc. b Turn...


