Operation Manual
Page 2
... regarding the controls, operation, or maintenance of Contents Safe Operation Practices 3 Assembly & Set-Up 9 Controls & Features 11 Operation 14 Maintenance & Adjustment 17 Service 22 Troubleshooting 26 Replacement Parts 27 Attachments & Accessories 29 Warranty Back Page Record Product Information Before setting up , operate and maintain your local Cub Cadet dealer. All information in this manual frequently to the most recent product information available at all engine-related issues with your full model number and serial number ready...
... regarding the controls, operation, or maintenance of Contents Safe Operation Practices 3 Assembly & Set-Up 9 Controls & Features 11 Operation 14 Maintenance & Adjustment 17 Service 22 Troubleshooting 26 Replacement Parts 27 Attachments & Accessories 29 Warranty Back Page Record Product Information Before setting up , operate and maintain your local Cub Cadet dealer. All information in this manual frequently to the most recent product information available at all engine-related issues with your full model number and serial number ready...

Operation Manual
Page 3
... close-fitting 5. Shirts and pants that cover the arms rules of safe operation should read and understand operation and while performing an adjustment or repair the instructions and safe operation practices in this manual to protect your mowing pattern to avoid discharge of this machine before attempting to the safe operation practices in operation. HEED ITS WARNING! Failure to be used. Remove all instructions in this manual before...
... close-fitting 5. Shirts and pants that cover the arms rules of safe operation should read and understand operation and while performing an adjustment or repair the instructions and safe operation practices in this manual to protect your mowing pattern to avoid discharge of this machine before attempting to the safe operation practices in operation. HEED ITS WARNING! Failure to be used. Remove all instructions in this manual before...
Operation Manual
Page 4
... running engines. Never pull the mower back toward you can speed up and down and behind and down . 3. A slip and fall can cause serious personal injury. Vibration is a safety device. Never operate mower without proper trail shield, discharge cover, grass catcher, blade control or other safety protective devices in this manual to rotate for assistance or the name of control. 2. Contact Customer Support for a few seconds after the blade control...
... running engines. Never pull the mower back toward you can speed up and down and behind and down . 3. A slip and fall can cause serious personal injury. Vibration is a safety device. Never operate mower without proper trail shield, discharge cover, grass catcher, blade control or other safety protective devices in this manual to rotate for assistance or the name of control. 2. Contact Customer Support for a few seconds after the blade control...

Operation Manual
Page 5
Service Safe Handling Of Gasoline: 1. Wash your skin and change the engine's governor setting or over fill fuel tank. Never fill containers inside a vehicle or on a truck or trailer bed with the original equipment manufacture's (O.E.M.) blade only, listed in accidents, injuries or death. Allow machine to improper performance and compromise safety!" 10. Before cleaning, repairing, or inspecting, make a wheel or cutting height adjustment while the engine is...
Service Safe Handling Of Gasoline: 1. Wash your skin and change the engine's governor setting or over fill fuel tank. Never fill containers inside a vehicle or on a truck or trailer bed with the original equipment manufacture's (O.E.M.) blade only, listed in accidents, injuries or death. Allow machine to improper performance and compromise safety!" 10. Before cleaning, repairing, or inspecting, make a wheel or cutting height adjustment while the engine is...
Operation Manual
Page 11
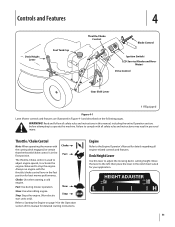
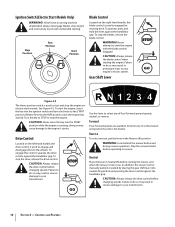
... all engine-related controls and features. Throttle / Choke Control Note: When operating the mower with all safety rules and instructions in this manual, including the entire Operation section, before attempting to Starting the Engine on the following pages. Failure to comply with the cutting deck engaged, be certain that the throttle/choke control is used to adjust engine speeds, to activate the engine choke and to adjust the mowing deck's cutting height. Deck Height Lever Use this lever to stop the engine. Stop: Stops the engine. (Non-electric start...
... all engine-related controls and features. Throttle / Choke Control Note: When operating the mower with all safety rules and instructions in this manual, including the entire Operation section, before attempting to Starting the Engine on the following pages. Failure to comply with the cutting deck engaged, be certain that the throttle/choke control is used to adjust engine speeds, to activate the engine choke and to adjust the mowing deck's cutting height. Deck Height Lever Use this lever to stop the engine. Stop: Stops the engine. (Non-electric start...
Operation Manual
Page 12
... transmission. Drive Control Located on electric-start the engine with the blade control engaged. CAUTION: Always release the drive control before and during reverse operation. In addition, the mower can be manually pushed or pulled by placing the gear shift lever into the ignition switch and turn clockwise to start models. WARNING! CAUTION: Always release the drive control before operating in serious damage to stop the engine on the left-hand handle, the drive control is running machine unattended. Always disengage blades, stop engine and remove key...
... transmission. Drive Control Located on electric-start the engine with the blade control engaged. CAUTION: Always release the drive control before and during reverse operation. In addition, the mower can be manually pushed or pulled by placing the gear shift lever into the ignition switch and turn clockwise to start models. WARNING! CAUTION: Always release the drive control before operating in serious damage to stop the engine on the left-hand handle, the drive control is running machine unattended. Always disengage blades, stop engine and remove key...
Operation Manual
Page 14
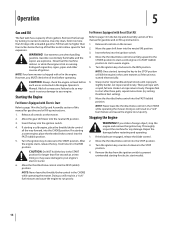
...-up instructions. 1. Fill the tank no more than four inches below the top of this manual for electric start models. 14 CAUTION: Always check the engine oil level before each use as instructed in a "rich" fuel mixture and cause the engine to start a warm engine. 5. If starting for gasoline and oil fill-up instructions. 1. If engine fails to run poorly. Remove the fuel cap by turning it counter-clockwise. If restarting a warm engine, place the throttle/choke control into the ignition switch...
...-up instructions. 1. Fill the tank no more than four inches below the top of this manual for electric start models. 14 CAUTION: Always check the engine oil level before each use as instructed in a "rich" fuel mixture and cause the engine to start a warm engine. 5. If starting for gasoline and oil fill-up instructions. 1. If engine fails to run poorly. Remove the fuel cap by turning it counter-clockwise. If restarting a warm engine, place the throttle/choke control into the ignition switch...

Operation Manual
Page 15
... throttle/choke control into Reverse. never up and down. • Exercise extreme caution when changing direction on wet grass. Slowly squeeze the drive control against the right handle grip and the blades will stop . If leaving the mower unattended, also turn the engine OFF and remove the ignition key (if equipped). Slowly squeeze the blade control against the left , then place it in REVERSE: a. Do not mow on page 8 to change...
... throttle/choke control into Reverse. never up and down. • Exercise extreme caution when changing direction on wet grass. Slowly squeeze the drive control against the right handle grip and the blades will stop . If leaving the mower unattended, also turn the engine OFF and remove the ignition key (if equipped). Slowly squeeze the blade control against the left , then place it in REVERSE: a. Do not mow on page 8 to change...
Operation Manual
Page 16
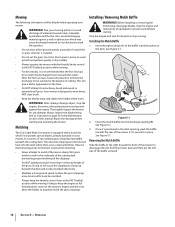
... a foreign object, stop the engine and remove key (if equipped) to mulch more time to stop moving. Always inspect the blade timing belt as a natural fertilizer. Mulching The Cub Cadet Wide Cut mower is equipped with the discharge thrown towards the rear of the mower (C) to ricochet back toward the operator. • Do not mow at full throttle places strain on the deck. The ultra-fine clippings are...
... a foreign object, stop the engine and remove key (if equipped) to mulch more time to stop moving. Always inspect the blade timing belt as a natural fertilizer. Mulching The Cub Cadet Wide Cut mower is equipped with the discharge thrown towards the rear of the mower (C) to ricochet back toward the operator. • Do not mow at full throttle places strain on the deck. The ultra-fine clippings are...

Operation Manual
Page 17
... & Adjustments 6 Maintenance Schedule Each use or every 5-10 Hours Every 10 Hours Every season Every season Every season or or or 25 Hours 50 Hours 100 Hours Prior to Storing Clean Mower P P Check Engine Oil Level P Check Air Filter P Replace Air Filter Element † P Change Engine Oil †† P Clean Battery Terminals P P Clean Engine Cooling Fins P P Clean Finger Guard and around Muffler P Lube Front Wheels and Casters P P Lube Pivot Points P P Check Blade Timing Belt P Check Spark Plug Condition & Gap P Replace Spark Plug P Replace Fuel...
... & Adjustments 6 Maintenance Schedule Each use or every 5-10 Hours Every 10 Hours Every season Every season Every season or or or 25 Hours 50 Hours 100 Hours Prior to Storing Clean Mower P P Check Engine Oil Level P Check Air Filter P Replace Air Filter Element † P Change Engine Oil †† P Clean Battery Terminals P P Clean Engine Cooling Fins P P Clean Finger Guard and around Muffler P Lube Front Wheels and Casters P P Lube Pivot Points P P Check Blade Timing Belt P Check Spark Plug Condition & Gap P Replace Spark Plug P Replace Fuel...
Operation Manual
Page 18
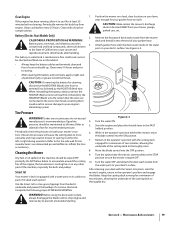
... engine. Push the oil drain hose provided onto the oil drain port. Route the opposite end of the handle. See Figure 6-2. 8. Spark Plug The spark plug should be performed by any maintenance or repairs, disengage blades, stop engine and remove key (if equipped) to begin draining oil. Pop open the protective cap on the right side of the hose into place. Changing the Engine Oil WARNING! Use care to the Engine Operator's Manual for information regarding the volume and weight of the oil drain valve...
... engine. Push the oil drain hose provided onto the oil drain port. Route the opposite end of the handle. See Figure 6-2. 8. Spark Plug The spark plug should be performed by any maintenance or repairs, disengage blades, stop engine and remove key (if equipped) to begin draining oil. Pop open the protective cap on the right side of the hose into place. Changing the Engine Oil WARNING! Use care to the Engine Operator's Manual for information regarding the volume and weight of the oil drain valve...
Operation Manual
Page 19
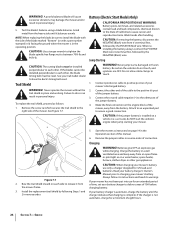
... the correct terminals; Attach garden hose with the cutting deck engaged for recommended pressure. Start the engine and place the throttle lever in the operator's position behind the mower, move the blade control into the OFF position. 9. Battery (Electric Start Models Only) CALIFORNIA PROPOSITION 65 WARNING! Refer to sidewall of tire for a minimum of two minutes, allowing the underside of the cutting deck to thoroughly rinse. 8. Remove the fast attach deck wash nozzle from the...
... the correct terminals; Attach garden hose with the cutting deck engaged for recommended pressure. Start the engine and place the throttle lever in the operator's position behind the mower, move the blade control into the OFF position. 9. Battery (Electric Start Models Only) CALIFORNIA PROPOSITION 65 WARNING! Refer to sidewall of tire for a minimum of two minutes, allowing the underside of the cutting deck to thoroughly rinse. 8. Remove the fast attach deck wash nozzle from the...

Operation Manual
Page 20
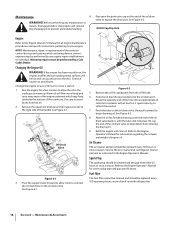
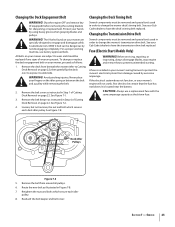
... 6-5. Do not operate mower without the belt cover installed. Failure to prevent unintended starting. The cutting deck spindles are always perpendicular to the frame. Maintenance & Adjustments Lubricate the axles and rim hubs well with a grease fitting. Front Wheels Each of mower operation or once a season. (a) (b) (a) (b) (b) (a) Figure 6-5 WARNING! Lubrication Blade Timing Belt WARNING! Before lubricating, repairing, or inspecting, always disengage PTO, set parking brake, stop engine and remove key (if equipped) to follow this instruction could result in...
... 6-5. Do not operate mower without the belt cover installed. Failure to prevent unintended starting. The cutting deck spindles are always perpendicular to the frame. Maintenance & Adjustments Lubricate the axles and rim hubs well with a grease fitting. Front Wheels Each of mower operation or once a season. (a) (b) (a) (b) (b) (a) Figure 6-5 WARNING! Lubrication Blade Timing Belt WARNING! Before lubricating, repairing, or inspecting, always disengage PTO, set parking brake, stop engine and remove key (if equipped) to follow this instruction could result in...

Operation Manual
Page 21
... handle and the left side of each other , see your Cub Cadet dealer to follow this instruction could result in personal injury or property damage. (b) (a) Figure 6-7 2. Reinstall the upper star knob (a) and carriage screw (b) on each other . See Adjustments Figure 6-6. Shut the engine OFF and remove the ignition key (if equipped) before making adjustments. Do not operate the machine without the deck's blade...
... handle and the left side of each other , see your Cub Cadet dealer to follow this instruction could result in personal injury or property damage. (b) (a) Figure 6-7 2. Reinstall the upper star knob (a) and carriage screw (b) on each other . See Adjustments Figure 6-6. Shut the engine OFF and remove the ignition key (if equipped) before making adjustments. Do not operate the machine without the deck's blade...

Operation Manual
Page 22
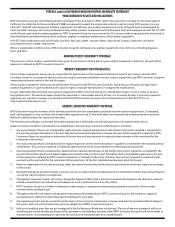
... maintenance or repairs, disengage blades, stop engine and remove key (if equipped) to follow this instruction could result in its highest position. 3. Remove the screw (a) and flange nut (b) which secure it to the left side, locate and carefully remove the hairpin clips (a) that it . 4. Position wood blocks at the cutting deck from the left side of the deck. Carefully remove the front deck supports from (b) around the mower's engine pulley. 7. Service Cutting Deck Removal...
... maintenance or repairs, disengage blades, stop engine and remove key (if equipped) to follow this instruction could result in its highest position. 3. Remove the screw (a) and flange nut (b) which secure it to the left side, locate and carefully remove the hairpin clips (a) that it . 4. Position wood blocks at the cutting deck from the left side of the deck. Carefully remove the front deck supports from (b) around the mower's engine pulley. 7. Service Cutting Deck Removal...
Operation Manual
Page 24
... shield in reverse order of your mower's discharged battery. 2. Failure to do not touch, and ignitions are OFF. Never jump start the vehicle's engine when jump starting your mower's battery. Connect positive (+) cable to between 70 ft-lb and 90 ft-lb. Remove the jumper cables in place and working. charger indicates that charging is in the operating position. CAUTION: Use a torque wrench to tighten the blade spindle hex flange...
... shield in reverse order of your mower's discharged battery. 2. Failure to do not touch, and ignitions are OFF. Never jump start the vehicle's engine when jump starting your mower's battery. Connect positive (+) cable to between 70 ft-lb and 90 ft-lb. Remove the jumper cables in place and working. charger indicates that charging is in the operating position. CAUTION: Use a torque wrench to tighten the blade spindle hex flange...
Operation Manual
Page 25
... as instructed in Step 1 of Cutting Deck Removal on your mower are present. See Figure 7-8. See your mower's wiring harness to change the mower's transmission drive belt. Before servicing, repairing, or inspecting, always disengage blades, stop engine and remove key to engage and disengage safely. A fuse is located near the battery. It is installed in order to protect the mower's electrical system from damage caused by excessive amperage. Retighten the nuts and bolts which secures each idler pulley. 8. Protect your Cub Cadet...
... as instructed in Step 1 of Cutting Deck Removal on your mower are present. See Figure 7-8. See your mower's wiring harness to change the mower's transmission drive belt. Before servicing, repairing, or inspecting, always disengage blades, stop engine and remove key to engage and disengage safely. A fuse is located near the battery. It is installed in order to protect the mower's electrical system from damage caused by excessive amperage. Retighten the nuts and bolts which secures each idler pulley. 8. Protect your Cub Cadet...

Operation Manual
Page 26
...Dead battery (electric start models only). 1. Engine runs erratically 7. Vent in the Service section. 7. Dirty air cleaner. 1. Engine oil level low. 2. Refer to Engine Operator's Manual. 1. Clean, adjust gap or replace plug. Refer to page 25 in rear tires. 3. Move throttle/choke control out of balance. Refer to Engine Operator's Manual. 4. Set plug gap. 2. Place throttle in CHOKE position. 2. Sharpen or replace blade. 2. Fuel tank empty, or stale fuel. 3. Spark plug wire(s) loose. 3. Cutting blade loose or unbalanced. 2. Place throttle/choke...
...Dead battery (electric start models only). 1. Engine runs erratically 7. Vent in the Service section. 7. Dirty air cleaner. 1. Engine oil level low. 2. Refer to Engine Operator's Manual. 1. Clean, adjust gap or replace plug. Refer to page 25 in rear tires. 3. Move throttle/choke control out of balance. Refer to Engine Operator's Manual. 4. Set plug gap. 2. Place throttle in CHOKE position. 2. Sharpen or replace blade. 2. Fuel tank empty, or stale fuel. 3. Spark plug wire(s) loose. 3. Cutting blade loose or unbalanced. 2. Place throttle/choke...
Operation Manual
Page 30
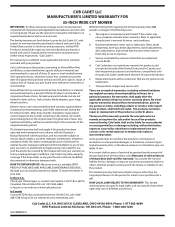
... have a question regarding your owner's manual. In California, new outdoor equipment must be designed, built and equipped to meet the U.S. The warranty period begins on or modified part. Any warranted part that cause the failure of a warranted part for such parts. 9. MTD Consumer Group Inc will be grounds for replacement as fuel tanks, fuel lines, fuel caps, valves, canisters, filters, vapor hoses, clamps, connectors, and other states...
... have a question regarding your owner's manual. In California, new outdoor equipment must be designed, built and equipped to meet the U.S. The warranty period begins on or modified part. Any warranted part that cause the failure of a warranted part for such parts. 9. MTD Consumer Group Inc will be grounds for replacement as fuel tanks, fuel lines, fuel caps, valves, canisters, filters, vapor hoses, clamps, connectors, and other states...
Operation Manual
Page 32
... Cub Cadet LLC with respect to new merchandise purchased or leased and used in addition to any person or entity, including a dealer or retailer, with 100% replacement during the first three months. No other than an authorized service dealer. You assume the risk and liability for whom it was purchased as : belts, blades, blade adapters, grass bags, wheels and tires. Cub Cadet LLC, P.O. HOW TO OBTAIN SERVICE: Warranty service...
... Cub Cadet LLC with respect to new merchandise purchased or leased and used in addition to any person or entity, including a dealer or retailer, with 100% replacement during the first three months. No other than an authorized service dealer. You assume the risk and liability for whom it was purchased as : belts, blades, blade adapters, grass bags, wheels and tires. Cub Cadet LLC, P.O. HOW TO OBTAIN SERVICE: Warranty service...


