Installation Instructions
Page 1
...2-4 Operating Instructions Controls 4-8 Quick Start Guide 5 Using the Dryer 9 Features 10 Care and Cleaning 11 Installation Instructions Before You Begin 12- 14 Connecting the Inlet Hoses 15 Connecting a Gas Dryer 16-19 Connecting an Electric Dryer 20-22 Exhausting the Dryer 23-29 Final Setup 30 Reversing the Door Swing 31-34 Stacking the Washer and Dryer 36-38 Owner's Manual & Installation Instructions GFDR485 GFDR480 GFDS375 GFDS370 GHDS365 GHDS360 GFDS265 GFDS260 GFDS255 GFDS250 Sécheuses Troubleshooting Tips 39-42 Consumer Support Consumer Support Back Cover Warranty...
...2-4 Operating Instructions Controls 4-8 Quick Start Guide 5 Using the Dryer 9 Features 10 Care and Cleaning 11 Installation Instructions Before You Begin 12- 14 Connecting the Inlet Hoses 15 Connecting a Gas Dryer 16-19 Connecting an Electric Dryer 20-22 Exhausting the Dryer 23-29 Final Setup 30 Reversing the Door Swing 31-34 Stacking the Washer and Dryer 36-38 Owner's Manual & Installation Instructions GFDR485 GFDR480 GFDS375 GFDS370 GHDS365 GHDS360 GFDS265 GFDS260 GFDS255 GFDS250 Sécheuses Troubleshooting Tips 39-42 Consumer Support Consumer Support Back Cover Warranty...
Installation Instructions
Page 2
... aerosol into the appliance if the drum is used near dryer at any type of spray cleaner when cleaning dryer interior. IMPORTANT SAFETY INFORMATION. DO NOT operate the dryer without the lint filter in published user repair instructions that could occur. „ See "Electrical Connection" located in death or serious injury. Do not use heat to reduce the possibility of the appliance and exhaust duct should be exposed to the...
... aerosol into the appliance if the drum is used near dryer at any type of spray cleaner when cleaning dryer interior. IMPORTANT SAFETY INFORMATION. DO NOT operate the dryer without the lint filter in published user repair instructions that could occur. „ See "Electrical Connection" located in death or serious injury. Do not use heat to reduce the possibility of the appliance and exhaust duct should be exposed to the...

Installation Instructions
Page 7
... of no-heat tumbling after clothes are "0:00". Wear, Delicates, Speed Dry, Bulky, Towels-Sheets, NOTE: Cycle times will be a slight pause and sound change when e-Dry is selected. 13 Delay Dry Use to a damp level. NOTE: If the door is opened , the dryer will beep and display optimum results. GEAppliances.com 8 Steam Refresh Cycle For slightly wrinkled dry garments. After the to have dried to delay the start the...
... of no-heat tumbling after clothes are "0:00". Wear, Delicates, Speed Dry, Bulky, Towels-Sheets, NOTE: Cycle times will be a slight pause and sound change when e-Dry is selected. 13 Delay Dry Use to a damp level. NOTE: If the door is opened , the dryer will beep and display optimum results. GEAppliances.com 8 Steam Refresh Cycle For slightly wrinkled dry garments. After the to have dried to delay the start the...

Installation Instructions
Page 11
... dryer door is open. Remove the bulb and replace with a mild, nonabrasive cleaner suitable for service. A partially clogged exhaust can lengthen the drying time. Make sure that the inside the duct or hood. Damage to make the dryer drum provides the highest reliability available in a GE dryer. Pull out the lint filter. If the dryer drum should be washed and dried normally. Before replacing the light bulb, be cleaned once a year by removing the fuse or switching...
... dryer door is open. Remove the bulb and replace with a mild, nonabrasive cleaner suitable for service. A partially clogged exhaust can lengthen the drying time. Make sure that the inside the duct or hood. Damage to make the dryer drum provides the highest reliability available in a GE dryer. Pull out the lint filter. If the dryer drum should be washed and dried normally. Before replacing the light bulb, be cleaned once a year by removing the fuse or switching...
Installation Instructions
Page 12
... foil-type) duct is removed from service or discarded, remove the dryer door. • Service information and the wiring diagram are located in the control console. • Do not allow children on or in death or serious injury. This symbol alerts you to the outdoors. • Before the old dryer is installed, it could be exposed to these instructions and local codes. • DO NOT install a clothes dryer with...
... foil-type) duct is removed from service or discarded, remove the dryer door. • Service information and the wiring diagram are located in the control console. • Do not allow children on or in death or serious injury. This symbol alerts you to the outdoors. • Before the old dryer is installed, it could be exposed to these instructions and local codes. • DO NOT install a clothes dryer with...

Installation Instructions
Page 13
... them away from the dryer legs. GE strongly recommends the use of hose failures and water damage. Part Number WE25M53 OR WE1M847 WE1M848 PM14X10056 WX14X10007 Accessory Complete Kit (hoses, Y-adapter washers) (included) Long Hose and Short Hose Dryer door opening vent brush (not included) LintEater™ Dryer rotary tube brush (not included) POWER CORDS: GE strongly recommends the use of factory specified parts. Installation Instructions UNPACKING YOUR DRYER Tilt the dryer sideways and remove the foam shipping pads...
... them away from the dryer legs. GE strongly recommends the use of hose failures and water damage. Part Number WE25M53 OR WE1M847 WE1M848 PM14X10056 WX14X10007 Accessory Complete Kit (hoses, Y-adapter washers) (included) Long Hose and Short Hose Dryer door opening vent brush (not included) LintEater™ Dryer rotary tube brush (not included) POWER CORDS: GE strongly recommends the use of factory specified parts. Installation Instructions UNPACKING YOUR DRYER Tilt the dryer sideways and remove the foam shipping pads...

Installation Instructions
Page 14
... from the gas supply piping during pressure testing at pressures greater than ½ psi (3.5 kPa). • A 1/8 inch NPT minimum plugged tapping, accessible for installation and service. • Closet ventilation openings required: 2 louvers each 60 square inches (387 square cm), located 3 inches (7.6 cm) from top and bottom of the gas supply connection to any other duct, vent or chimney. • Do not use sheet metal screws...
... from the gas supply piping during pressure testing at pressures greater than ½ psi (3.5 kPa). • A 1/8 inch NPT minimum plugged tapping, accessible for installation and service. • Closet ventilation openings required: 2 louvers each 60 square inches (387 square cm), located 3 inches (7.6 cm) from top and bottom of the gas supply connection to any other duct, vent or chimney. • Do not use sheet metal screws...

Installation Instructions
Page 15
... hoses to make that connection at the top of your washer's water inlet. Tighten by hand until firmly seated. Installation Instructions CONNECTING INLET HOSES CONNECTING INLET HOSES To produce steam, the dryer must also connect to the cold water, a "Y" connector is already in place remove it before installing the filter screen. Since the washer must connect to the cold water supply. never use old hoses. 1. Turn the cold water faucet off. Remove the washer inlet hose from the washer fill valve connector...
... hoses to make that connection at the top of your washer's water inlet. Tighten by hand until firmly seated. Installation Instructions CONNECTING INLET HOSES CONNECTING INLET HOSES To produce steam, the dryer must also connect to the cold water, a "Y" connector is already in place remove it before installing the filter screen. Since the washer must connect to the cold water supply. never use old hoses. 1. Turn the cold water faucet off. Remove the washer inlet hose from the washer fill valve connector...

Installation Instructions
Page 20
...., UL-listed flexible metal duct (if needed) ˆ Dryer power cord kit (not provided with dryer) UL rated 120/240V, 30A with 3 or 4 prongs. NEVER LEAVE THE ACCESS COVER OFF THE TERMINAL BLOCK. ˆFlat-blade crewdriver ˆLevel MATERIALS YOU WILL NEED ˆ 4" dia. Installation Instructions CONNECTING AN ELECTRIC DRYER (skip for gas dryers) TOOLS YOU WILL NEED ˆSlip-joint pliers ˆPhillips screwdriver Before making the electrical connection, turn off the circuit breaker(s) or remove the dryer's circuit fuse...
...., UL-listed flexible metal duct (if needed) ˆ Dryer power cord kit (not provided with dryer) UL rated 120/240V, 30A with 3 or 4 prongs. NEVER LEAVE THE ACCESS COVER OFF THE TERMINAL BLOCK. ˆFlat-blade crewdriver ˆLevel MATERIALS YOU WILL NEED ˆ 4" dia. Installation Instructions CONNECTING AN ELECTRIC DRYER (skip for gas dryers) TOOLS YOU WILL NEED ˆSlip-joint pliers ˆPhillips screwdriver Before making the electrical connection, turn off the circuit breaker(s) or remove the dryer's circuit fuse...

Installation Instructions
Page 23
... and cleaned at turns and joints. INSULATION • Ductwork that extend into a chimney, kitchen exhaust, gas vent, wall, ceiling, attic, crawl space, or concealed space of the roof. These fasteners can result in or over the exhaust duct. Use only 4" rigid metal or UL-listed dryer transition duct to connect the dryer to reduce condensation and lint buildup. TOOLS AND MATERIALS YOU WILL NEED TO INSTALL EXHAUST DUCT...
... and cleaned at turns and joints. INSULATION • Ductwork that extend into a chimney, kitchen exhaust, gas vent, wall, ceiling, attic, crawl space, or concealed space of the roof. These fasteners can result in or over the exhaust duct. Use only 4" rigid metal or UL-listed dryer transition duct to connect the dryer to reduce condensation and lint buildup. TOOLS AND MATERIALS YOU WILL NEED TO INSTALL EXHAUST DUCT...

Installation Instructions
Page 26
...-line installation, connect the dryer exhaust to the wall, using duct tape. Slide the end of the exhaust duct on the back of the dryer and secure with UL-listed duct. • Remove any lint from the wall exhaust opening. RECOMMENDED CONFIGURATION TO MINIMIZE EXHAUST BLOCKAGE Using duct elbows will permit direct access for easier exhaust connection. Wall Side Dryer Side 26 This will prevent duct kinking and collapsing. Wall Internal Duct Opening Check that you install your dryer before installing...
...-line installation, connect the dryer exhaust to the wall, using duct tape. Slide the end of the exhaust duct on the back of the dryer and secure with UL-listed duct. • Remove any lint from the wall exhaust opening. RECOMMENDED CONFIGURATION TO MINIMIZE EXHAUST BLOCKAGE Using duct elbows will permit direct access for easier exhaust connection. Wall Side Dryer Side 26 This will prevent duct kinking and collapsing. Wall Internal Duct Opening Check that you install your dryer before installing...

Installation Instructions
Page 28
.... Installation Instructions EXHAUSTING THE DRYER (cont.) SIDE VENTING (cont.) ADDING ELBOW AND DUCT FOR EXHAUST TO LEFT OR RIGHT SIDE OF CABINET (cont.) • Apply duct tape as shown and keep portion A. 28 Pull the duct out of cabinet for Gas and Electric models. NEVER LEAVE THE BACK OPENING WITHOUT THE PLATE. (Kit WE1M454.) BOTTOM VENTING: Dryer Exhaust to complete the exhaust system. Use 4" rigid metal ducting only inside the dryer exhaust duct and...
.... Installation Instructions EXHAUSTING THE DRYER (cont.) SIDE VENTING (cont.) ADDING ELBOW AND DUCT FOR EXHAUST TO LEFT OR RIGHT SIDE OF CABINET (cont.) • Apply duct tape as shown and keep portion A. 28 Pull the duct out of cabinet for Gas and Electric models. NEVER LEAVE THE BACK OPENING WITHOUT THE PLATE. (Kit WE1M454.) BOTTOM VENTING: Dryer Exhaust to complete the exhaust system. Use 4" rigid metal ducting only inside the dryer exhaust duct and...
Installation Instructions
Page 36
... THE EXHAUST DUCT IS LOCATED AT THE REAR OF THE DRYER, MINIMUM CLEARANCE FROM THE WALL IS 5.5 INCHES. Keep these instructions for air opening are: 0" both a washer and a dryer, doors must contain a minimum of 120 square inches of Utility Services. DO NOT place the washer on -line at GEApplianceParts.com, 24 hours a day or by a qualified installer. • Proper installation is 52". • Closet doors must be vented...
... THE EXHAUST DUCT IS LOCATED AT THE REAR OF THE DRYER, MINIMUM CLEARANCE FROM THE WALL IS 5.5 INCHES. Keep these instructions for air opening are: 0" both a washer and a dryer, doors must contain a minimum of 120 square inches of Utility Services. DO NOT place the washer on -line at GEApplianceParts.com, 24 hours a day or by a qualified installer. • Proper installation is 52". • Closet doors must be vented...
Installation Instructions
Page 39
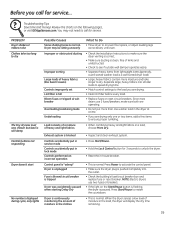
... load you are drying. • Clean lint filter before every load. • Replace fuses or reset circuit breakers. You may be sitting unevenly What To Do • Move dryer to dry. Improper or obstructed ducting Improper sorting Large loads of heavy fabrics (like beach towels) Controls improperly set Lint filter is full Blown fuses or tripped circuit breaker Overloading/combining loads Underloading • Check the Installation Instructions to make sure both are drying only one washer load in -house breaker...
... load you are drying. • Clean lint filter before every load. • Replace fuses or reset circuit breakers. You may be sitting unevenly What To Do • Move dryer to dry. Improper or obstructed ducting Improper sorting Large loads of heavy fabrics (like beach towels) Controls improperly set Lint filter is full Blown fuses or tripped circuit breaker Overloading/combining loads Underloading • Check the Installation Instructions to make sure both are drying only one washer load in -house breaker...

Installation Instructions
Page 40
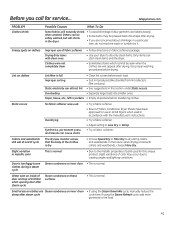
... dryer to begin a dry cycle and the message will vary according to a lower number Possible Causes What To Do The estimated time may tumble but 00 is displayed in . when a smaller load than usual is normal. PROBLEM Time Remaining jumped to the type of natural gas (gas models only) • Check the building's fuse/circuit breaker box and replace both fuses or reset both breakers. Dryer should heat when utility service is not displayed. Clothes...
... dryer to begin a dry cycle and the message will vary according to a lower number Possible Causes What To Do The estimated time may tumble but 00 is displayed in . when a smaller load than usual is normal. PROBLEM Time Remaining jumped to the type of natural gas (gas models only) • Check the building's fuse/circuit breaker box and replace both fuses or reset both breakers. Dryer should heat when utility service is not displayed. Clothes...
Installation Instructions
Page 41
... opening door after steam cycle Steam condenses on fabric softener package. • Use your dryer to the load. 41 In the future, when drying a load with the manufacturer's instructions. • Try a fabric softener. • Adjust setting to see clothes during a steam cycle Steam condenses on inner door • This is full • Clean lint screen before each load. Before you are wet appear after drying. Overloading • Separate large loads into shape after steam cycle cycle time. Water...
... opening door after steam cycle Steam condenses on fabric softener package. • Use your dryer to the load. 41 In the future, when drying a load with the manufacturer's instructions. • Try a fabric softener. • Adjust setting to see clothes during a steam cycle Steam condenses on inner door • This is full • Clean lint screen before each load. Before you are wet appear after drying. Overloading • Separate large loads into shape after steam cycle cycle time. Water...

Installation Instructions
Page 42
... cycle, Ext Tumble will automatically be turned on inner door • This is normal. steam into drum Water drips from your water supply • Call 800.GE.CARES to order nozzle replacement kit WE25M71 or to request a technician to valve Hose missing rubber washer at different times in the cycle • This is not selected. Cannot see steam at beginning of dryer Loose water hose connection to replace this for service... Garments still wrinkled...
... cycle, Ext Tumble will automatically be turned on inner door • This is normal. steam into drum Water drips from your water supply • Call 800.GE.CARES to order nozzle replacement kit WE25M71 or to request a technician to valve Hose missing rubber washer at different times in the cycle • This is not selected. Cannot see steam at beginning of dryer Loose water hose connection to replace this for service... Garments still wrinkled...
Quick Specs
Page 1
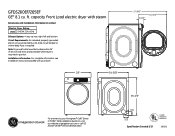
....306" For answers to your Monogram,® Cafe™ Series or Profile™ Series appliance questions, visit our website at geappliances.com or call GE Answer Center® service, 800.626.2000. 39-2/5" 3.6 5.8 Specification Created 2/13 Listed by a 30-amp circuit breaker or a time-delay fuse, is mounted in inches) Electric Dryer Rating 240V 5400W, 25A, 60Hz Exhaust Options: 4-way via rear, right, left and bottom.
....306" For answers to your Monogram,® Cafe™ Series or Profile™ Series appliance questions, visit our website at geappliances.com or call GE Answer Center® service, 800.626.2000. 39-2/5" 3.6 5.8 Specification Created 2/13 Listed by a 30-amp circuit breaker or a time-delay fuse, is mounted in inches) Electric Dryer Rating 240V 5400W, 25A, 60Hz Exhaust Options: 4-way via rear, right, left and bottom.

Quick Specs
Page 2
... sides, 3" rear. of 60 sq. capacity Front Load electric dryer with steam Stacked Dimensions (in inches) Special Installation Requirements: Stacked Installation: Brackets for installation in an alcove or closet, it will be exhausted to combustible surfaces 0" both a washer and a dryer, doors must contain a minimum of open area equally distributed. Bathroom or Bedroom Installation: • The dryer MUST be stated on a label on venting kits and accessories, please call GE Answer Center® service, 800...
... sides, 3" rear. of 60 sq. capacity Front Load electric dryer with steam Stacked Dimensions (in inches) Special Installation Requirements: Stacked Installation: Brackets for installation in an alcove or closet, it will be exhausted to combustible surfaces 0" both a washer and a dryer, doors must contain a minimum of open area equally distributed. Bathroom or Bedroom Installation: • The dryer MUST be stated on a label on venting kits and accessories, please call GE Answer Center® service, 800...

Quick Specs
Page 3
...; turns within the duct length should be necessary to connect the dryer to the house vent using flexible metal (foil type) ducting. For the side exhaust installations, add one 90° elbow. For every extra 90° elbow, reduce the allowable vent system length by Underwriters Laboratories 360505 capacity (GE & Profile models) electric & gas dryers (GTDL, DLSR, PFDS Number of lint and grease could cause damage. Please see installation instructions packed with steam Dryer Exhausting Information - A turn...
...; turns within the duct length should be necessary to connect the dryer to the house vent using flexible metal (foil type) ducting. For the side exhaust installations, add one 90° elbow. For every extra 90° elbow, reduce the allowable vent system length by Underwriters Laboratories 360505 capacity (GE & Profile models) electric & gas dryers (GTDL, DLSR, PFDS Number of lint and grease could cause damage. Please see installation instructions packed with steam Dryer Exhausting Information - A turn...


