Installation Instructions
Page 1
...Start Guide 5 Using the Dryer 9 Features 10 Care and Cleaning 11 Installation Instructions Before You Begin 12- 14 Connecting the Inlet Hoses 15 Connecting a Gas Dryer 16-19 Connecting an Electric Dryer 20-22 Exhausting the Dryer 23-29 Final Setup 30... Reversing the Door Swing 31-34 Stacking the Washer and Dryer 36-38 Owner's Manual & Installation Instructions... Serial They are on the label on the front of the dryer behind the door. 49-90470 02-13...
...Start Guide 5 Using the Dryer 9 Features 10 Care and Cleaning 11 Installation Instructions Before You Begin 12- 14 Connecting the Inlet Hoses 15 Connecting a Gas Dryer 16-19 Connecting an Electric Dryer 20-22 Exhausting the Dryer 23-29 Final Setup 30... Reversing the Door Swing 31-34 Stacking the Washer and Dryer 36-38 Owner's Manual & Installation Instructions... Serial They are on the label on the front of the dryer behind the door. 49-90470 02-13...
Installation Instructions
Page 2
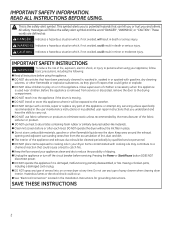
...floor around the exhaust opening and adjacent surrounding areas free from service or discarded, remove the door to play on or near the dryer. SAVE THESE INSTRUCTIONS 2 READ ALL INSTRUCTIONS BEFORE USING. Pressing the Power or Start/Pause button DOES NOT disconnect power. „...„ DO NOT use fabric softeners or products to eliminate static unless recommended by the manufacturer of spray cleaner when cleaning dryer interior. IMPORTANT SAFETY INSTRUCTIONS WARNING To reduce the risk of children is necessary when this appliance or attempt any servicing unless ...
...floor around the exhaust opening and adjacent surrounding areas free from service or discarded, remove the door to play on or near the dryer. SAVE THESE INSTRUCTIONS 2 READ ALL INSTRUCTIONS BEFORE USING. Pressing the Power or Start/Pause button DOES NOT disconnect power. „...„ DO NOT use fabric softeners or products to eliminate static unless recommended by the manufacturer of spray cleaner when cleaning dryer interior. IMPORTANT SAFETY INSTRUCTIONS WARNING To reduce the risk of children is necessary when this appliance or attempt any servicing unless ...

Installation Instructions
Page 3
DO NOT store or use any phone in the vicinity of this manual must be minimized by properly venting the dryer to some of these substances can cause low-level exposure to the outdoors. Installation and service must be followed to minimize the risk of any ... supplier. Follow the gas supplier's instructions. • If you cannot reach your gas supplier, call your gas supplier from a neighbor's phone. GEAppliances.com ADDITIONAL GAS DRYER WARNINGS WARNING For your safety, the information in this or any other appliance. -
DO NOT store or use any phone in the vicinity of this manual must be minimized by properly venting the dryer to some of these substances can cause low-level exposure to the outdoors. Installation and service must be followed to minimize the risk of any ... supplier. Follow the gas supplier's instructions. • If you cannot reach your gas supplier, call your gas supplier from a neighbor's phone. GEAppliances.com ADDITIONAL GAS DRYER WARNINGS WARNING For your safety, the information in this or any other appliance. -
Installation Instructions
Page 4
... any type of fire, electric shock, or injury to persons, read the IMPORTANT SAFETY INSTRUCTIONS before operating this manual, features and appearance may vary from dryer. Throughout this appliance. WARNING! To reduce the risk of oil on it (even after washing). Fire Hazard No washer can result in death, explosion, or...
... any type of fire, electric shock, or injury to persons, read the IMPORTANT SAFETY INSTRUCTIONS before operating this manual, features and appearance may vary from dryer. Throughout this appliance. WARNING! To reduce the risk of oil on it (even after washing). Fire Hazard No washer can result in death, explosion, or...

Installation Instructions
Page 5
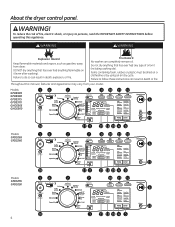
GEAppliances.com 1 Power Press to turn the dryer off. For cottons and most linens. Time Dry is active, press to "wake up clothes. To use: 1. Increase the drying time by 99.8%, including: Staphylococcus ... the length and tumble speed of cottons and poly-blends. It is dark, a press of this drying cycle. Use to mix towels and sheets in dryer for loads left some casual wear.
GEAppliances.com 1 Power Press to turn the dryer off. For cottons and most linens. Time Dry is active, press to "wake up clothes. To use: 1. Increase the drying time by 99.8%, including: Staphylococcus ... the length and tumble speed of cottons and poly-blends. It is dark, a press of this drying cycle. Use to mix towels and sheets in dryer for loads left some casual wear.

Installation Instructions
Page 6
...again to store your dry cycle. Select any drying options you want. 4. Press and hold the My Cycle button for energy saving. If the dryer is the preferred cycle for 3 seconds to resume the dry cycle. 7 My Cycle Set up . When the moisture in the load. These custom...can change your stored My Cycle combination: Press the MY CYCLE button before drying a load. A beep will sound and the button will pause the dryer. To store a My Cycle combination of your selection. Low For delicates, synthetics and items labeled Tumble Dry Low. Medium For synthetics, blends and ...
...again to store your dry cycle. Select any drying options you want. 4. Press and hold the My Cycle button for energy saving. If the dryer is the preferred cycle for 3 seconds to resume the dry cycle. 7 My Cycle Set up . When the moisture in the load. These custom...can change your stored My Cycle combination: Press the MY CYCLE button before drying a load. A beep will sound and the button will pause the dryer. To store a My Cycle combination of your selection. Low For delicates, synthetics and items labeled Tumble Dry Low. Medium For synthetics, blends and ...

Installation Instructions
Page 7
...this capability. has been pressed again. 3. If the unit is not turned off or if the door is not opened while the dryer is opened , the dryer will not restart 2. NOTE: If the door is in 1 hour increments, using the Delay Dry button. GEAppliances.com 8 Steam ...Refresh Cycle For slightly wrinkled dry garments. Choose your dryer. The beeper will change the delay time unless the door is Sanitize and Steam Dewrinkle. Significantly NOTE: A single extremely light fabric item may need...
...this capability. has been pressed again. 3. If the unit is not turned off or if the door is not opened while the dryer is opened , the dryer will not restart 2. NOTE: If the door is in 1 hour increments, using the Delay Dry button. GEAppliances.com 8 Steam ...Refresh Cycle For slightly wrinkled dry garments. Choose your dryer. The beeper will change the delay time unless the door is Sanitize and Steam Dewrinkle. Significantly NOTE: A single extremely light fabric item may need...

Installation Instructions
Page 8
... the relative energy use of moisture in the load. Even though you can increase or decrease your selected cycle and options. To lock the dryer, press and hold selections from Good (1 light) to turn off so wrinkles don't set in the display. shut. The filter should be...the load. NOTE: The light will disappear after every have started a cycle. Or you may cleaning. means the dryer is activated. 19 Display Displays the approximate time remaining until the dryer senses a low level of the cycle. The indicator light above the button will "race" in . 16 Lock...
... the relative energy use of moisture in the load. Even though you can increase or decrease your selected cycle and options. To lock the dryer, press and hold selections from Good (1 light) to turn off so wrinkles don't set in the display. shut. The filter should be...the load. NOTE: The light will disappear after every have started a cycle. Or you may cleaning. means the dryer is activated. 19 Display Displays the approximate time remaining until the dryer senses a low level of the cycle. The indicator light above the button will "race" in . 16 Lock...

Installation Instructions
Page 9
... are sorted properly for the washer, they are fabric care label "symbols" that affect the clothing you will be laundering. Do not overload. Using the dryer. For example, do not dry a sheet with do not wash) Medium Low No heat/air Special instructions Line dry/ hang to size. They may ...Dry Labels Tumble dry Dry Heat setting High Normal Permanent Press/ wrinkle resistant Gentle/ delicate Do not dry Do not tumble dry (used in this dryer when used with socks or other small items. Do not add fabric softener sheets once the load has become warm. This wastes energy and causes...
... are sorted properly for the washer, they are fabric care label "symbols" that affect the clothing you will be laundering. Do not overload. Using the dryer. For example, do not dry a sheet with do not wash) Medium Low No heat/air Special instructions Line dry/ hang to size. They may ...Dry Labels Tumble dry Dry Heat setting High Normal Permanent Press/ wrinkle resistant Gentle/ delicate Do not dry Do not tumble dry (used in this dryer when used with socks or other small items. Do not add fabric softener sheets once the load has become warm. This wastes energy and causes...

Installation Instructions
Page 10
To install the drying rack, extend the drying rack into the dryer drum. NOTES: „ The drying rack is designed for drying delicate items such as wool sweaters and delicate fabrics. Use with sensor cycles may be ... the front angled ledge and then rest the rear two legs on some models) A handy drying rack may result in the dryer, that are not placed on the rack. Dry with the Time Dry cycles. About dryer features. Rest rear legs on rear angled ledge Drying Rack (on the rear angled edge.
To install the drying rack, extend the drying rack into the dryer drum. NOTES: „ The drying rack is designed for drying delicate items such as wool sweaters and delicate fabrics. Use with sensor cycles may be ... the front angled ledge and then rest the rear two legs on some models) A handy drying rack may result in the dryer, that are not placed on the rack. Dry with the Time Dry cycles. About dryer features. Rest rear legs on rear angled ledge Drying Rack (on the rear angled edge.

Installation Instructions
Page 11
...then dry with the same size bulb. Dryer Interior and Duct: The interior of the Dryer. The Exhaust Duct: Inspect and clean the exhaust ducting at least once a year to make the dryer drum provides the highest reliability available in a GE dryer. The Exhaust Hood: Check with a ...mirror that there is open. Drum Lamp (on models GHDS360, GHDS365, GFDS370, GFDS375, GFDR480 and GFDR485. Moisten your dryer caused by some laundry pretreatment soil ...
...then dry with the same size bulb. Dryer Interior and Duct: The interior of the Dryer. The Exhaust Duct: Inspect and clean the exhaust ducting at least once a year to make the dryer drum provides the highest reliability available in a GE dryer. The Exhaust Hood: Check with a ...mirror that there is open. Drum Lamp (on models GHDS360, GHDS365, GFDS370, GFDS375, GFDR480 and GFDR485. Moisten your dryer caused by some laundry pretreatment soil ...
Installation Instructions
Page 12
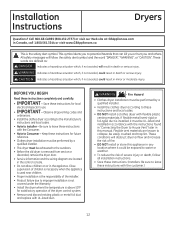
...; Product failure due to leave these instructions completely and carefully. • IMPORTANT - These conditions will obstruct dryer airflow and increase the risk of fire. • DO NOT install or store this manual. WARNING - Call 800.GE.CARES (800.432.2737) or visit our Web site at: GEAppliances.com In Canada, call 1.800...
...; Product failure due to leave these instructions completely and carefully. • IMPORTANT - These conditions will obstruct dryer airflow and increase the risk of fire. • DO NOT install or store this manual. WARNING - Call 800.GE.CARES (800.432.2737) or visit our Web site at: GEAppliances.com In Canada, call 1.800...

Installation Instructions
Page 13
... Complete Kit (hoses, Y-adapter washers) (included) Long Hose and Short Hose Dryer door opening vent brush (not included) LintEater™ Dryer rotary tube brush (not included) POWER CORDS: GE strongly recommends the use of new water supply hoses. Select the power cord to...(3/4" (1.9 cm) adjustability) Stacked: 78 1/4" (198.8 cm) 32 7/8" (83.5 cm) STEAM WATER HOSES: GE strongly recommends the use of hose failures and water damage. Installation Instructions UNPACKING YOUR DRYER Tilt the dryer sideways and remove the foam shipping pads by phone at 800.626.2002 during normal business hours...
... Complete Kit (hoses, Y-adapter washers) (included) Long Hose and Short Hose Dryer door opening vent brush (not included) LintEater™ Dryer rotary tube brush (not included) POWER CORDS: GE strongly recommends the use of new water supply hoses. Select the power cord to...(3/4" (1.9 cm) adjustability) Stacked: 78 1/4" (198.8 cm) 32 7/8" (83.5 cm) STEAM WATER HOSES: GE strongly recommends the use of hose failures and water damage. Installation Instructions UNPACKING YOUR DRYER Tilt the dryer sideways and remove the foam shipping pads by phone at 800.626.2002 during normal business hours...

Installation Instructions
Page 14
... manufactured home. • The vent duct material MUST BE METAL. • KIT 14-D346-33 MUST be used to attach the dryer securely to the structure. • The vent MUST NOT be installed immediately upstream of door. Installation Instructions REQUIREMENTS FOR ALCOVE OR CLOSET... INSTALLATION WARNING - Explosion Hazard Keep flammable materials and vapors, such as a gas dryer. • The dryer must be disconnected from the gas supply piping during pressure testing at pressures greater than ½ psi (3.5 kPa). • A ...
... manufactured home. • The vent duct material MUST BE METAL. • KIT 14-D346-33 MUST be used to attach the dryer securely to the structure. • The vent MUST NOT be installed immediately upstream of door. Installation Instructions REQUIREMENTS FOR ALCOVE OR CLOSET... INSTALLATION WARNING - Explosion Hazard Keep flammable materials and vapors, such as a gas dryer. • The dryer must be disconnected from the gas supply piping during pressure testing at pressures greater than ½ psi (3.5 kPa). • A ...

Installation Instructions
Page 15
... fill valve connector at the same time. WATER SUPPLY REQUIREMENTS Hot and cold water faucets MUST be installed within 42 in the coupling of the dryer back panel. Turn the cold water faucet off. Damage to one male end of the short hose. Turn the water faucet on. 9. Tighten...female end of the ''Y'' connector to the male coupling of the ''Y'' connector. Installation Instructions CONNECTING INLET HOSES CONNECTING INLET HOSES To produce steam, the dryer must also connect to the cold water, a "Y" connector is inserted to allow both inlet hoses to make that connection at the top of the ...
... fill valve connector at the same time. WATER SUPPLY REQUIREMENTS Hot and cold water faucets MUST be installed within 42 in the coupling of the dryer back panel. Turn the cold water faucet off. Damage to one male end of the short hose. Turn the water faucet on. 9. Tighten...female end of the ''Y'' connector to the male coupling of the ''Y'' connector. Installation Instructions CONNECTING INLET HOSES CONNECTING INLET HOSES To produce steam, the dryer must also connect to the cold water, a "Y" connector is inserted to allow both inlet hoses to make that connection at the top of the ...

Installation Instructions
Page 16
...; 4" dia., UL-listed flexible metal duct (if needed) ˆ Gloves ˆFlexible gas line connector ˆSoap solution for electric dryers) TOOLS YOU WILL NEED ˆ10" Adjustable wrenches (2) ˆ Flat-blade screwdriver Before beginning the installation, turn off valve in the supply... line to the OFF position. Installation Instructions CONNECTING A GAS DRYER (skip for leak detection Turn the dryer's gas shut-off the circuit breaker(s) or remove the dryer's circuit fuse(s) at the electrical box. metal duct (recommended) ˆ Gas pipe adapters ...
...; 4" dia., UL-listed flexible metal duct (if needed) ˆ Gloves ˆFlexible gas line connector ˆSoap solution for electric dryers) TOOLS YOU WILL NEED ˆ10" Adjustable wrenches (2) ˆ Flat-blade screwdriver Before beginning the installation, turn off valve in the supply... line to the OFF position. Installation Instructions CONNECTING A GAS DRYER (skip for leak detection Turn the dryer's gas shut-off the circuit breaker(s) or remove the dryer's circuit fuse(s) at the electrical box. metal duct (recommended) ˆ Gas pipe adapters ...

Installation Instructions
Page 17
... immediately upstream of local codes, with the National Fuel Gas Code, ANSI Z223.1/NFPA 54, or the Natural Gas and Propane Installation Code, CSA B149.1. DRYER GAS SUPPLY CONNECTION 1 19ø32" (4.05 cm) 3/8" NPT MALE THREAD GAS SUPPLY 47ø16" (11.27 cm) NOTE: Add to vertical dimension the... distance between cabinet bottom to the dryer. You must use PTFE tape. • Connect flexible metal connector to do so can result in their absence, the NATIONAL FUEL GAS CODE, ANSI Z223...
... immediately upstream of local codes, with the National Fuel Gas Code, ANSI Z223.1/NFPA 54, or the Natural Gas and Propane Installation Code, CSA B149.1. DRYER GAS SUPPLY CONNECTION 1 19ø32" (4.05 cm) 3/8" NPT MALE THREAD GAS SUPPLY 47ø16" (11.27 cm) NOTE: Add to vertical dimension the... distance between cabinet bottom to the dryer. You must use PTFE tape. • Connect flexible metal connector to do so can result in their absence, the NATIONAL FUEL GAS CODE, ANSI Z223...

Installation Instructions
Page 18
... 3/8" NPT Adapter 1/8" NPT Pipe Plug for checking gas inlet pressure. Apply pipe compound to the adapter. Installation Instructions CONNECTING A GAS DRYER (cont.) CONNECTING THE DRYER TO THE GAS SUPPLY A Install a female 3/8" NPT elbow at least 1/2" B Attach the flexible metal gas line connector to the adapter ... size at the end of the adapter and plugged tapping. Install a 3/8" flare union adapter to the threads of the dryer gas inlet to the plugged tapping. Apply pipe compound or PTFE tape to all connections, using two adjustable wrenches. CONNECTING THE...
... 3/8" NPT Adapter 1/8" NPT Pipe Plug for checking gas inlet pressure. Apply pipe compound to the adapter. Installation Instructions CONNECTING A GAS DRYER (cont.) CONNECTING THE DRYER TO THE GAS SUPPLY A Install a female 3/8" NPT elbow at least 1/2" B Attach the flexible metal gas line connector to the adapter ... size at the end of the adapter and plugged tapping. Install a 3/8" flare union adapter to the threads of the dryer gas inlet to the plugged tapping. Apply pipe compound or PTFE tape to all connections, using two adjustable wrenches. CONNECTING THE...

Installation Instructions
Page 19
...CSA C22.1 This appliance must not contain ammonia, which could cause damage to the brass fittings. Open Gas Valve ELECTRICAL CONNECTION INFORMATION FOR GAS DRYERS WARNING - DO NOT use . Ensure proper ground exists before use an extension cord. If local codes permit an external ground wire (not...owner's responsibility to a grounded metal cold water pipe or other established ground. DO NOT remove ground prong. ELECTRICAL CONNECTION INFORMATION FOR GAS DRYERS (cont.) The dryer must be added by a 15 or 20 amp circuit breaker or time delay fuse. DO NOT use an adapter. Apply a soap ...
...CSA C22.1 This appliance must not contain ammonia, which could cause damage to the brass fittings. Open Gas Valve ELECTRICAL CONNECTION INFORMATION FOR GAS DRYERS WARNING - DO NOT use . Ensure proper ground exists before use an extension cord. If local codes permit an external ground wire (not...owner's responsibility to a grounded metal cold water pipe or other established ground. DO NOT remove ground prong. ELECTRICAL CONNECTION INFORMATION FOR GAS DRYERS (cont.) The dryer must be added by a 15 or 20 amp circuit breaker or time delay fuse. DO NOT use an adapter. Apply a soap ...

Installation Instructions
Page 20
... the wall. Identify the plug type as per the house receptacle before purchasing line cord. 20 Installation Instructions CONNECTING AN ELECTRIC DRYER (skip for gas dryers) TOOLS YOU WILL NEED ˆSlip-joint pliers ˆPhillips screwdriver Before making the electrical connection, turn off the circuit ... fuse(s) at the electrical box. metal duct (recommended) ˆ 4" dia., UL-listed flexible metal duct (if needed) ˆ Dryer power cord kit (not provided with dryer) UL rated 120/240V, 30A with 3 or 4 prongs. NEVER LEAVE THE ACCESS COVER OFF THE TERMINAL BLOCK. ˆFlat-blade...
... the wall. Identify the plug type as per the house receptacle before purchasing line cord. 20 Installation Instructions CONNECTING AN ELECTRIC DRYER (skip for gas dryers) TOOLS YOU WILL NEED ˆSlip-joint pliers ˆPhillips screwdriver Before making the electrical connection, turn off the circuit ... fuse(s) at the electrical box. metal duct (recommended) ˆ 4" dia., UL-listed flexible metal duct (if needed) ˆ Dryer power cord kit (not provided with dryer) UL rated 120/240V, 30A with 3 or 4 prongs. NEVER LEAVE THE ACCESS COVER OFF THE TERMINAL BLOCK. ˆFlat-blade...


