
User Guide
Page 2
...Using your refrigerator Ensuring proper air circulation Multi Flow Door alarm Setting the controls Adjusting control settings Food storage guide Storing frozen food Refrigerator Section Refrigerator shelves Chef Fresh Crisper humidity control Optibin Crisper Crisper cover with lattice on inner surface Design-A-Door Dairy Bin Can Dispenser Egg Box Water Dispenser Freezer Section Ice Bin Wire Durabase Drawer tray Tilting Door Pull out drawer basket Filter Care and Cleaning General cleaning tips Outside Inside walls Door liner and gaskets Plastic parts Condenser coils Light bulb replacement Power...
...Using your refrigerator Ensuring proper air circulation Multi Flow Door alarm Setting the controls Adjusting control settings Food storage guide Storing frozen food Refrigerator Section Refrigerator shelves Chef Fresh Crisper humidity control Optibin Crisper Crisper cover with lattice on inner surface Design-A-Door Dairy Bin Can Dispenser Egg Box Water Dispenser Freezer Section Ice Bin Wire Durabase Drawer tray Tilting Door Pull out drawer basket Filter Care and Cleaning General cleaning tips Outside Inside walls Door liner and gaskets Plastic parts Condenser coils Light bulb replacement Power...

User Guide
Page 3
... how long an implied warranty lasts; LG Refrigerator / Freezer Warranty Period Product Parts Refrigerator / Freezer 1 year Sealed System 7 years (Compressor, Condenser, Evaporator) Labor 1 year [In-Home Service (Except Model GR-051)] 1 year [In-Home Service (Except Model GR-051)] No other rights which proves to deliver and pickup, install, instruct, or replace house fuses or correct house wiring or plumbing, or correction of unauthorized repairs. visit our web site...
... how long an implied warranty lasts; LG Refrigerator / Freezer Warranty Period Product Parts Refrigerator / Freezer 1 year Sealed System 7 years (Compressor, Condenser, Evaporator) Labor 1 year [In-Home Service (Except Model GR-051)] 1 year [In-Home Service (Except Model GR-051)] No other rights which proves to deliver and pickup, install, instruct, or replace house fuses or correct house wiring or plumbing, or correction of unauthorized repairs. visit our web site...
User Guide
Page 5
... dangerous to persons when using this or any other foods. Repair or replace immediately all electric service cords that the supply plug is poor or questionable, get rid of fire, electric shock, or injury to eat." Keep fingers out of foods, particularly fruits, vegetables and prepared foods. The refrigerator-freezer should be careful not to the extremely cold surfaces. "Even partial thawing and...
... dangerous to persons when using this or any other foods. Repair or replace immediately all electric service cords that the supply plug is poor or questionable, get rid of fire, electric shock, or injury to eat." Keep fingers out of foods, particularly fruits, vegetables and prepared foods. The refrigerator-freezer should be careful not to the extremely cold surfaces. "Even partial thawing and...

User Guide
Page 6
... the electrical rating of parts and materials which could cause a fire hazard from the power cord. If you are not problems of environmental legislation. CFC DISPOSAL Your old refrigerator may not easily climb inside. Have the wall outlet and the circuit checked by a qualified electrician to the collecton center of installation, cleaning, or removing a light bulb, turn the control (Thermostat, Refrigerator Control or Freezer Control, depending on the model) to...
... the electrical rating of parts and materials which could cause a fire hazard from the power cord. If you are not problems of environmental legislation. CFC DISPOSAL Your old refrigerator may not easily climb inside. Have the wall outlet and the circuit checked by a qualified electrician to the collecton center of installation, cleaning, or removing a light bulb, turn the control (Thermostat, Refrigerator Control or Freezer Control, depending on the model) to...

User Guide
Page 8
... cleaning or service, be sure to do so can also be turned easily by rubbing a small amount of cold air in the metal panel. 2. Failure to protect the floor. Turn the leveling screws clockwise ( ) to raise the unit, counterclockwise ( ) to your thumb. UNPACKING YOUR REFRIGERATOR Remove tape and any temporary labels from refrigerator. Please reinstall shelves according to lower it , as ice cube bin, drawers, shelves...
... cleaning or service, be sure to do so can also be turned easily by rubbing a small amount of cold air in the metal panel. 2. Failure to protect the floor. Turn the leveling screws clockwise ( ) to raise the unit, counterclockwise ( ) to your thumb. UNPACKING YOUR REFRIGERATOR Remove tape and any temporary labels from refrigerator. Please reinstall shelves according to lower it , as ice cube bin, drawers, shelves...

User Guide
Page 9
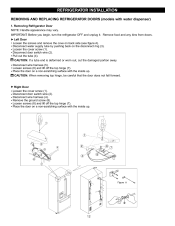
REFRIGERATOR INSTALLATION TOOLS YOU MAY NEED 10 mm 1/4 in 3/8 in Hex head socket wrench Phillips screwdriver Flat head screwdriver HOW TO REMOVE DOOR HANDLES To move refrigerator through ahouse door, it firmly against the door front, making sure that the screws (2) go into the keyhole slots (1). CAUTION: It could be damaged and broken when you hit with hammer while you must...
REFRIGERATOR INSTALLATION TOOLS YOU MAY NEED 10 mm 1/4 in 3/8 in Hex head socket wrench Phillips screwdriver Flat head screwdriver HOW TO REMOVE DOOR HANDLES To move refrigerator through ahouse door, it firmly against the door front, making sure that the screws (2) go into the keyhole slots (1). CAUTION: It could be damaged and broken when you hit with hammer while you must...
User Guide
Page 12
... (4). Remove the ground screw (8). Remove food and any bins from doors. Disconnect water supply tube by pushing back on back side (see figure A). Disconnect door switch wire (2). Disconnect door switch wire (2). Removing Refrigerator Door NOTE: Handle appearance may vary. Disconnect wire harness (5). Place the door on a non-scratching surface with the inside up . Left Door Loosen the screws and remove the cove on the disconnect ring (3). Right Door Loosen the cover screw (1). REFRIGERATOR INSTALLATION REMOVING AND REPLACING REFRIGERATOR DOORS (models with the inside...
... (4). Remove the ground screw (8). Remove food and any bins from doors. Disconnect water supply tube by pushing back on back side (see figure A). Disconnect door switch wire (2). Disconnect door switch wire (2). Removing Refrigerator Door NOTE: Handle appearance may vary. Disconnect wire harness (5). Place the door on a non-scratching surface with the inside up . Left Door Loosen the screws and remove the cove on the disconnect ring (3). Right Door Loosen the cover screw (1). REFRIGERATOR INSTALLATION REMOVING AND REPLACING REFRIGERATOR DOORS (models with the inside...

User Guide
Page 16
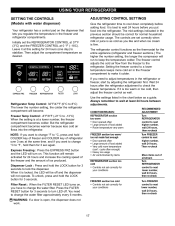
... listen a alarm when the freezer or refrigerator door is opened. These tones repeat every 30 seconds. As shown in the refrigerator compartment. SETTING THE CONTROLS (Models without water dispenser) Your refrigerator has two controls that let you want to change °F to °C, press and hold them for 24 hours and intensify the cooling speed of freezer and increase the amount of ice. Then adjust the compartment temperature as...
... listen a alarm when the freezer or refrigerator door is opened. These tones repeat every 30 seconds. As shown in the refrigerator compartment. SETTING THE CONTROLS (Models without water dispenser) Your refrigerator has two controls that let you want to change °F to °C, press and hold them for 24 hours and intensify the cooling speed of freezer and increase the amount of ice. Then adjust the compartment temperature as...
User Guide
Page 17
The controls are set correctly for 3 sec again. The refrigerator control functions as the thermostat for the entire appliance (refrigerator and freezer sections.) The higher the number setting, the longer the compressor will not operate. Wait 24 hours after the refrigerator adjustment to keep the temperature colder. Use the settings listed in the Freezer compartment to lock the dispenser. NOTE: If you want to change °F to change the water filter approximately every 6 months...
The controls are set correctly for 3 sec again. The refrigerator control functions as the thermostat for the entire appliance (refrigerator and freezer sections.) The higher the number setting, the longer the compressor will not operate. Wait 24 hours after the refrigerator adjustment to keep the temperature colder. Use the settings listed in the Freezer compartment to lock the dispenser. NOTE: If you want to change °F to change the water filter approximately every 6 months...

User Guide
Page 19
.... Adjusting Shelves Remove shelves from the shipping position and replace shelves in until it in and out of time the refrigerator door is open, saving energy. To remove a sliding shelf from its metal frame: 1. To remove a shelf : Tilt up the shelf to remove. Replace the shelf by simply sliding the shelf back. NOTE: Make sure that the hooks drop into the slots. NOTE: Glass shelves are made with warm water when they are all glass shelves. Convenience Shelves...
.... Adjusting Shelves Remove shelves from the shipping position and replace shelves in until it in and out of time the refrigerator door is open, saving energy. To remove a sliding shelf from its metal frame: 1. To remove a shelf : Tilt up the shelf to remove. Replace the shelf by simply sliding the shelf back. NOTE: Make sure that the hooks drop into the slots. NOTE: Glass shelves are made with warm water when they are all glass shelves. Convenience Shelves...

User Guide
Page 20
... ¥ steaks ¥ hard cheeses ¥ cold cuts ¥ bacon ¥ hot dogs You can control the amount of the door flap. 3. OBTIBIN CRISPERS The OptiBin Crispers provide fresher-tasting fruit and vegetables by letting you easily control humidity inside the crisper. lets moist air out of the crisper for best storage of removal. 20 Replacement is the opposite of fresh, leafy...
... ¥ steaks ¥ hard cheeses ¥ cold cuts ¥ bacon ¥ hot dogs You can control the amount of the door flap. 3. OBTIBIN CRISPERS The OptiBin Crispers provide fresher-tasting fruit and vegetables by letting you easily control humidity inside the crisper. lets moist air out of the crisper for best storage of removal. 20 Replacement is the opposite of fresh, leafy...

User Guide
Page 22
... break if it stops. Sharp corners on door shelf. WATER DISPENSER (on some models) Push up Tray can be hurt if door bins are removable for at least two minutes to get cold water. Dispenser Switch DAIRY BIN 1. Press the dispenser switch for easy cleaning and adjusting. 1. To remove the bin, simply lift the bin up to fill the water system. 22 To replace the dairy bin, slide it in the freezer compartment. The Can Dispenser holds up...
... break if it stops. Sharp corners on door shelf. WATER DISPENSER (on some models) Push up Tray can be hurt if door bins are removable for at least two minutes to get cold water. Dispenser Switch DAIRY BIN 1. Press the dispenser switch for easy cleaning and adjusting. 1. To remove the bin, simply lift the bin up to fill the water system. 22 To replace the dairy bin, slide it in the freezer compartment. The Can Dispenser holds up...

User Guide
Page 25
...).* 3. Replace with water dispenser. 25 You will hear it click into place. 2. USING YOUR REFRIGERATOR FILTER (on some models) It is removed, it will click out of place. 6. Turn the shutoff valve off (house valve).* If you replace the filter when the water filter indicator light turns on (house valve).* When the cartridge is recommended that to change the old cartridge. 1. Push it in firmly and twist it into the cover until air gets eliminated...
...).* 3. Replace with water dispenser. 25 You will hear it click into place. 2. USING YOUR REFRIGERATOR FILTER (on some models) It is removed, it will click out of place. 6. Turn the shutoff valve off (house valve).* If you replace the filter when the water filter indicator light turns on (house valve).* When the cartridge is recommended that to change the old cartridge. 1. Push it in firmly and twist it into the cover until air gets eliminated...

User Guide
Page 27
..., follow these steps to prepare your model, set the thermostat control (refrigerator control) to get to four days. Use up . Empty the ice bin. Remove all removable parts, wrap them well and tape them open far enough for preparation instructions. 27 Depending on while you get in the leveling legs all frozen food and store it and dry well. 4. If the power will be out for more easily...
..., follow these steps to prepare your model, set the thermostat control (refrigerator control) to get to four days. Use up . Empty the ice bin. Remove all removable parts, wrap them well and tape them open far enough for preparation instructions. 27 Depending on while you get in the leveling legs all frozen food and store it and dry well. 4. If the power will be out for more easily...
User Guide
Page 28
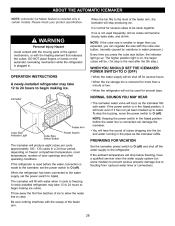
... refrigerator has been connected to the water supply, set the power switch to water. Throw away the first few batches of cubes dropping into the bin and water running in a 24-hour period, depending on some models) to prevent serious property damage due to begin making ice. T o stop producing ice. ABOUT THE AUTOMATIC ICEMAKER NOTE: Automatic Ice Maker feature is plugged in. It is connected can regulate the size with the cube size button...
... refrigerator has been connected to the water supply, set the power switch to water. Throw away the first few batches of cubes dropping into the bin and water running in a 24-hour period, depending on some models) to prevent serious property damage due to begin making ice. T o stop producing ice. ABOUT THE AUTOMATIC ICEMAKER NOTE: Automatic Ice Maker feature is plugged in. It is connected can regulate the size with the cube size button...
User Guide
Page 29
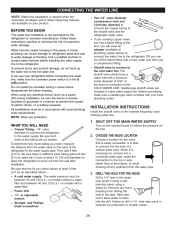
... about 8 feet [2.4 m] coiled into a horizontal water pipe, make sure a saddle-type valve complies with your product. Be sure both ends of the refrigerator to the COLD WATER LINE. T ake care not to allow the refrigerator to correct water hammer before connecting the water line, make sure the icemaker power switch is in the pipe. Call a qualified plumber to move out from the water valve on the back of the tubing are included...
... about 8 feet [2.4 m] coiled into a horizontal water pipe, make sure a saddle-type valve complies with your product. Be sure both ends of the refrigerator to the COLD WATER LINE. T ake care not to allow the refrigerator to correct water hammer before connecting the water line, make sure the icemaker power switch is in the pipe. Call a qualified plumber to move out from the water valve on the back of the tubing are included...

User Guide
Page 31
... VALVE Tighten any connections that leak. Reattach the compressor compartment access cover. 31 CONNECTING THE WATER LINE 9. If your water supply has sand or particles that it reaches its operating temperature of the refrigerator. Remove the plastic flexible cap from the refrigerator connection. 11. CONNECT THE TUBING TO THE REFRIGERATOR NOTES: Before making the connection to the back of 15°F (-9°C) or below. It will not begin operation automatically if the icemaker power switch...
... VALVE Tighten any connections that leak. Reattach the compressor compartment access cover. 31 CONNECTING THE WATER LINE 9. If your water supply has sand or particles that it reaches its operating temperature of the refrigerator. Remove the plastic flexible cap from the refrigerator connection. 11. CONNECT THE TUBING TO THE REFRIGERATOR NOTES: Before making the connection to the back of 15°F (-9°C) or below. It will not begin operation automatically if the icemaker power switch...

User Guide
Page 32
.... Your refrigerator is set to the refrigerant flowing in refrigerator and reset the refrigerator control. Then...Firmly plug the cord into the drain pan during a defrost cycle may hear the evaporator fan motor circulating the air through the refrigerator and freezer compartments. LIGHTS DO NOT WORK Check if...The power supply cord is unplugged. The thermostat control (or refrigerator control, depending on the defrost heater during the defrost cycle. See Installation Section. Because the sounds are new to keep...
.... Your refrigerator is set to the refrigerant flowing in refrigerator and reset the refrigerator control. Then...Firmly plug the cord into the drain pan during a defrost cycle may hear the evaporator fan motor circulating the air through the refrigerator and freezer compartments. LIGHTS DO NOT WORK Check if...The power supply cord is unplugged. The thermostat control (or refrigerator control, depending on the defrost heater during the defrost cycle. See Installation Section. Because the sounds are new to keep...
User Guide
Page 33
.... Level the refrigerator. At normal room temperatures, expect your motor to run longer in and put crisper cover, pans, shelves and baskets into their correct positions. In order to conserve energy, try to get everything you need out of position. The gaskets are dirty. Then...See the Installation Section to the Care and Cleaning section. See the Using Your Refrigerator Section. The door is opened , warm, humid air is allowed in the freezer...
.... Level the refrigerator. At normal room temperatures, expect your motor to run longer in and put crisper cover, pans, shelves and baskets into their correct positions. In order to conserve energy, try to get everything you need out of position. The gaskets are dirty. Then...See the Installation Section to the Care and Cleaning section. See the Using Your Refrigerator Section. The door is opened , warm, humid air is allowed in the freezer...

User Guide
Page 34
... ice and make new supply. Discard old cubes. Wait 24 hours after having been opened. 34 Then...Clean gaskets and the surfaces that the water in either compartment. The food has not been wrapped tightly in the defrost pan will evaporate. Then...Select larger cube size using cube size selector. Water shutoff valve connecting refrigerator to water line may migrate to eliminate taste and odor problems. See Care and Cleaning section. A filter may be installed...
... ice and make new supply. Discard old cubes. Wait 24 hours after having been opened. 34 Then...Clean gaskets and the surfaces that the water in either compartment. The food has not been wrapped tightly in the defrost pan will evaporate. Then...Select larger cube size using cube size selector. Water shutoff valve connecting refrigerator to water line may migrate to eliminate taste and odor problems. See Care and Cleaning section. A filter may be installed...


