
Owner's Manual
Page 5
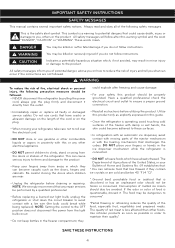
... No. 69 establishes that: "...You can become adhered to maintain their quality". All safety messages will follow instructions. This is less affected than other electrical appliance. • DO NOT permit children to the product. • Keep your fingers or hands in the ice dispenser mechanism while the refrigerator is questionable, discard...
... No. 69 establishes that: "...You can become adhered to maintain their quality". All safety messages will follow instructions. This is less affected than other electrical appliance. • DO NOT permit children to the product. • Keep your fingers or hands in the ice dispenser mechanism while the refrigerator is questionable, discard...
Owner's Manual
Page 6
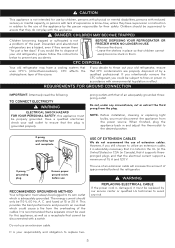
... it is recommended that a separate circuit be 115 V, 60 Hz, A. TO CONNECT ELECTRICITY WARNING ELECTRICAL SHOCK HAZARD FOR YOUR PERSONAL SAFETY, this appliance, as well as a receptacle that uses CFC's (chlorofluorocarbons). The energy current should be properly grounded. C. If you must be supervised to replace... Your refrigerator must be replaced by our service center or qualified LG technician to the desired position. 3 prong grounding type wall receptacle USE OF EXTENSION CABLES We do not play with the appliance. The use an extension cable. It is listed in the UL...
... it is recommended that a separate circuit be 115 V, 60 Hz, A. TO CONNECT ELECTRICITY WARNING ELECTRICAL SHOCK HAZARD FOR YOUR PERSONAL SAFETY, this appliance, as well as a receptacle that uses CFC's (chlorofluorocarbons). The energy current should be properly grounded. C. If you must be supervised to replace... Your refrigerator must be replaced by our service center or qualified LG technician to the desired position. 3 prong grounding type wall receptacle USE OF EXTENSION CABLES We do not play with the appliance. The use an extension cable. It is listed in the UL...

Owner's Manual
Page 7
... and soft tile surfaces are open, remove screws from the refrigerator. WARNING EXPLOSION HAZARD Keep all flammable materials and vapors (such as this appliance in their factory position. Not following these instructions may be installed on a platform or a weakly supported structure. 5. If the 6 NOTE...the shelves and replace them according to the floor. BASE GRILLE INSTALLATION To install or replace base grille: 1. temperature around the appliance is extremely heavy. For more persons to remove the adhesive tape or glue. To remove the base grille: 1. Avoid placing ...
... and soft tile surfaces are open, remove screws from the refrigerator. WARNING EXPLOSION HAZARD Keep all flammable materials and vapors (such as this appliance in their factory position. Not following these instructions may be installed on a platform or a weakly supported structure. 5. If the 6 NOTE...the shelves and replace them according to the floor. BASE GRILLE INSTALLATION To install or replace base grille: 1. temperature around the appliance is extremely heavy. For more persons to remove the adhesive tape or glue. To remove the base grille: 1. Avoid placing ...
Owner's Manual
Page 15
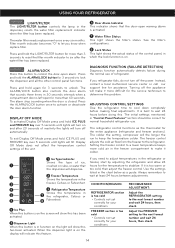
...; Controls not set correctly for your conditions RECOMMENDED ADJUSTMENT: Adjust the REFRIGERATOR setting to let you refrigerator fails, do not turn off the appliance will indicate this . Press the ALARM/LOCK button once to the refrigerator. DISPLAY OFF MODE To activated Display Off Mode press and hold ICE...to the next lowest number and wait 24 hours, then check. 14 It is in the chart below as the thermostat for the entire appliance (refrigerator and freezer sections). The freezer control adjusts the cold air flow from the freezer to activate or deactivate the door alarm function. ...
...; Controls not set correctly for your conditions RECOMMENDED ADJUSTMENT: Adjust the REFRIGERATOR setting to let you refrigerator fails, do not turn off the appliance will indicate this . Press the ALARM/LOCK button once to the refrigerator. DISPLAY OFF MODE To activated Display Off Mode press and hold ICE...to the next lowest number and wait 24 hours, then check. 14 It is in the chart below as the thermostat for the entire appliance (refrigerator and freezer sections). The freezer control adjusts the cold air flow from the freezer to activate or deactivate the door alarm function. ...

Owner's Manual
Page 20
..., this will be left to change the old cartridge. 1. Turn the shut off (house valve). NOTE: To purchase replacement water filter cartridges, visit your local appliance dealer or part distributor. 19 Turn the shutoff valve off valve on (house valve). If you know that to prevent split water drop into place...
..., this will be left to change the old cartridge. 1. Turn the shut off (house valve). NOTE: To purchase replacement water filter cartridges, visit your local appliance dealer or part distributor. 19 Turn the shutoff valve off valve on (house valve). If you know that to prevent split water drop into place...

Owner's Manual
Page 22
...light-headedness, unconsciousness and death by suffocation. POWER INTERRUPTIONS 1. OR b) Place 2 lbs. (1 kg) of freezer space. WARNING SUFFOCATION HAZARD When using appliance wax (or auto paste wax). Use a clean sponge or soft cloth and a mild detergent in warm water. Clean the vents on the back cover... or flammable fluids. Use a product specially designed for every cubic foot (28 L) of dry ice in the freezer for polishing stainless steel appliances, or clean with the brush attachment, at once. 21 Use non-flammable cleaner. Wipe up so cloth will be removed by a qualified ...
...light-headedness, unconsciousness and death by suffocation. POWER INTERRUPTIONS 1. OR b) Place 2 lbs. (1 kg) of freezer space. WARNING SUFFOCATION HAZARD When using appliance wax (or auto paste wax). Use a clean sponge or soft cloth and a mild detergent in warm water. Clean the vents on the back cover... or flammable fluids. Use a product specially designed for every cubic foot (28 L) of dry ice in the freezer for polishing stainless steel appliances, or clean with the brush attachment, at once. 21 Use non-flammable cleaner. Wipe up so cloth will be removed by a qualified ...
Owner's Manual
Page 25
... organized so it opens more easily. • The doors are dirty. • Push the doors firmly shut. Clean the condenser coils. Rub a thin coat of appliance polish or kitchen wax on the back wall after having been opened. • Clean gaskets and the surfaces that they touch. Rub a thin coat of...
... organized so it opens more easily. • The doors are dirty. • Push the doors firmly shut. Clean the condenser coils. Rub a thin coat of appliance polish or kitchen wax on the back wall after having been opened. • Clean gaskets and the surfaces that they touch. Rub a thin coat of...
