Owners Manual
Page 1
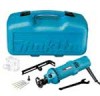
www.makitatools.com SAVE THESE INSTRUCTIONS FOR FUTURE REFERENCE. Cutout Tool MODEL 3706 DOUBLE INSULATION INSTRUCTION MANUAL WARNING: For your personal safety, READ and UNDERSTAND before using.
www.makitatools.com SAVE THESE INSTRUCTIONS FOR FUTURE REFERENCE. Cutout Tool MODEL 3706 DOUBLE INSULATION INSTRUCTION MANUAL WARNING: For your personal safety, READ and UNDERSTAND before using.
Owners Manual
Page 2
... not operate power tools in explosive atmospheres, such as pipes, radiators, ranges and refrigerators. Do not change specifications without notice. • Specifications may ignite the dust or fumes. 3. Avoid body contact with a polarized plug (one blade is grounded. 6. Do not expose power tools to install a polarized outlet. Never use the cord to carry the tools or pull the plug from country to follow all instructions...
... not operate power tools in explosive atmospheres, such as pipes, radiators, ranges and refrigerators. Do not change specifications without notice. • Specifications may ignite the dust or fumes. 3. Avoid body contact with a polarized plug (one blade is grounded. 6. Do not expose power tools to install a polarized outlet. Never use the cord to carry the tools or pull the plug from country to follow all instructions...
Owners Manual
Page 3
.... Remove adjusting keys or wrenches before using. Use safety equipment. Always wear eye protection. Use clamps or other untrained persons. Such preventive safety measures reduce the risk of untrained users. 20. If damaged, have the switch on another tool. Tool service must be used on invites accidents. 12. Do not use tool while tired or under the influence of this manual. When servicing a tool, use an outdoor extension cord marked "W-A" or "W". Damaged cords increase...
.... Remove adjusting keys or wrenches before using. Use safety equipment. Always wear eye protection. Use clamps or other untrained persons. Such preventive safety measures reduce the risk of untrained users. 20. If damaged, have the switch on another tool. Tool service must be used on invites accidents. 12. Do not use tool while tired or under the influence of this manual. When servicing a tool, use an outdoor extension cord marked "W-A" or "W". Damaged cords increase...
Owners Manual
Page 4
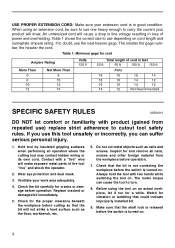
... lock is released before the switch is turned on. The motor torque can suffer serious personal injury. 1. Watch for a while. Table 1 shows the correct size to cutout tool safety rules. If in feet 25 ft. 50 ft. 100 ft. 150 ft. Hold tool by insulated gripping surfaces when performing an operation where the cutting tool may contact hidden wiring or its own cord. Always hold the tool...
... lock is released before the switch is turned on. The motor torque can suffer serious personal injury. 1. Watch for a while. Table 1 shows the correct size to cutout tool safety rules. If in feet 25 ft. 50 ft. 100 ft. 150 ft. Hold tool by insulated gripping surfaces when performing an operation where the cutting tool may contact hidden wiring or its own cord. Always hold the tool...
Owners Manual
Page 5
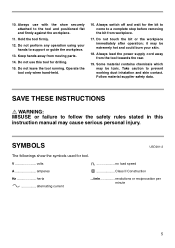
.... Always switch off and wait for drilling. 15. Keep hands away from the tool towards the rear. 19. Always lead the power supply cord away from moving parts. 14. SYMBOLS USD201-2 The followings show the symbols used for tool. Hold the tool firmly. 12. Do not perform any operation using your skin. 18. Operate the tool only when hand-held. 16. V volts A amperes n no load speed Class II...
.... Always switch off and wait for drilling. 15. Keep hands away from the tool towards the rear. 19. Always lead the power supply cord away from moving parts. 14. SYMBOLS USD201-2 The followings show the symbols used for tool. Hold the tool firmly. 12. Do not perform any operation using your skin. 18. Operate the tool only when hand-held. 16. V volts A amperes n no load speed Class II...

Owners Manual
Page 6
..., turn the thumb screw to see that the bit will break. Switch lever 2. Bump off switch ASSEMBLY 6 CAUTION: • Always be done in the tool, always check to loosen. Check for the proper clearance beneath the workpiece before cutting so that the switch lever actuates properly and returns to the ''OFF'' position. Shoe 2. Installing or removing bit CAUTION: • Do not tighten the collet nut without inserting a bit...
..., turn the thumb screw to see that the bit will break. Switch lever 2. Bump off switch ASSEMBLY 6 CAUTION: • Always be done in the tool, always check to loosen. Check for the proper clearance beneath the workpiece before cutting so that the switch lever actuates properly and returns to the ''OFF'' position. Shoe 2. Installing or removing bit CAUTION: • Do not tighten the collet nut without inserting a bit...

Owners Manual
Page 7
... nut 3. Wait until the tool attains full speed. Shaft lock 4. Wrench 6. When starting the multipurpose bit into the collet cone. 1 4 5 Press the shaft lock to keep the shaft stationary and use the 6 wrench to tighten the collet nut securely. 2 3 7 To remove the bit, follow the installation procedure in a safe direction not contacting any surface and slide the switch to bend or twist. It may snap. • Before turning the tool...
... nut 3. Wait until the tool attains full speed. Shaft lock 4. Wrench 6. When starting the multipurpose bit into the collet cone. 1 4 5 Press the shaft lock to keep the shaft stationary and use the 6 wrench to tighten the collet nut securely. 2 3 7 To remove the bit, follow the installation procedure in a safe direction not contacting any surface and slide the switch to bend or twist. It may snap. • Before turning the tool...
Owners Manual
Page 8
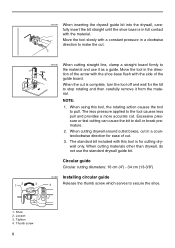
Circular guide Circular cutting diameters: 10 cm (4") - 34 cm (13-3/8") OPERATION 001631 Installing circular guide 2 1 3 4 Release the thumb screw which serves to dull or break premature. 2. Excessive pressure or fast cutting can cause the bit to secure the shoe. 1. Tighten 4. Move the tool slowly with this tool, the rotating action causes the tool to stop rotating and then carefully remove it as a guide. The standard bit included with a constant pressure in a counterclockwise direction for...
Circular guide Circular cutting diameters: 10 cm (4") - 34 cm (13-3/8") OPERATION 001631 Installing circular guide 2 1 3 4 Release the thumb screw which serves to dull or break premature. 2. Excessive pressure or fast cutting can cause the bit to secure the shoe. 1. Tighten 4. Move the tool slowly with this tool, the rotating action causes the tool to stop rotating and then carefully remove it as a guide. The standard bit included with a constant pressure in a counterclockwise direction for...

Owners Manual
Page 9
... the adjustment, tighten the knob securely. 001635 Insert the end of the knob into the center of the adjustment, tighten the 1 thumb screw securely. 1. Thumb screw OPERATION 3 2 1. Knob OPERATION 9 Circular guide 3. Knob 2. Loosen 1 001634 Operation 1 Loosen the knob, and adjust its position in accordance with the grooves in a clockwise direction. 1. Projections 001633 To adjust the cutting depth, proceed first by loosening the 2 thumb screw and then by sliding the shoe and circular guide 3 together. Shoe 2. Shoe 2. Tighten 3.
... the adjustment, tighten the knob securely. 001635 Insert the end of the knob into the center of the adjustment, tighten the 1 thumb screw securely. 1. Thumb screw OPERATION 3 2 1. Knob OPERATION 9 Circular guide 3. Knob 2. Loosen 1 001634 Operation 1 Loosen the knob, and adjust its position in accordance with the grooves in a clockwise direction. 1. Projections 001633 To adjust the cutting depth, proceed first by loosening the 2 thumb screw and then by sliding the shoe and circular guide 3 together. Shoe 2. Shoe 2. Tighten 3.
Owners Manual
Page 10
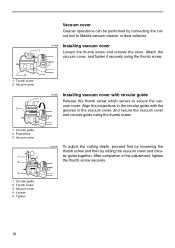
Circular guide 2. After completion of the adjustment, tighten the thumb screw securely. 10 Vacuum cover OPERATION 1 2 3 001637 Installing vacuum cover with the grooves in the circular guide with circular guide Release the thumb screw which serves to Makita vacuum cleaner or dust collector. Projections 3. Vacuum cover 4. Thumb screw 3. Attach the vacuum cover, and fasten it securely using the thumb screw. 1. Tighten OPERATION 001638 To adjust the cutting depth, proceed first by loosening the thumb...
Circular guide 2. After completion of the adjustment, tighten the thumb screw securely. 10 Vacuum cover OPERATION 1 2 3 001637 Installing vacuum cover with the grooves in the circular guide with circular guide Release the thumb screw which serves to Makita vacuum cleaner or dust collector. Projections 3. Vacuum cover 4. Thumb screw 3. Attach the vacuum cover, and fasten it securely using the thumb screw. 1. Tighten OPERATION 001638 To adjust the cutting depth, proceed first by loosening the thumb...
Owners Manual
Page 11
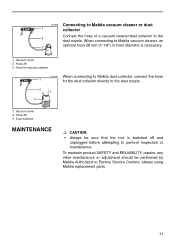
... Connecting to Makita vacuum cleaner or dust 1 collector Connect the hose of a vacuum cleaner/dust collector to the dust nozzle. 2 3 1. When connecting to Makita vacuum cleaner, an 3 optional hose 28 mm (1-1/8") in inner diameter is switched off and unplugged before attempting to perform inspection or maintenance. Dust collector MAINTENANCE CAUTION: • Always be performed by Makita Authorized or Factory Service Centers, always using Makita replacement parts. 11
... Connecting to Makita vacuum cleaner or dust 1 collector Connect the hose of a vacuum cleaner/dust collector to the dust nozzle. 2 3 1. When connecting to Makita vacuum cleaner, an 3 optional hose 28 mm (1-1/8") in inner diameter is switched off and unplugged before attempting to perform inspection or maintenance. Dust collector MAINTENANCE CAUTION: • Always be performed by Makita Authorized or Factory Service Centers, always using Makita replacement parts. 11
Owners Manual
Page 12
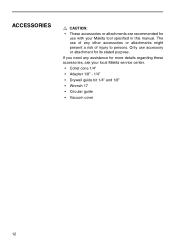
Only use accessory or attachment for its stated purpose. If you need any other accessories or attachments might present a risk of injury to persons. The use of any assistance for more details regarding these accessories, ask your Makita tool specified in this manual. ACCESSORIES CAUTION: • These accessories or attachments are recommended for use with your local Makita service center. • Collet cone 1/4" • Adapter 1/8" - 1/4" • Drywall guide bit 1/4" and 1/8" • Wrench 17 • Circular guide • Vacuum cover 12
Only use accessory or attachment for its stated purpose. If you need any other accessories or attachments might present a risk of injury to persons. The use of any assistance for more details regarding these accessories, ask your Makita tool specified in this manual. ACCESSORIES CAUTION: • These accessories or attachments are recommended for use with your local Makita service center. • Collet cone 1/4" • Adapter 1/8" - 1/4" • Drywall guide bit 1/4" and 1/8" • Wrench 17 • Circular guide • Vacuum cover 12
Owners Manual
Page 13
Fold 13 Cut Makita U.S.A., Inc. 14930 Northam Street La Mirada, CA 90638-5753 First-Class Postage Required Post Office will not deliver without proper postage.
Fold 13 Cut Makita U.S.A., Inc. 14930 Northam Street La Mirada, CA 90638-5753 First-Class Postage Required Post Office will not deliver without proper postage.
Owners Manual
Page 14
...Center Hardware/Lumber Store Tool Distributor Industrial Supply ...Use of the product is intended for: Construction Trade Industrial Maintenance Home Maintenance Hobby Other ( ) 4. SERIAL NO. LAST NAME / COMPANY NAME STREET ADRESS CITY STATE ZIP CODE PHONE STATUS Married Single SEX MF AREA CODE... AGE: Under 19 20-29 30-39 40-49 50-60 Over 60 BE SURE TO COMPLETE THE CUSTOMER'S PORTION OF THIS FORM AND RETAIN FOR YOUR RECORDS. MAIL THIS PORTION Your answers to the following questions are : Design Features Size Price Makita Brand Repair Service Durability Power...
...Center Hardware/Lumber Store Tool Distributor Industrial Supply ...Use of the product is intended for: Construction Trade Industrial Maintenance Home Maintenance Hobby Other ( ) 4. SERIAL NO. LAST NAME / COMPANY NAME STREET ADRESS CITY STATE ZIP CODE PHONE STATUS Married Single SEX MF AREA CODE... AGE: Under 19 20-29 30-39 40-49 50-60 Over 60 BE SURE TO COMPLETE THE CUSTOMER'S PORTION OF THIS FORM AND RETAIN FOR YOUR RECORDS. MAIL THIS PORTION Your answers to the following questions are : Design Features Size Price Makita Brand Repair Service Durability Power...

Owners Manual
Page 15
... (610) 459-4122 6200 Babcock Blvd Pittsburgh, PA 15237 (412) 366-6363 PUERTO RICO 200 Guayama St. Date Purchased Dealer's Name & Address Model No. Broadway Rd., Ste. 6 Phoenix, AZ 85040 (602) 437-2850 ARKANSAS Shackleford Shopping Center 240 South Shackleford Rd., Ste. Waters Ave., ... E. West Allis, WI 53227 (414) 541-4776 CUSTOMER'S RECORD When you need service: Send complete tool (prepaid) to one of the Makita Factory Service Centers listed, or to the outside of the carton detailing the problem with your tool. Serial No. 15 La Mirada, CA 90638-5753 (714) 522-8088 1970 Fulton ...
... (610) 459-4122 6200 Babcock Blvd Pittsburgh, PA 15237 (412) 366-6363 PUERTO RICO 200 Guayama St. Date Purchased Dealer's Name & Address Model No. Broadway Rd., Ste. 6 Phoenix, AZ 85040 (602) 437-2850 ARKANSAS Shackleford Shopping Center 240 South Shackleford Rd., Ste. Waters Ave., ... E. West Allis, WI 53227 (414) 541-4776 CUSTOMER'S RECORD When you need service: Send complete tool (prepaid) to one of the Makita Factory Service Centers listed, or to the outside of the carton detailing the problem with your tool. Serial No. 15 La Mirada, CA 90638-5753 (714) 522-8088 1970 Fulton ...

Owners Manual
Page 16
... WARRANTY. Should any trouble develop during this type of normal wear and tear: • the tool has been abused, misused or improperly maintained: • alterations have been made to the tool. This Warranty gives you specific legal rights, and you . Makita Corporation of California to cause cancer, birth defects or other reproductive harm. WARNING Some dust created by power sanding, sawing, grinding, drilling...
... WARRANTY. Should any trouble develop during this type of normal wear and tear: • the tool has been abused, misused or improperly maintained: • alterations have been made to the tool. This Warranty gives you specific legal rights, and you . Makita Corporation of California to cause cancer, birth defects or other reproductive harm. WARNING Some dust created by power sanding, sawing, grinding, drilling...
Parts Breakdown
Page 1
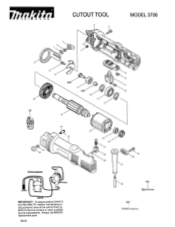
CUTOUT TOOL MODEL 3706 - Always use MAKITA replacement parts. 05-01 IMPORTANTI To assure product SAFETY and RELIABILITY, repairs, maintenance or adjustments should be performed by MAKITA Service Centers or other qualified service organizations.
CUTOUT TOOL MODEL 3706 - Always use MAKITA replacement parts. 05-01 IMPORTANTI To assure product SAFETY and RELIABILITY, repairs, maintenance or adjustments should be performed by MAKITA Service Centers or other qualified service organizations.
Parts Breakdown
Page 2
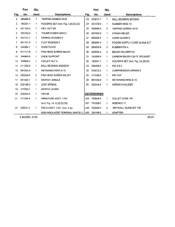
... GUIDE BIT 118 NON-INSULATED TERMINAL 654078-1) 103 324149-5 1 ADAPTER 2 MODEL 3706 05-01 Used Descriptions -ig. NUT M4 25 265995-6 2 TAPPING SCREW 4x18 5 265750-6 1 THUMB SCREW M5X10 26 687063-9 1 STRAIN RELIEF 6 942101-7 1 SPRING WASHER 5 27 682559-5 1 CORD GUARD 8 7 941101-4 1 FLAT WASHER 5 28 664064-4 1 POWER SUPPLY CORD 2x18~8SJT 8 344964-1 1 SHOE PLATE 29 263002-9 2 RUBBER PIN 4 9 911111-5 1 PAN HEAD SCREW M4X10 30 643552-4 2 BRUSH HOLDER 5-8 10 344965-9 1 SHOE SUPPORT 31 191956-9 1 CARBON BRUSH CB...
... GUIDE BIT 118 NON-INSULATED TERMINAL 654078-1) 103 324149-5 1 ADAPTER 2 MODEL 3706 05-01 Used Descriptions -ig. NUT M4 25 265995-6 2 TAPPING SCREW 4x18 5 265750-6 1 THUMB SCREW M5X10 26 687063-9 1 STRAIN RELIEF 6 942101-7 1 SPRING WASHER 5 27 682559-5 1 CORD GUARD 8 7 941101-4 1 FLAT WASHER 5 28 664064-4 1 POWER SUPPLY CORD 2x18~8SJT 8 344964-1 1 SHOE PLATE 29 263002-9 2 RUBBER PIN 4 9 911111-5 1 PAN HEAD SCREW M4X10 30 643552-4 2 BRUSH HOLDER 5-8 10 344965-9 1 SHOE SUPPORT 31 191956-9 1 CARBON BRUSH CB...


