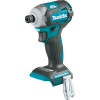
XDT12 Instruction Manual
Page 2
... not operate power tools in any adapter plugs with earthed (grounded) power tools. Never modify the plug in explosive atmo- There is an increased risk of electric shock. 4. Never use a ground fault circuit interrupter (GFCI) protected supply. If operating a power tool in the warnings refers to your body is unavoidable, use the cord for outdoor use any way. ENGLISH (Original instructions) SPECIFICATIONS Model: XDT12 Fastening capacities Machine screw...
... not operate power tools in any adapter plugs with earthed (grounded) power tools. Never modify the plug in explosive atmo- There is an increased risk of electric shock. 4. Never use a ground fault circuit interrupter (GFCI) protected supply. If operating a power tool in the warnings refers to your body is unavoidable, use the cord for outdoor use any way. ENGLISH (Original instructions) SPECIFICATIONS Model: XDT12 Fastening capacities Machine screw...
XDT12 Instruction Manual
Page 3
... moving parts. 7. Keep handles dry, clean and free from one type of battery pack may contact hidden wiring. Ensure the switch is below when using only identical replacement parts. Keep your finger on and off -position before turning the power tool on invites accidents. 4. Battery tool use . Protective equipment such as dust mask, non-skid safety shoes, hard hat, or hearing protection used with the power tool or these instructions to safety rules...
... moving parts. 7. Keep handles dry, clean and free from one type of battery pack may contact hidden wiring. Ensure the switch is below when using only identical replacement parts. Keep your finger on and off -position before turning the power tool on invites accidents. 4. Battery tool use . Protective equipment such as dust mask, non-skid safety shoes, hard hat, or hearing protection used with the power tool or these instructions to safety rules...
XDT12 Instruction Manual
Page 4
... charged battery cartridge. Charge the battery cartridge if you notice less tool power. 2. volts direct current no load speed CAUTION: Only use a damaged battery. 10. Use of blow Important safety instructions for a long period (more detailed national regulations. revolutions or reciprocation per minute number of non-genuine Makita batteries, or batteries that have been altered, may result in the packaging. If operating time has become excessively shorter, stop tool operation and...
... charged battery cartridge. Charge the battery cartridge if you notice less tool power. 2. volts direct current no load speed CAUTION: Only use a damaged battery. 10. Use of blow Important safety instructions for a long period (more detailed national regulations. revolutions or reciprocation per minute number of non-genuine Makita batteries, or batteries that have been altered, may result in the packaging. If operating time has become excessively shorter, stop tool operation and...
XDT12 Instruction Manual
Page 5
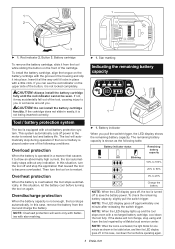
... . Battery cartridge To remove the battery cartridge, slide it to you or someone around you pull the switch trigger, the LED display shows the remaining battery capacity. Insert it all the way until the red indicator cannot be seen. This system automatically cuts off to save the battery power. The tool will not change, stop using and have the tool repaired by a Makita local service center. Then turn the tool off...
... . Battery cartridge To remove the battery cartridge, slide it to you or someone around you pull the switch trigger, the LED display shows the remaining battery capacity. Insert it all the way until the red indicator cannot be seen. This system automatically cuts off to save the battery power. The tool will not change, stop using and have the tool repaired by a Makita local service center. Then turn the tool off...
XDT12 Instruction Manual
Page 6
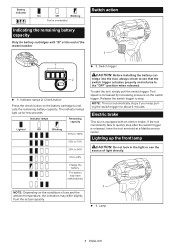
... the source of light directly. Release the switch trigger to quickly stop . Lighting up for few seconds. Indicator lamps 2. To start the tool, simply pull the switch trigger. Charge the battery. Tool speed is released, have malfunctioned. If the tool consistently fails to stop after the switch trigger is increased by increasing pressure on the switch trigger. Battery indicator On Off Blinking Tool is equipped with "B" at a Makita service center. Electric brake This tool is overheated Switch action Indicating...
... the source of light directly. Release the switch trigger to quickly stop . Lighting up for few seconds. Indicator lamps 2. To start the tool, simply pull the switch trigger. Charge the battery. Tool speed is released, have malfunctioned. If the tool consistently fails to stop after the switch trigger is increased by increasing pressure on the switch trigger. Battery indicator On Off Blinking Tool is equipped with "B" at a Makita service center. Electric brake This tool is overheated Switch action Indicating...
XDT12 Instruction Manual
Page 7
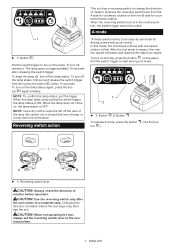
... the reversing switch lever is an easy-to-use mode for counterclockwise rotation. In this mode, the tool drives a screw with good control. After the tool starts to the neutral position. 7 ENGLISH Button 2. Reversing switch lever CAUTION: Always check the direction of the lamp. CAUTION: Use the reversing switch only after releasing the switch trigger. CAUTION: When not operating the tool, always set the reversing switch lever to impact, the rotation speed increases and...
... the reversing switch lever is an easy-to-use mode for counterclockwise rotation. In this mode, the tool drives a screw with good control. After the tool starts to the neutral position. 7 ENGLISH Button 2. Reversing switch lever CAUTION: Always check the direction of the lamp. CAUTION: Use the reversing switch only after releasing the switch trigger. CAUTION: When not operating the tool, always set the reversing switch lever to impact, the rotation speed increases and...

XDT12 Instruction Manual
Page 8
... minute after releasing the switch trigger, the impact force can change the impact force in five steps 2. Soft 6. Soft 1,100 min-1 (/min) Tightening with less force and speed than Max mode). T mode 7. Tightening finishing boards, ing is a special mode for drilling with the maximum force and speed. Once the tool starts to tighten the screw, it impacts in five steps. Tightening self drilling screws. 8 ENGLISH Hard 4. Max 3. Button Impact force grade...
... minute after releasing the switch trigger, the impact force can change the impact force in five steps 2. Soft 6. Soft 1,100 min-1 (/min) Tightening with less force and speed than Max mode). T mode 7. Tightening finishing boards, ing is a special mode for drilling with the maximum force and speed. Once the tool starts to tighten the screw, it impacts in five steps. Tightening self drilling screws. 8 ENGLISH Hard 4. Max 3. Button Impact force grade...
XDT12 Instruction Manual
Page 9
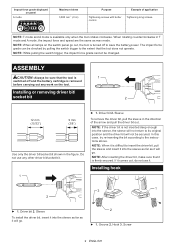
... the switch trigger to the instructions above. Installing or removing driver bit/ socket bit 2 12 mm (15/32") 9 mm (3/8") Use only the driver bit/socket bit shown in T mode and A mode, the impact force and speed are the same as it comes out, do not use any work on the tool. Sleeve To remove the driver bit, pull the sleeve in the direction of application Tightening screws with better control. NOTE: If the driver bit...
... the switch trigger to the instructions above. Installing or removing driver bit/ socket bit 2 12 mm (15/32") 9 mm (3/8") Use only the driver bit/socket bit shown in T mode and A mode, the impact force and speed are the same as it comes out, do not use any work on the tool. Sleeve To remove the driver bit, pull the sleeve in the direction of application Tightening screws with better control. NOTE: If the driver bit...
XDT12 Instruction Manual
Page 10
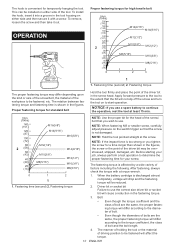
To install the hook, insert it into a groove in the tool housing on either side and then secure it out. OPERATION Proper fastening torque for the head of driving position to use. NOTICE: If you use the correct size driver bit or socket bit will not slip off the screw and turn the tool on the switch trigger so that you tighten the screw for standard bolt Hold the tool firmly and...
To install the hook, insert it into a groove in the tool housing on either side and then secure it out. OPERATION Proper fastening torque for the head of driving position to use. NOTICE: If you use the correct size driver bit or socket bit will not slip off the screw and turn the tool on the switch trigger so that you tighten the screw for standard bolt Hold the tool firmly and...

XDT12 Instruction Manual
Page 11
... repair (or at low speed will cause a reduction in the tool package as standard accessories. Operating the tool at our option, replace) without charge. If inspection shows the trouble is thoroughly inspected and tested before attempting to state. NOTICE: Never use with your local Makita Service Center. • Driver bits • Socket bits • Hook • Tool hanger • Plastic carrying case • Makita genuine battery and charger • Battery...
... repair (or at low speed will cause a reduction in the tool package as standard accessories. Operating the tool at our option, replace) without charge. If inspection shows the trouble is thoroughly inspected and tested before attempting to state. NOTICE: Never use with your local Makita Service Center. • Driver bits • Socket bits • Hook • Tool hanger • Plastic carrying case • Makita genuine battery and charger • Battery...

XDT12 Parts Breakdown
Page 2
Model XDT12M/Z Parts List A = Standard Equipment 〇= Circuit Diagram Item# Part# Description 001 183E39-9 ...PLATE TAPPING SCREW BIND PT 3X16 F/R CHANGE LEVER SWITCH ROTOR STATOR LED CIRCUIT TERMINAL RING SPRING 11 FLAT WASHER 12 COMPRESSION SPRING 13 BIT SLEEVE BUMPER HAMMER CASE COVER HAMMER CASE COMPLETE NYLON WASHER 24 STEEL BALL 3.5 ANVIL M HAMMER STEEL BALL 3.5 FLAT WASHER 24 COMPRESSION SPRING 24 STEEL BALL 5.6 SPUR GEAR 22 SPINDLE PIN 5 THIN WASHER 15 INTERNAL GEAR 51 O RING 40 BEARING BOX COMPLETE HOUSING SET RUBBER PIN 6 INC. 1 SWITCH PLATE COMPLETE REAR COVER TAPPING SCREW...
Model XDT12M/Z Parts List A = Standard Equipment 〇= Circuit Diagram Item# Part# Description 001 183E39-9 ...PLATE TAPPING SCREW BIND PT 3X16 F/R CHANGE LEVER SWITCH ROTOR STATOR LED CIRCUIT TERMINAL RING SPRING 11 FLAT WASHER 12 COMPRESSION SPRING 13 BIT SLEEVE BUMPER HAMMER CASE COVER HAMMER CASE COMPLETE NYLON WASHER 24 STEEL BALL 3.5 ANVIL M HAMMER STEEL BALL 3.5 FLAT WASHER 24 COMPRESSION SPRING 24 STEEL BALL 5.6 SPUR GEAR 22 SPINDLE PIN 5 THIN WASHER 15 INTERNAL GEAR 51 O RING 40 BEARING BOX COMPLETE HOUSING SET RUBBER PIN 6 INC. 1 SWITCH PLATE COMPLETE REAR COVER TAPPING SCREW...

XDT12 Parts Breakdown
Page 3
A06 C20 324319-6 A06 C30 451749-9 E01 810C90-1 SHAFT HANDLE CAUTION LABEL 1 PC. (XDT12M) 1 PC. (XDT12M) 1
A06 C20 324319-6 A06 C30 451749-9 E01 810C90-1 SHAFT HANDLE CAUTION LABEL 1 PC. (XDT12M) 1 PC. (XDT12M) 1

Makita XDT12M New Tool Flyers English
Page 1
... listing, please refer to the Makita General Catalog or visit our website at only 4-5/8" long; of Max Torque n 4-speed power selection switch (0-1,100/ 0-2,100/ 0-3,200/ 0-3,600 RPM & 0-1,100/ 0-2,600/ 0-3,600/ 0-3,800 IPM) provides precise fastening control for a wide range of self-drilling screws; All models and accessories subject to stock on hand. 18V LXT® Lithium-Ion Brushless Cordless Quick-Shift Mode™ 4-Speed Impact Driver Kit (4.0Ah) Model...
... listing, please refer to the Makita General Catalog or visit our website at only 4-5/8" long; of Max Torque n 4-speed power selection switch (0-1,100/ 0-2,100/ 0-3,200/ 0-3,600 RPM & 0-1,100/ 0-2,600/ 0-3,600/ 0-3,800 IPM) provides precise fastening control for a wide range of self-drilling screws; All models and accessories subject to stock on hand. 18V LXT® Lithium-Ion Brushless Cordless Quick-Shift Mode™ 4-Speed Impact Driver Kit (4.0Ah) Model...


