User Guide
Page 2
...the Security - Setting the Image memory Function 47 Alarm recording Tab - Setting the Periodical recording mode 49 Folder Structure of Contents Overview Features 4 Camera section 4 Network section, Control section 4 Others 4 Phenomena Specific to CCD Image Sensors ....... 5 How to Use This User's Guide 6 System... the alarm 45 Periodical sending Tab - Alarm output setting Menu 51 Alarm out 1, 2 Tab 51 Setting the Operations from the Camera - Setting of Contents e-Mail (SMTP) setting Menu 41 Common Tab - Setting the periodical mail sending mode 43 Sending Images to...
...the Security - Setting the Image memory Function 47 Alarm recording Tab - Setting the Periodical recording mode 49 Folder Structure of Contents Overview Features 4 Camera section 4 Network section, Control section 4 Others 4 Phenomena Specific to CCD Image Sensors ....... 5 How to Use This User's Guide 6 System... the alarm 45 Periodical sending Tab - Alarm output setting Menu 51 Alarm out 1, 2 Tab 51 Setting the Operations from the Camera - Setting of Contents e-Mail (SMTP) setting Menu 41 Common Tab - Setting the periodical mail sending mode 43 Sending Images to...

User Guide
Page 3
...Control Tab 57 Date time Tab 58 PPPoE Tab 58 Rebooting the Camera 59 Using the SNC audio upload tool - Playing Video/ Audio File Recorded on Camera 65 Download the SNC video player 65 Using the SNC video player 65 Using the Custom Homepage Installer 66 Uploading the ... Detection Function - Inquiry Commands 69 2. Setting Commands 69 Index 71 3 Table of Contents Transmitting Audio to Camera 59 Installing the SNC audio upload tool 59 Connecting the Camera to the Camera Using ARP Commands 68 Using the SNMP 69 1. Schedule setting Menu 54 Setting the Alarm Buffer - Setting ...
...Control Tab 57 Date time Tab 58 PPPoE Tab 58 Rebooting the Camera 59 Using the SNC audio upload tool - Playing Video/ Audio File Recorded on Camera 65 Download the SNC video player 65 Using the SNC video player 65 Using the Custom Homepage Installer 66 Uploading the ... Detection Function - Inquiry Commands 69 2. Setting Commands 69 Index 71 3 Table of Contents Transmitting Audio to Camera 59 Installing the SNC audio upload tool 59 Connecting the Camera to the Camera Using ARP Commands 68 Using the SNMP 69 1. Schedule setting Menu 54 Setting the Alarm Buffer - Setting ...

User Guide
Page 4
...terminals. No further authentication is operating properly before /after the moment alarm detection went off. • Multicast streaming is dome-shaped color video camera adopting 1/4 type Super HAD CCD®. Since the service is Internet-based, there is a risk that any other legal rights, and the... responsibility for restoration of Ethernet). • The camera is done by a user name and the password you are monitoring can also control this unit, SONY accepts no responsibility for making sure you set the...
...terminals. No further authentication is operating properly before /after the moment alarm detection went off. • Multicast streaming is dome-shaped color video camera adopting 1/4 type Super HAD CCD®. Since the service is Internet-based, there is a risk that any other legal rights, and the... responsibility for restoration of Ethernet). • The camera is done by a user name and the password you are monitoring can also control this unit, SONY accepts no responsibility for making sure you set the...
User Guide
Page 6
...before operating. Installation Manual (printed matter) The supplied Installation Manual describes the names and functions of parts and controls of the Network Camera, connecting examples and how to Use This User's Guide / System Requirements System Requirements These are explanatory examples. Processor Intel Pentium III...displays may differ from those as you operate the application software. Software display examples Note that displays the image or controls the camera. Be sure to read on the computer display. Overview How to Use This User's Guide This User's Guide explains how ...
...before operating. Installation Manual (printed matter) The supplied Installation Manual describes the names and functions of parts and controls of the Network Camera, connecting examples and how to Use This User's Guide / System Requirements System Requirements These are explanatory examples. Processor Intel Pentium III...displays may differ from those as you operate the application software. Software display examples Note that displays the image or controls the camera. Be sure to read on the computer display. Overview How to Use This User's Guide This User's Guide explains how ...
User Guide
Page 7
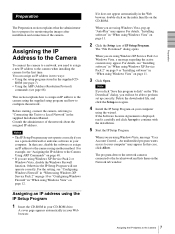
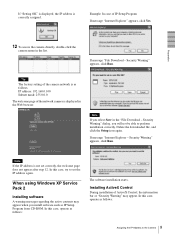
...Vista, disable the Windows Firewall function. In this Unit to a Local Network" in the supplied Installation Manual. The program detects the network cameras connected to the local network and lists them on page 68. • If you are using Windows XP Service Pack 2" on page 12... continue with the installation. 5 Start the IP Setup Program. When you are using another method. Assigning the IP Address to the Camera To connect the camera to a network, you use a personal firewall or antivirus software in your Web browser. Consult the administrator of IP Setup Program. ...
...Vista, disable the Windows Firewall function. In this Unit to a Local Network" in the supplied Installation Manual. The program detects the network cameras connected to the local network and lists them on page 68. • If you are using Windows XP Service Pack 2" on page 12... continue with the installation. 5 Start the IP Setup Program. When you are using another method. Assigning the IP Address to the Camera To connect the camera to a network, you use a personal firewall or antivirus software in your Web browser. Consult the administrator of IP Setup Program. ...

User Guide
Page 8
... settings of both items are assigned automatically. Note You cannot change these items, see "Setting the User - The network settings for the selected camera are correctly set, then click OK. 8 Assigning the IP Address to assign a new IP address. Normally, select 80 for this step. To... DNS server address in the relevant boxes. User setting Menu" on page 39. 11 Confirm that the DHCP server is operating on the camera in this camera. 9 Set the HTTP port No. To obtain the DNS server addresses automatically: Select Obtain DNS server address automatically. 6 Click on the...
... settings of both items are assigned automatically. Note You cannot change these items, see "Setting the User - The network settings for the selected camera are correctly set, then click OK. 8 Assigning the IP Address to assign a new IP address. Normally, select 80 for this step. To... DNS server address in the relevant boxes. User setting Menu" on page 39. 11 Confirm that the DHCP server is operating on the camera in this camera. 9 Set the HTTP port No. To obtain the DNS server addresses automatically: Select Obtain DNS server address automatically. 6 Click on the...
User Guide
Page 9
... starts. In this case, try to set correctly, the welcome page does not appear after step 12. Tip The factory setting of the network camera is correctly assigned. Delete the downloaded file, and click the Setup icon again. In this case, operate as IP Setup Program from CD-ROM.... installation correctly. IP address: 192.168.0.100 Subnet mask: 255.0.0.0 The welcome page of the camera network is not set the IP address again. Security Warning" dialog, you will not be able to the Camera If "Setting OK" is displayed, the IP address is displayed in the Web browser. Example:...
... starts. In this case, try to set correctly, the welcome page does not appear after step 12. Tip The factory setting of the network camera is correctly assigned. Delete the downloaded file, and click the Setup icon again. In this case, operate as IP Setup Program from CD-ROM.... installation correctly. IP address: 192.168.0.100 Subnet mask: 255.0.0.0 The welcome page of the camera network is not set the IP address again. Security Warning" dialog, you will not be able to the Camera If "Setting OK" is displayed, the IP address is displayed in the Web browser. Example:...
User Guide
Page 10
...the information bar appears, click on the configuration of Windows Firewall. (No cameras are shown in the list even if they are detected.) In this case... Control Panel from the Start menu of Windows. 2 Select Security Center of ActiveX Control starts. The cameras will be displayed in the Windows Firewall dialog. The installation of the working field. Preparation If message ... 4 Select the "Exceptions" tab. 5 Select Add Program.... 10 Assigning the IP Address to the Camera When installation is completed, the main viewer or the Motion detection setting menu appears. If " Internet ...
...the information bar appears, click on the configuration of Windows Firewall. (No cameras are shown in the list even if they are detected.) In this case... Control Panel from the Start menu of Windows. 2 Select Security Center of ActiveX Control starts. The cameras will be displayed in the Windows Firewall dialog. The installation of the working field. Preparation If message ... 4 Select the "Exceptions" tab. 5 Select Add Program.... 10 Assigning the IP Address to the Camera When installation is completed, the main viewer or the Motion detection setting menu appears. If " Internet ...

User Guide
Page 11
.... In this case, double-click the "index.htm" file in the CD-ROM. If message "File Download - Preparation When the above procedure is completed, the cameras connected in the local network are displayed in the "File Download - If pop-up "AutoPlay" appears when a CD-ROM is added to the...
.... In this case, double-click the "index.htm" file in the CD-ROM. If message "File Download - Preparation When the above procedure is completed, the cameras connected in the local network are displayed in the "File Download - If pop-up "AutoPlay" appears when a CD-ROM is added to the...
User Guide
Page 12
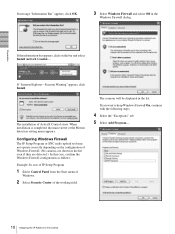
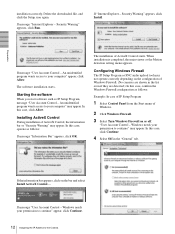
... ActiveX Control During installation of Windows. 2 Click Windows Firewall. 3 Select Turn Windows Firewall on or off. The installation of Windows Firewall. (No cameras are shown in the "General" tab. If message "User Account Control - In this case, click Continue. 4 Select Off in the list even...the bar and select Install ActiveX Control.... If message "User Account Control - Configuring Windows Firewall The IP Setup Program or SNC audio upload tool may appear. In this case, operate as IP Setup Program, message "User Account Control - Windows needs your permission to...
... ActiveX Control During installation of Windows. 2 Click Windows Firewall. 3 Select Turn Windows Firewall on or off. The installation of Windows Firewall. (No cameras are shown in the "General" tab. If message "User Account Control - In this case, click Continue. 4 Select Off in the list even...the bar and select Install ActiveX Control.... If message "User Account Control - Configuring Windows Firewall The IP Setup Program or SNC audio upload tool may appear. In this case, operate as IP Setup Program, message "User Account Control - Windows needs your permission to...

User Guide
Page 13
...Click Enter. Then the IP Setup Program is displayed. When the main viewer is correctly displayed, the IP address assignment is displayed. Preparation The cameras will be displayed in the IP Setup Program. The main viewer is completed. Use Internet Explorer as the Web browser. 1 Start the Web ...browser on the computer and type the IP address of the camera is completed, the cameras connected in the local network are displayed in the list. When the above procedure is displayed for the first time When you ...
...Click Enter. Then the IP Setup Program is displayed. When the main viewer is correctly displayed, the IP address assignment is displayed. Preparation The cameras will be displayed in the IP Setup Program. The main viewer is completed. Use Internet Explorer as the Web browser. 1 Start the Web ...browser on the computer and type the IP address of the camera is completed, the cameras connected in the local network are displayed in the list. When the above procedure is displayed for the first time When you ...

User Guide
Page 14
...correctly, set the Proxy server manually. In that case, disable Automatic configuration and set the security level of the Internet Explorer to the camera uses JavaScript. Tip Every page of this software is optimized as display character size Medium for Internet Explorer, then select Internet Options and...Explorer. on the computer • When you use antivirus software, security software, personal firewall or pop-up blocker on your computer, the camera performance may be reduced, for example, the frame rate for displaying the image may be affected if you use antivirus software or other ...
...correctly, set the Proxy server manually. In that case, disable Automatic configuration and set the security level of the Internet Explorer to the camera uses JavaScript. Tip Every page of this software is optimized as display character size Medium for Internet Explorer, then select Internet Options and...Explorer. on the computer • When you use antivirus software, security software, personal firewall or pop-up blocker on your computer, the camera performance may be reduced, for example, the frame rate for displaying the image may be affected if you use antivirus software or other ...

User Guide
Page 15
... user for sending the monitor image attached to the install position, network condition or purpose of the image sent from the camera. Setting contents Set the camera function suitable for the installation place. Set the format of the computer. Setting menu Exposure mode (page 32) Video mode... setting Menu (page 41) Security setting Menu (page 40) 15 Basic Configuration by logging in with those of the image sent from the camera microphone is sent or not. Preparation Basic Configuration by the Administrator You can also set various functions according to a mail. We recommend you...
... user for sending the monitor image attached to the install position, network condition or purpose of the image sent from the camera. Setting contents Set the camera function suitable for the installation place. Set the format of the computer. Setting menu Exposure mode (page 32) Video mode... setting Menu (page 41) Security setting Menu (page 40) 15 Basic Configuration by logging in with those of the image sent from the camera microphone is sent or not. Preparation Basic Configuration by the Administrator You can also set various functions according to a mail. We recommend you...

User Guide
Page 16
...who log in the computer Send an image file z z to the FTP server Send an image z z attached to monitor the image from the camera, and controlling the camera. Function Administrator Full Monitor a live image z z Watch date and time z z Control the frame z z rate (Usable only when JPEG mode... is usable with the Java applet viewer. 2) This function is classified as the one of three types. For setting the camera, see "Administrating the Camera" on page 39. 16 Administrator and User The functions of the administrator and the user can use are monitoring the image ...
...who log in the computer Send an image file z z to the FTP server Send an image z z attached to monitor the image from the camera, and controlling the camera. Function Administrator Full Monitor a live image z z Watch date and time z z Control the frame z z rate (Usable only when JPEG mode... is usable with the Java applet viewer. 2) This function is classified as the one of three types. For setting the camera, see "Administrating the Camera" on page 39. 16 Administrator and User The functions of the administrator and the user can use are monitoring the image ...

User Guide
Page 17
... be set to Medium or higher. The main viewer appears. The usable viewers differ depending on the computer and type the IP address of the camera. Welcome page when the video mode is displayed. Welcome Page Logging in to Homepage - Note If the Welcome page does not activate correctly, the... page 14 and check the security level. 17 Logging in as a User 1 Start the Web browser on the video mode (page 31) of the camera you want to monitor. 3 Select the viewer language. Click English or Japanese at the bottom of the Internet Explorer may not select other viewers. (MPEG4...
... be set to Medium or higher. The main viewer appears. The usable viewers differ depending on the computer and type the IP address of the camera. Welcome page when the video mode is displayed. Welcome Page Logging in to Homepage - Note If the Welcome page does not activate correctly, the... page 14 and check the security level. 17 Logging in as a User 1 Start the Web browser on the video mode (page 31) of the camera you want to monitor. 3 Select the viewer language. Click English or Japanese at the bottom of the Internet Explorer may not select other viewers. (MPEG4...

User Guide
Page 18
... Administrator. The user name "admin" and the password "admin" are set the Proxy server manually. You must install this viewer when the camera video mode is optimized for display character size Medium for the first time When you access to install Java. Tip Every page of Internet Explorer... the Administrator menu (see page 39). Java applet viewer You can be logged in the User setting menu of the camera for Internet Explorer. 18 Logging in the network camera using ActiveX Control. If Java (Sun) is not displayed, it does not operate correctly, check whether the effective Java...
... Administrator. The user name "admin" and the password "admin" are set the Proxy server manually. You must install this viewer when the camera video mode is optimized for display character size Medium for the first time When you access to install Java. Tip Every page of Internet Explorer... the Administrator menu (see page 39). Java applet viewer You can be logged in the User setting menu of the camera for Internet Explorer. 18 Logging in the network camera using ActiveX Control. If Java (Sun) is not displayed, it does not operate correctly, check whether the effective Java...

User Guide
Page 19
... box and click the icon. Transmission (Switching the TCP/ UDP transmission mode) (Displayed only when the camera Video mode (page 31) is set to JPEG.) Selects the frame rate to download the "SNC video player" application program built in as the administrator. For a detailed explanation on page 65.) (Displayed.... (page 21) Capture Click to capture a still image shot by the camera and to store it attached to a mail (page 22), record the image on the camera with your computer. (See "Using the SNC video player - The SNC video player allows you want to On/Off (page 24). Playing Video/Audio...
... box and click the icon. Transmission (Switching the TCP/ UDP transmission mode) (Displayed only when the camera Video mode (page 31) is set to JPEG.) Selects the frame rate to download the "SNC video player" application program built in as the administrator. For a detailed explanation on page 65.) (Displayed.... (page 21) Capture Click to capture a still image shot by the camera and to store it attached to a mail (page 22), record the image on the camera with your computer. (See "Using the SNC video player - The SNC video player allows you want to On/Off (page 24). Playing Video/Audio...
User Guide
Page 20
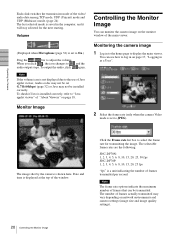
... icon is a unit indicating the number of "About Viewers" on network environments and camera settings (image size and image quality settings). 20 Controlling the Monitor Image The selectable frame rates are the following: SNC-DF70N: 1, 2, 3, 4, 5, 6, 8, 10, 15, 20, 25, 30 fps SNC-DF70P: 1, 2, 3, 4, 5, 6, 8, 10, 15, 20, 25 fps "fps" is not displayed due to...
... icon is a unit indicating the number of "About Viewers" on network environments and camera settings (image size and image quality settings). 20 Controlling the Monitor Image The selectable frame rates are the following: SNC-DF70N: 1, 2, 3, 4, 5, 6, 8, 10, 15, 20, 25, 30 fps SNC-DF70P: 1, 2, 3, 4, 5, 6, 8, 10, 15, 20, 25 fps "fps" is not displayed due to...

User Guide
Page 21
... from among Auto, 640 × 480, 320 × 240 and 160 × 120. Click View size list box to . 3 To cancel zooming in the Camera setting menu (page 31). Zooming in the monitor image 1 Click Digital zoom icon. 2 Click the point you click is captured, and the still image is... displayed in . Capturing a monitor image 1 Monitor the camera image in the computer. The image is determined by about 1.5 times with the clicked point at the center. Auto is expanded by the image size...
... from among Auto, 640 × 480, 320 × 240 and 160 × 120. Click View size list box to . 3 To cancel zooming in the Camera setting menu (page 31). Zooming in the monitor image 1 Click Digital zoom icon. 2 Click the point you click is captured, and the still image is... displayed in . Capturing a monitor image 1 Monitor the camera image in the computer. The image is determined by about 1.5 times with the clicked point at the center. Auto is expanded by the image size...

User Guide
Page 22
Operating the Camera Saving the captured image With the ActiveX viewer 1 Capture the monitor image. 2 Click Save. Save Picture dialog appears. 3 Click Trigger icon. The still image of ...
Operating the Camera Saving the captured image With the ActiveX viewer 1 Capture the monitor image. 2 Click Save. Save Picture dialog appears. 3 Click Trigger icon. The still image of ...


